Pages

Wednesday, November 27, 2013

Pre-ThanksLiving Breakfast of Champions...


I don’t know why, but I’ve really been feeling breakfast lately. Those of you who’ve been following the blog for a while now know that I’m not really a food in the morning kind of person. I much prefer a smoothie if I’m going to have anything. Of course there are those rare exceptions when I wake up ravenous and just want to tear into a big ‘ole plate of waffles or a tofu scramble. I typically make a hearty breakfast about once a month - if that - and the rest of the time I subside on smoothies, juice, water, tea or some homemade granola for breakfast. But lately I seem to wake up hungry a lot, and so I’ve been making breakfast about two or three times a week, and it’s been a lot of fun. You know, despite not being a big AM eater, I sure do love breakfast food. I think when you’re really in the mood for a big meal in the morning, it’s the most satisfying and enjoyable meal of the day. Nothing puts a smile on your face like a plate of pancakes am I right?


I know everyone in the United States is gearing up to celebrate ThanksLiving tomorrow. Everyone’s got their crock-pot seitan roast at the ready. Pumpkin pies are baked, potato are peeled, veggies are prepped, everything’s in the works, but I’ll be honest, I’m not feeling the holiday spirit this year. Maybe it’s because this has been a rough year - and particularly a rough month and a half - for me, or maybe it’s the fact that I never cared all that much about American Thanksgiving anyway, or maybe I’m beginning to see the holiday for what it is. A supposed celebration of thanks built upon a tradition of murder and violence. Maybe I just feel really sad for all those poor turkeys, and just want to shun the holiday all together. Whatever the reason I just don’t feel much like celebrating.


That being said, nothing’s ever stopped me from going all out and preparing a big meal. Every American Thanksgiving - except last year - my husband and I go to his aunts house. In previous years I brought vegan food for us to eat during dinner, along with appetizers and desserts that everyone could enjoy. This year since I’m not in a celebratory mood - and since I already put on a big lavish Thanksgiving spread back in October - I just didn’t feel like doing that again. So when I told my husband we would eat something simple at home and asked him what he wanted me to cook, imagine my joy when he said “Breakfast.”

This man is amazing y’all, and I love him to death. He’s not in too much of a celebratory mood himself these days, I think for many of the same reasons as me. So I really like that for ThanksLiving we’re doing something totally off the wall and different. Brunch instead of dinner. No roast, no Veganized Thanksgiving. We’re just going to have a good time, eating good food, and say to hell with tradition. Who knows, maybe this’ll be a new trend? I’d honestly prefer not to be reminded of turkeys at all during this time, and so brunch is perfect, for me there is no connection between the two, and I needed feel sad, or guilty, or helpless.


Anyway, what’s all this got to do with anything? Well there are so many great breakfast foods out there, so many amazing recipes! When I was trying to figure out what to make I just couldn’t decide and so I decided to do a little pre-ThanksLiving-Breakfast this morning, and it was so killer I wanted to share it with you.

I made the Green Chile and Cheese Omelet and The Perfect Hash browns from Lane Gold’s “Vegan Junk Food” This is not a book I use often, in fact I rarely use it, but something about this omelet recipe just spoke to me. In the past I had no luck flipping egg or tofu omelets and so it’s not something I ever think to make, but it just sounded so good that I was determined to give it a try. This is probably the easiest vegan omelet recipe I’ve ever made, and they came out absolutely perfectly! Not to mention mind-blowing, mouth-watering delicious! All you do is blend some tofu with soy milk, oil, flour, baking powder, salt, and turmeric. Add in some chopped chives, green chilies and daiya cheddar cheese. Then you simply cook ie up in a 12inch skillet much like you would a pancake. Simple!

The hash browns were the best I’ve ever had, and my husband said the same thing. They are super simple, potato, onion, salt, pepper, garlic powder and Earth Balance, but they were so amazing. They were buttery, and crisp, yet soft. I’ve never been a hash brown person - never got the appeal - but these were melt in your mouth perfection.


So yeah, yay for vegan breakfast!  For all of you who are celebrating ThanksLiving this year I hope you have a wonderful time.

Lastly, I encourage everyone to consider participating in Farm Sanctuary’s “Adopt a Turkey” program this year. It’s a wonderful thing, you make a $30 donation which goes towards sponsoring a turkey of your choosing. It’s such a great gesture at this time of year, and the turkey’s really need your love, your support, and your compassion. They’re beautiful creatures with wonderful spirits. My husband and I have been doing this for the past three years - we ‘adopted Tulip this year - and it’s really a wonderful thing.

You can learn more about the program here....

Farm Sanctuary - Adopt A Turkey!

Friday, November 22, 2013

The Art of Making Soy Milk: Product Review - Soyajoy G4 Soymilk Maker...


I love DIY. Some people don’t. Some people prefer to buy everything pre-made at the store for convenience, but not me. Cooking for me is a fun activity, it’s therapeutic, it helps me relax, and helps me to clear my mind. There are few things better then putting on some good music, playing it loud, and setting in on some new culinary adventure. I love to bake bread, both in my bread machine and by hand. I love to make homemade seitan - it’s the only kind I ever eat - I love to make my own veggie burgers, my own sauces, my own condiments, I’ve even made my own peanut butter, but one of my latest interests has been making my own soy milk.

Back in July I was given some Amazon gift cards from my In-Laws for my birthday. At the time there weren’t any cookbooks that I was dying to have and so I racked my brain trying to figure out what I wanted. For some time I’d been interested in - and eyeing - various soymilk makers, and so after reading hundreds of reviews I finally took the plunge and settled on one.


I bought the Soyajoy G4 which is a really cool little machine that’s super easy to use. It comes with a measuring cup for your soybeans, a packet of non-GMO soybeans for your first batch of milk, a pitcher to pour the milk into and a fine mesh sieve for straining. The machine itself is stainless steel inside and out, which makes it look very sleek. The gripping handle and the lid are made from plastic but these features are on the outside, and do not touch the milk so you don’t have to worry about the plastic leaching into your soy milk. There are also several function buttons. The machine can make soy milk, nut milk, raw milks, grain milks, and even soup. It’s pretty much a miracle worker!

Of course you can totally make your own soy milk at home without a machine. You can do it the old fashioned way with pots, and your hands, but I as much as I love DIY that’s a bit much for me. I don’t fancy sitting around squishing my own soybeans all morning when something else can do it for me a lot faster, and a lot better. The Soyajoy will get you fresh hot smooth soymilk in under half an hour, and the best part of it is that it doesn’t contain a bunch of additives or nefarious ingredients. It’s just straight up soymilk.


Now to be honest if you drink it right from the machine it doesn’t taste wonderful. It has a much stronger soy taste then commercial soy milk - which is severely watered down - and there’s no sweetness, but this isn’t really a big deal. You can easily season your soymilk any way you like with different sweeteners or flavorings. I personally like to use Barley Malt Syrup and Stevia, vanilla stevia if I’m making vanilla soy milk, but you could just use regular old cane sugar or agave too.

Typically once I’ve made a batch os soymilk I bottle it just the way it is - Unflavored and unseasoned. I use old Kombucha and Kevita bottles that I’ve saved especially for this purpose - and to use as salad dressing containers. They make the perfect vessel as they’re 12oz bottles. Since I mostly use my homemade soy milk for cooking, baking, or to use in smoothies or sometimes cereal I prefer to sweeten the overall dish rather then the individual bottle of soy milk, unless I’m making a particular flavor - such as vanilla.

I’ve been doing this roughly once a week since July and it’s been a really fun process. The soyajoy made great milk right out of the gate, and it’s easy to use, but with a little tinkering I’ve managed to get the texture and flavoring perfect for my palate. I make an expert batch every time now. One of the great things about making your own soymilk is the cost. It’s so much cheaper to do it yourself then to buy a carton at the store. A carton usually goes for $2.99-$5.99 but you can easily make 32oz yourself for under $1. I bought a pound and a half of soybeans back in July and I’m still using the same batch! It doesn’t take a lot of beans to produce 32oz, so you really do save yourself a lot of money in the long-run.


Some people complain that the soyajoy is loud, and it can be, but it’s not loud the entire time it’s on. The grinding process is loud, but the boiling, and cooking process isn’t. I also love that this machine only has two parts and is super easy to clean, and the straining process isn’t as hard as you might think. Once your milk is done you put the sieve over the pitcher pour the milk through and what you’re left with is Okara - the pulp. Squeeze a little more milk out of that and then you can either discard the Okara or use it in some other dish. Simple as that.

This is a really great machine, and it’s not very expensive compared to a lot of other kitchen appliances. I got mine on sale and paid around $110 for it. Every penny was worth it I think because I absolutely love having fresh homemade soy milk. I love knowing exactly what’s in my milk, saving money, and not having to worry about GMO’s or crazy additives. You know what else is really cool? You can use your homemade soymilk to make homemade soy yogurt! This is one of my new favorite activities but I’ll talk about it more next week so stay tuned!

Thursday, November 21, 2013

Product Review - Califa Farms: Holiday Nog...


A couple of days ago I posted about Califa Farms new Iced Coffee Almond Milks. I also mentioned in that post that they have begun making a Holiday Nog, but I didn’t go into too much detail about that because I thought their new nog deserved it’s own post.

Eggnog - or just Nog as I prefer to call it now - is so connected with the holiday season for most of us. Like many people I used to love nog when I was a kid, I would drink cartons of the stuff. It just wasn’t Christmas without a glass of nog you know? When I entered my twenties I realized my taste for it had changed and even though I still liked it I noticed that drinking a full glass of it made me sick. I began drinking it less frequently, until I gave it up for good when I went vegan. This wasn’t a big loss mind you, but something about the holidays always makes me want a cool glass of nog. It kind of makes you all warm and fuzzy inside you know?

Well, there are several great vegan nog options for offer these days. So Delicious Coconut Milk Nog  is by far my favorite, but when I saw Califa Farms almond milk nog I just knew I’d have to try it. I love the cute holiday design on the bottle - though as I mentioned in my earlier review of Califa I wish the bottles were glass.


I also love that this nog is made with almond milk rather then soy. Not that I have anything against soy mind you but almond milk is my favorite. I really love that this particular nog isn’t overly sweet. In fact compared to virtually all of the other nogs I’ve tried - dairy and non-dairy - this is probably the least sweet tasting. Calorie wise this is about 100 calories per 8oz which keeps it on par with everyone else. Though the bottle says it’s 50 calories per serving they list a serving size as 4oz which translates to a half glass. Unless you have very small glasses!  I also love the taste, it’s got a very nog-like flavor. In fact I think this is possibly the closest to actual dairy nog, that I’ve tried. I know it’s been years since I’ve had actual dairy nog but I think it would be very difficult for a person to tell the difference.

Having said all that however I think the texture is just slightly thin for nog. I also detect just the slightest hint of almond flavor. This is not a bad thing if you like almond milk as much as I do, but some people might not like ir. Lastly I don’t think that this nog is quite as rich as dairy nog, nor do I think it’s as rich as the coconut milk nog. This may not be a big deal for some people, and certainly the flavor is definitely there, but If I’m being honest I did kind of miss that richness, and thick texture.

Overall I would say this is a really good holiday nog though, and I really recommend it to all you vegan nog lovers out there. The coconut milk nog remains my favorite but this is a close runner-up, and I will most likely buy another bottle before the holiday season ends.

Monday, November 18, 2013

Product Review - Califa Farms: Pure Iced Coffee with Almond Milk...


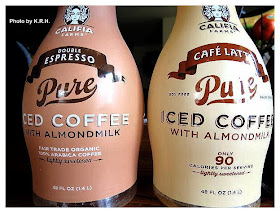
A few weeks ago my husband discovered something amazing. Almond milk iced coffee!  It’s made by Califa Farms and comes in three flavors - Mocha, Double Espresso, and Café Latte. We were so excited by this incredible revelation that we bought all three and not a single bottle lasted through the weekend. We sucked it back like crack.


My husband is the real coffee drinker in our marriage, which is funny because when we first met he never touched the stuff and I was a hard-core latte addict. Somehow over the years we’ve been together these roles have reversed and now he’s the hard-core caffeine user while I mostly ignore the stuff. Of course I enjoy a latte or a mocha, or a cappuccino now and then, but mostly I try not to drink it, and typically only allow myself the pleasure about once every few weeks or months, or when I’m on holiday. Since getting back from Montreal however I’ve had some difficulty kicking the caffeine monster and so it’s been something of a weekly, twice weekly, or even thrice weekly event as of late, but I digress.

Even though I’m not the coffee lover/drinker I used to be, there is just something so fantastic about being able to walk into a grocery store and pick up a bottle of pre-made vegan iced coffee. Pre-made iced coffee in a bottle is not something we as vegans typically get to enjoy because they’re all contaminated with milk. The only other company I know of who’s making a vegan iced coffee for sale is Silk, but I’m not sure how widely available it is. I’ve only ever seen it in one store in my area, and it’s not always in-stock. 


Califa Farms on the other hand seems to be gaining in popularity and it’s being carried in Whole Foods, which means it might just stick around for a while. The company is California based - as their name suggests - and is committed on working with local California ingredients, as well as making their farming practices and company as eco-friendly and sustainable as possible. They also make sure to only use coffee grown on Rainforest Alliance Certified Farms. Which means that the farmers growing the coffee beans do so without harming rainforest, rivers, soil, or wildlife. The Rainforest Alliance Seal also ensures that farmers are paid a just wage, and have access to healthcare, and education. All great things.

Currently Califa Farms makes three flavors of iced coffee - the aforementioned Café Latte, Double Espresso, and Mocha, - as well as Five flavors of almond milk - Unsweetened, Original, Vanilla, Toasted Coconut Almond, and Holiday Nog, - and three flavors of citrus juice - Lemonade, Lemon Limeade, and Orange Juice. However since this is a post about their iced coffee flavors I’ll stick to that.


Of the three coffee flavors I have to say that I love them all, but Mocha might be my favorite followed closely by Double Espresso. What I like about these drinks is that they’re only 90 calories per serving, have a very nice and mellow coffee flavor without any real almond taste, and are not overly sweet. The double espresso has 10g of Sugar per serving, with the other two flavors have 13g of sugar per serving. The texture is smooth, not watery, perfectly creamy, and is just all around delicious. They also have a nice dose of vitamins, and are NON-GMO certified - though not organic.

The ingredients list is pretty straight forward, most of the standard things we’ve all come to expect in our non-dairy milk. Cane sugar is used as the sweetener, and there are no artificial flavors. These drinks do use Carrageenan however if that’s a concern to you.


The only thing I don’t like is that these milks come in plastic bottles. I realize that the plastic is made from recycled material, which is entirely commendable but even still I prefer non-plastic packaging as much as possible, but that’s my only real gripe. Though I would point out that as delicious as these iced coffees are they are a little pricier then your average carton of almond milk, selling for about $5 a bottle. That may seem a bit steep to some but for an occasional ‘splurge’ item it seems alright. I certainty wouldn’t buy these iced coffee drinks every week but they sure are a nice treat when you’re in the mood for it.

So if you liked iced coffee as much as my husband and I do, and don’t feel like making your own, check out Califa Farms. But be warned, it really is hard to just have one glass! If you’re not careful the entire bottle might disappear before you even know it!


For more information check out,

Thursday, November 14, 2013

Brussels Sprout and Red Potato Hash...


This breakfast was born out of a strong desire to ‘change-things-up.’ I’ve said before that I’m not typically a breakfast person, or a morning eater, but for some reason this week I’ve been craving a large morning meal. Monday I had scrambled Chickpeas - have you done this? It’s delicious. Tuesday it was leftovers from Monday night. Yesterday it was pancakes. Today I really felt like a scramble, but I wasn’t really in the mood for tofu. I wanted something quick and easy that I could whip up in no time that was savory. Except, so many of my favorite cook books include savory breakfast recipes that contain spinach, and peppers - neither of which I had. So I had to start thinking about what I did have, and suddenly that 2lb pound bag of Brussels sprouts in the fridge, and the 5lb bag of organic red potatoes sitting on my kitchen counter started calling to me.


Originally I was calling this a scramble, but since nothing gets scrambled per-say I suppose it’s more of a hash. Whatever you decide to call it, it’s amazingly delicious. It was a super savory way to start my day and came together really quickly. The vegan sausage is totally optional but makes a nice addition. I strongly suggest using your own homemade sausage as opposed to store-bought - as I did, I had one homemade seitan sausage leftover in my fridge and what a way to use it up! - that’s just me. I prefer the taste of home-made, but whatever floats your boat. The salsa too is optional and not imperative, if you don’t have it don’t sweat it. It’s just that the hash might get a bit dry unless you add a bit of extra oil, and the salsa’s a nice way to moisten it up, plus it adds a kick of extra flavor. Also a great way to use leftover salsa that’s been kicking around your fridge.


This can feed two people, or maybe just one very, very hungry person. Enjoy!


Brussels Sprout and Red Potato Hash

1-2 tsp Olive Oil
12 Small Brussels Sprouts Halved (or 6-8 Large ones quartered)
3 Small Red Potatoes Diced
½ Red Onion Diced
4 Garlic Cloves Minced
1 Vegan Italian Sausage homemade or store-bought. (I Used Homemade Seitan Sausage)
1 tsp Dried Oregano
½ tsp Dried Basil
½ tsp Smoked Paprika
½ tsp Chili Powder
Sea Salt and Black Pepper to taste
Siracha to taste (I used about 1tsp)
Water as needed
2-3 Tbsp of your Favorite Salsa

- Heat the Oil over medium-high heat in a heavy bottomed skillet. Preferably cast iron if you have it because it gives the best sear. When the oil is sizzling drop in the brussels sprouts and diced potatoes. Let cook on medium-high heat for 2 minutes. Then flip with a spatula and cook another 2 minutes. This may take a couple of minutes longer depending on your pan and on how hot it gets. If your Sprouts and potatoes aren’t getting golden, and even a bit brown they need to cook a bit longer. 2 minutes in my cast iron is about all it needs but it may be different for you.

- When your veg is nicely seared lower the heat to medium and add in 1 cup of water. Cover the pan with a lid and let steam for 5 minutes. Check for doneness by poking the veg with a fork and if they’re not quite tender enough let steam another 3-4 minutes.

- Once veg are tenderized to your liking remove them from the pan and drain off all the excess water.

- Return the pan to the stove and add the red onion. You may want to add in a little splash of oil or water to get things going here, but if’s not necessary in a cast iron pan. Saute the onions for 5 minute until they begin to soften and golden. Add in the garlic and vegan sausage if using saute another 2-3 minutes.

- Add in the Oregano, Basil, Smoked Paprika, Salt, Pepper, and chili powder. Stir to combine. If you didn’t use any oil or water in the previous step you may need to add a bit now as the spices can dry things up.

- Add the Sprouts and Potatoes back into the pan and stir to coat evenly with spices. Saute for about a minute just to marry the flavors then fold in the siracha and salsa if using.

- Transfer to a plate, and serve with extra Siracha, salsa, or even a diced avocado if desired. Enjoy!


NOTE: Though my version of this hash was not gluten-free you can easily make it so by using a gluten-free vegan sausage or omitting the sausage altogether.

Tuesday, November 12, 2013

Product Review - Beyond Meat: Chicken-Free Strips...


Okay, so I totally intended to review Beyond Meat way back in Spring when I first tried it, but things get away from you and now I’m a little late to the game. Does everyone know about Beyond Meat already? Well, in case you don’t Beyond Meat is the latest Vegan Meat on the scene. This stuff is really cutting edge, it looks like chicken, it feels like chicken, and it tastes like what I remember chicken to taste like. I’ve tried quite a few of the vegan meats on the market, and though I don’t hate any of them I have to admit that some are better then others, and Beyond Meat is definitely the best. It’s better and more realistic then any other vegan meat product out there, it doesn’t have that seitan aftertaste that a lot of vegan wheat meats have, nor does it have that tofu aftertaste that a lot of soy based vegan meats have. Beyond meat isn’t grainy, it isn’t mushy, it doesn’t taste like dough, or soy, it’s not too soft, nor too firm, it’s perfect. In fact it’s so realistic that I have successfully fooled the most ‘die-hard’ omnivores into believing that it’s actually chicken.


Now I’m not the sort of person who promotes using store-bought vegan meats regularly, they shouldn’t be the staple of anyone’s diet, but every now and then it’s nice to kick things up a notch, and if you like vegan meat then you’re gonna love this one. Hell, even if you don’t like vegan meat - or think you don’t - you might really come around if you give Beyond Meat a try. Certainly it’s worth trying once just for the sheer novelty factor alone, although I have had vegans tell me that it’s actually too realistic, so much so that it discomforts them.

BBQ Beyond Meat Wraps 


Currently Beyond Meat only offers Chicken-Free Strips in three flavors, Lightly Seasoned, Grilled, and Southwest. I’ve tried all three and I liked them all, but Grilled is maybe my favorite, closely followed by Southwest. The strips are Gluten-Free, and are made primarily of Non-GMO soy, Pea Protein, Amaranth, Carrot fiber and spices.  The first time I tried Beyond Meat I made BBQ Chicken wraps to go along with some vegan poutine that I made. The second time I used them in a standard chicken salad with red grapes, walnuts, green onion, and vegan mayo. The third time I used them in a broccoli carrot stir-fry, and each time they were out-of-this-world delicious.


From what I hear the peeps at Beyond Meat would like to develop a number of meat-free products. It’s their goal to be the leader in this industry, and to always be on the cutting edge of vegan food technology. I read an article about Beyond Meat Last year that had some quotes from Ethan Brown the Beyond Meat Founder in which he stated that he wants to ‘redefine the category.’ Rather then call meat or vegan meat, meat he wants them to be called protein. His goal - a hugely ambitious one - is to make his vegan meat - or vegan protein - products so realistic that they will be sold in the Meat counter at grocery stores rather then next to the tofu. Certainly an interesting concept, and probably the first time anyone’s thought to try it, or the first time anyone thought it was possible.

Here's a shot of that delicious poutine.
The Recipe is from Bryanna Clark Grogan's book
"World Vegan Feast"


I am definitely interested in seeing where this company goes next, and I’m eagerly waiting to see what their next vegan meat product might be, and when it will drop. This is definitely a company to keep your eyes on, and if you're interested in learning more about the company and the products you can check out their website.

Beyond Meat

Saturday, November 9, 2013

The 29th Annual Toronto Vegetarian Food Festival...


This year my husband and I were fortunate enough to attend the 29th annual Vegetarian Food Festival in Toronto. The festival was held September 5th-7th which was serendipitous for us, because we were planning to be in Montreal then. Originally for our somewhat belated anniversary getaway we were going to go to Niagara Falls and then head straight for Montreal, totally bypassing Toronto, then I found out about the festival. The Toronto Veg Fest is the largest Vegetarian Festival in all of North America, it’s a 3 day extravaganza and always amazing. How could we pass that up? So as much as it pained us we decided to knock a couple of days off of the Montreal trip to attend the festival.

CN Tower
Amazing View!


We arrived in Toronto on Saturday afternoon, and after checking into our hotel we headed straight for the festival. I had never been to Toronto before and so the whole experience was new and exciting. There was some massive construction going on but lucky for us we had a GPS that helpfully guided us to the Harbourfront Centre where the festival was being held. Once we found a parking garage - pretty easy - we headed off to explore the ground. First I have to say it’s a beautiful location, right on the water with glorious views of the CN Tower and other absurdly tall skyscrapers. The grounds themselves were massive too, and jam-packed full of fun loving vegetarians, vegans and the veg-curious. There was live music, and a ton of awesome vendors - something like 150 different vendors in total.

The Awesome World Cafe 


There were local bakeries, food trucks, local restaurants, there were local advocacy groups, and product manufacturers. There were well-known vegan companies such as Daiya, Gardein, Earth Balance, Field Roast and Vega sampling out their newest products. I got to try the new Daiya cream cheeses which I thought were alright but not my favorite of their products. I got to try some samples of vegan coconut bacon, vegan chicken, new and interesting Kombucha’s, fair-trade chocolate and so much more. It was a total blast, although I found that first afternoon a little overwhelming. The grounds were just so big, and there were just so many people - thousands upon thousands - and I was in an unfamiliar place being bombarded with too much information all at once. It was a little bit of vegan overload for me you know? Hard to compute it all. So after giving everything a good look over and enjoying a few snacks we decided to go explore the city, and enjoy a proper dinner.

Steam Buns - White Potato Curry Bun Left
Whole What Cabbage Bun Right 


Of course we returned to the festival Sunday afternoon and stayed nearly till the end. We enjoyed a ton more vegan goodies like the Mac & Cheese Burrito from Hot Beans. We also grabbed one of their jackfruit tacos. We grabbed some delicious steam buns from King’s Café - 1 cabbage steam bun and 1 potato curry steam bun.  We ate some delicious vegan Jerky - probably the best I’ve ever had, even better then Primal Strips - some organic salad and then it was time to move onto dessert.

Mac & Cheese Burrito 
Jackfruit Taco 


From Bunner’s we got a delicious cinnamon bun and an Orange Spice cupcake., with I think a rose water frosting. - It’s been a couple of months so cut me some slack on the memory. - From Tori’s Bakeshop we got a delicious gluten-free Coconut Cupcake that actually tasted a lot like a corn muffin with a sweet frosting, good thing I like corn muffins! But the best thing we had dessert wise was probably their espresso cupcake with biscotti, so mind-blowing! We finished the decadence with a cone of wild blueberry doughnuts and a Strawberry Ice Cream Sandwich. So good!

Cinnamon Bun 

Orange Spice Cupcake 


Honestly I feel like we actually ate a lot more then this, but the festival is all kind of a blur for me now and these are the only pictures I have. I think the festival was just so much fun, and just so cool that we neglected to take pictures of what we were doing and what we were eating. The awe-factor you know?


Oh well, Hot Beans, Tori’s Bakeshop, and Bunner’s were all on my list of ‘must-visit spots’ for when I was in Toronto and so I was glad that we could knock ‘em all out of the way in one fell swoop at the festival.

Espresso Cupcake Left, Coconut Cupcake Right 


Of course if vegan festival food isn’t quite your thing there was plenty else going on. There were so many amazing speakers, a bunch of awesome cooking demo’s and even a world record breaking 550kg yolk walk by German strongman Patrik Baboumian. Pretty neat stuff. Among some of the guest speakers and demoer’s were Taymer Mason, Del Sroufe, Allyson Kramer, Doug McNish, Melissa Morgan, Jo-Anne McArthur, Liz Marshall, Gene Bauer, Jenny Brown, David Simon, Erin Red, Breeze Harper, Michael Gregor, John Pierre, Kristen Lajeunesse, and Jennifer Cornbleet. Pretty cool lineup no? Because of timing, and scheduling I didn’t get to see all the speakers that I wanted to, there was just too many cool things to see and do, too many great things to eat, it was hard to fit it all in even in two days, but I did make the time and the effort to go and see Taymer Mason.

Wild Blueberry Doughnuts
Strawberry Ice Cream Sandwich 


Taymer’s cooking demo was wonderful, and I’m really glad I got to see it. If you’re unframiliar with Mason, she wrote the amazing book “Caribbean Vegan” which you may recall I made quite a few recipes from over the course of this year’s vegan mofo. For her demo she made the Lentil Patties, and the Eggplant Seaweed Accras from her book, and both were delicious. Rather then all of us getting a minuscule sample we each got a nice plate with a hearty half pattie and a large accra. Mason was a pleasure to watch during her demo, you can really see the passion she has for cooking, and her easy, down to earth, friendly vibes made the whole experience great. Afterwards she was kind enough to stay and sign cook books, and I was lucky enough to have had the forethought to bring my copy of “Caribbean Vegan” along. It was a real treat to speak with her, and it’s pretty cool having a signed book you know?

Taymer Mason Cooking up some great stuff!

And I guess that about rounds it up for the Toronto Vegetarian Food Festival. We stayed till the end, took a nap under a tree near where they were cracking open coconuts, listening to music and people talking, and then what did we do? Well, we went to a restaurant and had dinner! I know we’re total gluttons, but that’s what you do on vacation is it not?

I’m really hoping we’ll be able to make the Toronto Vegetarian Food Festival next year.

Tuesday, November 5, 2013

The Mac and Cheese Burrito...


Okay, there is nothing - and I mean absolutely nothing - even remotely healthy about the following recipe. It doesn’t matter if you make your own home-made vegan sausage, use gluten-free noodles, or whole wheat tortillas, just stop pretending you can justify it, I mean it’s mac and cheese in a burrito!  Anyway, who cares which side of the healthy living spectrum this fall on anyway, if you eat a healthy whole foods most of the time like I do then you deserve a little indulgence now and again.


On our latest trip my husband and I indulged a lot, especially in Toronto and Montreal - there are just too many amazing vegan options in both cities to worry about health, and waistlines, and keeping on the straight and narrow. We stuffed our faces with every bizarre, grotesque, outrageous, creative, out of this world amazing vegan decadence that we could find, and we didn’t feel the least bit guilty about it. One such indulgence came to us via the wonderful Toronto Vegetarian Festival. The food court was packed with tons of great options - several healthy ones too - but one place I knew I had to stop was Hot Beans. For those unfamiliar Hot Beans is a little take-away place in Kensington Market in Toronto that gets rave reviews for their creative burritos, and tacos. This is one place I really wanted to go but since we had limited time in Toronto I wasn’t able to go to their actual Kensington Market location - lucky for me they were at the Festival and so after some deliberation we ordered the Mac and Cheese Burrito. We ordered this for two reasons 1) It sounded bizarre and possibly disgusting. 2) The sheer novelty is too much to ignore. Of course we were blown away by this crazy concoction, and I am now convinced that I have a real talent for sniffing out the most insane - but can’t believe how good they are - dishes.


We talked about this burrito repeatedly throughout the trip, and I do mean repeatedly. Even after we got home my husband would look at me and say “Remember that mac and cheese burrito?” Well, who could forget? Finally to satiate our desire I decided to get creative myself and see if I could make a passable version at home. I have to say that for a first attempt this was pretty damn good. It wasn’t spot on, it wasn’t exactly like Hot Beans - it wasn’t quite as good - but it was definitely good! Mouth-watering, delicious, satisfying, and that’s all that we were really looking for. I’m hoping to experiment around a little more with this recipe in the future but for now, I give you my version of the Mac and Cheese Burrito.


The Mac and Cheese Burrito

1 Batch Creamy Macaroni and Cheese - or your favorite Mac.
4 Field Roast Frankfurters sliced into rounds - Or other vegan hot dog.
1 Batch Crispy potatoes - recipe follows
4-6 Whole What or Gluten-Free Tortillas

Crispy Potatoes 

3 Large Russet Potatoes peeled and cut into 1 inch cubes
1 Tbsp Sesame Oil
1 Tbsp Apple Cider Vinegar
1-2 tsp Liquid Smoke
2 Tbsp Potato Starch
Sea Salt, White Pepper, and Smoked Paprika to taste

- To make the Potatoes Preheat Oven to 450'F

- Combine all ingredients - except potato starch -  in a mixing bowl and mix thoroughly to ensure all potato cubes are coated. Sprinkle in the potato starch and toss again to caot.

- Use a slotted spoon to transfer the potato cubes to a lightly greased baking sheet.

- Bake for 15 minutes then flip and bake another 15-20 minutes until potatoes are golden brown and crispy. Set aside and let cool.

- While Potatoes are cooking lightly spray a small skillet with non-stick spray and heat over medium heat. Add the Sliced Frankfurter rounds and fry for 3 minutes until brown, flip, and fry for another 3 minutes until brown and crispy. Remove from skillet and set aside.


- To assemble

- Lay one tortilla onto a plate.

- Top the tortilla with a generous spoonful of Crispy Potatoes.

- Add a spoonful of Sliced Frankfurter rounds.

- Top with 1-2 Generous scoops of Creamy Macaroni and Cheese.

- Fold the edges of the tortilla over and roll up like a burrito. Eat and enjoy!