Showing posts with label Collard Greens. Show all posts

Monday, September 30, 2013

Vegan Mofo #35 - Mark’s Beer Braised Greens...


Vegan Mofo #35 - Mark’s Beer Braised Greens 

The Region - Germany
The Book - The 30 Minute Vegan’s Taste of Europe
The Author - Mark Rienfeld
The Recipe - Beer Braised Greens
Page #189
Difficulty - Easy
Duration - Roughly 20 minutes

I’m not entirely sure how this is a typical German dish - except for it’s use of German beer it seems a rather ordinary braising recipe. - But Mark includes it in his Germany Chapter in The 30 Minute Vegan’s Taste of Europe and so, because I had some greens begging to be used I decided to make it as part of my German Schnitzel feast. I hadn’t intended to use the recipe for Mofo as it was simply a side, but it turned out so much better then expected I could hardly see why not to include it.


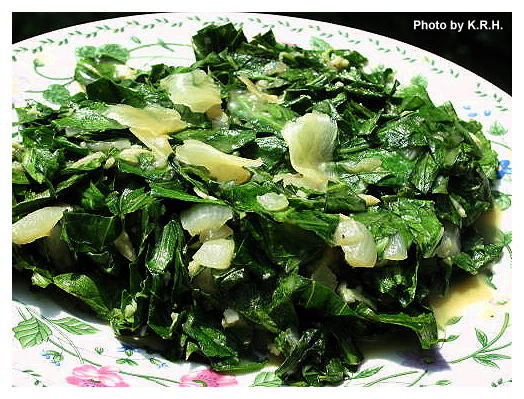
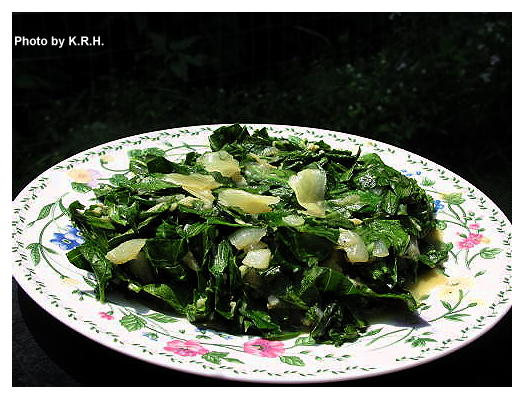
The dish is simple, thinly sliced greens - Mark calls for Kale but I used Collards because that’s what I had - sauteed in garlic, olive oil, red pepper flakes, caraway, lemon, red wine vinegar, salt, pepper and of course beer. I thought the beer would be overpowering but it wasn’t. Somehow it worked with the bitter greens and the red pepper flakes gave the dish a nice kick.

The Full German Feast.
Top - German Potato Salad & Vegan Schnitzel
Bottom - Red Cabbage and Brussels Sprouts & Beer Braised Greens 


Is it my favorite vegetable recipe ever? No, but it was a new and interesting way to use greens that I hadn’t thought of before, and it worked really well as a part of the German feast. Each dish complimented the other, and so if you choose to make the schnitzel, potato salad and the red cabbage I highly suggest also adding one more pan to the mix and braising up a batch of beer braised greens. Yum, yum!


Friday, June 14, 2013

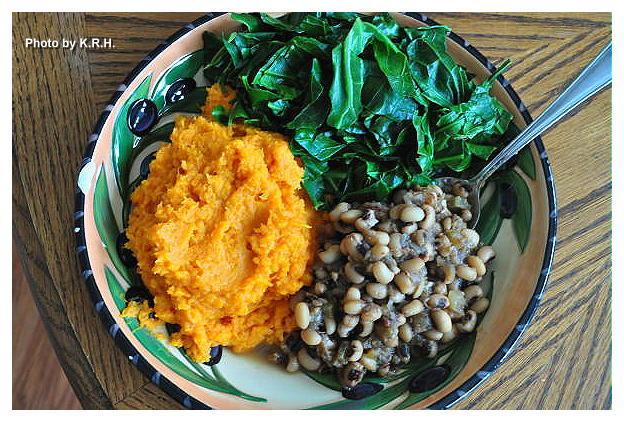
Jae's Southern Bowl - Chipotle Black-Eyed Peas with Maple Mashed Sweet Potatoes and Collard Greens...


Today I wanted to share with you a meal that I’ve been enjoying quite a lot lately. Actually I first made this dish back in April but it quickly became a favorite and a staple. It’s both super simple, and yet loaded with amazing flavor. This dish really inspired me to rethink food and how to prepare a meal. As much as I love fancy food and spending a lot of time in the kitchen, sometimes all you want and all you need is good, clean, and hearty nutrition to fuel you through your day. At least that’s all I’ve been wanting lately, and trust me when I tell you that as simple as this dish looks, it’s super satisfying and filling. It’s the kind of meal you can feel good about eating because you know everything in it is good for you.

Before I get into the recipe let me start by saying “Get It Ripe” by Jae Steele is a cook book I’ve owned for years and yet hardly ever use. I bought it in my favorite used book store back when I first went vegetarian and honestly it was just a little too over my head at the time. The recipes themselves are not particularly complicated I just didn’t know what the hell spelt flour was, or millet, or why I should use brown rice syrup! These days of course I’m an old pro, I’m not intimidated by strange sounding ingredients, these days most of them are regular features in my pantry. Still this is an often overlooked book in my collection for the simple fact that my cook book collection is so large. I have definite ‘go-to’ cook books that I use quite frequently, but every now and then I get tired of them and so I go through the shelves to look for that one book I never use that suddenly inspires me. Back in April that was “Get it Ripe” and the first thing I made out of it after dusting it off was this amazing Southern Bowl which contains - Chipotle Black-Eyed Peas, with Maple Mashed Sweet Potatoes and Collard Greens. Even though I wasn’t much of a bean lover when I first bought this book, this was always the number one recipe that stood out to me. I’ve always wanted to make it, and so I finally did. Honestly I don’t know what took me so long because this dish is fan-freaking-tastic. It is so mouth-watering good, the beans alone will blow your mind and you can eat them straight out of the pot they’re that amazing. There are definitely a couple of steps to this dish but say you make a big pot of the beans on a Sunday, the rest is pretty easy to throw together for a quick weekday lunch or dinner.


The black-eyes peas are simmered with olive oil, garlic, onion, celery, zucchini, chipotle, allspice, bay leaves, sea salt, and vegetable broth or water. The first time I made this I used vegetable broth, and the other times I made this using water, and honestly the beans are so flavorful that you can use water and they’re not bland at all. They’re so rich, and even a bit creamy, and they have a perfect level of spice from the chipotles. I mean really, chipotles and beans they were meant to be together.

Then you layer those delicious mouth-watering beans on some soft, and creamy mashed sweet potatoes and you’re in food heaven. Jae makes her sweet potatoes with coconut oil, sea salt, non-dairy milk, maple syrup and black pepper. The coconut oil is amazing in them and lends a really light coconuty flavor that’s the perfect accompaniment to the slightly spicy beans. Now, I’ve had a lot of mashed sweet potatoes in my time, hell I’ve had a lot of coconut mashed sweet potatoes in my time but seriously these are some of the best I’ve ever had anywhere.


Lastly you add in one whole bunch of simply and lightly steamed collard greens. I know that doesn’t sound like anything special but when you mix ‘em in with the sweet potatoes and some saucy spicy beans well you have a flavor explosion. The slightly bitter greens are well complimented with the sweet and spicy flavors of the rest of the dish, and once you eat all three components together you can’t really imagine eating any one part separate. You truly need to have the three together to create magic.

This dish, is really one of the most perfect examples I’ve ever found of just how amazing simple vegan fare can be.

Tuesday, January 8, 2013

Strawberry Sunshine Beet Blast...


Everyone wants to start the New Year off right. We sit down and make goals and game-plans and say we’re not going to do this and this thing today but we will do this and that thing instead. January is always full of positive energy and good intentions, but making those good intentions stick can sometimes be a little bit difficult for people. It’s part of why I don’t make resolutions - aside from the obvious, that if you want to change your life the best time to do it is now in the moment rather then wait for some arbitrary date. - Making resolutions almost sets people up for failure. For a lot of people it’s too much pressure, and when they don’t quite make their resolution the disappointment is too big, and too overwhelming. I prefer goal setting, and I set goals for myself all the time not just in January. Goal setting for me is more long-term, and sometimes the goals I set for myself are life-long. Goals are something I work towards and depending on the goal it doesn’t really matter how close I am to achieving it because every stride towards it is a stride in the right direction, and that alone is enough to fill me with happiness and positive energy.


I would say that whenever you’re making goals or resolutions less is more. Meaning, instead of making big sweeping declarations, start small. Your goals have to be realistic and manageable, and most importantly you have to know why you’re setting them in the first place. If you don’t truly want what it is you’re setting your goal for, you will never achieve it. If you say to yourself that you’re going to give up coffee, but inside you’re already looking ahead to when you might have your next cup - be it a week, a month what have you - then you’re not there yet. You’re not ready, and it’s not going to work. Instead of saying “I’m not going to have coffee again” say to yourself “I’m not going to have coffee today.” Work with that, and then move onto the next day and say the same thing. Don’t think too far ahead, and don’t think too hard about it. Make it simple, take it a day at a time, and that’s true of any goal not just giving up coffee or some other bad habit.


Of course if you are planning on leaving some bad habits behind for the New Year it’s always a good idea to replace them with a good habit. Replacing a bad habit with a good one makes the transition easier on you, and it makes you more likely to accomplish your goal if you feel like you’re getting something in return. I know for myself the most important thing in making sure I achieve my goals is starting the day out right. I know that sounds weird but if I start my day out right by getting up early, exercising, and enjoying a nutritious breakfast I find I’m overall happier and more productive throughout the day. If I sleep in, don’t exercise, and either don’t eat, or just eat whatever I’ve got lying around without putting my thought into it I’m much more likely to be lethargic, lazy, disagreeable, and spend the day wasting time. So that’s one of my biggest goals for this year, something I’ve been working on the past few days and I’m really feeling great about it.

As I said for me part of starting the day off right is about getting adequate - as well as delicious - nutrition in the mornings. I’m a total smoothie fanatic, as some of you probably already know, but after my summer holidays I kind of fell off of the smoothie wagon and wasn’t drinking them with as much regularity. Or I was drinking protein smoothies instead rather then fresh fruit and vegetable smoothies. This week I really wanted to make sure I got back on track as far as the smoothies go and so I came up with this delicious concoction yesterday. For some reason I’ve really been dreaming about beets, and what better way to utilize their amazing power, and their unique flavor? It may sound weird to you but I assure you it’s delicious and revitalizing, just give it a try! The color alone is brilliant!


Strawberry Sunshine Beet Blast 

½ of a Large Beet or 1 Small Beet peeled and chopped
2 C Frozen Strawberries
Thumb Sized Piece of Ginger
1 C Unsweetened Almond Milk
1/4 C Orange Juice
2 Collard Green Stems
1 Tbsp Flaxseed

- Place all ingredients into a high-speed blender and blend on high for 60-90 seconds until completely smooth. Pour into a glass and enjoy!

*** Note - If you feel it needs a little extra sweetness feel free to add in a tsp or two of agave. Or a pinch of pure green Stevia.***

Monday, November 12, 2012

Umeboshi Noodles with Black Soybeans and Collard Green Ribbons in Soy Broth...

I know with all the toppings it's kind of hard to see all
the awesomeness in this bowl


If you know me, or If you’ve been following this blog for any length of time you probably know that Asian Cuisine is one of my favorites. I love the duality between the simple fresh ingredients and the bold complex flavors that are so characteristic of Asian cooking. I also love bowls and one pot meals, especially on cold days. Well, today was a cold day, and I was feeling particularly inspired thanks in part to the reading I’ve been required to do for my Chinese Medicine class, as well as my most recent trip to Mitsuwa, the Japanese Market in Arlington Heights.


My last trip to Mitsuwa was a couple of weeks ago, and I was on a mission for Miso and a variety of Japanese noodles. These are things I can find easily in the health food stores in my area, however they’re roughly half the price at Mitsuwa, which is way more economical considering how much miso I go through. As for the noodles I found exactly what I wanted, a ton of Udon, Soba and Somen, and then I found some packages of Green Tea flavored noodles, and Ume flavored noodles. Ume of course referring to Umeboshi, the tart, sour, slightly sweet plum typically used as a paste or made into vinegar in Japanese cooking. I’d never seen Ume noodles anywhere else before, nor had I even heard of them, but they were bright pink and beautiful, and contained no weird or nefarious ingredients and so I bought a package.


I really had no idea what I was going to do with them once I got them home, and so they’ve just been sitting in my pantry for the past couple of weeks. Until today. Today, for whatever reason was the day I decided to give them a try. Initially I was a bit stumped as to what to pair them with, or what kind of dish to put them into because I wasn’t sure what their flavor would really be like. Eventually I decided to go with traditional Asian seasonings such as garlic, ginger, sesame, and tamari, and picked my vegetables according to what I had on hand and what I thought might make the most startling contrast. Green, orange and black I thought would all look fantastic against the bright pink noodles, and I had really been trying to find a use for the solitary can of Black Soybeans left over in my pantry from a squash stew I made a couple of months ago.


Now, I’ll be honest, at first I wasn’t sure how this would turn out. I was kind of just flying by the seat of my pants so to speak. Whenever you just start tossing things together there is always the risk that you’ll under season or over season whatever your making, or just make a bad call on an ingredient. So when we sat down to eat I was a little hesitant and a bit skeptical, particularly of the noodles since I had no idea what to expect from them. Turns out there was no real need to worry because this delicious hearty bowl really blew me away. The flavors were exactly what I was looking for, rich - complex - and warming, and the entire thing came together in the most delicious way. The Ume noodles in particular were fantastic, and now I can’t wait for my next trip to Mitsuwa so I can buy myself some more packages. If you see Ume Noodles in your area pick some up, and make this dish!


Umeboshi Noodles with Black Soybeans and Collard Green Ribbons in Soy Broth.

8oz Umeboshi Noodles
1-2 Tbsp Toasted Sesame Oil
6 Garlic Cloves Minced
1 Thumb Sized Piece of Ginger grated
1 Medium Sized Leek sliced
1 Bunch Collards - ribs removed cut in ribbons
4 oz Enoki Mushrooms
1 15oz can Black Soybeans
A Few Dashes of Ume Vinegar
1 tsp Japanese 7 Spice

For Broth 

1 1/3 C Low-Sodium Vegetable Broth
2 Tbsp Low-Sodium Tamari
½ Tbsp Agave nectar

For Garnish 

1 Large Grated Carrot
½ Tbsp Brown Rice Vinegar per bowl
2 tsp Sesame Seeds per bowl


- Cook Ume Noodles according to package directions. Then drain in a colander and rinse with cold water to stop cooking and set aside, until ready to serve.

- While Noodles are cooking heat 1 Tbsp of sesame oil in a large skillet. Add the minced garlic, grated ginger and sliced leek. Saute over medium-high heat until the leek has softened, and garlic is fragrant. About 5-7 minutes.

- Add in the collard green ribbons, then cover and cook for three minutes. Then add in the enoki mushrooms and cook another 3-5 minutes until the mushrooms are soft and the collard greens are bright green and tender. If the pan starts looking dry during this time you can add an additional 1 tbsp of toasted sesame oil.

- Lower the heat and stir in the black soybeans, ume vinegar, and 7 spice seasoning. Replace the lid and let sit over low heat until the soy beans are warmed through then turn the heat off. And set the pan aside until ready to serve.

- To make the broth whisk the vegetable broth, soy sauce, and ume vinegar in small sauce pan. Then bring to a boil and reduce to simmer. Let simmer one minute then turn off the heat.

- To serve divide the noodles into two bowls. Then divide the broth and the collard green mixture evenly among them. Top each bowl with grated carrot, sesame seeds and the rice vinegar.


PS: Black Soybeans by the way are pretty interesting. They look like a black bean but a bit lighter, and taste a regular soybean or maybe a blander edamame. Outside of health food or specialty stores I don’t know how easy it is to find them, the brand I used was Eden Organic’s but if you can’t find them you could always sub in regular soybeans, edamame or black beans if you want to keep the contrast. Shiitake mushrooms would also be good if you don't have Enoki.


Once I mixed it all up you could better see those lovely
Pink Ume Noodles!

Wednesday, June 6, 2012

Garlic Scape and Collard Green Pizza...


There are few things better then a truly good pizza, and I’ve made plenty of tasty pizza’s in my life, but this one beats them all by a thousand miles. The flavors in this pizza are out of this world amazing! It’s truly amazing what you can create when you’re making every effort to use every last bit of fresh produce in your fridge. Collard greens, tomatoes, and non-dairy cheese were all staring at me yesterday afternoon threatening to spoil unless I used them before vacation. A quarter of a jar of garlic and green onion olive oil had been sitting on my counter for the better part of a month. A jar of sun-dried tomatoes sat nearly empty in my fridge, and I had just purchased 4 bunches of garlic scapes from my local grocery.


I was not suppose to buy groceries this week, but when I saw that scapes were back in season I knew I’d have to have them before I left, because by the time I get back they’ll surely be gone. It was a total impulse by, and my stomach not my brain was responsible. When I got them home, I thought “What am I going to do?” I have hardly anything left in my fridge. I stared down the contents of my fridge for a good long while and then the above mentioned ingredients started calling to me. They started saying “pizza, pizza, piiiizzzzaaaa!” Until I just had to listen.


Though this was my own idea, I was skeptical at first. Collard greens on a pizza? I’d never hear of such a thing, and collards - love them though I do - are just one of those things that one immediately identifies with ‘health food’ not pizza. Still, I decided it was better to try and fail and have to through the collards out because dinner was terrible, vs throwing the collards out because they went bad. I can not tell you how amazed I was by the end result. This is literally the best pizza I have ever made, perhaps even the best pizza I have ever eaten and I do not say that lightly. We’re talking mind-blowing, mouth-watering, tastebud-tickling good, so good that you’ll crave it! Even my husband, a pizza eating fanatic said it was one of the best pizza’s he’d ever eaten, and last night he simply couldn’t get enough of it!


Instead of sauce I decided to coat the crust in home-made garlic and green onion infused olive oil. I wanted a lighter, cleaner tasting pizza, and wasn’t in the mood for a heavy acidic tomato based sauce. Of course if you’re anti-oil this may not be the pizza for you, but you can control how much oil you brush onto the crust. You don’t have to go overboard and if you’re only eating a slice or two it’s really not all that bad. You can of course try it with a tomato based sauce though I can’t grantee that it’ll taste at all the same. The infused oil is highly recommend. Also though I list the non-dairy cheese as optional I highly recommend that too. I used Daiya’s Garlic Jalapeno Havarti which was amazing and really kicked the pizza up to a new level, but you could use vegan mozzarella if that’s all you can find. Remember though to use just a little bit, you want it more as a garnish than anything else, the pizza shouldn’t be dripping with it. Just sprinkle on enough that you get a few good bites of it per slice. On it’s own the pizza is hearty and filling, but to make it even more of a meal you could serve it with a nice side salad and perhaps even a glass of red wine if wine is your thing. However you serve it, just be sure to enjoy it! And trust me when I say this comes together a lot quicker then the length of the recipe may imply. Also the topping can be made ahead and saved till needed, which makes it that much easier!


Garlic Scape and Collard Green Pizza 

Topping 

2 Leeks white and light green parts only sliced thin
2 bunches collard greens chopped into bite size pieces
3 Roma tomatoes sliced thin
1-2 Bunches garlic scapes sliced into 1 inch lengths
Garlic and Green Onion infused Olive Oil for brushing ***
1/8 C Shredded non-dariy cheese (optional)
10-15 sun-dried tomatoes sliced into strips
Rosemary sea salt ***
Fresh Black pepper to taste (Optional)
1 ½ Tbsp Balsamic Vinegar to drizzle over top

Dough

2 1/4 C All Purpose Flour
1 ½ Whole Wheat Flour
1 pack active dry yeast
1 C warm water
3/4 tsp salt
2 Tbsp Olive Oil

Preheat Oven to 400'F

- Water Saute leeks, collard greens, and garlic scapes in large pan over medium-high heat. Saute about 10 minutes until veggies are tender and all the water has been absorbed. You want the mixture to be a bit dry. Transfer to a bowl when finished and set aside, or if making ahead refrigerate until ready to use.

- To make the dough, combine all purpose and whole wheat flour, and salt in a food processor and pulse to incorporate.

- Combine Active Dry Yeast with Warm water and set aside for five minutes

- Drizzle the olive oil into the food processor and add the yeast/water mixture. Process until mixture forms a cohesive dough. If the dough is too moist or sticky add in more flour until you’ve reached your desired consistency.

- Remove the dough from the food processor, shape into a ball and set aside to rest for 10 minutes.

- After the dough has sat, you can either divide it to make two smaller thin crust pizzas or leave it as is to make one large regular crust pizza.

- Flour a clean work surface and flour a rolling pin. Gently roll dough out into a large circle. Start with the edge closest to you and roll the dough outwards in a circular motion. Flip the dough over and continue rolling outwards in a circle. Flip the dough one more time and continue to roll outwards until the circle is large enough to fit your pizza pan.

- Lightly grease your pizza pan with some non-stick cooking spray. Then gently transfer your pizza dough to the pan. There should be excess dough flowing over the edge of the pan. Roll it up to form a crust around the edge of the pan. Trim some off as needed if the excess is too much.

- Poke your pizza dough with the tings of a fork a few times. Then brush the dough with a generous amount of garlic and green onion olive oil (or regular olive oil) make sure to brush both the base of the dough as well as the crust.

- Place pan in preheated oven and cook for 10-15 minutes until dough is firm. Remove from the oven.

- Brush with a little more garlic and green onion oil, then layer sliced Roma tomatoes around the crust. Evenly distribute the collard green, leek and garlic scape mixture over top of the tomatoes. There will be a lot but that’s okay, pile it all one and spread it as evenly as possible.

- Next scatter the sun-dried tomato strips over top of the pizza, and the shredded non-dairy cheese if using.

- Finish the pizza by drizzling the balsamic vinegar over top, sprinkling with Rosemary sea salt and a few twists of a black pepper mill.

- Return the pizza to the oven and bake for 15 or so minutes until the cheese has melted, and the edges of the crust begin to golden.

- Slice and serve hot with a bowl of garlic and green onion olive oil dotted with balsamic vinegar for dipping your pizza crusts! Enjoy!


*** Note - The Garlic and Green Onion Olive Oil is super easy to make and tastes amazing on this pizza. If you prefer you can use regular olive oil, but this oil really does kick the pizza up a notch and infuses it with such great flavor. I highly recommend it, especially since it’s so easy. All you do is pour 2 cups of olive oil in a mason jar. Add 1 cup of sliced green onions (just the green parts) ½ cup of finely minced parsley or basil (or a mixture of both) a pinch of sea salt, and 10-12 garlic cloves finely minced. Screw a lid on tight, give it a good shake then leave it on your kitchen counter for 24 hours to let the flavors develop. So delicious! ***


*** Note - Rosemary Sea Salt is easy to make. All you need is fresh Rosemary springs and sea salt. Remove the Rosemary leaves from the stems and grind in a food processor. Then add to a shaker with an equal (or slightly less) amount of sea salt. Use on everything because it tastes delicious! ***


*** Note - This pizza is only soy-free if you use a soy-free non-dairy cheese.*** 

Thursday, February 23, 2012

Coconut ‘Shrimp’ Tacos with Fried Plantains and Collard Greens...


Ah - I’ve been trying to post for the past two days and was unable to due to some sort of technical difficulty that appears to now be sorted out. This is the recipe I’d planned to post Tuesday, and since I haven’t been able to post in a couple I’ve got a nice backlog of posts waiting to be published. So stay tuned for all the delicious treats I have in store!


As winter is slowly coming to it’s end for another year I find I too am gradually moving away from the cozy, comforting meals associated with the colder months. It seems to always happen this way, about a month or so before the true end to a season my body is already geared up to enter the next phase. While I’m still enjoying soups, and other wintery treats, for the most part my heart and tastebuds are set on spring and summer.


Now before I was a vegetarian, shrimp was always a food I associated with spring, and especially summer. Coconut shrimp in particular, and over the course of the weekend I found myself longing for that sweet, crisp, coconut flavor. Of course I had no desire to eat actual shrimp, and no intention of doing so, but I wanted to find a way to recreate that flavor and texture, and I wanted to enjoy it wrapped in a summery Caribbean inspired kind of taco.


I have to say that despite some of my reservations while cooking, this dish turned out phenomenally and totally satisfied that tropical flair I was craving. Of course these little tempeh bites taste nothing like what I remember of shrimp but that’s not the point, the point is the fried coconut! Combined with the plantains, the collards, the coconut milk drizzle and the mango salsa this dish was heaven on a plate!


Now to put this whole thing together it does require a bit of work. There are several steps you have to go through to make the different taco components but it is so worth it, and if you prepare ahead of time it actually doesn’t take that long. So give it a go, really in the grand scheme of things it’s not a lot to ask for some good homemade coconut ‘shrimp’ tacos! Enjoy, and stay tuned for the salsa recipe which I plan on posting tomorrow.


Coconut ‘Shrimp’ Tacos with Fried Plantains and Collard Greens

Coconut ‘Shrimp’

1 lb Tempeh cut in cubes
1 15 oz can coconut milk
½ tsp garlic powder
½ tsp dried dill
1 tsp hot sauce
1 tsp kelp granules
½ C Panko Breadcrumbs (or gluten-free breadcrumbs if you're GF)
3/4 C Coconut Flakes (I used unsweetened)
1 tsp Cajun Seasoning Blend (or to taste)

Taco Fixin’s

1 Bunch Collard Greens chopped in bite sized pieces.
Whole Wheat or Corn Tortillas
1 Recipe Sweet Shredded Fried Plantains (Recipe Follows)
Roasted Vegetable Mango Salsa (Recipe to come)
Diced Avocado
Diced Green Onion
Coconut Milk Drizzle (Optional)

Sweet Shredded Fried Plantains

3 Plantains
2 Tbsp Coconut Oil
½ tsp Cinnamon
½ tsp Cajun spice blend
1 tbsp Brown Sugar
Water if needed

- First prepare your tempeh. If you’re working with two 8oz blocks of tempeh as I was cut each block horizontally into 6-8 slices. Then slice vertically in half or in thirds depending on how big you want your cubes. Place tempeh into an airtight container when cubed.

- Mix together the coconut milk, garlic powder, dill, kelp, and hot sauce. Pour over the tempeh. Close the container give it a good shake until all the tempeh is covered and then place in the fridge and let marinate for 1-2 hours.

- After the tempeh has marinated mix breadcrumbs, coconut flakes and Cajun seasoning in a shallow bowl. Grab a tempeh cube from the marinating dish give it a shake to remove any excess coconut milk then roll it in the breadcrumb mixture until it’s breaded on all sides. Set aside and repeat until all cubes have been breaded. Reserve the marinade mixture if you want to make a coconut drizzle.

- Once all of your tempeh has been breaded you can cook it 1 of 2 ways. The first way being to fry them. If you have a deep fryer just pop them in there for a few minutes until they’re golden brown. Then remove them and drain on a plate lined with paper towels. If you don’t have a deep fryer you can fry them in about a ½ cup of coconut oil or nuteral vegetable oil in a large frying pan, until golden brown. If however you’re like me and like to try and keep on the healthier side of things you can bake your coconut tempeh in the oven.

- Preheat your oven to 400'F (200'C) lightly grease a baking sheet then place your tempeh cubes on it. Spray the top of each cube with a tiny bit of non-stick spray then place in the oven and bake for 15 minutes. Remove from the oven turn each cube over and return to the oven to cook for another 10-15 minutes. Make sure to keep an eye on them so they don’t burn. Smaller cubes will cook faster and larger cubes will take longer so times may vary.

- While your tempeh is cooking you can work on your plantains. Grab 3 large, green plantains. Cut off the ends and peel. I find the easiest way to be running the tip of a knife down two sides then just dig in with my nail and roll the peel off.

- Once the peel has been removed take a vegetable peeler and run it along the plantains like you would to peel a carrot. You’ll get nice long thin strips of plantain, continue until all plantains have been turned into strips. You’ll probably be left with a core of plantain that your peeler can’t turn into strips, and that’s okay just cut it into thin rounds and toss it in with the strips. Waste not want not right?

- Heat the coconut oil in a large frying pan over high heat. Once melted add the plantains and stir until all strips are coated. Add in the cinnamon, sugar and Cajun Seasoning. Stir again until thoroughly coated and then cook on medium heat until plantains are golden brown and soft. About 8-10 minutes. Make sure to stir frequently so no plantains stick to the bottom, and you may need to add more oil, or water. I added in about a 1/4 of water because I didn’t want to use more oil, and it worked brilliantly. When plantains are finished remove them from the heat and if you like you can drain them on a paper towel. I personally didn’t bother draining them.

- To make your collards just add an inch of water into a pot fitted with a steamer basket. Add your chopped up collards and steam for 3-5 minutes until they’re bright green and wilted. They shouldn’t be mushy but soft, with still a bit of texture. Remove them immediately from the steamer basket and place onto a plate or in a bowl.

- To make the coconut drizzle all you have to do is stir 1-2 packets of stevia into the reserved coconut marinade along with 1-2 tbsp flaked coconut. Set aside, until ready to use.

- To assemble your taco place one tortilla on a plate. Layer on some collard greens and then a generous spoonful of shredded plantains. Top with 4-5 cubes of coconut tempeh, and a bit of coconut milk drizzle. Top with diced green onion, avocado, and a generous spoonful or two of roasted vegetable mango salsa. Wrap up tight and enjoy!


*** Note - This dish can be made Gluten-Free if using Corn Tortilla's and GF Breadcrumbs***

Friday, August 19, 2011

Coconut Lime Curried Greens Over Volcano Rice...


As I mentioned the other day we really should be making leafy greens a significant part of our daily food consumption, so I’ve been experimenting all week with interesting and exciting ways to jazz them up. Personally I don’t mind greens served relatively plain with a bit of garlic, lemon juice, olive oil and salt and pepper, but I know most people are looking for a bit more of a kick for the old tastebuds. So this is what I came up with last night for dinner and I think it more then serves the purpose of delivering a creative new way to eat greens. It’s got a wonderful blend of Asian flavor, and is completely oil-free, which you gotta love right?


Coconut Lime Curried Greens Over Volcano Rice

Greens

1 Bunch Kale
½ Bunch Collards
1 red pepper medium dice
1 yellow onion medium dice
1 cup frozen peas
8-10 cloves garlic crushed
Vegetable broth to saute
Small handful basil leaves torn
Sea salt and black pepper

Coconut Lime Curry Sauce

1 can coconut milk plus a little water - slightly less then 1/4 cup water
1 tbsp lime juice
1 packet stevia (Optional - to taste)
1-2 heaping tbsp Thai red curry paste (To taste)
½ tbsp kaffir lime leaves minced (Optional)

Volcano Rice

1 ½-3/4 C Volcano Rice (Depending on how hungry you are)
2 - 2 1/4C Vegetable broth or water (Depending on the amount of rice)

- To make Rice add broth and rice to rice cooker and follow manufacturer’s directions. If you don’t own a rice cooker, cook as package directs.

- While rice is cooking, saute onions, red pepper, and garlic in a few tbsp of vegetable broth over medium heat. Until onions are translucent and peppers are soft. About 7-10 minutes.

- Add in your cooked greens and stir to coat with broth, and vegetables. Place lid over pan and cook on medium/medium-low heat stirring occasionally about 10 minutes.

- While greens are cooking make your marinade. Whisk together Coconut milk, lime juice, curry paste, stevia, water and lime leaves. Taste for seasoning and adjust as needed. If you like a bit more heat add more curry paste. Also you can use either red, green or yellow curry paste. I just prefer red. If you don’t have stevia you can use another sweetener of choice. Agave, brown sugar, granulated cane sugar etc...

- After 10 minutes your greens should have decreased in size and broken down a bit. Add your coconut milk mixture along with your torn basil leaves, sea salt and black pepper. Let boil, the reduce to simmer about 5 minutes. Add in frozen peas and simmer roughly 5 minutes longer.


- Serve coconut greens over rice and enjoy.

*** Note - Volcano rice is a product made by Lotus Foods http://www.lotusfoods.com/Volcano-Rice/p/LOT-503219&c=LotusFoods@SRI packed with minerals and antioxidants. It’s delicious, and has a mild flavor but if you can’t find it or don’t want to go searching for it you can just use regular brown rice. Also as for the greens you can use any kind you have on hand. I prefer kale and collards for this dish, but you can do all kale, or all collards or throw in some chard, whatever you want, don’t be afraid to be creative.***

Wednesday, August 17, 2011

Sweet Smokey Miso Collards with Pickled Ginger...


Greens are amazing, everyone should know that by now and if you don’t it’s time for you to wake up. Dark leafy green vegetables are one of the most vital, healthful foods we can eat, in fact calorie for calorie they are the most nutrient dense foods on the planet! They are absolutely loaded with essential vitamins and minerals, and have been shown to have anti-cancer benefits as well as cholesterol lowering properties. Collards in particular really rock out at the top of the list. 1 cup of cooked collards contains a mere 49 calories! Yet it also packs 880% of your daily vitamin K, 118% of vitamin A, 57% of vitamin C, 53% of manganese, 45% of your Folate, nearly 25% of your Calcium, 20% Fiber, 15% Potassium, nearly 15% Vitamin B6, & B2, 10% Protein, Vitamin E, and Omega-3 fatty acids and roughly 8% of your daily Iron. That’s all in just ONE cup! Incredible right? And people wonder where Vegans and Vegetarians get our nutrients from!

Now I know what you’re thinking. You’re thinking "But collards are boring, they’re bland etc..." but you couldn’t be more wrong. I truly believe that culturally we have such a negative opinion of greens, because we’ve never really eaten them cooked properly. All to often our parents either undercooked and under seasoned our greens so that they were tough and bland. Or worse, they overcooked our greens, boiled them down until they were a watery slimy mush. Definitely not appetizing. However when greens are cooked properly and seasoned well, they are the most scrumptious thing, and the more you eat them the more you’ll crave them. The other fantastic thing about them is that they’re quick and easy to cook. At most they take about 10 minutes, and who doesn’t like that?


I know the other big problem with greens is trying to find inventive ways to incorporate them into our diets daily. Ideally we should be eating some kind of dark leafy green each day, though I know most of us don’t. I too occasionally slip into a pattern of neglecting my greens, and in all honesty when I don’t eat them regularly I start to feel a bit sluggish. The past month in particular I’ve been neglecting them, but over the past few days I’ve been back on track.

The following recipe I whipped up for lunch today, and man was it good. Seriously the flavors mingled so well, that the dish exceeded all expectations. So give it a try. Introduce your tastebuds to a new way of thinking about greens and I promise you will fall in love.


Sweet Smokey Miso Collards with Pickled Ginger

For the Collards

1 ½ - 2 Bunches Collard Greens chopped into bite size pieces, large ribs removed
1-2 tsp Sesame Oil
1 Large Yellow Onion chopped
8-10 Garlic Cloves minced (or to taste)

For the Sauce

1/2C Water (or more or less to taste)
2 Tbsp Mellow White Miso
1 Tbsp Agave (or to taste)
1-2 tsp Liquid Smoke (or to taste)
Dash of black pepper

1 Tbsp Lemon Juice
2 tbsp pickled ginger (or to taste) (Optional but highly recommended)

- Place sesame oil into a large pan and heat to medium.

- Mince garlic, chop onions and add to the heated pan. Saute, stirring occasionally to avoid sticking, until onions are soft and translucent. About 7-10 minutes.

- While onions and garlic are sauteeing, chop your collards. I find the easiest way is to run my knife down one side of the rib until I have a huge piece, then do the same along the other side of the rib so that the rib is removed but all the leaf is intact. Then I fold the halves, slice them in half lengthwise once, and then cross-wise into bite sized pieces. When done set your chopped collards aside.

- To make your dressing whisk together the water, white miso, liquid smoke, black pepper, and agave nectar. Taste for flavor and adjust as needed. Though with the liquid smoke I suggest adding it in 1 tsp at a time, and once you’ve reached 2 tsp add it in at a 1/4 - 1/2tsp increments.

- When onions and garlic are ready add the collards to the pan. Mix until evenly coated with oil, garlic and onion then cover and let cook for 2-3 minutes. Then add in your sauce stirring to evenly coat and cook another 3 minutes. You want your collards to decrease in size slightly and break down a bit. You want them to be soft, with just a hint of firmness to them. You don’t want them to be chewy or mushy. If after a total of 6 minutes your collards still aren’t quite there give them another 2 minutes.

- When collards are cooked, add the 1 tbsp lemon juice and stir to mix. It’ll really make the flavor pop, and brighten up the greens a bit. Then distribute evenly amongst 2 plates. (Or pile one plate super high) and add in the ginger. About 1 tbsp sliced pickled ginger per serving, or more or less to taste. This is entirely optional but super delicious. It gives the collards a little something extra, a nice sweet gingery bite.


Enjoy as part of your main course, a first course, or a side dish.