Monday, January 23, 2012
Garden Veggie Miso Soup...
I was inspired to make this soup last month when I was really in the mood for some miso soup but didn’t have any seaweed, or tofu on hand, and frankly wasn’t interested in eating either that particular night anyway. What I really wanted was something light, colorful, and warm yet not necessarily ‘cooked.’ Scanning the fridge I realized I was running low on groceries, but what I did have was just enough to make a delicious, healthful, and surprisingly hearty soup. Everything about this soup screams Spring to me, but really I think it’s perfect anytime of year, and the great thing about it is that you can have it done and on the table in 25-30 minutes. Using some frozen vegetables helps make the soup come together fast, and slicing the veggies thin or grating them helps them soften while simmering without needing to cook or boil them to death, so you retain more nutrition. Who doesn’t love that? This soup can also conveniently be made in a large batch and stored in the fridge for a couple of days for easy access to a nice healthy meal at lunch or dinner, on days when you might not have as much time to cook as you’d like. The first time I made this soup I served it with a simple salad, last night I served it with some hand-rolled sushi, but this soup can just as easily be enjoyed on it’s own. I really do love the combination of miso with the sweetness of peas, and the crispness of broccoli... Mm... mm... Try it for yourself and see!
Garden Veggie Miso Soup
1 Large Carrot Grated
2 Small Zucchini cut in half moons or 1 large cut in quarters
1 bunch green onion chopped (green part only)
1 C Frozen Green Peas
Frozen Broccoli to taste (Couple handfuls)
Garlic Powder, Ginger Powder and Black Pepper to taste
1/4-2/3 C Mellow White Miso
3-5 C Water
- Whisk together the Miso and Water in a medium sized pot until dissolved. Turn the heat onto medium and bring to a simmer.
- Add in all of your veggies, and season to taste with garlic powder, ginger powder and black pepper.
- Simmer for 20-25 minutes until veggies are tender but still crisp. Do not bring to a boil. If over medium heat the soup starts bubbling too heavily reduce the heat to low and finish simmering. You want the veggies to be soft, but not cooked all the way though, you don’t want them to be boiled to death and mushy. You want texture and a nice bite.
- Serve with homemade hand-rolled sushi, Summer or Spring Rolls, or a salad, and enjoy.
*** Note - If you have fresh garlic and ginger feel free to finely mince or grate them and use it instead of powdered. I didn’t have fresh on hand, otherwise I would have used it. Also keep in mind that the amount of miso you want to use will be dependant on your personal taste preference. I like a medium flavored miso broth, not weak, and not too overpowering. Usually 1/4-1/2C is good for 3-4 C of water, and ½-2/3 C is good for 4-5 C of water, depending on your taste. You can also use any color miso you want, but remember that darker shades of miso have a more pungent flavor and so less will be required. White miso is personally my favorite because I find it to be the most versatile. But feel free to experiment ***
Labels:
Broccoli,
Carrots,
Gluten-Free,
Green Onions,
Low-Fat,
Miso,
Oil-Free,
Peas,
Soup,
Sugar-Free,
Zucchini
Friday, January 20, 2012
'Healthy At 100: How you can - at any age - Dramatically Increase Your Life Span and Your Health Span' by John Robbins
"The myths and stereotypes we have about old age are so deeply entrenched in American society that they can insinuate themselves into our psyches without our ever knowing what they are. It is difficult to escape the messages that our culture sends about the aging process. From birthday cards that decry the advance of age to the widespread use of demeaning language about the elderly - ("geezer" "old fogey" "Old Maid" "Dirty old man" "old Goat" etc.) to the lack of positive images of the elderly in ads and on television programs, each of us is continually imbued with feelings of aversion to those who are old." - John Robbins - 'Healthy at 100'
"I do take heart though from the fact that modern western culture is not the only way people can live, and it’s prevailing assumptions are not the only way people can think" - John Robbins - 'Healthy at 100'
I am a big fan of John Robbins. Both "Diet For a New America" and "Food Revolution" are brilliant pieces of literature that are extremely well researched. Robbins is definitely one of the leading voices in both the health and vegan community. So when I discovered his book "Healthy at 100: How you can - at any age - Dramatically Increase Your Life Span and Your Health Span" I was very eager to read it. The name alone caught my attention, Healthy at 100 is a concept that for most of us I think seems unrealistic. However I don’t think it’s all that crazy to imagine myself as a healthy centenarian, in full control of all of my faculties and fully capable of enjoying the life I’ve always had.
For most people in the western world however the words ‘old age’ are synonymous with decline. We live in a society that treasures youth and beauty, and feels disgusted by age. We live in a culture that perpetuates ageist stereotypes, such as old people unable to do anything for themselves. We consider it normal to continue to rapidly decline as we get older, when in fact this doesn’t have to be the case. Many of us - young people in particular - view aging as a fate worse then death, and we shouldn’t.
In his book John Robbins lays to rest many of the ageist stereotypes that we’ve always grown up with. He points out the ridiculousness of how we perceive age and aging and debunks many common myths surrounding old age. However he also points out that the tragedy of our culture here in the west is our complete lack of respect for the aged, and our total compliance in allowing ourselves to decline as we age simply because it’s ‘what’s always been.’ It was these parts of the book that I found particularly interesting because here he explores the psychology behind how the average westerner sees aging compared to how aging is viewed in other cultures around the world. In many cultures spanning the glob from South America all the way to Asia it’s true that the older you are the more respect you receive. Age is seen as a triumph and a virtue, and the elderly in these cultures are revered, they would never consider themselves somehow incapable simply because they are ‘old.’
"The consequences of ageism are similar to those associated with discrimination against other groups. People who are subjected to prejudice and intolerance often internalize the dominant groups negative image and then behave in ways that conform to their negative image. Thus older people often hold ageist views about their contemporaries, about those who are slightly older then they are, and even about their own worth" - John Robbins 'Healthy at 100'
In addition to debunking the myths of age, Robbins focus’s the book on four very different cultures credited with producing the worlds healthiest oldest people, deeply exploring just how exactly these cultures have been able to remain in perfect health even at an advanced age, often exceeding 100. Those he focuses on are the Abkhasians in the Caucasus south of Russia, the Vilcabambans in the South American Andes, the Hunzans of Pakistan, and the Japanese of Okinawa. Through his extensive research of these varying cultures Robbins discovers that they all have something in common. Diet, Lifestyle and Attitude.
All four of these cultures consume diets of whole foods, no processed fair and their diets are for the most part plant-based. Containing little to no meat, and little to no dairy products. Their traditional diets are also relatively low in sugar, salt, fat, and oil, and consist almost entirely of vegetation that is both local and seasonal. Their lifestyles are also very active. While they may not engage in rigorous exercise regimes like we do here in the west, they are active in many other ways. People in these cultures walk a lot, they participate in communal work, organization, and farming. They work in their own personal gardens, play with their children and regularly engage in outdoor activity. Many people from these cultures would think nothing of walking 2 miles just to visit a friend. As far as their attitude goes they perceive aging as a happy process. They look forward to their golden years rather then dread them as people in western cultures do. They also have strong familial bonds and have lifelong connections with friends. They suffer less stress, and it’s not because they’re lives are less difficult, it’s because they take a positive attitude towards life, and tend not to fret about things that are out of their control. Stress and loneliness in Robbins opinion - and I’m inclined to agree - can kill a person just as quickly as smoking or an unhealthy diet.
"From our culture we learn what is expected of us, and to a considerable extent we then often conform to those expectations. When the prevailing image of aging expects older people to be asexual, intellectually rigid, forgetful, and invisible many elderly people will take on these characteristics even though doing so may run counter to the way they had previously lived their lives." - John Robbins ' 'Healthy at 100'
I not only found the chapters concerning these cultures completely captivating but also inspiring and uplifting. Here in the west we have so few positive association with age that it was great to be able to read about people in their 90's, or early 100's walking, running, and/or hiking miles per day. To read about 90 and 100 year olds still happily working either in their community or at actual jobs is inspiring. This is not something we see in North America. If people in our society even make it to 90 they are very often immobile and in nursing homes, hell it’s more and more common in our culture these days to see people in their 70's in that state. We consider the 90 year old grandma that lives on her own, and walks everyday to the grocery store an exception to the rule in our society when in fact - as is proven by these cultures - it should be the rule!
Through this book John Robbins has shown that getting older doesn’t have to be scary or something to dread, but rather it should be viewed upon as an opportunity. An opportunity to educate others and to show people that age doesn’t have to mean decline if you don’t want it to. Through this book Robbins imparts on us the tools we need to live healthy, joyous lives of meaning and longevity. With an emphasis on a simple whole foods diet, a manageable daily exercise routine, the cultivation of strong loving personal relationships and a positive attitude and outlook. With this book as our guide we can easily make our later years a period of wisdom, vitality, and happiness. We can at any age be productive members of society and our community, and we do not have to fall into the death trap of ageist stereotypes simply because that’s how it’s always been for us.
"Ageism represents a prejudice against a group that all people will inevitably join if they live long enough. As a result an ideology that equates aging with deterioration steals hope from everyone and from every stage of our lives" - John Robbins - 'Healthy at 100'
I highly recommend this book, as much for it’s well researched information as for it’s efforts to shift the cultural norms and common perceptions of aging.
"It remains an indisputable fact that in Hunzans as in Abkhasians and Vilcabambans, a large proportion of elder citizens have retained their faculties, remained vigorous and enjoyed life right up until only weeks or months before their deaths. It is an established fact that the elderly in each of these regions have had extremely low rates of heart disease, cancer, obesity, arthritis, asthma, dementia and the other degenerative infirmities that plague so many older people in the west. It is a fact that they have remained for the most part remarkably fit and active as they age" - John Robbins - 'Healthy at 100'
*** Note - Image found using Google Image search***
Thursday, January 19, 2012
Iron - The Truth About Iron and Iron Deficiency....
If you’re a vegetarian or a vegan chances are you’ve been asked about Iron. Next to protein and calcium, iron is one of the biggest nutrients that non-vegetarians always seem concerned about. Not for themselves mind you, but for you. How do you get your iron? Where do you get your iron? Aren’t you worried about becoming anemic? These questions get asked over and over again and sometimes they’re coupled with comments such as, "I tried vegetarian for a while but had to stop because I became anemic." or "I had a friend who was vegetarian who had to go back to meat because she was anemic." Statements like these continue to perpetuate the myths that the diet of vegetarians is in some way lacking, difficult to manage, or that vegetarians are simply incapable of receiving proper nutrition through a healthful plant-based diet. All of which are entirely untrue.
I don’t know what it is about our culture but so often it seems that we end up hearing one ‘fact’ from one person, who may or may not have any actual authority on the matter and then stick to it like it’s gospel. Somewhere along the line it seems like we dropped the ball on asking questions and doing research for ourselves. It’s this lack of education that keeps these myths alive. So since I’ve already dispelled the common myths surrounding protein, and calcium I thought it pertinent to do the same for Iron. The information you’ll find in this post I think will be helpful for a wide range of people regardless of your dietary orientation, and you’ll see why in a moment.
Iron of course is one of the essential minerals needed to sustain most of earth’s life forms (both human and non human) and is required for normal human physiology. The majority of iron in the body is found in the hemoglobin, the protein in red blood cells that carries oxygen to your tissues. It’s also essential for regulation of cell growth.
There are two different types of iron problems that effect humans. Iron deficiency - which is described as low iron stores typically measured by a serum ferritin level of less then 18ng/ml (nanograms per milliliter) and Iron Deficiency Anemia. IDA symptoms include pale skin, brittle fingernails, hair loss, fatigue, weakness, difficulty breathing upon exertion, inadequate temperature regulation, and loss of appetite. Many of these are symptoms of other nutritional deficiencies and diseases and therefor only a medical doctor can properly and accurately diagnose IDA.
Iron deficiency is the most common nutrient deficiency Worldwide and in the United States. Iron deficiency effects people of all backgrounds, races, economic status, and dietary choices. Meaning iron deficiency effects vegetarians, vegans and non-vegetarians almost equally. Though people often show ‘concern’ for the iron levels of vegetarians the truth is iron deficiency is not about vegetarians not getting the proper nutrition while non-vegetarians are getting the proper nutrition, it’s a case of everyone needing to make sure they are receiving the proper nutrition from their diet, regardless of their dietary choices. In fact studies have shown that healthful vegetarian - and particularly vegan - diets contain higher or equal amounts of dietary iron then that of non-vegetarians. Why is it that vegetarians/vegans have more iron in their diets then non-vegetarians? The answer is simple, not only does virtually everything a vegetarian eats contain some level of iron but also vegetarians simply consume more fruits and vegetables. Why is this important? Because of vitamin C. Studies show that vegetarians consume up to 50% more vitamin C then non-vegetarians and consuming vitamin C at the same time you are consuming iron rich foods makes the iron more bioavailable to the body.
When it comes to iron there are two types available through our diet. Heme iron which comes from animal products, and nonheme iron which comes both from plants and animal products. While heme iron is considered more easily absorbable, it is not superior. Once the iron has been absorbed into the body and has reached our cells to be used in building hemoglobin and other purposes the body doesn’t care where the iron originated from and whether or not it was heme or nonheme. It’s also important to note that some studies suggest that heme iron from red meat has effects which may increase the likelihood of colorectal cancer. Which brings us to the next point.
While there is such a thing as iron deficiency, there is also such a thing as iron overabundance. Iron you see is tightly regulated by the human body which has no regulated physiological means of excreting excess iron. Excluding incidences of blood loss due to injury or menstruation, the amount of iron lost daily due to mucosal and skin epithelial cells sloughing is very, very small. Large amounts of ingested iron can cause excessive levels of iron in the blood. High blood levels of free ferrous iron react with peroxides to produce free radicals which are highly reactive and can damage DNA, proteins, lipids and other cellular compounds; thus iron toxicity occurs when there is free iron in the cells, which occurs when iron levels exceed the capacity of trasferrin to bind the iron. Damage to the cells of the gastrointestinal tract can also prevent regulation of iron absorption leading to further increases in blood levels.
Iron overload is serious and is particularly damaging to the cells in the heart and liver, as well as the pancreas, and spleen. It can cause significant adverse effects such as various types of cancer, coma, metabolic acidosis, shock, liver failure, coagulopathy, adult repertory disease syndrom, long term organ damage, osteoporosis, diabetes, hyperthyroidism, and death. Excess iron has also been linked to diseases like Parkinson’s, and Alzheimer’s, as it was found that an excess of iron had accumulated in the hippocampus section of the brains of those with Alzheimer’s, and the substantia nigra of patients with Parkinson’s. Iron overload can also accelerate the effects and symptoms of Alzheimer’s, Parkinson’s, MS, and Epilepsy. Not very fun stuff, and while you certainly don’t want to mess around with anemia either, recent studies have shown that low iron stores may not necessarily be a bad thing.
While healthy vegetarians are no more susceptible to iron deficiency then non-vegetarians, it is documented that most adult vegetarians have iron stores that are on the lower end of normal. In addition to not being put at a higher risk for the above mentioned diseases caused by or linked to iron overload, low iron stores are also associated with a higher glucose tolerance which may help prevent diabetes.
Those at the highest risk for iron deficiency (vegetarian or non-vegetarian) are woman of childbearing age (menstruating woman) pregnant or breast feeding woman, children and the elderly. You do not need to worry about iron if you are otherwise healthy and eat a varied vegan or vegetarian diet. Of course if you are worried about iron absorption there are steps you can take to increase the bioavailability of iron in your body. Increase the amount of beans and legumes in your diet, and just as vitamin C helps with iron absorption there are many things that can also inhibit iron absorption. Coffee and tea are two of the biggest culprits as the tannins within them work to block the absorption of iron into the body. It is not recommenced that you drink either of these beverages while eating iron rich meals, particularly if your goal is to increase absorption. Taking calcium supplements with meals can also decrease the amount of iron absorption as well as eating dairy products including eggs, chocolate, and taking Aspirin, and antacids. Drinking alcohol with meals or over abuse of alcohol, narcotics, or prescription medications can all impair iron absorption. It is wise to remove these things from meals, and make sure to eat your iron rich foods with foods rich in vitamin C such as lemon, lime, tomato, oranges etc... Of course if your concerns persist you should have a doctor measure your iron stores, which is a quick and easy thing to do. In fact I recommend having a full blood test done at least once a year just to ensure that you are getting adequate nutrition. That’s what I do, and it gives me peace of mine and the confidence to defend my diet when others may criticize it.
Part of the reason the myths surrounding vegetarianism and iron deficiency continue to persist despite evidence to the contrary is that an overwhelming amount of people self-diagnose themselves as being anemic. All too often when people first transition to a vegetarian diet they automatically assume they’ve become anemic if they begin to feel tired or fatigued. However their feeling tired could be the result of a number of things such as not eating enough calories or protein, eating too many high-sugar foods, or even not getting enough sleep. However rather then dig into the real reasons for why they may be feeling the way they are people tend to jump to what they consider to be the most logical conclusion. Since these myths about iron continue to persist that ‘logical conclusion’ is usually ‘anemia’. Some people may also base this judgment on the suggestion of family or friends who automatically jump to that conclusion as well, without having any of the actual facts. As stated before the only way to know for sure if you have iron deficiency anemia is to be diagnosed by a doctor.
There is some evidence that iron absorption may be more of a problem when a person first becomes vegetarian, because long-term studies of vegetarian woman have not shown high drop off iron rates. Physiologically it makes some sense that the problem would show up right away or not at all for the following reason: The body secretes transferrin into the digestive tract when iron stores are low in order to increase absorption into the blood. If someone has been a meat eater all their life, their body has not had a need to manufacture as much transferrin as they may now need as a vegetarian. This might cause a quick initial drop in iron absorption after first becoming vegetarian. As the person’s body adjusts to the new diet and lifestyle it may become more efficient at producing the appropriate amount of transferrin over time. However if a person becomes anemic or iron deficient right away they will likely quit the diet without giving their body a chance to acclimate to the new lifestyle. More evidence to support this theory is that children who were vegan from birth, and otherwise well-nourished and living in developed countries, are not known to have developed Iron deficiency Anemia. Since vegan infants have no prior history of depending on heme iron, they begin their lives efficiently absorbing nonheme iron and retain this ability throughout life.
If you do become anemic after switching to a vegan or vegetarian diet, this is easy to fix with iron supplements. Of course make sure to get diagnosed by your doctor first, and then talk about supplementation with him/her before self dosing. Your doctor may tell you to start eating meat again if he/she finds you to be anemic, this is a common response when doctors encounter anemic vegetarians yet it is a ridiculous one that doesn’t make any sense. After all iron deficiency and anemia in non-vegetarians is not simply treated by having the meat-eater, ‘eat more meat’ they are treated through iron supplements, and vegetarians or vegans can also be easily treated this way. However it is important to note that unless a deficiency or enhanced need exists, iron should not be supplemented, particularly in males, and postmenopausal woman who are no longer menstruating regularly, as iron is an oxidant and over abundance of it can lead to increased risk for many diseases as well as toxicity as described in the paragraphs above.
As you can see iron deficiency and iron deficiency anemia is not the disastrous and un-treatable boogeyman most people make it out to be. A lot of the fear and hype is overblown, and there is some very good evidence for why a lower (within reason) iron store may be more beneficial then a higher one. To say vegetarians or vegans are more susceptible to iron deficiency or anemia simply because thy don’t eat meat isn’t only ludicrous it’s simply not true. Statements such as those have absolutely no basis in fact, and are built off of propaganda, and myth designed to discredit a vegetarian diet, or to simply justify and excuse a non-vegetarian one. The perpetuation of these inaccuracies not only due us all a disservice but they are particularly harmful to those of us who want to continue on the vegan or vegetarian path for moral, ethical, environmental or health reasons, and are told we should not. All too often otherwise dedicated vegetarians are swayed back to eating meat by these myths, particularly when informed of them by an authority figure, not knowing any better they may feel forced to switch back despite their resistence to do so. This is something I know from personal experience, as it was the reason I shifted back to eating meat after just over a year of vegetarianism when I was in my teens. I also know non-vegetarians are equally plagued by iron deficiency anemia from personal experience as I’ve had two non-vegetarian friends diagnosed as anemic despite their constantly gorging themselves on red meat.
So now that you have all the information you may be wondering what some iron rich foods are. That’s the easy and delicious part! Beans particularly white beans, pinto, soybeans and chickpeas are an excellent source of iron, as are all lentils. Nuts and seeds, particularly pumpkin seeds are a great source of iron, as are whole grains. Especially barley, quinoa, and oatmeal. Blackstrap Molasses also contains a good deal of iron, as do Sea Vegetables (Seaweeds) and tofu. Dried fruits such as apricots, figs and raisons are all excellent sources as well, and of course last but not least greens. Lots and lots of greens such as spinach, Swiss Chard, Kale, Collards, Broccoli, asparagus, green beans, peas, bok choy and Brussels Sprouts. Potatoes and mushrooms are also a decent source of iron. As you can see, given you’re eating a variety of whole plant foods not processed junk your diet should be rich in iron, and of course it’s also an option to buy iron fortified cereals, and non-dairy milks as well. For extra insurance. Don’t ever let anyone tell you, your diet is nutritionally inferior!
I don’t know what it is about our culture but so often it seems that we end up hearing one ‘fact’ from one person, who may or may not have any actual authority on the matter and then stick to it like it’s gospel. Somewhere along the line it seems like we dropped the ball on asking questions and doing research for ourselves. It’s this lack of education that keeps these myths alive. So since I’ve already dispelled the common myths surrounding protein, and calcium I thought it pertinent to do the same for Iron. The information you’ll find in this post I think will be helpful for a wide range of people regardless of your dietary orientation, and you’ll see why in a moment.
Iron of course is one of the essential minerals needed to sustain most of earth’s life forms (both human and non human) and is required for normal human physiology. The majority of iron in the body is found in the hemoglobin, the protein in red blood cells that carries oxygen to your tissues. It’s also essential for regulation of cell growth.
There are two different types of iron problems that effect humans. Iron deficiency - which is described as low iron stores typically measured by a serum ferritin level of less then 18ng/ml (nanograms per milliliter) and Iron Deficiency Anemia. IDA symptoms include pale skin, brittle fingernails, hair loss, fatigue, weakness, difficulty breathing upon exertion, inadequate temperature regulation, and loss of appetite. Many of these are symptoms of other nutritional deficiencies and diseases and therefor only a medical doctor can properly and accurately diagnose IDA.
Iron deficiency is the most common nutrient deficiency Worldwide and in the United States. Iron deficiency effects people of all backgrounds, races, economic status, and dietary choices. Meaning iron deficiency effects vegetarians, vegans and non-vegetarians almost equally. Though people often show ‘concern’ for the iron levels of vegetarians the truth is iron deficiency is not about vegetarians not getting the proper nutrition while non-vegetarians are getting the proper nutrition, it’s a case of everyone needing to make sure they are receiving the proper nutrition from their diet, regardless of their dietary choices. In fact studies have shown that healthful vegetarian - and particularly vegan - diets contain higher or equal amounts of dietary iron then that of non-vegetarians. Why is it that vegetarians/vegans have more iron in their diets then non-vegetarians? The answer is simple, not only does virtually everything a vegetarian eats contain some level of iron but also vegetarians simply consume more fruits and vegetables. Why is this important? Because of vitamin C. Studies show that vegetarians consume up to 50% more vitamin C then non-vegetarians and consuming vitamin C at the same time you are consuming iron rich foods makes the iron more bioavailable to the body.
When it comes to iron there are two types available through our diet. Heme iron which comes from animal products, and nonheme iron which comes both from plants and animal products. While heme iron is considered more easily absorbable, it is not superior. Once the iron has been absorbed into the body and has reached our cells to be used in building hemoglobin and other purposes the body doesn’t care where the iron originated from and whether or not it was heme or nonheme. It’s also important to note that some studies suggest that heme iron from red meat has effects which may increase the likelihood of colorectal cancer. Which brings us to the next point.
While there is such a thing as iron deficiency, there is also such a thing as iron overabundance. Iron you see is tightly regulated by the human body which has no regulated physiological means of excreting excess iron. Excluding incidences of blood loss due to injury or menstruation, the amount of iron lost daily due to mucosal and skin epithelial cells sloughing is very, very small. Large amounts of ingested iron can cause excessive levels of iron in the blood. High blood levels of free ferrous iron react with peroxides to produce free radicals which are highly reactive and can damage DNA, proteins, lipids and other cellular compounds; thus iron toxicity occurs when there is free iron in the cells, which occurs when iron levels exceed the capacity of trasferrin to bind the iron. Damage to the cells of the gastrointestinal tract can also prevent regulation of iron absorption leading to further increases in blood levels.
Iron overload is serious and is particularly damaging to the cells in the heart and liver, as well as the pancreas, and spleen. It can cause significant adverse effects such as various types of cancer, coma, metabolic acidosis, shock, liver failure, coagulopathy, adult repertory disease syndrom, long term organ damage, osteoporosis, diabetes, hyperthyroidism, and death. Excess iron has also been linked to diseases like Parkinson’s, and Alzheimer’s, as it was found that an excess of iron had accumulated in the hippocampus section of the brains of those with Alzheimer’s, and the substantia nigra of patients with Parkinson’s. Iron overload can also accelerate the effects and symptoms of Alzheimer’s, Parkinson’s, MS, and Epilepsy. Not very fun stuff, and while you certainly don’t want to mess around with anemia either, recent studies have shown that low iron stores may not necessarily be a bad thing.
While healthy vegetarians are no more susceptible to iron deficiency then non-vegetarians, it is documented that most adult vegetarians have iron stores that are on the lower end of normal. In addition to not being put at a higher risk for the above mentioned diseases caused by or linked to iron overload, low iron stores are also associated with a higher glucose tolerance which may help prevent diabetes.
Those at the highest risk for iron deficiency (vegetarian or non-vegetarian) are woman of childbearing age (menstruating woman) pregnant or breast feeding woman, children and the elderly. You do not need to worry about iron if you are otherwise healthy and eat a varied vegan or vegetarian diet. Of course if you are worried about iron absorption there are steps you can take to increase the bioavailability of iron in your body. Increase the amount of beans and legumes in your diet, and just as vitamin C helps with iron absorption there are many things that can also inhibit iron absorption. Coffee and tea are two of the biggest culprits as the tannins within them work to block the absorption of iron into the body. It is not recommenced that you drink either of these beverages while eating iron rich meals, particularly if your goal is to increase absorption. Taking calcium supplements with meals can also decrease the amount of iron absorption as well as eating dairy products including eggs, chocolate, and taking Aspirin, and antacids. Drinking alcohol with meals or over abuse of alcohol, narcotics, or prescription medications can all impair iron absorption. It is wise to remove these things from meals, and make sure to eat your iron rich foods with foods rich in vitamin C such as lemon, lime, tomato, oranges etc... Of course if your concerns persist you should have a doctor measure your iron stores, which is a quick and easy thing to do. In fact I recommend having a full blood test done at least once a year just to ensure that you are getting adequate nutrition. That’s what I do, and it gives me peace of mine and the confidence to defend my diet when others may criticize it.
Part of the reason the myths surrounding vegetarianism and iron deficiency continue to persist despite evidence to the contrary is that an overwhelming amount of people self-diagnose themselves as being anemic. All too often when people first transition to a vegetarian diet they automatically assume they’ve become anemic if they begin to feel tired or fatigued. However their feeling tired could be the result of a number of things such as not eating enough calories or protein, eating too many high-sugar foods, or even not getting enough sleep. However rather then dig into the real reasons for why they may be feeling the way they are people tend to jump to what they consider to be the most logical conclusion. Since these myths about iron continue to persist that ‘logical conclusion’ is usually ‘anemia’. Some people may also base this judgment on the suggestion of family or friends who automatically jump to that conclusion as well, without having any of the actual facts. As stated before the only way to know for sure if you have iron deficiency anemia is to be diagnosed by a doctor.
There is some evidence that iron absorption may be more of a problem when a person first becomes vegetarian, because long-term studies of vegetarian woman have not shown high drop off iron rates. Physiologically it makes some sense that the problem would show up right away or not at all for the following reason: The body secretes transferrin into the digestive tract when iron stores are low in order to increase absorption into the blood. If someone has been a meat eater all their life, their body has not had a need to manufacture as much transferrin as they may now need as a vegetarian. This might cause a quick initial drop in iron absorption after first becoming vegetarian. As the person’s body adjusts to the new diet and lifestyle it may become more efficient at producing the appropriate amount of transferrin over time. However if a person becomes anemic or iron deficient right away they will likely quit the diet without giving their body a chance to acclimate to the new lifestyle. More evidence to support this theory is that children who were vegan from birth, and otherwise well-nourished and living in developed countries, are not known to have developed Iron deficiency Anemia. Since vegan infants have no prior history of depending on heme iron, they begin their lives efficiently absorbing nonheme iron and retain this ability throughout life.
If you do become anemic after switching to a vegan or vegetarian diet, this is easy to fix with iron supplements. Of course make sure to get diagnosed by your doctor first, and then talk about supplementation with him/her before self dosing. Your doctor may tell you to start eating meat again if he/she finds you to be anemic, this is a common response when doctors encounter anemic vegetarians yet it is a ridiculous one that doesn’t make any sense. After all iron deficiency and anemia in non-vegetarians is not simply treated by having the meat-eater, ‘eat more meat’ they are treated through iron supplements, and vegetarians or vegans can also be easily treated this way. However it is important to note that unless a deficiency or enhanced need exists, iron should not be supplemented, particularly in males, and postmenopausal woman who are no longer menstruating regularly, as iron is an oxidant and over abundance of it can lead to increased risk for many diseases as well as toxicity as described in the paragraphs above.
As you can see iron deficiency and iron deficiency anemia is not the disastrous and un-treatable boogeyman most people make it out to be. A lot of the fear and hype is overblown, and there is some very good evidence for why a lower (within reason) iron store may be more beneficial then a higher one. To say vegetarians or vegans are more susceptible to iron deficiency or anemia simply because thy don’t eat meat isn’t only ludicrous it’s simply not true. Statements such as those have absolutely no basis in fact, and are built off of propaganda, and myth designed to discredit a vegetarian diet, or to simply justify and excuse a non-vegetarian one. The perpetuation of these inaccuracies not only due us all a disservice but they are particularly harmful to those of us who want to continue on the vegan or vegetarian path for moral, ethical, environmental or health reasons, and are told we should not. All too often otherwise dedicated vegetarians are swayed back to eating meat by these myths, particularly when informed of them by an authority figure, not knowing any better they may feel forced to switch back despite their resistence to do so. This is something I know from personal experience, as it was the reason I shifted back to eating meat after just over a year of vegetarianism when I was in my teens. I also know non-vegetarians are equally plagued by iron deficiency anemia from personal experience as I’ve had two non-vegetarian friends diagnosed as anemic despite their constantly gorging themselves on red meat.
So now that you have all the information you may be wondering what some iron rich foods are. That’s the easy and delicious part! Beans particularly white beans, pinto, soybeans and chickpeas are an excellent source of iron, as are all lentils. Nuts and seeds, particularly pumpkin seeds are a great source of iron, as are whole grains. Especially barley, quinoa, and oatmeal. Blackstrap Molasses also contains a good deal of iron, as do Sea Vegetables (Seaweeds) and tofu. Dried fruits such as apricots, figs and raisons are all excellent sources as well, and of course last but not least greens. Lots and lots of greens such as spinach, Swiss Chard, Kale, Collards, Broccoli, asparagus, green beans, peas, bok choy and Brussels Sprouts. Potatoes and mushrooms are also a decent source of iron. As you can see, given you’re eating a variety of whole plant foods not processed junk your diet should be rich in iron, and of course it’s also an option to buy iron fortified cereals, and non-dairy milks as well. For extra insurance. Don’t ever let anyone tell you, your diet is nutritionally inferior!
Wednesday, January 18, 2012
Triple Tomato and Farro Soup...
Last week I bought a 3 pound bag of Farro. Over the past year I’ve come across a handful of recipes that call for it, and I’ve always been curious to try it. Yet somehow it just never came to pass. Then by chance while I was out grocery shopping I saw Costco had a huge bag of it for a relatively cheap price. I eagerly grabbed it up. Though I have a few recipes in which I could have first used this interesting grain, I decided to come up with one of my own. It’s been cold here lately, snow and icy wind, you know the typical Chicago winter, and so I wanted soup. Not just any soup mind you, but something hearty and tomato based. I was really craving tomatoes, and since I know tomatoes and rice go well together I thought why not Farro? Of course I also wanted to make this dish oil-free, relatively low-sodium, and low in fat, so after a bit of playing around this is what I came up with.
It turned out so much better then I initially expected, and though the picture doesn’t in anyway do it justice - remember that bad lighting in my kitchen? Well it really makes any food with a yellow, orange or red tint look ugly, - you will have to just trust me on this. This soup is pretty damn phenomenal and it really hits the spot on those long cold winter nights. It’s especially good if like me, you are an avid tomato lover. This soup is loaded with rich acidic tomatoey goodness, I couldn’t stop myself from eating two bowls, and my husband went back for thirds!
As for the Farro, never having had it before I wasn’t quite sure what to expect, or even if I’d like it, but that’s me, always taking a chance on food. I’m glad I did though, because I quite liked it. Farro has a consistency sort of like rice, but chewier, and the flavor reminds me of barley. I can’t wait to start experimenting more with it.
Triple Tomato and Farro Soup
1 Large Onion chopped
10 Cloves Garlic minced
1/4 C Vegetable Broth
2 C Carrot Juice ***
1 1/4- 1 ½ C Low-Sodium Vegetable Broth
½ C Red Lentils
1 28oz can Diced Tomatoes with Juice
6oz Tomato Paste with Italian Herbs
½ tsp Crushed Rosemary
½ tsp Smoked Paprika
1/8 tsp Saffron Threads
1 1/4 C cooked Farro ***
1 Tbsp Dried Basil
1 Tbsp Dried Oregano
2 Tbsp Lemon Juice
1/8 tsp White pepper (or to taste)
1 15oz can Stewed Sliced Tomatoes with Italian Herbs with Juice
1-2 Chopped and Seeded Fresh Tomato for Garnish (Optional)
- Combine Onion, Garlic and 1/4 C Vegetable Broth in pot on medium-high heat. Saute until fragrant and onions become translucent. Between 7-10 minutes.
- Meanwhile combine 1 1/4 Farro and 2 ½ C water in another pot on high heat. Bring to a boil, let boil for five minutes and reduce heat to medium and let simmer for 15-20 minutes. Cook farro till al dente and liquid is absorbed. If farro is cooked and not all liquid has been absorbed strain through a fine mesh sieve and set aside until ready to add it to the soup.
- Stir carrot juice, vegetable broth and red lentils into the pot with the onions and garlic. Bring to a boil and let boil for five to ten minutes. Add in diced tomatoes and tomato paste then reduce heat and let simmer for another 20-25 minutes until lentils are tender and are beginning to break down. Stir in rosemary, smoked paprika and saffron.
- Remove soup from heat and puree in a blender. If you prefer a chunkier consistency blend half, for a smoother texture blend the whole pot. Once blended return the soup to the pot on low heat, and stir in the cooked farro, basil, oregano, lemon juice, white pepper, and 15 oz can of sliced tomatoes. Simmer for 10 minutes or until farro and sliced tomatoes are heated through.
- Garnish with some chopped tomato, fresh chopped basil, or parsley and serve, perhaps with a slice of rustic gluten-free or gluten-full bread. Enjoy!
*** Note - Farro may not be easy for some people to find - I got mine at Costco, but the Whole Foods in my area also sells it - or it may be expensive in your area, if this is the case feel free to use rice instead. Also farro is a wheat product, if you are gluten-intolerant this soup can easily be made gluten-free by substituting brown rice or quinoa for the farro. ***
*** Note - I recommend using Organic Carrot Juice if it’s available to you. I also strongly recommend that you choose a commercial carrot juice that only contains carrots and perhaps water. There shouldn’t be any added sugar, sodium or anything like that. Boathouse Farms makes a good carrot juice if you can find it. Of course if you are lucky enough to have a juicer - I’m not - then you could simply juice your own! ***
Labels:
Basil,
Carrot Juice,
Farro,
Garlic,
Lemon,
Lentils,
Low-Fat,
Main Meal,
Oil-Free,
Onions,
Oregano,
Quick and Easy,
Rosemary,
Soup,
Soy-Free,
Sugar-Free,
Tomato
Tuesday, January 17, 2012
Baked Coconut Curry Sweet Potato Fries...
I made a really delicious tomato and farro soup for dinner last night, the recipe for which I was planning to post today. I am however in a bit of a time crunch, but since I don’t want to leave you empty handed so to speak I thought I’d share with you the absolutely to die for sweet potato fries I made last week.
If you’ve never had a sweet potato fry before - I don’t know how you couldn’t have, they’re amazing! - or you’re simply a sweet potato fry skeptic, - Do they really exist? - I urge you to try these out. They’re simply delicious, and a heck of a lot better for you then the typical French Fry. Not only are sweet potatoes so much healthier for you then the nutritionally dead white potato, but baking your fries instead of frying them is way more heart healthy, after all, all that oil isn’t doing any of us any favors right? Now I know, baking your fries doesn’t get them quite as crispy as frying them, but they do get crispy. Not quite as crispy is a small price to pay for your health I think. By the way you could always add a bit of cornstarch into the mix to coat the fires with, that usually helps the fries crisp up, I don’t think it’s necessary here but you could always try it.
As for this recipe I love coconut and I love curry, and those to flavors just so happen to go really well with sweet potatoes. Now there is a lot of controversy out there about coconuts, and coconut oil, is it really good for us? Or is it really bad for us? Honestly I don’t have the answer to that. My opinion on it is that it’s a plant food, a plant food who’s health benefits may out weight the few negatives. I look to the cultures that use coconut extensively in their cooking and see that study after study shows that they tend to have lower rates of heart disease then we do here in the west, but I can’t say with confidence that coconut oil is a health food or an evil food. So I treat it like most other things, moderation is important. I don’t eat it or use it everyday, and when I do use it I don’t overuse it, but I don’t stress about it either. However each of us has to make up our own mind about the foods we eat with the research we have available. If you don’t want to use coconut oil you could use organic peanut oil or another mild flavored vegetable oil, but it won’t be quite the same, and you can’t call them ‘coconut sweet potato fries’
Baked Coconut Curry Sweet Potato Fries
1 Tbsp Coconut Oil liquified
1 tsp Sweet Curry Powder
Sea salt to taste
2 Large Sweet Potatoes sliced into fry shapes
- To liquify the coconut oil just pop it into a glass bowl and microwave for a few seconds or put it in a pot on the stove over medium heat.
- Once liquified stir in your sweet curry powder. Add your sliced up sweet potatoes and toss until oil and curry have coated all of the fries. Sprinkle with a little sea salt then spread on a lined or lightly greased baking sheet.
- Bake at 400'F (204'C) for fifteen minutes. Remove from oven and flip over, return to oven and bake another fifteen to twenty minutes until fries are golden and firm on the outside but soft on the inside. Depending on your oven it make take up to forty-five minutes total so just make sure to check on them now and again.
Monday, January 16, 2012
Simple Massaged Kale Salad with Avocado Dressing...
I’ll be honest, I’m feeling pretty darn lazy today. Maybe it’s the weather, maybe it’s work, but I got up early this morning with the best intentions and an hour later I fell back asleep. After that the rest of the day was a mess, all I want to do is lay on the couch, snuggled up in a warm blanket and read.
However, the more I thought about it the more I realized that you should not have to suffer for my poor attitude today. Since the new year I’ve been trying to update Monday through Friday, and I’ve been succeeding. Last week I even posted twice on a couple of days, so I don’t want to ruin that trend now with one bad day.
Today’s recipe is rather simple, but it is also delicious, nutritious and doesn’t contain any added oil. This is a salad I made to serve alongside some leftover soup we ate Saturday night, it’s also a salad I often find myself eating while at work. It’s something I tend to gobble up at work when I’m hungry but looking for something that is oil, soy and wheat free. It always satisfies and serves as a great versatile template for any other additions you’d like to throw on top. I like to keep it simple, but to each their own
Simple Massaged Kale Salad with Avocado Dressing
1 Bunch Kale chopped into bite-sized pieces
1 Red Pepper cut into thin strips
2 Carrots gated
½ -1 Small Red Onion finely chopped
1-2 tomatoes seeded and chopped
3 Tbsp Lemon Juice
A very small amount of sea salt, 1-2 dashes at most
Black pepper to taste
½ Tbsp Maple Syrup (optional)
1 Large Avocado
1-2 Garlic Cloves to taste
Dash of smoked paprika
1-2 Tbsp Water as needed
- Place the kale in a large bowl and toss with 2 tbsp of lemon juice, sea salt, and black pepper. Massage with hands until the kale begins to break down and soften slightly. About 2-4 minutes.
- Add red onion, red pepper, tomato and carrots to the kale mixture and toss to combine.
- In Food processor blend together the avocado and garlic, and remaining tbsp of lemon juice. Depending on your food processor you may also need to add in 1-2 tbsp of water to get things moving. Blend until smooth.
- Scrape the avocado mixture onto the kale salad and using either your hands or a spoon mix the avocado into the salad. Making sure to really massage it into the leaves. Add a dash of paprika and taste for seasoning.
- If it’s a bit to tart for you, you can add the ½ Tbsp of Maple Syrup or if you’d prefer use 1-2 packets of stevia. Mix again to combine and serve. Delicious!!! Kale, if you didn’t know already is a favorite food of mine, and with good reason. Enjoy.
Labels:
Avocados,
Bell Pepper,
Carrots,
Garlic,
Gluten-Free,
Kale,
Lemon,
Low-Fat,
Oil-Free,
Onions,
Salad,
Soy-Free,
Sugar-Free,
Tomato
Friday, January 13, 2012
'The Beauty Detox Solution: Eat Your Way to Radiant Skin, Renewed Energy and the Body You’ve Always Wanted' by Kimberly Snyder, C.N.
"In order to become younger, many of ones habits must be changed. To do this constructively one can do it only with an open mind and with the wholehearted desire to see if it really works. A closed mind, a mind which has made it a practice to frown on radical changes in thought, habits and actions, is the greatest stumbling block towards any progress on the road to become younger. "
Dr. Norman Walker -Become Younger
This is another one of those books that - like "Crazy Sexy Diet" - I initially ignored because I thought it was just another fad diet book. Once again I was proven wrong, and I’m so glad that I decided to give this book a chance. Like the before mentioned CSD this isn’t a diet book, it’s a lifestyle book that focuses on bringing you to your optimal level of health through long term dietary and lifestyle changes.
After Christmas I was searching amazon for health and wellness books I hadn’t read yet, that I could spend some of my Christmas money on. In almost every search this book kept popping up. I continued to ignore it, until finally I decided to at least read the reviews. From those reviews I was able to gleam that this book was in fact about health, how to achieve it and sustain it through holistic measurers and a nutritious plant based diet. Strangely it happened to be the negative reviews that got me the most curious about reading this book. Some people seemed outraged by the books obvious vegan and raw lean, and many claimed that the advice offered within it’s pages was ‘unrealistic’ and ‘unaccessible to the average person’ after all that drama how could I not read the book? Luckily I found a copy of it collecting dust at my local library, took it home and devoured it.
The author Kimberly Snyder has an interesting story, and while she didn’t turn to veganism and raw food because she was battling an incurable disease she was fighting a grab bag of maladies that seem to plague a great majority of us. Battles with weight, poor complection and bad skin, lack of energy, poor digestion, constipation, indigestion, and more. By chance she came across an Australian holistic nutritionist - she was living in Australia at the time - who ran a holistic detox center and from there she was transformed. Giddy and impassioned by this new information Snyder realized that she was not truly living the life she wanted or was meant to. Within one week she quit her job, quit law school, dumped her boyfriend and broke her apartment lease. Instead she decided to take a trip around the world - that ended up lasting 3 years - in which she would study natural health and beauty, as well as holistic living in various remote communities across the glob. Upon her return she got jobs at beauty companies, and longevity centers to further her knowledge, became a certified clinical nutritionist and started her own business. This story in itself is amazing and inspiring, but the rest of the information within the book is certainly worth reading for all that it has to offer.
This book focuses on holistic healing, and healing oneself through diet and lifestyle changes. The book goes into great detail about why consuming massive quantities of meat and dairy products is toxic for our health, what symptoms and diseases they initiate and how they react in the body on a chemical level once ingested. There is a lot of really good solid information in this book about the PH balance of your body, how to attain a more alkaline ph as well as how to sustain it. Though the author herself is vegan she does not call for those interested in her plan to take an all or nothing approach. Her program Is very adaptable to all diets. Though one thing this book does advocates quite strongly is eating raw foods as often and as much as possible. Some people may be put off by that notion, however all the recipes in the book are super simple and easy, and don’t require any expensive equipment. - Except for a juicer but if you don’t have one - I don’t - then you can simply follow the plan by drinking a smoothie each day rather then a juice.
"The Problem is not that ageing is inevitable, it is that most of us don’t understand what causes it" - Kimberly Snyder, C.N. 'The Beauty Detox Solution"
In addition to PH Snyder talks a lot about food pairing which is a concept I find very interesting and I think makes a lot of sense. She says fruits should be eaten first and on their own as they digest the fastest, or they can be eaten with non-starchy high water content vegetables. She recommends eating proteins and Starches closer to the end of the day because they take longer to digest. The reason this order is important is because say you eat a bowl of rice and beans for dinner it is going to take a long time to break down in your body and digest. If you eat an apple after dinner for dessert, the apple will already be broken down and ready for digestion but it can’t be processed because your digestion is still working on the rice and beans. Which leaves the apple sitting on top of the rice and beans, in a state of fermentation. Which in turn causes bloating and gas. This is a really interesting concept, and I think it goes a long way in explaining how some of us may feel bloated after eating certain meals that are seemingly healthy. This isn’t something I’d ever heard of before so I really appreciate the chapters devoted to it. This is definitely a concept I’ve been trying to work into my daily meals and on days that I have done it I find my digestion is smoother.
Another concept she discusses in some length is the idea that we should eat light to heavy. Eat our lightest meal in the morning and our heaviest meal at night. Her rational for this is because eating a heavy meal in the morning will leave us feeling bogged down most of, if not all day, where as a heavy meal at night will digest over the course of our sleep. She also recommends starting the day off by drinking water with lemon, followed by a green juice or smoothie. No solid food early in the morning leaves are digestive enzymes free to repair other parts of the body that may need attention. Attention they might not get if our enzymes are once again busy breaking down yet more food.
There is an extensive amount of information on enzymes and probiotics and how they help to keep us not only healthy but looking young as well. I found the information on enzymes particularly fascinating and I’d recommend the book based solely on those chapters, but there are a lot of great ideas, concepts and principals discussed in the book that are at least worth knowing, even if you don’t practice them.
Snyder also includes lists of the best foods, minerals, and fats to eat for beauty. She includes a detox plan that has three levels depending on your comfort and how much you want to commit. Each level is suppose to be of some benefit to those interested in participating. She also includes a bunch of recipes. None of which I’ve tried yet, however they all look really delicious and I can’t wait to start making some of them!
"Detoxing ourselves by getting rid of old waste is key to allowing our digestion to function optimally" Kimberly Snyder, C.N. 'The Beauty Detox Solution"
As for the negative reviews I’ve read of this book, to say that this plan is unreasonable or unrealistic for the average person is ridiculous. None of the recipes require any heavy prep, nor do they require any strange ingredients or expensive kitchen tools to prepare them. - Except of course the before mentioned juicer but we discussed that. - Snyder’s whole idea is that we should eat healthfully, and simply using as few ingredients as possible as long as those ingredients are nutrient dense. While she does recommends colonics, or enemas, as well as taking probiotics and digestive enzyme supplements it is not an all or nothing deal. If you don’t want to get a colonic no one is putting a gun to your head. If you don’t want to go to your local health food store and buy a probiotic supplement then no one is forcing you. This plan is all on you, it’s at your own pace, at the level for which you feel comfortable and there is no judgement from Snyder about which road you wish to take. I think the people who post such negative reviews containing such ridiculous statements are really just after another fad diet book, in which they can continue eating the garbage they already eat, while making it look like they’re actually making significant change when they aren’t. If that’s you, if that’s what you’re looking for then forget this book.
On the other hand if you’re serious about grabbing the reigns of your health then you might want to consider giving this book a good and thorough read. It just might be the thing you’ve been looking for.
*** Note - Photo found using Google Image Search ***
Labels:
Book Review,
Detox,
Enzymes,
Health,
Nutrition,
Ph Balance,
Probiotics,
Raw,
Vegan
Thursday, January 12, 2012
Sesame Asparagus Maki...
Ah... see, yesterday I promised sushi and today I shall deliver it. I’ve been in a real sushi kind of mood lately, there’s something about that combination of brown rice and seaweed that’s got me jonesing bad - Sounds strange I know - but seriously it’s all I could think about last week. I made sushi twice, and this is one of the Maki’s I came up with. As I mentioned yesterday Asparagus sushi was always one of my favorites, and it’s been so long since I’ve had asparagus that I broke down and bought a bundle even though it’s not technically in season. - Very bad of me I know. - Though this Maki is kind of on the simpler side, it is super delicious either on it’s own or dipped lightly in soy sauce. It has a flavor and texture slightly reminiscent of a ‘traditional’ California Roll, which used to be me husband’s favorite. I’m proud to say that out of all the Maki I’ve ever made, in fact out of all the Maki he’s eaten, after eating this one he generously claimed that it was his new hands down favorite.
So, go ahead, and don’t be afraid to roll your own. It isn’t really that hard, and it’s not overly time consuming. You just need a little patience, and delicacy. If you can manage that, you can roll your own Maki and impress your family and friends by making them think you’re a super awesome sushi chef!
Sesame Asparagus Maki
1 ½ C Brown Rice
3 C water
1 Tbsp Granulated Cane Sugar
2 Tbsp Brown Rice Vinegar
1 lb Asparagus
4 Tbsp Sesame Seeds
4 Sheets Nori Seaweed
4 Tbsp Vegan Mayo
Wasabi paste to taste
Liquid Smoke to taste
- The quickest and easiest way to make sushi is to have everything prepared and ready to go. Meaning clean off a good sized work space. Have all your pots, pans, steamers, and bowls set up and ready to go. Have your ingredients laid out on the counter with your knives and measuring tools, and don’t forget your sushi mat!
- First, start your rice. Now if you’re like me you own a rice cooker for ease and convenience sake. I use it so often that it really is the most used appliance in my house after the Vitamix. If you have a rice cooker, dump your rice, water, vinegar and sugar into it. Mix to combine and then cook according to manufacture directions. However if you are not so fortunate to own a rice cooker you’re going to have to make your rice the old fashioned way, but you should be used to that I’d think. Pour rice, water, vinegar and sugar into a pot, stir to combine cover and bring to a boil. Reduce heat and let simmer until all water is absorbed and rice is cooked. Cooking time varies but for brown rice I’d say it’s usually done within 35-45 minutes so just check on it every now and again and make sure to stir so the bottom doesn’t burn. Add more water if necessary.
- When rice is done cooking fluff it with a fork and set aside to cool. About 10-15 minutes. Or you could put it in the fridge for a quick cool.
- While rice is cooking, trim the corse ends from the Asparagus and discard. Also trim off the leafy tips of the Asparagus, though save those to toss into salads, stir-fries or soups etc... Place asparagus in steamer basket and steam for 5 or so minutes until Asparagus is bright green and tender crisp.
- Remove asparagus from steamer and set aside till cool enough to handle.
- While your rice and asparagus are cooling combine the mayo, wasabi and liquid smoke in a bowl. Taste for flavor and adjust as needed. The sauce should not be overly spicy in fact it should only have a hint of wasabi heat, and a bit of sweet smokiness. However if you prefer more heat by all means feel free to add it. 3-4 small drops of wasabi paste should be sufficient for achieving the flavor I intended.
- Now comes the trickiest part, but trust me you’ll be okay. On your clean work surface. - I use a clean bamboo cutting board - lay down your bamboo sushi rolling mat. On top lay down 1 sheet of Nori with the shiny side facing up. Have a bowl of cold water at your work station and with wet - but not profusely dripping - hands grab handfuls of rice and spread evenly over the sheet of nori. Spread the rice as close to the edges as possible but leave about a half to a quarter inch of space on the horizontal side of the Nori furthest from you. This little boarder will help your rolled Maki stick together. Rinse your hands before moving onto the next step.
- Spoon 1 Tbsp worth of the mayo sauce horizontally along the edge of rice closest to you. Then sprinkle 1 Tbsp of the sesame seeds - by the way you can use toasted or not it doesn’t matter. Mine weren’t toasted - over the rice.
- Next layer in 3 spears of asparagus on the left parallel with the horizontal edge of the nori closest to you. Laying them down over the mayo layer you just created. If they’re not long enough to reach from left to right then layer in 3 more spears on the right so that the edge closest to you is completely filled with asparagus. If some poke out past the nori you can trim them off, and use them on the next roll or eat them.
- Now, using your mat, and working slowly pull the mat up slightly and roll it over. Moving slowly and using both hands slowly roll your Maki, using the bamboo mat to press down and make the roll tight. You may have to stop at some point to push the filling back under the Nori or to help guide the roll. Stop just before you get to the opposite edge that you’ve left empty. Dip your fingers into the water, run them along the empty edge then roll your nori closed. Press down tightly to seel.
- It’s okay if it’s not perfect, rolling Maki takes practice and even though I’ve done it a ton of times I still don’t make a perfect roll each time. Sometimes my rolls are to fat, sometimes they don’t seel properly, sometimes I don’t cut them well. It happens, don’t beat yourself up about it. Remember that you’re doing it for the fun of it, and it’s - maybe - your first time, you’ll get better the more you practice.
- Next, and this step is very important. Before cutting your Nori into one inch sections run your chef knife under cold water. By the way you should always use a chef knife or other similar smooth edged knife to cut sushi. If you use a steak knife, or a bread knife or some other kind of knife with a jagged edge your Maki is going to get shredded and will likely fall apart. Once seaweed is wet it is very, very durable, your roll will fall apart before the seaweed cuts properly. I know from experience. So run your Chef knife under cold water. Give it a shake and then starting from one edge and working towards the other cut your roll into rounds.
- The best way to cut your roll is to do it in one smooth motion. Do not use your knife as a saw. Press down firmly it’s okay if the roll doesn’t cut right away, it’s okay if it looks like it’s getting squished a bit this is normal. Use one fluid motion, press down on the knife with your knife hand and hold the long end of the roll steadily in place with the opposite hand. Press the knife firmly down until it has cut all the way through. To separate the round from the rest of the roll you may have to give one quick saw motion depending on the sharpness of your knife, but otherwise that is it. Run your knife under cold water before EACH cut! This is important. Before each cut your knife must be wet. The drier your knife Is the more difficult this will be and the more likely your roll will fall apart.
- Congratulations! Now that one roll is finished - You should have gotten 6-8 rounds out of it by the way - give yourself a pat on the back, and then begin again from step one. Repeat all steps until ingredients are used up. At the end you may have some leftover rice. If this is the case no worries, stick it in the fridge and toss it into a salad tomorrow!
- To serve arrange on plates and serve with dipping bowls of soy sauce, and my favorite Sweet Thai Chili Sauce. Serve with addition dollops of wasabi if desired and pickled ginger, yum!
PS: As you can see in the pictures two of my rolls were coming apart at the seam, so don’t fret if yours do too. Also end pieces are always kind of ugly so don’t worry about them either. If you’re making this for a friend you’d like to impress you can always stuff the ends with extra filling once they’ve been cut. This way you have greater control and the filling won’t fall out on you.
*** Note - Can be made Sugar-Free by Omitting the Cane Sugar***
Labels:
‘Mayo’,
Asparagus,
Gluten-Free,
Liquid Smoke,
Nori,
Rice,
Seaweed,
Sesame Seeds,
Sugar-Free,
Sushi,
Wasabi
Breakfast in the Raw, Part 2: Raw Brazilian Milk and Ani’s Buckwheat Crispies...
Before I get into the Raw Brazilian Milk I'd like to talk a little bit about my breakfast.
Yesterday I mentioned that I wanted to make Ani Phyo’s Buckwheat Crispies from "Ani’s Raw Food Essentials" and so I set about prepping it. I put the 1pound bag of buckwheat groats that I just so happened to have in my pantry, into a bowl with thrice the amount of water and let it soak overnight. I had nowhere to be this morning, nor any plans, and though it might have been nice to sleep in a little, I decided to set my alarm for 6am so I could begin making my Crispies.
At six I rose with my alarm and silently padded down the stairs to the kitchen. Once there I drained the groats and began the process of rinsing them. Since it was such a large volume and my strainer is rather small I did this in two batches. After each rinse I drained them again and shook the strainer to expel excess water. I then used the back of a wooden spoon to press the groats into the mess of the strainer in the hopes of squeezing out as much water as possible. When I was satisfied that they were as dry as they were going to get I used the wooden spoon to spread the groats out into a thin layer over two dehydrator trays. I then popped them into the dehydrator and set it for 114 ‘F. Ani says to dry them at 104 ‘F but thanks to my climate region (Which is almost always either too cold or too humid) I find this is not a good temperature recommendation for me, as every recipe ends up taking infinitely more time then is specified. Since enzymes are destroyed at temperatures above 118'F and since the majority of Raw Food books suggest dehydrating at this temperature, I didn’t feel bad about upping the temp to 114'F. I figure as long as I stay below 118'F I am fine. Once the trays were set in place, the dehydrator closed up and turned on there was nothing more to do except wait. As I was still a bit tired, having gone to bed around 1am I decided to return to bed, for a couple of hours.
The recipe said the Crispies would take 3-5 hours to dry. I turned on my dehydrator at 6:30am, and so I returned to check it at 9:30 am, the three hour mark. I found that the Crispies lining the perimeter were pretty well dry, but those closer to the middle where they were spread a little thicker sill had a bit of moisture. Had I planned to eat the entire batch over the course of a couple of days I might have took it out then. However I’m the only one eating it, and it’ll likely take me a week or more to do so. I didn’t want to take the chance and have the Crispies mold due to improper drying, so I rotated the trays and popped them back in.
I checked again at 10:30am and found they were almost finished. I returned again at 11am and they were done! I was so excited! I removed the trays from the dehydrator brought them to my kitchen counter and carefully transferred the Crispies to a plastic container.
Once they were put away I finished my morning Green Smoothie then my husband and I took our beautiful little dog for a nice long walk in the first snowfall of the year. It’s beautiful I might add, and surprisingly not too cold. She loved it!
Upon our return I set to work fixing myself a small bowl of Buckwheat Crispies. I used a half cup of Crispies with 3/4 C Raw Brazilian Chocolate Milk (Recipe to Follow) a handful of raw pistachios, a handful of dried cherries, and ½ Tbsp each of Ground Flaxseeds and Hemp Seeds. I wasn’t sure at all how this was going to turn out, as I find that a lot of raw food is hit or miss with me. However I was extremely surprised at how delicious this cereal was! Really, mouthful by mouthful I became more and more impressed. I could easily see myself eating this for breakfast on a regular basis, particularly on a day that I work because it’s actually quite filling. It’s really interesting how I could probably consume 2 bowls or your average store bought granola with store bought nut milk and be hungry 2 hours later, where as just a half cup of this has kept me full and satisfied since noon!
Now the Buckwheat itself doesn’t have much of a taste, it’s rather plain with a slight nutty or seedy flavor and a somewhat chalky texture. It makes a good template for any flavor profile you want to add to it. It’s also not as hard or crunchy as you might imagine considering it had been in the dehydrator so long. I mean it did have crunch but I was expecting it to be tooth cracking hard, and it wasn’t at all. It felt more akin to puffed rice cereal in my opinion. This was a really great hearty breakfast that filled me up without leaving me feeling heavy, gassy, weighed down or bloated. As I said to my husband, "It’s like granola but better!"
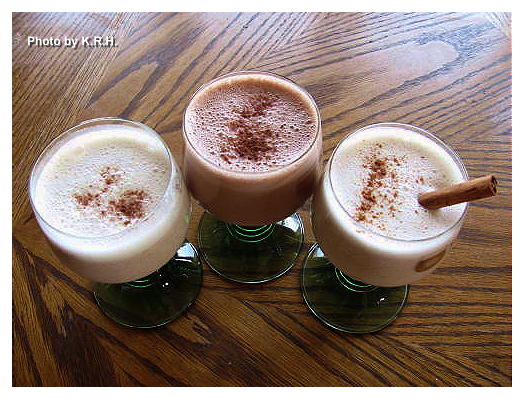
As for the Milk, I made it yesterday in anticipation of today’s breakfast. Since I was having a raw breakfast cereal I didn’t want to use pasturized store-bought nut milk on it, and so my only option was to make my own milk. I used Brazil Nuts because I bought them a while ago for a recipe I ended up never making and rather then see them go to waste I figured why not experiment with them? I’ve never seen commercial Brazil Nut Milk before and so I was curious as to what it might taste like.
Brazil Nuts if you are not familiar with them have a slight bitter edge to them, some people might not like that but the milk turned out really well, it far exceeded my expectations of it. Although to be honest I wasn’t thrilled with it upon my first stip straight out of the blender. It is definitely the kind of thing that needs to be refrigerated for a few hours, and perhaps preferably over night so that the flavors mingle properly and mellow out a little.
And just a quick word before I bestow you my recipe, trust me when I say that making your own nut milk is actually really easy. It is! I know you may be sitting there reading this and feeling somewhat skeptical. Maybe the idea of making your own nut milk is a little too intimidating, maybe you feel unsure, nervous or a little afraid to try your hand at it. I completely understand because I used to feel that way too. I never thought in a million years I would make my own nut milk, why bother when you can buy it? I always said, but you can’t buy Brazil Nut Milk, or Cashew Nut Milk, or Peanut Nut Milk or several other kinds of nut milk, and as far as I’ve seen you can not buy them raw. So trust me, and take a chance it is so much easier then you might be imagining, I wouldn’t steer you wrong! All it takes is a bit of patience, and a little self-confidence, I was amazed yesterday and then super proud of myself for giving it a try. If I can do it so can you!
So here is my recipe, I really hope you give it a try, and if you do I hope you enjoy it. I’m actually finding it kind of addictive right now! Haha...
Raw Brazilian Milk (3 Ways!)
3/4 C Raw Brazil Nuts (Soaked in warm water 2 hours) ***
8 Medjool Dates pitted
4 C Filtered Water
Stevia to taste (Optional)
Chocolate Variety - Add between 1-3 Tbsp Raw Cacao Powder (or to taste) into the mixture when you blend. If you don’t have Raw Cacao Powder and don’t particularly care about keeping your meal 100% raw then by all means use whatever Baking Coco you have.
Cinnamon Vanilla Variety - Add the scrapings from one Vanilla Bean Pod, or1-2 tsp Pure non-alcohol Vanilla Extract and Ground Cinnamon to taste when you blend. I like at least 1 tsp of Cinnamon but feel free to use more or less.
- Place all ingredients except stevia in highspeed blender and blend on high until completely smooth. Depending on your blender, how long you soaked your nuts or if you soaked them at all this could take anywhere from 2-5 minutes. Don’t worry if it takes longer, as you really want to make sure to get the mix as smooth as possible. Take your time and be patient!
- Once the milk is at the consistency you like it taste for flavor. If the milk is not sweet enough for you, or the bitterness of the nuts is to much I recommend adding in 2 packets of stevia or more or less to taste. Blend for another few seconds until incorporated and taste again. If you taste it again and still don’t think it’s sweet enough or isn’t quite to your liking I recommend you hold off on adding more sweetener right away as I think a few hours (or overnight) in the fridge really goes a long way to enhancing the flavor of the milk. You may want to wait till the next morning before adding any additional sweetener. However it’s entirely up to you.
- Next you have two options. You can either leave the milk as is or you can strain it through a cheesecloth. If you leave the milk as is, even if it’s pretty darn smooth it may still be a bit pulpy or grainy. The Vitamix can definitely pulverize but it doesn’t remove fibrous flesh or pulp. Some people don’t like that, I personally don’t mind. Though I recommend that if you do plan to just drink the milk straight it will probably taste a lot better strained. If you’re using it solely for cereal or other recipes in which the milk will be combined with other textured things then I see no harm in leaving it a bit pulpy, that’s what I did.
- Once you’ve strained your milk (If you choose to go this route) and it’s a nice smooth consistency to your liking you can discard the pulp unless you have other plans for it. Pour the milk into an air tight jar or container and refrigerate for 3-4 hours or preferably overnight. Enjoy in the morning with your breakfast! You see, it’s as simple as that!
*** Note - If you don’t have time, or simply don’t want to soak your nuts you don’t have to. Although keep in mind that soaking your nuts will release more enzyme activity and it will also soften the nuts which will yield a smoother milk. However if you’re using a vitamix and straining through cheesecloth your milk will be pretty smooth as is. The choice is yours, do what best fits into your schedule.***
PS: And yes I will post the recipe for Sesame Asparagus Maki tonight as promised! Two recipes in one day, exciting!
Wednesday, January 11, 2012
Sushi: An Introduction...
Sushi - People either love it or hate it. Some people are afraid of it. Some people don’t understand it. Some people are misinformed about it. They hear the word sushi and the first thing to pop into their head is this image of some pale, slimy, and quivering, raw fish flesh. Not very appetizing to most people I’m sure, but there’s a whole world of sushi out there! Far to often we don’t realize that there is and can be so much more to a thing then just the stereotype with which we are most familiar with. Sushi is a great example of this.
The history of Sushi is actually quite interesting. I mean did you know that the word sushi actually means ‘sour-tasting’? This meaning is a reflection of it’s historical fermented roots. As the oldest type of sushi was originally made by fermenting fish in sour fermenting rice. This caused the fish proteins to break down into it’s constituent amino acids resulting in a sour taste, one of the five basic tastes called umami in Japanese. Also very interesting is that once this process was completed it was only the fermented fish that was consumed, while the fermented rice was discarded.
Of course the contemporary sushi that we know - and love - today bears little resemblances to this dish of the past. In fact the sort of sushi with which we are acquainted today was created by Hanaya Yohei in Tokyo sometime in the 1800's. It’s intention was as an early form of fast food. Fresh fish was used instead of fermented which decreased the preparation time, and the small rolls were something that people could eat quickly and easily with their hands on the go, in a theater or at a roadside food stall. Strangely - or perhaps not so strangely considering the common humans aversion to all that is perceived as being different - Sushi did not make it’s way to the West until the 1950's and didn’t really catch on until the end of the 20th century.
Now when it comes to sushi you are probably imagining a tight roll with a one inch diameter with either seaweed or rice on the outside and a filling on the inside, but there is a vast array of sushi types out there. They come in different shapes, sizes, styles, with different fillings and seasonings, different preparation and presentations but the one thing they all have in common is that they all include rice, which has usually been seasoned with rice vinegar and sometimes sugar. Everything else however is up to the discretion of the chef.
Here is a quick guide to the most common types of sushi.
Makizushi - Also known as Norimaki, Makimono, or simply Maki meaning ‘roll’ or ‘Rolled Sushi’ Is the most common variety of sushi you are likely to find at least in the West. It is also my favorite to make. It is a cylindrical piece formed with the help of a bamboo mat, and cut into six or eight pieces. It is generally wrapped in Nori seaweed, and contains rice and whatever your desired fillings are. Within this category there are several different types of Maki.
Futomaki are a popular type of Maki that are larger and thicker then your average Maki. They are traditionally vegetarian and can be vegan if they do not include egg. Generally three or four fillings are picked to fill the Futomaki for their complimentary color and taste.
Hosomaki is another type of Maki that are very thin and only contain one filling. Usually cucumber, avocado, pickle or tuna. Interestingly Cucumber Maki known as Kappa Maki is named after a legendary Japanese water Imp called the Kappa said to be fond of cucumbers.
Temaki is a hand roll not cylindrical but cone shaped stuffed with various ingredients spilling out of the wide end. These too are very delicious and I enjoy them, though I’m not so skilled in making them myself.
Uramaki also known as an ‘inside out roll’ because in this case though it’s still a cylindrical roll like many other maki, the seaweed is on the inside while the rice is on the outside. They can be filled with any kind of filling you prefer and are usually coated with something on the outside. Sometimes it’s fish roe or avocado but more often it’s sesame seeds. Interestingly enough the Uramaki isn’t that popular in Japan, but in the West it is the most popular kind of maki, mainly because Westerners are adverse to eating seaweed. So having the seaweed rolled on the inside makes it more appealing to the average Westerner. I admit I love inside-out rolls too but not because I dislike seaweed. I like them for their presentation! And by the way if you fall into the category of ‘not liking seaweed’ get over it! It’s SO good for you! It’s loaded with vital nutrients and is so beneficial to ones health.
Chirashizushi - Also known as 'scattered sushi' is a particular favorite of mine because it always looks so beautiful. It’s also quicker and easier to prepare then a traditional hand roll. Scattered sushi traditionally consists of rice, that is garnished with various things either raw or cooked, though generally raw. There is no set formula for the ingredients and is usually determined by the chef’s mood, or a request by the customer. Think of the sushi roll salads that are becoming more and popular here in the west - such as the one I posted about from Appetite for Reduction last year - this could technically be considered a scattered sushi, although in a much larger form.
Inarizushi - Is a pouch of fried tofu filled usually with just rice. Named after the Shinto God Inari for his supposed love of fried tofu. Not to be confused with Inarimaki which is fried tofu in a regular maki roll.
Nigirizushi - Also known as ‘hand formed sushi’ or ‘pressed sushi’ is an oblong mound or rice formed by pressing a rectangle of rice between the palms. It is then topped with a bit of wasabi (sometimes) and a topping that is draped over it. Sometimes these toppings are secured by a strip of Nori Seaweed but not always. These are also really fun and easy to make, and have an endless amount of possibility as far as taste and presentation go. I love them!
Gunkanmaki - also known as a‘Warship roll’ is another form of Nigirizushi that is an oval hand shaped clump of rice with a strip of Nori wrapped around it’s perimeter to form a vessel or boat that is then filled with loose, soft, or fine chopped ingredients. These are also quite tasty and very cute!
Temarizushi - Known as ‘ball sushi’ is another form of Nigirizushi that is formed by pressing rice and your desired filling into a ball shape using plastic wrap. Sometimes it is wrapped in Nori, sometimes it’s left plain, and sometimes it’s wrapped with just a strip of Nori. These can also come in other shapes beside a ball. A square or a triangle are also popular. These can be a lot of fun especially to make for other people. You display the rice balls on a plate, everyone grabs a few, they take a bite and are surprised by the filling hidden inside!
Oshizushi - Also known as ‘Pressed sushi’ or ‘Box sushi’ it is a pressed sushi in which a wooden mold is used to form it. Topping ingredients are scattered along the bottom of the mold and then the rice is placed over top. The top of the wooden mold is then secured and the sushi is pressed into a tight square or rectangle. Then the mold is removed and the sushi is cut into bite sized pieces.
Lastly there is Narezushi - which is a matured sushi that is left to ferment in a wooden barrel for six months. This always consists of fish and so Is not in any way appealing or desirable to me.
So you see there are many different types of sushi, many different ways to roll it, adorn it and serve it and it can literally be made with any ingredients under the sun. I’ve known so many people over the years who wouldn’t try sushi because they were disgusted by the idea of eating raw fish, or even warm fish - as sushi is often served at room temperature - They had no idea that sushi doesn’t automatically equate fish, and that many Maki Rolls are made vegetarian. Though I guess in honestly I wasn’t so quick to jump on the sushi bandwagon either. It wasn’t until I reached high school that I braved to try it. Interestingly even though at that time I ate many different kinds of sushi, vegetarian and non vegetarian alike, my favorites were always Asparagus Maki, Spinach Sesame Maki, Sweet Potato Maki or Yam Maki, Cucumber Maki, Avocado Maki, Vegetable Roll Maki, and Futomaki. I guess my mind, body, and spirit were even trying to tell me something way back then.
But I guess by now you’re wondering, "What the hell does this have to do with anything?" Well aside from it being a bit of interesting culinary history peppered with some fun facts, I tend to make a lot of sushi. Both my husband and I love it, it’s one of our favorite foods. Since I make it so often, especially lately it seems I would like to be able to share my sushi recipes with you, however I thought little lesson in sushi history would be nice first. Particularly for those of you who may not be so familiar with this delicious little food, or for those of you who may regard it with suspicion and distaste.
Tomorrow I hope to post my recipe for Sesame Asparagus Maki - Pictured below.
Subscribe to:
Posts (Atom)