Thursday, May 31, 2012

Roasted Chili Lime and Indian Spiced Chickpeas...


Garbanzo Beans or Chickpeas as they’re also called are my hands down favorite bean ever! Well, I love other beans of course, and If I had to pick I’d say black beans, lima beans and edamame are right up there with chickpeas but chickpeas were the first bean I fell in love with so they’d always hold a special place in my heart.

I truly love them in anything. Soup, chili, stew, salad, sauteed with greens and other veggies. In rice, cous cous, or farro dishes, obviously as hummus. I love them in traditional Indian, Middle Eastern and Hispanic dishes, I just love, love, love them. They are probably the bean I buy and eat most frequently but sometimes - if you’re like me - you don’t want to go through the whole rigamarole of making something just to enjoy the one ingredient you love. Am I right? Now, I am no stranger to eating chickpeas right out of the can, I do it often, and it’s delicious, but some days you jsut need a little more than that, but you want something less than a meal. Well roasted snack chickpeas are just the thing!

Roasted Indian Spiced Chickpeas


Now roasting chickpeas isn’t exactly a new idea, so I can’t take credit for it. I’d seen mention of it before in magazine’s and online articles that connected to ‘healthy snacking’ though always intrigued by the idea I’d never actually thought to do it until last week. By then the recipes I’d previously seen were distant memories but roasting chickpeas seemed an easy enough task. All I needed to do was decide what flavorings I wanted to use. In the end I decided to go with a Mexican inspired flavor, and an Indian inspired flavor. Since they are two of my favorite types of cuisine and both traditionally use chickpeas it seemed a no-brainer.

Chili Lime Roasted Chickpeas


I was so impressed with the finished result. Not only do these things cook up fast, but they’re delicious! Absolutely-freaking delicious. They’re a truly healthy snack, and hearty too. The perfect thing to munch on pre-dinner when you usually reach for the sweets. They’re great served hot out of the oven or at room temperature, and truth be told they’re not half bad cold either. Bring a batch to your next BBQ or pot-luck and stick them on the snack table beside the chips, dips, pretzels, and party mix. They’ll be a sure fire hit.


Roasted Chickpeas 2 ways
(Cooking Instructions are the same for both)

Chili Lime Roast Chickpeas

1 15oz can Chickpeas
1 ½ Tbsp Lime Juice
½ Tbsp Agave Nectar
3/4 tsp Chili Powder
3/4 tsp Ground Cumin
Sea Salt

Indian Spiced Roast Chickpeas

1 15oz Can Chickpeas
1 Tbsp Lemon Juice
½ Tbsp Agave
½ Tbsp Olive Oil
3/4 tsp Curry Powder
3/4 tsp Gram Masala
1/4 tsp Ground Coriander
1/4 tsp Ground Cumin
Sea Salt

- Preheat oven to 400'F

- Drain and Rinse Chickpeas, then pat dry. Try to get them as dry as possible, before transferring them to a bowl.

- In a separate small bowl whisk together all flavor ingredients, both liquids and spices.

- Pour over the chickpeas and stir until thoroughly combined.

- Spread chickpeas in a single layer over a parchment lined baking sheet. Bake for 10-15 minutes then stir and bake another 10-15 minutes until chickpeas are brown and crispy.

- Remove from oven and transfer to a serving bowl, serve hot or refrigerate in an airtight container for later.

*** Note - For an Oil-Free version of the Indian Spiced Chickpeas Omit Olive Oil and use Lemon Juice or Tamarind Paste instead.***

PS: This probably goes without saying but if you decide to make both flavors at once do not put them on the same baking sheet. Use two different sheets!

Tuesday, May 29, 2012

Product Review - Daiya’s Garlic Jalapeno Havarti Wedge....


Though I don’t eat vegan cheese often, as a former cheese lover/addict I do appreciate some good vegan cheese every now and again. However most commonly available vegan cheese only comes in a few flavors, typically mozzarella, cheddar, pepper jack, and nacho. While I’ve had all of these flavors in the past, and like them, it gets old. I’ve never been the sort of person who could eat the same thing over and over and over again without complaint. I like variety, even when it relates to products I eat only occasionally.


Of all the vegan cheese I’ve tried thus far, Daiya - as I may have mentioned before - is by far my favorite. When it was announced that they were coming out with sliceable wedge versions of their classic flavors I wasn’t all that excited. There was no situation I could think of that would require me to use vegan cheese slices rather then shreds.  Things like cheese and crackers and grilled cheese are snack and meal ideas of the far distant past. Then I heard that they were coming out with a new flavor in wedge style. Garlic Jalapeno Havarti, well I nearly jumped out of my seat when I read that. Havarti you see, was a particular favorite of mine back in my dairy cheese eating days. Right up their along with smoked Gouda, feta and Brie. Now I haven’t had havarti in years. Long before I ever went vegan, possibly before I even got married, and I can’t honestly say I’ve really missed it in all that time. Yet when I read Daiya had come out with a havarti flavor I knew I’d have to try it, at least once, for old times sake. The fact that it’s garlic jalapeno flavor is just icing on the cake as far as I’m concerned. Since back in my Havarti loving days my favorite types of havarti were always the flavored ones, garlic jalapeno and dill were my top two.


It was about a month or so at least from the time I read that announcement to the time Daiya’s Havarti Wedge made it’s way into my local grocery. I discovered it Friday afternoon, and even though I wasn’t in the mood for vegan cheese I just had to grab it. Then came the problem of what to do with it when I got it home. What could I make with it? First I had to figure out what I wanted to make with cheese, then I had to think about what would require slices over shreds. I thought of all my options, and in the end I decided to go the boring conventional route and make a grilled cheese sandwich. Now before I go into the details of my experience it should be noted that I am not nor have I ever been one of those vegans pining away for a vegan grilled cheese. Or for the perfect cheese to turn into a grilled cheese. After about the age of 10 I stopped caring about grilled cheese altogether, - which might actually be the last time I ate one - it simply wasn’t in my orbit anymore.


Growing up my dad made killer grilled cheese and I loved them. His were open-faced with loads of cheese, sliced tomatoes, chopped white onion, and black pepper, they were to die for. Although as good as they were once I grew up grilled cheese just automatically fell into the food category of “for children’ or ‘poor people’ and it was never something I felt the need to eat again. I’ve never craved or desired one since. To this day when I see recipes online, on blogs, in magazines, or in cook books for grilled cheese - vegan or other wise - I can’t help but roll my eyes. First of all why is there a recipe? It’s bread, butter and cheese, sometimes a little extra if you want to get fancy but it’s pretty damn basic. It’s cooking at it’s least creative and least inspirational. People consider it ‘comfort food’ it’s a reminder of a simpler time. It’s a way for foodies to manipulate you by seeming down to earth and familiar, while still appealing to your desire for something classy and creative which they apparently achieve simply by calling their sandwiches‘adult grilled cheese’ or ‘sophisticated grilled cheese’ etc... Of course plopping the word sophisticated in front of something doesn’t make it so, and I’ve never found anything particularly comforting about a grilled cheese. Even as a former cheese addict I always viewed the sandwich as a heart damaging, artery clogging plate of cholesterol and fat. - Of course a vegan version would be free of cholesterol but the image still remains. - But that’s me, and I’ve been told on more than one occasion, by more than one person that I have the occasional tendency towards snobbery.


Despite all of this, and all of my personal feelings towards grilled cheese and uncreative food in general, on this particular day, with no better idea in mind, I decided to use my garlic jalapeno havarti wedge to make... yes... a grilled cheese. The hypocrisy and irony of this decision I might add was not lost on me. Not one bit. In fact as I set about preparing my ‘cheese’ all I could think was “I can’t believe I’m making a grilled cheese.” and “This is so lame.” I kept internally chiding myself for being ridiculous, but still couldn’t come up with any better way to use my havarti wedge. In the end the sandwich came out fantastic, it tasted amazing and my pride recovered. Taking a little inspiration from my dad I decided to use fresh tomato slices, and black pepper, but I also added rosemary sea salt and arugula. - my new love. - No recipe though because that really would be going too far, it’s more than easy enough to figure out on your own.


As for Daiya’s Garlic Jalapeno Havarti Wedge itself, well it’s a marvel. Truly fantastic, amazing, incredible, and down right delicious. I tried two thin sliced on their own before trying it on my grilled cheese and the flavor of it unmelted was just as good as the flavor melted. The cheese is creamy and rich exactly how I remember Havarti tasting, and it melts wonderfully. Melted it was creamy and rich, plus thick and gooey. As for the garlic jalapeno flavor it was perfect, not to overpowering and not to subtle with just the right blend of heat. It’s hard to see how any dairy based havarti could be better than what Daiya has created. It’s absolutely perfect, so if you like vegan cheese and were/are a fan of havarti in general then I urge you to go forth and by thyself a garlic jalapeno wedge. Your tastebuds will not be sorry, and if you come up with a more creative use of your wedge than I, please let me know so I can try it too!

Thursday, May 24, 2012

Restaurant Review: Loving Hut in Chicago...


I’d been dying to go to Loving Hut ever since I heard about it last summer, but somehow every time my husband and I planned to go something always seemed to come up and spoil our plans. We finally made it there a few weeks ago and enjoyed a phenomenal dinner where we celebrated me passing my Introduction to Herbal Medicine class with a 99.2%.

First of all I have to say that the restaurant itself is nothing like what I was expecting. Since it’s a vegan Asian restaurant I was expecting some sort of gaudy design or decoration to highlight this. Chain restaurants after all tend to all fall into a sort of theme. However from the outside the place looked small and unassuming, and inside it was quiet - peaceful, dare I even say zen? - clean, and minimalist. The decor was simple, the music light and the atmosphere was very calming and welcoming. We entered, and were told to sit anywhere by a lovely elderly Asian gentlemen working behind the counter.

Dumplings


We were given menus and water and asked if we had any further drink orders. Since I’d already perused the menu online - as I often do when venturing to new restaurants - I already knew I was going to order a cappuccino. I rarely, if ever drink coffee these days, but back when coffee was a thing for me I used to love a good cappuccino. Of course when I went vegan that changed as it’s highly unlikely you’ll find a restaurant serving them with soy or nut milk rather then cow’s milk. So of course both my husband and I - he too was a great lover of cappuccino - were very eager to have a cup. It was everything I remember, delicious, foamy and bittersweet, but I soon realized that after not having coffee for so long it probably wasn’t the wisest decision. C’est la vie!

Lady Fingers


For appetizers we ordered steamed dumplings. Dumplings and Gyoza are a favorite of my husband so of course we had to try them, and they did not disappoint. They were succulent and the dipping sauce was fantastic. We also ordered the lady fingers which are a thin spring roll like thing filled with red bean paste. Now I love red bean paste, it was always one of my favorite treats to get when I went into Chinatown back in Vancouver. However since I moved to Chicagoland I haven’t seen red bean paste anything - that is until a discovered Mitsuwa a couple of weeks ago! Yay! - So I was very excited to try these, and they definitely did not disappoint. They were sweet and crispy and came with a slightly spicy sauce that complimented them wonderfully.

Royal Pho


For my main I got the Royal Pho. I’ve never actually had regular pho before, not in all the times I’ve been to Vietnamese restaurants, but I’d always wanted to try it. Of course when I went vegan that made ordering pho at a regular restaurant sort of impossible. In Maui there is a wonderful vegan Vietnamese restaurant in Paia that we went to that has vegan pho. I thought about ordering it there because it came highly recommended but it was so hot outside I just couldn’t justify eating soup. After we left Maui I regretted the decision not to get the pho. So when I saw Pho on the Loving Hut menu I knew I’d have to get it. As it happens the night we went was unseasonably cold and windy making soup the perfect order. It was absolutely delicious! I can not express just how wonderful this pho was. It was so packed and loaded with flavor and It comes in a massive bowl. For anyone who thinks they can’t stuff themselves on soup, you haven’t had the Loving Hut Pho.  Made with non-GMO TVP, Rice Noodles, mung bean sprouts, cilantro, lime, Seitan, onion and a special house broth it’s to die for! My husband got a dish called Forever Love, which is a stir-fry sort of thing. It includes non-GMO fried battered TVP, Mango, onion, red and green peppers, carrot, black mushrooms, and a house sweet and sour sauce served over brown rice. He loved it, and I took a little bite and must say it was very good indeed!

Forever Love


Though we were pretty darn stuffed after our entrees we decided to get dessert anyway, because let’s face it, how often do you get to go into a restaurant as a vegan and order anything on the menu? Plus, they had a green tea cheesecake! My good friend K from back home makes a really great green tea cheesecake. In fact until she made one and brought it over to my house when I was home for a visit in 09 I’d never eaten a green tea cheesecake before. After I tried hers I was hooked, and she made a couple more before that visit was over. That was the last time I ever ate green tea cheesecake. It’s not exactly a common type of cheesecake is it? And though I’m sure it’s easy enough to make it had never really occurred to me to try and make one myself.

Green Tea Cheesecake & Chocolate Mousse Pie


Loving Hut’s Green Tea Cheesecake was very good, but sadly it must be said that it just didn’t compare to my friend K’s version. It wasn’t quite as rich as I was expecting, nor was the green tea flavor as pronounced, and I felt that the soy base was a bit strong for my liking. I did however love that they used agave to sweeten the cake rather then refined sugar, so they get major points for that. Also I should say that if you haven’t been spoiled by K’s Green tea cheesecake you’ll probably love this.  My husband got the Chocolate Mousse Pie, which I had a bite of. We both thought it was very good, but also very chocolatey. Even for two chocolate lovers like us the richness was a little much, definitely good though, and again they used agave to sweeten rather then refined sugar. Gotta love that.

All and all it was a out of this world dinner, and it was a wonderful experience. Our server - the elderly Asian gentleman behind the counter - was super nice, and sweet. Everything about him and his demenor made me smile. I can not wait to go back for another meal! I highly recommend you check out Loving Hut if you live in Chicago but even if you don’t have no fear, because Loving Hut is an international chain restaurant. Which means they have many different locations in many different cities in many different countries. So be sure to check their website to see if there’s a Loving Hut near you!

Loving Hut - Chicago Location 
5812 North Broadway Street, Chicago

A list of their U.S. Locations 
http://lovinghut.us/

A List of International Locations 
http://www.lovinghut.com/index.php

PS: Apologies for the poor photos, the lighting was a bit low-key.

Monday, May 21, 2012

Lemongrass Tofu Marinated Maki...


For those days when you’re looking for a heartier more protein rich maki may I make a suggestion? Lemongrass tofu! This dish came about simply out of my desire to do something different with my maki. Asparagus, and avocado, sweet potato, and cucumber rolls are brilliant, but sometimes you just want something different. My local health food store sells a really tasty fried tofu maki that I enjoy occasionally, and I happened to have a block of extra firm sitting in my fridge, so I put two and two together. However unlike the tofu maki at my local grocery I wanted to create a sweet, tangy and spicy sauce to marinate the ‘fu in.


Since I’ve been playing around a lot with Asian flavors lately I found myself reminiscing about Vietnamese food. I absolutely love the richness and complexity of Vietnamese fare, one dish can have so many flavor notes. I also love the liberal use of lemongrass stalk in South East Asian cooking, it’s an ingredient that’s completely neglected in every other cuisine. Which in my opinion is unfortunate. The world at large should not be deprived of the awesomeness of a really good lemongrass coconut milk ice cream, but I digress.


The marinade I made for my tofu, is inspired by the countless recipes and menu listings I’ve seen over the years for lemongrass chicken. It seems to be everywhere in Vietnamese restaurants, and though I’ve only eaten it once - years and years ago - I can tell you that lemongrass tofu is infinitely better. However I should say that I’d never go so far as to claim this marinade is in any way authentic - just the happy outcome of me tossing things together, - it is absolutely delicious, and makes for an equally good dipping sauce for the finished maki, instead of or in addition to soy sauce.


Lemongrass Tofu Marinated Maki

4 Sheets Nori
1 ½-2  C Brown Rice
3 C Water
2 Tbsp Brown Rice Vinegar
1 Tbsp Sugar
2 Carrots grated
4 Green onions thinly sliced
1lb Block of Extra Firm Tofu

Sweet Lemongrass Marinade 

1/3 C Soy Sauce
1/4 C Agave
1/4-1/2 C water
2-4 Tbsp Minced Lemongrass
2-3 Tbsp Kieffier Lime Leaves minced
4 garlic cloves
1 piece ginger
½ tsp red pepper flakes

Soy Sauce or Thai Chili Sauce for Dipping
Pickled Ginger and Wasabi to Garnish

- First prepare your tofu. Drain your tofu and squeeze out as much water as possible. You want it to become dense. I used my tofu press for this, and left it in for about 2 hours. If you don’t have a tofu press you can simply wrap the tofu in a clean dish towel and place heavy objects on top of it.

- In the meantime pour all marinade ingredients into a blender and blend on high until thoroughly combined. 30-60 seconds. Set aside.

- When tofu has been thoroughly drained, place it in a container with a secure lid and pour the marinade over top. Leave in the fridge to marinate for 1-2 hours.

- Now is a good time to think about making your rice. For this recipe I used brown rice because that’s what I had, but if you prefer you can easily switch it out for sushi rice and there won’t be any difference. So combine your rice, your water, the vinegar and sugar in your rice cooker and cook as directed. If you don’t have a rice cooker combine rice, water, vinegar and sugar into a pot, stir to combine cover and bring to a boil. Reduce heat and let simmer until all water is absorbed and rice is cooked. Cooking time varies but for brown rice I’d say it’s usually done within 35 - 40 minutes so just check on it every now and again and make sure to stir so the bottom doesn’t burn. Add more water if necessary. However if you are using sushi rice the cooking time will be shorter, count on 20-25 minutes cook time but be sure to check.

- When your rice is cooked set aside until cool enough to handle.

- When tofu has finished marinating. Heat a large non-stick or cast iron pan over medium-high heat. Spray with a touch of non-stick spray. Remove the tofu from the marinade and reserve marinade. On a clean cutting board slice the tofu into 1/4 inch thick strips. Dip the strips back into the marinade to coat and then place in the heated pan.

- Fry tofu slices until firm, crisp, golden, and slightly blackened. Roughly five minutes per side, perhaps a little longer if using a non-stick pan. Once all slices have been fried on both sides remove the tofu to a plate and set aside. Once cooled slice each strip into thinner slices lengthwise.

- Now you’re ready to assemble your Maki, which is by far the trickiest part, but trust me you’ll be okay. On your clean work surface. - I use a clean bamboo cutting board - lay down your bamboo sushi rolling mat. On top lay down 1 sheet of Nori with the shiny side facing up. Have a bowl of cold water at your work station and with wet - but not profusely dripping - hands grab handfuls of rice and spread evenly over the sheet of nori. Spread the rice as close to the edges as possible but leave about a half to a quarter inch of space on the horizontal side of the Nori furthest from you. This little boarder will help your rolled Maki stick together. Rinse your hands before moving onto the next step.

- Next layer in 2-3 strips of tofu on the left parallel with the horizontal edge of the nori closest to you. Laying them down over the rice you just spread out. If they’re not long enough to reach from left to right then layer in 3 more strips on the right so that the edge closest to you is completely filled with tofu. If some poke out past the nori you can trim them off, or leave them as is.

- Sprinkle desired amount of grated carrots and sliced green onions over top of the tofu,

- Now, using your mat, and working slowly pull the mat up slightly and roll it over. Moving slowly and using both hands slowly roll your Maki, using the bamboo mat to press down and make the roll tight. You may have to stop at some point to push the filling back under the Nori or to help guide the roll. Stop just before you get to the opposite edge that you’ve left empty. Dip your fingers into the water, run them along the empty edge then roll your nori closed. Press down tightly to seel.

- It’s okay if it’s not perfect, rolling Maki takes practice and even though I’ve done it a ton of times I still don’t make a perfect roll each time. Sometimes my rolls are to fat, sometimes they don’t seel properly, sometimes I don’t cut them well. It happens, don’t beat yourself up about it. Remember that you’re doing it for the fun of it, and it’s - maybe - your first time, you’ll get better the more you practice.

- Next, and this step is very important. Before cutting your Nori into one inch sections run your chef knife under cold water. By the way you should always use a chef knife or other similar smooth edged knife to cut sushi. If you use a steak knife, or a bread knife or some other kind of knife with a jagged edge your Maki is going to get shredded and will likely fall apart. Once seaweed is wet it is very, very durable, your roll will fall apart before the seaweed cuts properly. I know from experience. So run your Chef knife under cold water. Give it a shake and then starting from one edge and working towards the other cut your roll into rounds.

- The best way to cut your roll is to do it in one smooth motion. Do not use your knife as a saw. Press down firmly it’s okay if the roll doesn’t cut right away, it’s okay if it looks like it’s getting squished a bit this is normal. Use one fluid motion, press down on the knife with your knife hand and hold the long end of the roll steadily in place with the opposite hand. Press the knife firmly down until it has cut all the way through. To separate the round from the rest of the roll you may have to give one quick saw motion depending on the sharpness of your knife, but otherwise that is it. Run your knife under cold water before EACH cut! This is important. Before each cut your knife must be wet. The drier your knife Is the more difficult this will be and the more likely your roll will fall apart.

- Congratulations! Now that one roll is finished - You should have gotten 6-8 rounds out of it by the way - give yourself a pat on the back, and then begin again from step one. Repeat all steps until ingredients are used up. At the end you may have some leftover rice. If this is the case no worries, stick it in the fridge and toss it into a salad tomorrow, or make a veggie roll for lunch!


- To serve arrange on plates and serve with dipping bowls of soy sauce, the reserved lemongrass marinade and my favorite Sweet Thai Chili Sauce. Serve with dollops of wasabi if desired and pickled ginger, yum!


*** Note - Gluten-Free if using GF Tamari. If you don't have  Kieffier lime leaves you can just use some fresh grated lime zest and fresh lime juice.***

Saturday, May 19, 2012

5 Spice Fiddleheads and Bunapi Mushrooms...


Fiddleheads are the unfurled fronds of a young fern. They are harvested seasonally, in early spring before the fronds have opened and reached their full height. I knew what fiddleheads were, and I’ve come across recipes for them before, but until a few days ago I’d never tasted them, nor even seen them in person. Apparently they are the new ‘in’ thing but I didn’t really know what all the fuss was about. So of course, when they made their appearance in my local market last weakened I knew I’d have to try them. If only to see if they lived up to the hype, and because it’s become something of a rule for me that whenever I’m faced with a vegetable I don’t know or have never tried, I must eat it.


My first thought upon eating one raw was “Wow, this tastes exactly like a fern.” A reaction that my husband found greatly amusing, and if like him, you too, are wondering how do I know what ferns taste like, it’s simple. I did grow up in Vancouver after all, amongst a rich natural landscape, and I was a Tom Boy as a child. Meaning I spent all of my childhood playing out doors, especially in the woods, - of which there was no shortage in my neighborhood - and when you’re the sort of child that spends her days climbing trees, and building forts and, tree houses, you inevitably find yourself doing a bit of foraging. So yes, I’ve eaten wild ferns, and wild berries, and tons of other random, wild vegetarian. - Which by the way I don’t recommend unless you absolutely know what you’re doing! - So when I first bit into that raw Fiddlehead it brought back a flood of memories of days spent in trees, playing at being a ‘wild thing.’ I can’t say the flavor of ferns is a particularly delicate one, and it is something of an acquired taste to be sure. Cooked fiddleheads on the other hand are an entirely different vegetable. When you cook them they become far milder, almost bland, with a hint of sweetness and a wonderful chewy texture. My second thought upon eating a blanched fiddlehead was “Interesting.” my third thought was “Amazing.” Like tofu, they really soak up the flavor of whatever you cook them with, they absorb so much which I love, but the thing I love most about them is their texture. I can’t really explain it, but something about it really appeals to me.


Though I wouldn’t go so far as to say they are my new favorite vegetable, nor do they even make it onto my top ten, but they are definitely a treat. A wonderful spring surprise to brighten up and liven up your palate. So if you see them, do give them a try, their season is very short so you have to snap them up when the opportunity presents itself.


So, about this recipe, since I’d never cooked with fiddleheads before I wasn’t really sure what to do. I did a google search and pretty much every recipe I found came back using fiddleheads as a garnish to meat. A few other recipes had them thrown into pasta, and many more still had them cooked in butter with morel mushrooms. None of these things appealed to me, and none of them seemed particularly creative or interesting. However I did like the idea of cooking the fiddleheads with mushrooms. Not morels though. As it happened I still had a package of Bunapi mushrooms that I’d bought at the Japanese market, and so I decided why not try them, and do an Asian inspired sort of dish? - By the way Bunapi mushrooms also known as White Beech are a unique sort of Japanese mushroom with a crisp texture and slightly nutty flavor. If you can’t find them you could always substitute shiitake or oyster mushrooms. - I’ve also been kind of addicted to Chinese 5 Spice Powder lately, and so I thought I’d try and work that into the recipe too. In the end the whole thing came together perfectly, far exceeding my expectations. The flavors of this dish are a complex mixture of sweet, salty, and spicy, and it’s just so delicious you’ll definitely be craving more.


5 Spice Fiddleheads and Bunapi Mushrooms

5oz Bunapi Mushrooms stem base removed and separated
7oz Fiddleheads
8 Garlic Cloves Minced
1 Thumb sized piece Ginger grated
2 Shallots minced
2 tsp Sesame Oil
2 Tbsp Soy Sauce or coconut aminos
½-1 Tbsp Brown Rice Syrup
½-3/4 tsp Chinese 5 Spice Powder
1/4-1/2 tsp Crushed Red Pepper Flakes

- First bring a medium sized pot of water to a boil, add the fiddleheads to the pot and boil for 2 minutes. Quickly drain and then plunge into a bowl of ice cold water to stop the cooking process. Once cooled drain the fiddleheads and pat dry, set aside on a plate.

- Heat the 2 tsp of sesame oil in a large pan over medium-high heat. Add the garlic, ginger and shallot and saute for 5 minutes until fragrant. Add in the crushed red pepper flakes and saute another 2-3 minutes until the shallots are soft.

- Whisk soy sauce, brown rice syrup and five spice powder together in a small bowl and set aside.

- Add in the Bunapi mushrooms and the Fiddleheads saute for 5 minutes. Add in the reserved sauce and saute another 3-5 minutes until the sauce has absorbed a bit and the mushrooms and fiddleheads are softened.

- Serve and enjoy!


*** Note - gluten-free if using GF Tamari, soy-free if using coconut aminos.***


FYI - Fiddleheads are reported to be a good source of Omega-3 and Omega-6 fatty acids. They’re also high in Iron, fiber and potassium. They also have a good deal of antioxidant activity as does the bunapi mushroom.

Thursday, May 17, 2012

Gluten-Free Fettuccine With Broccoli Rabe and Ramps...


This was the final dish I made with the last of my bounty of ramps. I really hadn’t wanted to use them in another pasta dish, but my husband loves pasta and seeing as how I had a huge bunch of broccoli rabe and a large quantity of ramps that needed to get used, on a day that I didn’t have a lot of time I figured this would have to do. Though it wasn’t how I originally intended to end my love-affair with ramps it was nonetheless delicious! Everything about ramps is delicious, and if you love pasta as much as my husband does you will surely love this dish.


It has a unique blend of flavor thanks to the sour lemon, the tart tomato, the delicate ramp and the slightly bitter broccoli rabe. I’d never actually eaten broccoli rabe before though I’d seen it a million times. I only had it because I’d picked it up on a whim when I saw it on sale and I thought ‘why not?’ I was surprised at how much I liked it. Perhaps not as much as Broccolini (my absolute favorite) or regular broccoli, but enough to know that I’ll be buying many more bunches over the coming months so I can experiment with it. What I like most about this dish is that it comes together fast, and is super simply yet has an air of sophistication about it. You’re not just sitting down to another plate of spaghetti you’re sitting down to a meal! And while I’ve listed the breadcrumbs as being optional I highly suggest you use them, they add that little extra something that everyone needs in their pasta.


Gluten-Free Fettuccine With Broccoli Rabe and Ramps 

1 lb Gluten-Free Fettuccine (or your favorite gluten-free pasta)
10 Cloves Garlic Minced
2 Bunches Ramps trimmed, green and white parts (about 20)
4-5 Tbsp Non-dairy butter
1/4-1/2 tsp Red Pepper Flakes
1 Large bunch Broccoli Rabe
1 15oz can diced tomatoes
3/4-1 C dry white wine
3-4 Tbsp Lemon Juice + 1 Tbsp
1 Bunch Parsley Minced
Sea Salt and Black Pepper to taste
Italian Style Gluten Free breadcrumbs (optional)***

- Cook Pasta according to package directions

- Trim the stems from the broccoli Rabe and cut it into roughly 1 inch pieces.

- Bring a large pot of salted water to a boil, add the broccoli rabe and boil for 3-5 minutes until rabe is bright green and stems are tender. Remove rabe with a slotted spoon to a bowl of ice water to stop the cooking process. Reserve the pot of boiling water to cook the pasta.

- Melt the non-dairy butter in a large pan over medium-high heat. Add the garlic, ramps, and the red pepper flakes and saute until fragrant and ramps begin to soften. About five minutes.

- Strain the canned tomatoes through a mesh sieve over a bowl. Gently pour the liquid from the drained tomatoes into the pan with the non-dairy butter, garlic and ramps. Stirring slowly and constantly until fully combined. About 1-2 minutes of stirring should be sufficient.

- Add in the reserved tomatoes, ½ C of White wine, and lemon juice. Stir the ingredients until fully incorporated - about 1-2 minutes - and then bring to a low simmer. Simmer for 10-15 minutes or until the mixture has reduced slightly. Taste and add salt and pepper as needed.

- Add the Broccoli Rabe to the Sauce and cook until heated through.

- When Pasta has finished cooking, drain and return to the pot. Pour over the remaining 1/4-1/2C of the White Wine, the extra tbsp of lemon juice and season lightly with salt and pepper to taste. Give the pasta a good stir to incorporate.

- Pour the Sauce over the pasta, and add in the minced parsley. Stir to evenly distribute sauce over the pasta.

- Arrange pasta into bowls or on plates and garnish with a little extra parsley, some fresh cracked pepper and a good sprinkling of Gluten-Free Breadcrumbs.


*** Note - If you can’t find Gluten-Free breadcrumbs it’s easy to make your own by pulsing your favorite gluten-free bread into fine crumbs in your food processor. If you can only find plain gluten-free breadcrumbs it’s easy to make them Italian style. Just stir in dried Oregano, Basil, Rosemary and Thyme to taste, and voila! This dish can also be made soy-free if using a soy-free non-dairy butter*** 

Wednesday, May 16, 2012

Indo-Malaysian 'Mutton' Soup...


I have never eaten mutton in my life, nor have I had any desire to. However when I came across a recipe for an Indian Mutton Soup in a Malaysian cook book recently, I found myself intrigued. Not in the least by the meat but by the idea of a rich, flavorful, lightly spiced soup with large chunks of tomato. The picture looked very appetizing, and I could feel the creative juices in my brain begin to flow. How could I make this vegan? At first I wasn’t sure how I’d be able to achieve this, because as far as I know there is not currently a vegan lamb, or sheep substitute. There is vegan beef, and vegan chicken, there is vegan tuna, and vegan shrimp, hell there is even vegan calamari and Haggis, but no vegan lamb. I considered using seitan or tempeh because they’re both chewy and easily soak up flavor but I didn’t have any seitan on hand and tempeh I decided might taste too much like tempeh. I wanted this dish to be really rich and decadent so I needed something else.


Lucky for me I had a package of Gardein Beefless Tips in my freezer. Even though they’re not in the slightest bit mutton like I figured they’d be a fine substitute. I’ve only eaten lamb a couple of times in my life and it was long ago. I recall it being stronger, gamier, and richer then beef but not necessarily that different, maybe I’m wrong there but I’ll never know. The tips in the end worked magically. They were exactly the right thing for this delicious hearty soup. The mixture of flavors in this soup is incredible, my husband and I couldn’t stop raving about the awesome flavor of the broth. It was perfectly spiced and tasted fantastic with bread. Originally I wanted to use Naan, but the store was out, and I didn’t have the time to make any so we used pita. It worked just as well I think, so when you make this soup you must get bread, any kind! You will not be sorry.


This soup apparently also goes by the name of Sop Kambing and is a particularly popular dish amongst the Muslim and Malay hawker stalls, as well as in the coffee shops. I hear it’s best when served at night as it’s said to have a restorative property. I don’t know about that, but I definitely felt sated after finishing off a large bowl, and now you can enjoy it too!


Indo-Malaysian 'Mutton' Soup

1 thumb size piece of ginger
8 Garlic Cloves
1 Red Chili or ½-1 tsp Red pepper Flakes
1 Large Yellow Onion roughly chopped
2 Tbsp Non-dairy Butter
1 ½ tsp Ground Coriander
1 ½ tsp Ground Cumin
1 ½ tsp Ground Fenugreek
1 ½ tsp Sugar
1/4-1/2 tsp Ground Cinnamon
3-4 tsp Tomato Paste
7 Green Cardamom Pods
Sea Salt and Black Pepper to taste
2 C Water + 1 Vegan ‘Beef’ Bullion Cube
3 Tomatoes, peeled, seeded, and quartered, then the quarters cut in half
10oz -1 lb Gardein Beefless Tips
1 Bunch Cilantro minced

- Spray large pan with non-stick spray and cook beef tips over high heat until browned on all sides. 3-4 minutes. Remove from pan and set aside.

- Place Ginger, Garlic and Red Chili into a food processor and process into a paste

- Heat the non-dairy butter in a large pan over medium-high heat. Add the onions and saute for 4-5 minutes until fragrant. Add the garlic, ginger paste and saute another 2 minutes. Add the coriander, cumin, fenugreek and sugar stir to combine and saute another 2-3 minutes until very fragrant and onions are golden.

- Add the water and bullion cube, along with the tomato paste, cinnamon and cardamom pods. Stir to combine, then bring to a boil.

- Reduce the heat and cover simmer for 20 minutes.

- Add the tomatoes along with sea salt and pepper to taste. Then cover and simmer another 15 minutes.

- Add in the reserved ‘beef’ tips and simmer another 10 minutes.

- Fish out the cardamom pods and discard. Garnish with the cilantro and serve with your favorite crusty bread or Naan.


*** Note - This can be made Gluten-Free if using Tempeh or soy based beef instead. Or it can be made Soy-free if using Seitan or soy-free beef and soy-free non-dairy butter instead. Although I can’t promise it’ll taste the same with either substitution.*** 


Monday, May 14, 2012

Hot and Sour Pineapple Seitan Broth...


Everyone has a favorite type of cuisine, it doesn’t matter who you ask, everyone has a favorite. Some might say Italian, and some might say Mexican. Others might say German, or Greek, or Japanese, or Chinese. I love all cuisine’s, and if you asked me to pick a favorite I wouldn’t be able to narrow it down to one specific country, but I could narrow it down to a continent. Asia. Asian cuisine is by far my favorite, if I could eat nothing else for the rest of my life that would be totally fine with me. I love Chinese, Japanese, Indonesian, Korean, Thai, Vietnamese, Cambodian, Malaysian, Nepalese, and Indian food, I love them all. This is the food I grew up on, and these are the types of restaurants I typically sought out when I grew older - not that they were at all hard to find in Vancouver.


Vancouver you see has a huge Asian population. Over 30% of the cities inhabitants are of Chinese heritage, they are the largest ethnic group in the city. Vancouver has the largest Chinatown in all of Canada, and the third largest Chinatown by population in North America. The city also boasts significant Japanese, Korean, Filipino, Vietnamese, Indonesian, Cambodian, and Indian populations. I loved this growing up, and I spent a significant portion of my teenage and early adult years exploring Vancouver’s Chinatown, which still today remains one of my top 3 favorite places in all of Vancouver. I loved going to the night markets, I loved going to hawker stalls, and food stands. I loved ducking into little shops, bakeries and groceries, and I most definitely loved eating in every Asian restaurant I came across. It is amongst these people, and these cultures that I feel most comfortable and most at home. I miss ‘my’ Chinatown all the time, I miss meditating in the Sun Yet Sen Classical Chinese Garden - one of the most beautiful and peaceful places in downtown - something I typically did 2-3 times a week when I wasn’t working. Some weeks I was in Chinatown everyday, usually alone, which is how I preferred it. For some reason I rarely went to Chinatown with friends, these adventures were always solo, that is until I met my husband, and then the two of us would explore together.


My husband, who loves Asian food as much as I do if not more, found Vancouver to be a magical place. Growing up in Chicago and suburban Illinois he wasn’t exactly exposed to the same level of Asian culture as I was. It wasn’t until he attended University in Southern California that he really experienced Asian food proper, particularly sushi for which he has an undying love. I can’t tell you how many Vancouver days and nights we spent stuffing our faces with all the glorious sushi on offer. Sushi bars you see are to Vancouver what Starbucks is to Seattle. No joke, you can’t throw a rock in downtown Van without hitting at least three Sushi Bar’s or restaurants. They are almost literally on every corner, and they are far more populous then either Starbucks or McDonald’s. As my husband said to me many years ago - and has said many times since - “Even the shittiest hole in the wall Sushi bar in Vancouver is better than the best Sushi Bar in Chicago.” - With which after moving here I would have to agree. While after a lot of searching I have found some very good sushi here in Chicago none of it can ever compare to the sushi I enjoyed in Vancouver, which Is why I typically prefer to make my own, but that’s beside the point.


Together we hit up Korean BBQ’s and Vietnamese Pho restaurants all over the city. We chowed down on Thai takeaway, and Indian curries. We stuffed ourselves on fried bananas in coconut milk, and green tea ice cream. More often than not we were the only white people eating in the restaurants we chose, and half the time we couldn’t read the menus - which weren’t in English - and so had to order by pointing at pictures. I miss this a lot, and I definitely miss the food. Even after living here for nearly 5 years I can’t get used to the endless stream of white faces, I feel awkward being part of the ‘majority,’ and I find the lack of diversity in the suburbs suffocating.


I guess it’s because I’ve been missing Vancouver lately that I’ve been making more and more Asian dishes at home. Lately I find myself particularly fascinated by the foods of Malaysia. The cuisine of Malaysia is one of the few Asian cuisines with which I’m not overly familiar, but it’s always intrigued me. Years ago I bought a Malaysian and Singapore cook book but never made anything out of it because at the time I wasn’t very proficient in the kitchen. When I finally developed my skills in the kitchen I’d stopped eating red meat and pork and was only six months away from turning vegetarian. So the book has just been sitting in my closet collecting dust for the past five years.


Traditionally Malaysian food is not particularly vegan friendly. Malaysia is a pretty ethnically diverse place, and religiously diverse as well, with a percentage of the population being Buddhist. So there are vegetarian dishes but many of them call for eggs. Most people might consider this a problem, but not me. These dishes have been calling to me over the past couple of weeks, and once I get curious about something I find it very hard to get my mind off the topic, so I decided I would try and veganize some of these recipes. When it comes to vegan Asian cuisine I find there are a lot of repeat recipes. Anyone can make a vegan curry, or a vegan stir fry. There are recipes abound for vegan won ton, vegan kung pao, vegan fried rice, and vegan tempura. As much as I love all of those things I like a little variety too, and I want to start making vegan versions of more of the dishes I used to enjoy. As well as new dishes that remind me of the tastes, and flavors I loved back in those days.


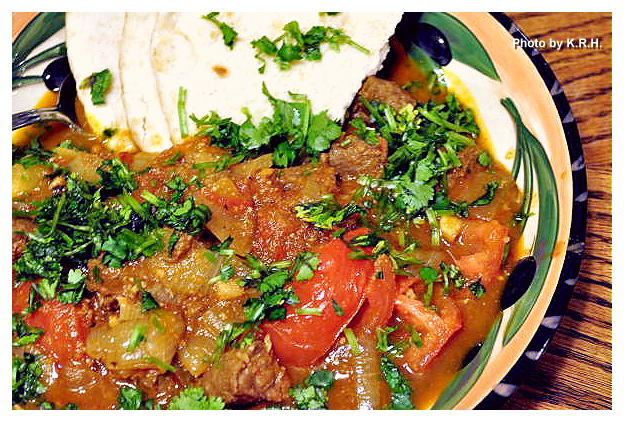
The first dish I decided to recreate is a simple Nonya dish. When early Chinese traders settled in ports of Penang, Melaka and Singapore beginning in the 15th century, many of them married local Malay woman. These marriages created an ethnic sub-group of Malay-Chinese, which in Malay are referred to as Peranakan. This group was particularly noted for it’s distinctive dress, it’s lavishly decorated homes and above all it’s cuisine. All the meals were cooked by the woman or Nonyas - the Peranakan word for female - and were an inspired blend of both Chinese and Malay traditions. The style of cuisine is very unique, full of flavor and infused with elements of Indian, Thai, Portugese, and Chinese cooking.


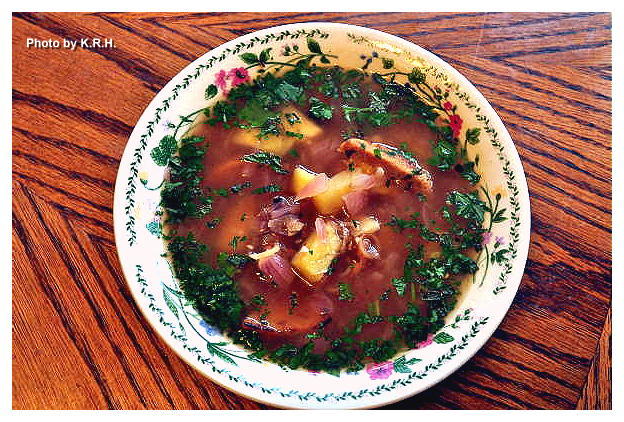
For my first foray into Malay cooking I chose a simple soup dish because It intrigued me, and it inspired memories of many of the sweet, sour and hot dishes I used to enjoy back home. Though the soup is traditionally made with prawns It wasn’t hard for me to decide that seitan would be a perfect substitute. I had some homemade seitan in the freezer that I needed to use, and all the other ingredients I needed were on hand. Though I was initially a little skeptical about how this might turn out I have to say it came out amazing. Really, I enjoyed leftovers of this soup for lunch all week, and it got better and better each day. I highly suggest making it a day in advance and giving it a night to let the flavors develop in the fridge. However it does taste wonderful the first day as well. I really hope you try this delicious soup, and enjoy it as much as I did.


Hot and Sour Pineapple Seitan Broth 

1 Tbsp Peanut Oil
1 Small Red Onion diced
8 Garlic Cloves minced
1 Thumb sized Piece of Ginger grated
1 ½ tsp Red Pepper Flakes
1 lemongrass stalk trimmed and minced or 3 tsp jarred minced lemongrass
2-3 Tbsp Tamarind Paste
1 ½ Tbsp Sugar
1 ½ Tbsp Soy Sauce (or Coconut Amino's)
5 C Water
Sea salt and Black Pepper to taste (Optional)
8oz Seitan (Homemade or Store Bought)
2 C Fresh Pineapple chopped into bite sized pieces
½ Bunch Cilantro minced
Fresh mint leaves, minced to garnish

- First prepare your seitan by slicing it into thin strips.

- Next heat a large pan over medium-high heat and spray lightly with non-stick spray. Add Seitan in batches and fry a few minutes on each side until browned and crispy. When browned on each side remove the seitan to a plate and set aside.

- Heat the oil in a medium sized pot over medium-high heat. Add the diced onion, minced garlic and grated ginger. Saute for 5 minutes until fragrant.

- Add the red pepper flakes, and lemongrass saute another 2-3 minutes until onions become translucent.

- Stir in the tamarind paste and sugar, then add the 5 cups of water. Stir to combine then bring to a boil. Reduce the heat then simmer for 10 minutes.

- Season the broth lightly with sea salt and pepper to taste, and stir in the soy sauce.

- Add the Pineapple and reserved Seitan to the broth and simmer for an additional 5 minutes until the pineapple is soft and both it and Seitan are heated through.

- Add in the minced cilantro and mint leaves. Divide the broth evenly amongst serving bowls making sure each bowl gets a good helping of both pineapple and seitan. Garnish with extra cilantro and mint if desired.

Typically this soup is served as an appetizer because it’s considered an appetite enhancer, however you can also serve this broth over a plate of steamed rice or noodles for a more substantial meal, or eat it as is for a light lunch or dinner. Either way it’s delicious!


*** Note - Soy Free if using Coconut Amino's instead of soy sauce ***

Sunday, May 13, 2012

The Good Karma Kitchen’s 1 Year Anniversary Post...


Today is The Good Karma Kitchen’s 1 year anniversary! It’s hard to believe that I’ve been doing this blog for a year now. Sometimes it feels like much less, and other days I feel as though I’ve been doing it forever which I guess is generally how I feel about most things. The passage of time for me is so surreal that sometimes I feel as though it doesn’t register for me in quite the same way that it does for others. Other people always seem to have a much firmer grip on time then I do, for me it just sort of flows, and I just flow along with it. Perhaps this is so because I try to live in every moment - despite how fast those moments move - or maybe it’s because I don’t typically get hung up on the details of ‘time’ like what hour it is, or what day of the week or month it is. These things rarely matter to me, most of the time I don’t like to have firm or set plans. I like to take life as it comes and just go with it. In the immortal worlds of John Lennon “Life is what happens when you’re busy making other plans.”

This blog initially was much less a plan, and more of a whim than anything else. It arose out of my desire to help and support the people in my life who were/are struggling not only with vegetarianism/veganism but general health as well. I wanted to create a place for them to go and feel like they were not alone. That’s something I did not have when I made my transformation. Lucky for me I had the complete support of my husband, but sometimes I think it would have also been nice if I’d had a vegetarian friend or two to lean on as well.

After 200 posts I see this blog has grown from just a simple resource I could hand to my friends and family, into something people anywhere in the world can and do access, which is more then I could have ever hoped for. So I would like to thank you, all of you, all of my readers. Those of you who comment, and those of you who read silently. You have changed my life for the better, and you have been an inspiration to me. I can only hope that I have done the same for you. I hope that the information that I present here has been helpful/useful, and I definitely hope that you’ve enjoyed the recipes! Here’s to hoping this next year is as great as the last!

May good health and peace follow you always!

And stay tuned for tomorrow when I will kick off the start of year 2 with a delicious Malaysian recipe!

Love
Kyleigh

Saturday, May 12, 2012

Wild Ramp Pesto...


So, the other day I mentioned that one of the things I did with my bounty of ramps was make a pesto. It may not have been the most original idea out there, but since I’d never used ramps in that way before and since I’m a big lover of pesto I thought why not? Sounded like the perfect dish to me.


Initially I wasn’t sure if I should leave the ramps raw or cook them first. Amongst ramp pesto lovers there seems to be quite the divide. Some prefer raw, some prefer cooked. After tasting one ramp raw, I decided to go the ‘mostly’ cooked route. Ramps are very pungent, and while a few raw ones here and there probably taste great, I thought it would be a bit too over powering to have them all raw. So I decided to blanch 18 and leave 2 raw and honestly I think it worked out great. 2 raw ramps were enough to give the pesto that oomph without giving it any ugh factor. At least in my opinion, but if you like a little more pungency feel free to use more then 2 raw ramps. Use them however best suits your taste, but definitely use them, and definitely use them to make pesto, because this is without a doubt one of the best pesto’s I’ve ever eaten! And I’ve eaten a lot of pesto in my time.


Wild Ramp Pesto 

20 Ramps - 18 Blanched, 2 Raw
2 Garlic Cloves
2/3 C Walnuts
2/3-3/4 C Olive Oil
Dash of ground Thyme
Sea salt and Black Pepper to taste
½ Tbsp Dried Oregano
2-4 Tbsp Lemon Juice
½ bunch Parsley

- Fill a medium sized pot with water and bring it to a boil over high heat. Trim the roots off the ramps and when the water is boiling add the 18 whole ramps into the water. Boil for 1-2 minutes until ramps are soft. Immediately drain, and then plunge into a bowl if ice water to stop them from cooking.

- Place the walnuts in a food processor and pulse until it resembles fine crumbs.

- Add olive oil, lemon juice, garlic and raw ramps to the processor, pulse until combined.

- Add the blanched ramps to the food processor along with the thyme, sea salt, black pepper, oregano and parsley. Pulse until creamy and smooth. Taste for flavor and adjust seasoning as needed.

- Enjoy over your favorite pasta. I used Gluten-Free Rice Spaghetti, and it tasted fabulous. It’s also great garnished with a handful of halved cherry or grape tomatoes!