Showing posts with label Mint. Show all posts

Monday, September 14, 2015

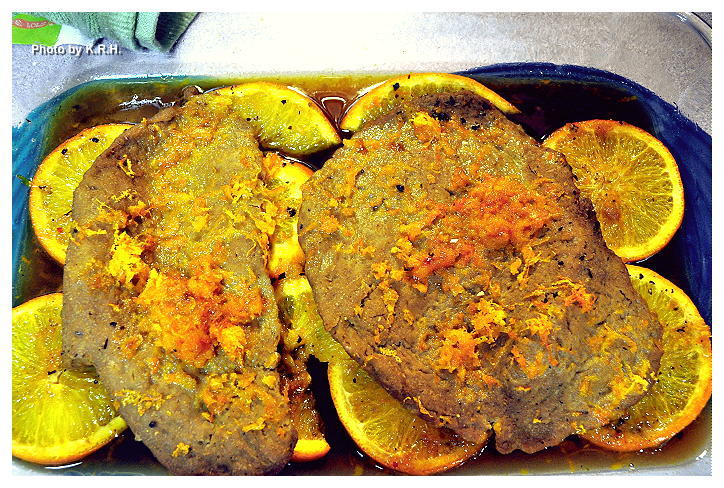
Vegan Mofo #16: Seitan a l’Orange...


I’ve never had Duck a l’Orange before, because I never liked duck, but there was something really intriguing to me about trying to veganize this recipe. I thought it might work out well with seitan in place of duck and since I had some ‘duck’ style seitan left over from making the Duck with Raspberries I thought I’d give it a try. I have to admit I was really skeptical about it, because I had to really play around with the cooking method and times, and I wasn’t at all sure it was going to be any good, but much to my surprise it turned out really, really well. The sauce is so flavorful and on a nice juicy piece of seitan it works so well. Though I imagine the sauce would also be a nice accompaniment to tofu or tempeh as well.


Certainly there is a bit of work involved in a recipe like this, but that’s French cooking for you right? The end result is worth it, so I hope you give it a try. Enjoy your seitan a l’Orange with some simple sides like rice and broccoli as we did, or potatoes and asparagus.


Seitan a l’Orange 
(AKA Canard a l’Orange, AKA ‘Duck’ a l’Orange, ) 

2-4 Homemade or store bought Chicken Style Seitan Cutlets
5 Large Oranges
2 Cinnamon Sticks
1-2 Tbsp Minced Fresh Mint Leaves
½ Cup Brown Sugar
½ Cup Apple Cider Vinegar
1/3 Cup Grand Marnier
4 Tbsp of Nondairy Butter + 1 Tbsp
1 Tbsp Cornstarch


- Preheat the oven to 300'F

- Grease a glass baking dish that’s large enough to hold your seitan. Slice two of the oranges into thin slices. Line the bottom of the glass dish with the slices from one orange. Place the cinnamon sticks over top of the oranges and sprinkle with mint. Layer your seitan cutlets over top, and then top those with the remaining orange slices.

- Roast in the Oven for roughly 30 minutes.

- Meanwhile zest and juice the remaining 3 oranges.  Heat a small pot of water over high heat. When it’s boiling blanch the orange zest Refresh under cold water, drain, and set aside.

- Heat the sugar in a saucepan over low heat until it melts and caramelizes, use a whisk to whisk the sugar a bit so that it caramelizes evenly. When the sugar is a rich brown add in the vinegar, but be carefully as it might splatter.  Boil for three minutes then add the reserved orange juice and grand Marnier. Simmer the mixture for 2 minutes.

- Remove the seitan from the oven, and pour a third of the sauce over the cutlets. If using 2 cutlets place 2 Tbsp of Butter on each Cutlet, if using 4 Cutlets place 1 Tbsp on each cutlet. Then Sprinkle the cutlets with about a quarter of the orange zest. Place back into the oven and roast for another 30 minutes.

- Mix the Tablespoon of cornstarch with a bit of water and whisk to combine. Slowly add it into the pot with the sugar, vinegar, juice mixture. Increase heat and simmer, whisking constantly until the sauce has thickened. Add in the remaining tbsp of butter and the orange zest stir to combine and turn off the heat. Set aside.

- When the seitan is ready, remove it from the oven. Place one cutlet on each plate, and top with as much sauce as you like. FYI the sauce also tastes great over broccoli and rice!


Monday, June 4, 2012

Indo-Malaysian Shami Kebabs...


Just incase you thought I was finished experimenting with Malaysian cooking, this post it to assure you that I’m not. I’ve just been very busy lately preparing for vacation, so I haven’t been cooking quite as much as usual, and much of the cooking I have been doing has been for the express purpose of cleaning out my fridge before I take off. Before I do however, this dish really needs to be shared!


Even though a Shami Kebab isn’t exactly the sort of kebab we here in the west are used to, they are delicious. Originally of Indian Origin these kebabs are traditionally made from a mix of lentils and ground lamb. They are a popular item at the Malay and Muslim Hawker stalls and are often served alongside a dish or rice, and a sambal, however they are also sometimes eaten as a burger which is sort of how I chose to enjoy mine.


Of course my Shami Kebabs were not made with ground lamb, (Ew!) Instead to get that kind of texture and ‘sticking together’ effect I decided to use two different kinds of lentils, as well as cashews and mushrooms. The end result was so fantastic and delicious that both my husband and I failed to see how the dish could have in any way been improved by the addition of lamb. These kebabs, or patties as they should more accurately be called - are hearty, flavorful, and down right scrumptious. I dare you to eat just one.


Also instead of eating these kebabs with a heavy side or rice, or on a burger bun I decided to slayer them onto a sliced French Baguette, piled with lettuce, tomato, cilantro, mango chutney, and a drizzle of tamarind sauce, and mint yogurt. Now that I think of it a few sliced onions would have gone perfectly on there as well. Next time!


Shami Kebabs 

1/3 C Red Lentils
1/3 C Green Lentils
2 Onions finely diced
10 Garlic Cloves minced
1 Thumb Size Piece Ginger grated
1 Small Green Chili minced (Optional)
6oz Baby Bella Mushrooms finely diced
½ C Cashews Ground into a meal
1/4-1/3 C Chickpea Flour (depending on how wet your mixture is)
2 tsp Curry Powder
1 tsp Ground Coriander
1 tsp Ground Cumin
1 tsp Gram Masala
½ tsp Ground Turmeric
Sea Salt to taste
2-3 Tbsp Earth Balance
½ Bunch Cilantro minced

Optional Garnishes 

Cilantro
Sliced Tomato
Lettuce
Thin Sliced Red or Yellow Onion
French Baguette or Italian Loaf
Mango Chutney

Quick Tamarind Sauce 

2 tbsp tamarind paste
2 packets stevia or to taste
water to thin

Quick Mint Yogurt 

1/4 C Sour Cream
1 Tbsp Lemon Juice
1 Tbsp White Miso
2 Tbsp Water
Minced Fresh Mint to taste
Salt and Pepper to taste

- Rinse Lentils then place them in a medium sized pot and add enough water to cover. Bring to a boil then reduce heat to simmer and cook lentils until the water has absorbed and the lentils are tender. Roughly 20-40 minutes. If your water absorbs before your lentils are tender add more water.

- When lentils have finished cooking drain and set aside.

- Meanwhile melt the Earth Balance in a large pan. Stir in the diced onions, garlic, ginger, and green chili. Saute over medium-high heat for 5-10 minutes until mixture is fragrant and onions are translucent.

- Add in the diced mushrooms, the curry powder, coriander, cumin, gram masala, and turmeric. Saute for 3-4 minutes then add the lentils. Saute another 5-10 minutes until mushrooms are soft and moisture has evaporated. Transfer the mixture to a large mixing bowl and set aside to cool.

- Once mixture is cool enough to handle season with sea salt and pepper and add in the ground cashews, the minced cilantro and the chickpea flour. Thoroughly combine until the mixture becomes cohesive enough to form patties.

- Form the mixture into 10-12 palm sized patties. Place on a lightly greased baking sheet and bake at 400'F for 10-15 minutes. Remove the baking sheet, gently flip the patties over and bake for another 10-15 minutes until the patties are browned and have firmed up. Let cool for 5-10 minutes before serving if serving as a sandwich. It serving with rice serve immediately.

- To assemble your Shami Kebab sandwich. Slice a French Baguette in half crosswise then slice each half lengthwise down the middle so you have two roughly 6inch sandwiches. Slice three patties in half then layer three halves on each baguette. Top with mint yogurt, mango chutney, tamarind sauce, lettuce, tomato and cilantro and serve!


- To make Tamarind Sauce and Mint Yogurt simply whisk the ingredients for the Tamarind sauce in a bowl. Taste, adjust for seasoning and thickness and serve. For Mint Yogurt whisk all ingredients together in a bowl taste for seasoning and thickness and serve.

Monday, May 14, 2012

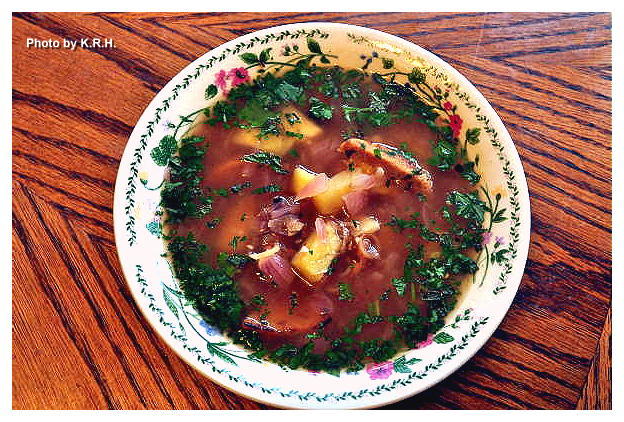
Hot and Sour Pineapple Seitan Broth...


Everyone has a favorite type of cuisine, it doesn’t matter who you ask, everyone has a favorite. Some might say Italian, and some might say Mexican. Others might say German, or Greek, or Japanese, or Chinese. I love all cuisine’s, and if you asked me to pick a favorite I wouldn’t be able to narrow it down to one specific country, but I could narrow it down to a continent. Asia. Asian cuisine is by far my favorite, if I could eat nothing else for the rest of my life that would be totally fine with me. I love Chinese, Japanese, Indonesian, Korean, Thai, Vietnamese, Cambodian, Malaysian, Nepalese, and Indian food, I love them all. This is the food I grew up on, and these are the types of restaurants I typically sought out when I grew older - not that they were at all hard to find in Vancouver.


Vancouver you see has a huge Asian population. Over 30% of the cities inhabitants are of Chinese heritage, they are the largest ethnic group in the city. Vancouver has the largest Chinatown in all of Canada, and the third largest Chinatown by population in North America. The city also boasts significant Japanese, Korean, Filipino, Vietnamese, Indonesian, Cambodian, and Indian populations. I loved this growing up, and I spent a significant portion of my teenage and early adult years exploring Vancouver’s Chinatown, which still today remains one of my top 3 favorite places in all of Vancouver. I loved going to the night markets, I loved going to hawker stalls, and food stands. I loved ducking into little shops, bakeries and groceries, and I most definitely loved eating in every Asian restaurant I came across. It is amongst these people, and these cultures that I feel most comfortable and most at home. I miss ‘my’ Chinatown all the time, I miss meditating in the Sun Yet Sen Classical Chinese Garden - one of the most beautiful and peaceful places in downtown - something I typically did 2-3 times a week when I wasn’t working. Some weeks I was in Chinatown everyday, usually alone, which is how I preferred it. For some reason I rarely went to Chinatown with friends, these adventures were always solo, that is until I met my husband, and then the two of us would explore together.


My husband, who loves Asian food as much as I do if not more, found Vancouver to be a magical place. Growing up in Chicago and suburban Illinois he wasn’t exactly exposed to the same level of Asian culture as I was. It wasn’t until he attended University in Southern California that he really experienced Asian food proper, particularly sushi for which he has an undying love. I can’t tell you how many Vancouver days and nights we spent stuffing our faces with all the glorious sushi on offer. Sushi bars you see are to Vancouver what Starbucks is to Seattle. No joke, you can’t throw a rock in downtown Van without hitting at least three Sushi Bar’s or restaurants. They are almost literally on every corner, and they are far more populous then either Starbucks or McDonald’s. As my husband said to me many years ago - and has said many times since - “Even the shittiest hole in the wall Sushi bar in Vancouver is better than the best Sushi Bar in Chicago.” - With which after moving here I would have to agree. While after a lot of searching I have found some very good sushi here in Chicago none of it can ever compare to the sushi I enjoyed in Vancouver, which Is why I typically prefer to make my own, but that’s beside the point.


Together we hit up Korean BBQ’s and Vietnamese Pho restaurants all over the city. We chowed down on Thai takeaway, and Indian curries. We stuffed ourselves on fried bananas in coconut milk, and green tea ice cream. More often than not we were the only white people eating in the restaurants we chose, and half the time we couldn’t read the menus - which weren’t in English - and so had to order by pointing at pictures. I miss this a lot, and I definitely miss the food. Even after living here for nearly 5 years I can’t get used to the endless stream of white faces, I feel awkward being part of the ‘majority,’ and I find the lack of diversity in the suburbs suffocating.


I guess it’s because I’ve been missing Vancouver lately that I’ve been making more and more Asian dishes at home. Lately I find myself particularly fascinated by the foods of Malaysia. The cuisine of Malaysia is one of the few Asian cuisines with which I’m not overly familiar, but it’s always intrigued me. Years ago I bought a Malaysian and Singapore cook book but never made anything out of it because at the time I wasn’t very proficient in the kitchen. When I finally developed my skills in the kitchen I’d stopped eating red meat and pork and was only six months away from turning vegetarian. So the book has just been sitting in my closet collecting dust for the past five years.


Traditionally Malaysian food is not particularly vegan friendly. Malaysia is a pretty ethnically diverse place, and religiously diverse as well, with a percentage of the population being Buddhist. So there are vegetarian dishes but many of them call for eggs. Most people might consider this a problem, but not me. These dishes have been calling to me over the past couple of weeks, and once I get curious about something I find it very hard to get my mind off the topic, so I decided I would try and veganize some of these recipes. When it comes to vegan Asian cuisine I find there are a lot of repeat recipes. Anyone can make a vegan curry, or a vegan stir fry. There are recipes abound for vegan won ton, vegan kung pao, vegan fried rice, and vegan tempura. As much as I love all of those things I like a little variety too, and I want to start making vegan versions of more of the dishes I used to enjoy. As well as new dishes that remind me of the tastes, and flavors I loved back in those days.


The first dish I decided to recreate is a simple Nonya dish. When early Chinese traders settled in ports of Penang, Melaka and Singapore beginning in the 15th century, many of them married local Malay woman. These marriages created an ethnic sub-group of Malay-Chinese, which in Malay are referred to as Peranakan. This group was particularly noted for it’s distinctive dress, it’s lavishly decorated homes and above all it’s cuisine. All the meals were cooked by the woman or Nonyas - the Peranakan word for female - and were an inspired blend of both Chinese and Malay traditions. The style of cuisine is very unique, full of flavor and infused with elements of Indian, Thai, Portugese, and Chinese cooking.


For my first foray into Malay cooking I chose a simple soup dish because It intrigued me, and it inspired memories of many of the sweet, sour and hot dishes I used to enjoy back home. Though the soup is traditionally made with prawns It wasn’t hard for me to decide that seitan would be a perfect substitute. I had some homemade seitan in the freezer that I needed to use, and all the other ingredients I needed were on hand. Though I was initially a little skeptical about how this might turn out I have to say it came out amazing. Really, I enjoyed leftovers of this soup for lunch all week, and it got better and better each day. I highly suggest making it a day in advance and giving it a night to let the flavors develop in the fridge. However it does taste wonderful the first day as well. I really hope you try this delicious soup, and enjoy it as much as I did.


Hot and Sour Pineapple Seitan Broth 

1 Tbsp Peanut Oil
1 Small Red Onion diced
8 Garlic Cloves minced
1 Thumb sized Piece of Ginger grated
1 ½ tsp Red Pepper Flakes
1 lemongrass stalk trimmed and minced or 3 tsp jarred minced lemongrass
2-3 Tbsp Tamarind Paste
1 ½ Tbsp Sugar
1 ½ Tbsp Soy Sauce (or Coconut Amino's)
5 C Water
Sea salt and Black Pepper to taste (Optional)
8oz Seitan (Homemade or Store Bought)
2 C Fresh Pineapple chopped into bite sized pieces
½ Bunch Cilantro minced
Fresh mint leaves, minced to garnish

- First prepare your seitan by slicing it into thin strips.

- Next heat a large pan over medium-high heat and spray lightly with non-stick spray. Add Seitan in batches and fry a few minutes on each side until browned and crispy. When browned on each side remove the seitan to a plate and set aside.

- Heat the oil in a medium sized pot over medium-high heat. Add the diced onion, minced garlic and grated ginger. Saute for 5 minutes until fragrant.

- Add the red pepper flakes, and lemongrass saute another 2-3 minutes until onions become translucent.

- Stir in the tamarind paste and sugar, then add the 5 cups of water. Stir to combine then bring to a boil. Reduce the heat then simmer for 10 minutes.

- Season the broth lightly with sea salt and pepper to taste, and stir in the soy sauce.

- Add the Pineapple and reserved Seitan to the broth and simmer for an additional 5 minutes until the pineapple is soft and both it and Seitan are heated through.

- Add in the minced cilantro and mint leaves. Divide the broth evenly amongst serving bowls making sure each bowl gets a good helping of both pineapple and seitan. Garnish with extra cilantro and mint if desired.

Typically this soup is served as an appetizer because it’s considered an appetite enhancer, however you can also serve this broth over a plate of steamed rice or noodles for a more substantial meal, or eat it as is for a light lunch or dinner. Either way it’s delicious!


*** Note - Soy Free if using Coconut Amino's instead of soy sauce ***

Tuesday, March 13, 2012

The Rejuvenator...


It’s an absolutely gorgeous day in Chicagoland today. Sunny, and warm with a nice breeze. My favorite kind of day and I’ve been taking advantage of it by spending time outside walking and hooping, and by having all the shades and windows open while I’ve been in. It’s amazing just how good a little sunshine and exercise can make you feel!


Now I don’t know about you but I know when the seasons begin to change I begin to change with them. My habits, my food choices, my overall routine - it all shifts. During the cold winter months this usually means I eat hardier heavier fare, exercise less and stay indoors more. Something I always feel good about in the beginning because who doesn’t like to laze about a bit after the long hot sweaty months? Truth is though, I hate being cooped up indoors, I hate the stale re-circulated air, and I hate not being able to go for long walks or ride my bike. Then of course there’s the food, now as much as I love stews, soups, chilies, pasta, baked goods, sweets and creamy gooey comfort food goodness there always comes a point where I feel enough is enough. By the time Spring rolls around all I want to do is run, and eat salad. Even if I haven’t gained any weight over the winter - which I usually don’t - I always feel heavier, bogged down, and just generally sick of spirt I suppose. Which is exactly how I was feeling last Friday after a week long adventure in cooking Latin food. It was so good - mouth watering good, and it was so much fun to begin learning a new cuisine but by the end of the week I just wanted to die. I was so stuffed, so tired, so clogged up; everything about my body and my spirt felt out of whack, they were no longer working in harmony with one another, and I felt awful.


The only way I know how to remedy this is to get myself back to basics. Get off the sugar, get off the starch, get off the corn, soy and wheat. Get myself back into a routine of green smoothies, salads, and a lot more fresh raw produce. Cutting all that out and just eating and living simply is the best way to flush out the body and restore balance to both your physical and spiritual self. After only two days I’m feeling better, healthier, lighter, happier and more positive then I have in months. It’s a wonderful feeling, and so I wanted to share with you the smoothie I made Saturday morning to get myself back on track. It’s so delicious and invigorating that I drank the entire blender full in about twenty minutes, and felt fantastic all day. My sugar cravings diminished and my belly stayed full all afternoon without making me feel like death, not to mention I felt less tired and more energized.

I highly recommend you kick off the new season with a cleanse of your own, and include this refreshing, rejuvenating drink!

Happy Spring!


The Rejuvenator

2 Cara Cara Oranges***
3-4 Large Kale Leaves
1 D’Anjou Pear
1 Banana
1 Granny Smith Apple
1 tsp Spirulina
2 C water
1-2 Tbsp lemon juice
1-2 packets stevia
3-4 sprigs Fresh Mint

- Peel oranges, and remove as much pith (the white skin covering the fruit) as possible.

- Place all ingredients except Stevia in a high-speed blender and blend on high for 60 seconds or until well blended and completely smooth. Taste for sweetness and add stevia to taste.

*** Note - You could use Navel Oranges if you don’t have Cara Cara, however the Cara Cara oranges add a really unique and delicious flavor to this smoothie that Navels will not. Cara Cara’s are a favorite of mine, and for good reason, so I highly recommend you try them if you can find them at your local grocer or farmer’s market. ***

Monday, March 5, 2012

Greek Style Dolmathes...


Dolmathes are an essential part of Greek Cuisine for me, and no Greek feast can be complete without these delicious rice stuffed vine leaves. Dolmathes - or dolmas, which is the Turkish name they’re more commonly known by - originated sometime during the Ottoman Empire and have many different variations depending on the region. Though they may not have originated in Greece exactly, they have certainly become synonymous with the culture and the cuisine; and to be honest it’s the simple Greek preparation of dolmathes that I love and appreciate the most.


The cool thing about dolmathes is that they’re one of the few - possibly the only? - dish in Greek cuisine that is traditionally vegan. That’s right, true Greek dolmathes are vegan, they contain no meat, no cheese, no egg, and no other dairy products. So don’t allow people to tell you that dolmathes are meat based, or that meatless dolmathes are not traditional or are in some way lacking, because they’re not. Dolmathes have always been one of the many great vegetarian dishes of Greece that just happens to also be vegan. Having said that however, you should be mindful when eating dolmathes in restaurants because there are meat stuffed variations of dolmathes as well. In Greece the meat stuffed versions are called Dolmathakia, but on restaurant menus - at least in North America - rarely is a distinction drawn between the two. Most often all types of dolmathes are simply labeled dolmathes or dolmas and so you’ll want to read the ingredients.


Typically dolmathes are served cold with Avgolemono sauce while dolmathakia are served warm with yogurt sauce, though dolmathes can also be served warm which is usually how I serve mine. Except the leftovers of course which I prefer to eat cold. Believe it or not they taste amazing either way though even if you eat them cold you’ll want to warm your avgolemono up a bit. In restaurants dolmathes are also generally served as an appetizer but served with a nice Greek salad or small side dish they make a wonderful main course in their own right. If you’ve never had dolmathes, and in particular never made your own you really must try it!

They may appear intimidating upon first glance but I assure you they are not as fussy as they seem. In fact preparing them is relatively easy and it’s true that the more often you make them the more you improve. They don’t require any special equipment and all they really ask for is a bit of patience and a gentle hand. Be gentle with your grape leaves so as not to tear them, role your dolmathes tightly like you’re rolling sushi and pack them firmly together. Follow that advice and you shall not be led astray. Though everyone - including myself - is bound to have at least one or two dolmathes burst on them during the cooking process, no worries, they may not look pretty and they may not be the ones you choose to serve to your guests but they taste just fine so scoop ‘em into a bowl to eat the next day and don’t worry about them. My only other advice is that you buy more grape leaves then you think you need, and my reason for this is simple - you never know. You never know what the quality of your leaves will be like, you never know if you’re going to tare any or how many you might tare, and you never know how big or small the leaves are. If you get a jar of small leaves you may want to overlap two leaves to make one dolmathes instead of using one leaf. I tend to do this a lot and it actually makes the process a lot easier. So with all that in mind lets get rolling....


Dolmathes

At least a16oz jar of Grape Vine Leaves
1 ½ C Cooked Brown Rice
2 Medium Onions grated
2 Large tomatoes grated
4 tsp or 1 Tbsp Fresh Mint minced (to taste, I typically like more)
1/3 C Olive Oil (or more as needed)
2 ½ C Water
1/4 C Olive Oil
1/4 C lemon Juice or ½ a Lemon Juiced
Sea Salt and Black Pepper to taste

- First bring a pot of water to boiling drop your tomatoes into it for a couple of minutes then dunk in a bowl of ice water. Rub skins until they come off and set aside.

- Grate onions and tomato on a cheese grater, then add it to a bowl with your cooked rice. Add in the mint, salt and pepper to taste and 1/3 C olive oil. This should be enough oil, however depending on how juicy or not juicy your onions and tomatoes are you may want to increase the oil to 1/2 C. It's up to you, but also keep in mind that while you want the mixture moist and flavorful, you don't want it liquidy.

- On a clean cutting board lay out one vine leaf. Place a spoonful of filling down the center of the leaf. Carefully but firmly roll tucking in the sides as you go until you’ve formed a neat, tight roll. Think of it like rolling sushi or a burrito. Repeat this process until all filling has been used. Remember if your leaves are small or a little bedraggled you can always use a second leaf, overlapping it with the first to create a larger sturdier roll.

- Place a pot big enough to hold your dolmathes in a single layer, on the stove. Place reserved tomato skins at the bottom and then pile your dolmathes on top. Try to keep them in a single layer, packing them in tightly. If you need to go two high, or have a few extras on top it’s okay, but they cook best when packed tight so try to cram them in. Gently of course. Add the 2 ½ cups of water, plus the 1/4 of olive oil to the pot.

- Place a plate, or another pot inside the pot on top of the dolmathes to hold them down then cook over medium-low heat for fifteen minutes.

- Remove the plate or pot and discard. Give the dolmathes a gentle stir and add the lemon juice. Then cover with a lid and cook another fifteen minutes.

- Drain off any liquid that may remain in the pot then remove dolmathes from the pot with a slotted spoon and place on a serving plate or individual plates. Discard tomato skin.

- Serve with a huge dollop of Avgolemono sauce and enjoy!


PS: In retrospect I probably should have taken a picture of one of these guys cut in half so you could see the inside, apologies!

Tuesday, January 10, 2012

Green Hydration Smoothie...


You know how sometimes you wake up and feel super desperate for water? Somehow over the course of the night your mouth transformed into a desert wasteland and now your body is just aching for some good old fashion hydration? In addition to drinking some delicious agua upon waking this smoothie is the perfect solution. It’s not only hydrating but refreshing. I consider all the ingredients in this smoothie to either be hydrating or refreshing. Cucumbers are especially hydrating because they contain so much water themselves, they’re also super refreshing particularly on a hot day. Mint too helps to calm and cool the body leaving you feeling oh so good, and bananas help replenish your electrolytes.


The great thing about this smoothie - in addition to it being delicious - is that it’s super light. It has a consistency more akin to a juice rather then a smoothie due to all the high water content produce within. So you can drink a large amount of it and not feel bogged down or overly full. In fact even if you drink the entire blender full you’ll still have a bit of room to have a bit of solid breakfast if you wish. I recommend drinking this smoothie upon first waking, then get yourself into some exercise, light cardio, a brisk walk a nice jog, then come home and drink another glass with a bit of breakfast. It’s the perfect start to a beautiful day.


Green Hydration Smoothie

1 Small Zucchini
1 Large Cucumber seeded ***
1 thumb sized knob of Ginger Root (or to taste)
2 Granny Smith Apples (or Pink Lady or a Combination)
2 C Water
6 Leaves Fresh Mint (or to taste)
2 Packets Stevia
3-4 Tbsp Lime Juice
1 Banana

- Place all ingredients except stevia in a high-speed blender and blend on high for 60 seconds or until completely smooth. Add in Stevia, blend to incorporate and serve.


*** Note - You do not have to seed your cucumber if you don’t want to. However I find that depending on the cucumber the seeds can be sweet or bitter. I recommend tasting a piece of your cuke and if the seeds are bitter remove them. If not feel free to leave them in ***

*** Note - Because this is a question I often get I would like to make it clear that whenever I’m using non-organic produce I always, always peel it. If you are using non-organic zucchini or cucumber or apples in this recipe I urge you to peel them! If you are using organic then there is no need for you to do so. Just give them a wash. As for water, whenever I call for water in recipes particularly smoothie, sauces or other non-cooked recipes I’m always talking about filtered water. You can use bottled or filtered tap, whatever works for you, but I don’t recommend using unfiltered tap water, particularly if you’re living in an area where the water might not be so pure.***