Showing posts with label Jalapeno. Show all posts

Thursday, December 20, 2012

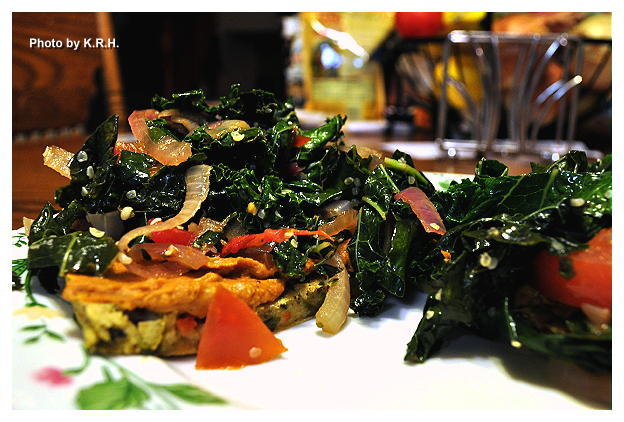
Simple Socca with Fava Bean Spread and Sauteed Kale...


I know I haven’t been keeping up with this as well as I should have been, but with the holiday season I’ve been a little pressed for time. School has been brutal the past couple of weeks as I struggled to finish all of my assignments in time to take my final - which I did today, and aced! - And any time I’ve had not devoted to school has been divided between work, holiday planning/Christmas shopping and watching documentaries on Netflix until my one month free-trial runs out on the 24th. Suffice to say I haven’t been doing a lot of cooking, or rather I have been, but I haven’t really been ‘creating. ‘ Mostly I’ve been relying on my good and trusty cook books to see me through, particularly those cook books devoted to healthful recipes that can be made in under 30 minutes. As unlike everyone else - or so it seems - I’m actually trying to keep with my routine this holiday season rather then use the holiday as an excuse to excessively binge on high fat junk foods. So I’ve been eating a lot of salad - which I’ve been craving lately anyway - and a lot of soup because the days are growing colder, a lot of things you probably wouldn’t find to enticing except for maybe the Socca.


Socca you see is my new favorite thing. - That and firtatta but more on that another time! Now Socca is a specialty in Southeastern French cuisine particularly in and around Nice. However it apparently originates in Genoa, Italy, and over time spread to Nice where it became popular throughout the region of the Ligurian Sea.  There are apparently similar dishes in countries such as Algeria, Argentina and Uruguay but I digress. The Socca I’m talking about is of the French variety. For those of you still unsure of what a Socca is, it’s a crispy thin pancake cooked in a cast iron skillet and eaten as a finger food while piping hot. It’s seasoned with fresh herbs, and generous amounts of black pepper and is typically eaten on it’s own. However I’m quite fond of turning my socca into a kind of pizza topped with a bean dip instead of a marinara sauce, and a lightly dressed salad. Making your meal an all in one sure makes cleanup a breeze! Over the past few weeks I’ve made quite a few socca’s, I’m typically making it twice a week now, and so I’ve tried a lot of different things, but this was one of my favorite combinations, and my husbands too. It’s sort of a cross between Provincial and Italian with a little red hot jalapeno thrown in for good measure, but what it really is, is delicious so I hope you try it out.


Simple Socca with Fava Bean Spread and Sauteed Kale

Socca 

1 ½ C Chickpea Flour
½ tsp Sea Salt
1/4 - ½ tsp Freshly Ground Black Pepper
3-4 Nice Sprigs Fresh Rosemary minced
1 tsp Dried Basil
1 tsp Dried Oregano
½ tsp Garlic Powder
1 ½ C Water
2 Tbsp Olive Oil
1/4 C Minced Kalamata Olives
1/4 C Minced Sun-dried Tomatoes
1/4 C Minced Green Onion
Minced Pickled Jalapeno to taste - try between 2-4 Tbsp.

Fava Bean and Sun-dried Tomato Spread

1 15oz Can Fava Beans drained and rinsed
2 Garlic Cloves - or to taste
6 Oil-Packed Sun-Dried Tomatoes
1 tsp Dried Basil
Sea Salt and Black Pepper to Taste
2 Tbsp Olive Oil - optional
1 Tbsp Lemon Juice
2 Tbsp Water to thin as needed

Topping 

1-2 Tbsp Olive Oil
1 Large Red Onion sliced thin
1 Large Bunch Kale cut into bite sized pieces.
10 Cherry Tomatoes halved
2 Tbsp Hemp or Sesame Seeds
Sea Salt and Pepper to taste
Ume Vinegar to taste


- Preheat oven to 425'F

- To make Socca whisk flour, salt, pepper, rosemary, basil, oregano, garlic powder, water and olive oil together in a bowl and set aside for 30 minutes.  - While Socca is resting you can make the Fava Spread and the topping.

- After thirty minutes whisk in all remaining ingridients.

- Heat a cast iron skillet over high heat on top of the stove. Spray with a little non-stick cooking spray. Once hot enough that water sizzles pour the Socca batter into the pan. Let the socca cook on high in the pan for 1 minute until the edges turn golden brown.

- Turn off the burner, and remove the cast iron pan, placing it into the heated oven. Bake for 15-20 minutes until light golden brown.

- To make the Fava Bean Spread combine all ingredients in a food processor and process until completely smooth and spreadable. Adding more water or oil to thin as needed. Taste for seasonings and adjust as necessary.

- To make topping. Heat olive oil in a pan over medium heat. Add onion and saute until translucent about 5-7 minutes.

- Add Kale and saute for another 5-8 minutes until kale is wilted and tender. Add in cherry tomatoes and saute for 2-3 minutes. Season with salt, pepper, ume vinegar and hemp seeds. When the mixture has reached it’s desired tenderness and flavor remove from heat.

- To assemble, cut the socca into four equal pieces and divide amongst 2-4 people. Spread each wedge of socca with a generous amount of the fava spread and top with a generous helping of the sauteed kale mixture.

- Enjoy! Seriously i'm so in love with socca you may see more recipes for it and variations of it from me in the future!


PS: Socca’s seem to be becoming a little more popular in North America. Over the past few weeks I’ve been making them I’ve seen them mentioned a few times in magazines, blog posts, and even in newly released cook books! Also another great fact about Socca is that they’re naturally gluten-free, and vegan! 

Monday, October 1, 2012

Vegan Mofo #2 - Chloe’s Thai Chickpea Burgers with Sweet ‘n’ Spicy Sauce...


Vegan Mofo #2 - Chloe’s Thai Chickpea Burgers with Sweet ‘n’ Spicy Sauce
The Book - Chloe’s Kitchen
The Author - Chloe Coscarelli
The Recipe - Thai Chickpea Burgers with Sweet ‘n’ Spicy Sauce
Page #121
Difficulty - Easy
Duration - 30-40 minutes depending on how fast you’re able to whip everything together. Longer if you’d prefer to bake the patties as opposed to frying them.


I am a big fan of anything chickpeas, they are without a doubt my favorite bean, and I could eat them cold straight out of the can. I’m also a huge fan of falafel and falafel type things, so I was eager to test this recipe out. The fact that it’s pretty simple to prepare and comes together rather fast was a bonus since I had to make it all yesterday morning before heading off to work.


I haven’t made a lot of recipes in Chloe’s Kitchen, but of the one’s I’ve made I haven’t been steered wrong yet, and these burgers are no exception. I love the robust combination of flavor as well as the density of the patties. They’re hearty, they’re filling, they feel like they should be really bad for you but really they’re not. I also love the simplicity. No wheat-gluten, no seitan, no tempeh not even tofu. Just good down-home ingredients that most people already have handy in their fridges and pantries. It’s perfect for a busy weeknight meal, a quick weekend throw-together or an afternoon lunch.


The patties are a blended mixture of chickpeas, onion, garlic, ginger, cilantro, lime juice, jalapeno and a couple of other things. They have a slightly spicy subtly tangy twist, and a vague Thai or Asian fusion feel. They’re especially good paired with the super simple and easy sweet ‘n’ spicy sauce which is just a combination of tomato paste, olive oil, water, agave, vinegar, red pepper flakes and salt though for some extra kick I also added Siracha. Of course no spicy burger would be complete without the addition of cooling avocado.


In the end I served these burgers pretty plain. On simple wheat burger buns, with sweet orange tomatoes from our garden and a smear of Earth Balance Mindful Mayo. I know it sounds so simple, but sometimes simple is all you’re looking for, sometimes simple is what you need.

I’m looking forward to trying more recipes out of Chloe’s Kitchen in the future.

PS: Please excuse the bad lighting I took these pictures close to Midnight and you know how my kitchen lighting is. Also excuse the poor presentation, I wasn’t about to make a side dish just for aesthetics.


Thursday, June 7, 2012

Curry Kapitan with Coconut and Chili Relish...


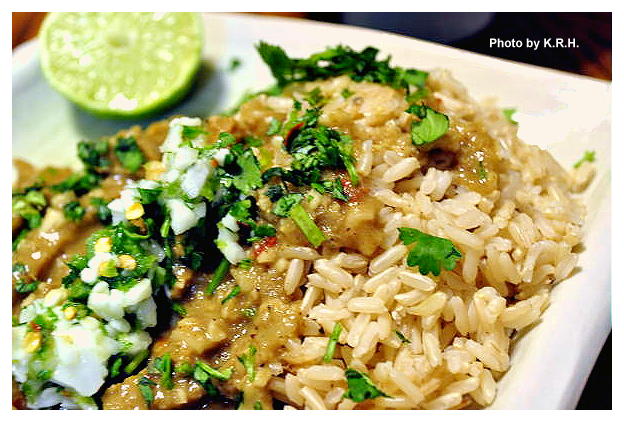
My latest foray into Malaysian Cooking. Curry Kapitan is traditionally made with chicken, and it’s said that the dish recalls the traditional role of the Chinese Kapitan, who was a man of considerable social standing amongst the Malay and Chinese people in old Melaka. Possibly invented by the Peranakans - the Malay-Chinese - to present to the Kapitan or to celebrate his role. It owes it’s flavor to the cultural melting pot of Old Melaka, and to the traditions of Chinese, Malay, Portugese, and Indian cuisine. Of course for my version I used homemade seitan instead of chicken, and decided to use soy sauce for a salty taste instead of dried shrimp paste.


This dish is nothing if not flavorful. The aroma alone is mouth-watering, but the taste... incredible! Though the ingredient list may seem long, this dish actually comes together rather quickly and it is worth every ounce of effort. When I first set out to make this dish I had no idea what to expect, and there were a few moments at least where I thought the whole thing would end in disaster. However when it came time to eat, and I took my first bite of curry Kapitan I was in love. The flavor is so complex that it’s hard to describe, but it has every flavor note you could possibly want in a dish. You can adjust the seasonings to make it as hot or mild as you like, but a little bit of kick is part of what makes this dish so fantastic. Use the chilies as a garnish, with a squeeze of lime and you won’t be disappointed. It tastes even better the next day!


Curry Kapitan with Coconut and Chili Relish 

For the Rempah 

½-1 tsp red pepper flakes
1 large red onion
10 cloves garlic
thumb sized piece of ginger
1 tbsp soy sauce
½ tsp ground turmeric
2 tsp Chinese five spice powder
1/4-1/2 tsp ground cinnamon

For the Curry 

2 Tbsp tamarind paste
Flesh from half of 1 Fresh Thai Coconut (roasted)
2 tbsp peanut oil
1 15oz can coconut milk + 1/3 c water
1-2 Pack Stevia
1 ½ lb Seitan (Homemade or Store bought)

For the Chili Relish 

½ - 1 Jalapeno Minced (Depending on how spicy you want it)
½-1 Red Chili Minced or ½-1 tsp red pepper flakes
½ Bunch Cilantro Minced
Flesh from half of 1 Fresh Thai Coconut
Juice of 1 Lime


To Serve

1 Lime
Extra Cilantro minced
Cooked Brown Rice

- First you must open your coconut. To do this the easiest way is to get a cleaver. It doesn’t have to be a good cleaver, it doesn’t have to be a $500 one, a $50 one will work just as good. Use the cleaver to whack your coconut a couple of times to break through. Drain the liquid out into a bowl or measuring cup and refrigerate to dink later, it’s not needed for the recipe.

- Once the liquid has been drained from the coconut you can split it in half. Use your cleaver and give the coconut a great whack in the middle. If like me you’re not strong enough to get the cleaver all the way through the coconut in one whack, and not skilled enough to keep hitting it in the exact same spot, use a rubber mallet to hammer the cleaver down through the coconut. This works really great, and fast.

- Once your coconut is in half use a spoon to scoop out the delicious white flesh. Once all the flesh has been removed rinse it under cold water and rub any filament away. Pat the coconut dry, and then slice it thin. Reserve half the amount of coconut in a bowl, to use as part of the relish and dry roast the other half in a pan over medium heat until it’s golden brown. Be careful not to burn it. The coconut should emit a slight nutty aroma.

- Once the coconut is a nice golden brown remove it and grind it either in a food processor or mortar and pestle until it resembles corse sugar grinds. Place in a bowl and set aside.

- Now to make the Rempah. In a food processor blend together the garlic, ginger and onion. Add in the soy sauce and pulse to combine. Stir in the turmeric, cinnamon and five spice powder.

- Heat the oil in a large pan over medium-high heat and stir in the rempah. Fry for five to eight minutes until the mixture becomes fragrant.

- Add the seitan to the pan and fry another 3-5 minutes, to let the seitan brown a little.

- Add in the coconut milk, water, Tamarind, stevia and season with sea salt and black pepper. Bring the mixture to a boil, then reduce heat and let simmer for 10-20 minutes. Add in the reserved roasted coconut.

- In the meantime combine all the relish ingredients in a bowl.

- Serve the Curry Kapitan over a bed of brown rice, garnished with extra cilantro, some squeezed lime, and the chili relish.


*** Note - To make this dish Gluten-Free use Wheat Free Tamari and a soy-based ‘meat’ or tofu. To make this dish Soy-Free use Coconut Amino’s instead of soy sauce.***

Monday, June 4, 2012

Indo-Malaysian Shami Kebabs...


Just incase you thought I was finished experimenting with Malaysian cooking, this post it to assure you that I’m not. I’ve just been very busy lately preparing for vacation, so I haven’t been cooking quite as much as usual, and much of the cooking I have been doing has been for the express purpose of cleaning out my fridge before I take off. Before I do however, this dish really needs to be shared!


Even though a Shami Kebab isn’t exactly the sort of kebab we here in the west are used to, they are delicious. Originally of Indian Origin these kebabs are traditionally made from a mix of lentils and ground lamb. They are a popular item at the Malay and Muslim Hawker stalls and are often served alongside a dish or rice, and a sambal, however they are also sometimes eaten as a burger which is sort of how I chose to enjoy mine.


Of course my Shami Kebabs were not made with ground lamb, (Ew!) Instead to get that kind of texture and ‘sticking together’ effect I decided to use two different kinds of lentils, as well as cashews and mushrooms. The end result was so fantastic and delicious that both my husband and I failed to see how the dish could have in any way been improved by the addition of lamb. These kebabs, or patties as they should more accurately be called - are hearty, flavorful, and down right scrumptious. I dare you to eat just one.


Also instead of eating these kebabs with a heavy side or rice, or on a burger bun I decided to slayer them onto a sliced French Baguette, piled with lettuce, tomato, cilantro, mango chutney, and a drizzle of tamarind sauce, and mint yogurt. Now that I think of it a few sliced onions would have gone perfectly on there as well. Next time!


Shami Kebabs 

1/3 C Red Lentils
1/3 C Green Lentils
2 Onions finely diced
10 Garlic Cloves minced
1 Thumb Size Piece Ginger grated
1 Small Green Chili minced (Optional)
6oz Baby Bella Mushrooms finely diced
½ C Cashews Ground into a meal
1/4-1/3 C Chickpea Flour (depending on how wet your mixture is)
2 tsp Curry Powder
1 tsp Ground Coriander
1 tsp Ground Cumin
1 tsp Gram Masala
½ tsp Ground Turmeric
Sea Salt to taste
2-3 Tbsp Earth Balance
½ Bunch Cilantro minced

Optional Garnishes 

Cilantro
Sliced Tomato
Lettuce
Thin Sliced Red or Yellow Onion
French Baguette or Italian Loaf
Mango Chutney

Quick Tamarind Sauce 

2 tbsp tamarind paste
2 packets stevia or to taste
water to thin

Quick Mint Yogurt 

1/4 C Sour Cream
1 Tbsp Lemon Juice
1 Tbsp White Miso
2 Tbsp Water
Minced Fresh Mint to taste
Salt and Pepper to taste

- Rinse Lentils then place them in a medium sized pot and add enough water to cover. Bring to a boil then reduce heat to simmer and cook lentils until the water has absorbed and the lentils are tender. Roughly 20-40 minutes. If your water absorbs before your lentils are tender add more water.

- When lentils have finished cooking drain and set aside.

- Meanwhile melt the Earth Balance in a large pan. Stir in the diced onions, garlic, ginger, and green chili. Saute over medium-high heat for 5-10 minutes until mixture is fragrant and onions are translucent.

- Add in the diced mushrooms, the curry powder, coriander, cumin, gram masala, and turmeric. Saute for 3-4 minutes then add the lentils. Saute another 5-10 minutes until mushrooms are soft and moisture has evaporated. Transfer the mixture to a large mixing bowl and set aside to cool.

- Once mixture is cool enough to handle season with sea salt and pepper and add in the ground cashews, the minced cilantro and the chickpea flour. Thoroughly combine until the mixture becomes cohesive enough to form patties.

- Form the mixture into 10-12 palm sized patties. Place on a lightly greased baking sheet and bake at 400'F for 10-15 minutes. Remove the baking sheet, gently flip the patties over and bake for another 10-15 minutes until the patties are browned and have firmed up. Let cool for 5-10 minutes before serving if serving as a sandwich. It serving with rice serve immediately.

- To assemble your Shami Kebab sandwich. Slice a French Baguette in half crosswise then slice each half lengthwise down the middle so you have two roughly 6inch sandwiches. Slice three patties in half then layer three halves on each baguette. Top with mint yogurt, mango chutney, tamarind sauce, lettuce, tomato and cilantro and serve!


- To make Tamarind Sauce and Mint Yogurt simply whisk the ingredients for the Tamarind sauce in a bowl. Taste, adjust for seasoning and thickness and serve. For Mint Yogurt whisk all ingredients together in a bowl taste for seasoning and thickness and serve.

Monday, November 7, 2011

Irish Nachos...


Originally I had a much bigger and more exciting post to share with you today, but in all honesty I’m feeling a little uninspired and pretty wiped out from a busy weekend of work combined with celebrating. Celebrating what? you may ask. Well Chicago’s Vegan Mania of course, and that’s what I’d intended to post about today. However it appears as though you’ll have to patiently wait at least one more day for my Vegan Mania write up, while I gather my thoughts and transform them from jumbled gobblygook to coherent sentences.

Not wanting to short change you though, I thought it only fair that I post about something, and it just so happens I had the perfect thing waiting in the wings. It’s a recipe review, and I know that after a month of Vegan Mofo you might be a bit tired of recipe reviews but trust me when I tell that after eating this dish I could not let it pass into food oblivion without at least giving it a mention.


The first thing I did upon my return from vacation was go to the library and return the books I’d taken out to read on the plane. While I was there I decided to peruse the cookbook section and I just happened to come across a cookbook I’d never seen or even heard of before. The title is "Hearty Vegan Meals for Monster Appetites" by Celine Steen and Joni Marie Newman, which was published this year. I took a quick peek and deemed it interesting enough to bring home. Once I had it home however I realized that the recipes are for foods I would normally not eat, or at least not eat with any kind of regularity. As a health-nut I try to shy away from fats, sugars, and processed foods. I keep my consumption of soy-based and wheat based foods/cheeses/meats to a strict minimum and try to focus my diet on healthful foods like whole grains, vegetables, legumes, fruits, nuts and seeds in their most natural state. This book is full of recipes for what I’d call the ultimate comfort foods. However even health-nuts get a wicked craving for something decadent once in a while, and there were a handful of recipes that caught my eye. The most enticing of which was the "Irish Nachos"

Exactly why I found this dish enticing I couldn’t tell you, as the recipe contains several things I either never eat or don’t like. Tater tots, ‘fake’n bacon’ soy cream and nutritional yeast to name a few. Yet something about it just called to me. Perhaps it was the very weirdness of the dish, as you should all know by now my almost obsession with cooking things that sound utterly awful. Maybe it was my love for nachos, something I haven’t eaten in a while. Maybe it was because it reminded me nostalgically of Ireland. Stranger still since I never saw anything even remotely like this in my travels there. Whatever it was that caught my interest, Saturday night after returning home from Vegan Mania I decided to whip up a batch of these.


The night of Vegan Mania was probably the perfect night to make these. For one thing they were super quick taking barely 30 minutes from start to finish, and secondly I’d just spent the entire day gorging myself on all kinds of delicious food I don’t normally eat. To then go home and consume a plate of greens just wouldn’t fit in with the decadence of the day, or probably be very satisfying, so Irish Nachos it was!

I started by throwing the tots onto a greased cookie sheet and putting them in the oven to bake. Then I started the cheesy sauce. Normally I don’t like cheesy sauces that are made with nutritional yeast. I find the nooch has a weird taste to me, one I can’t quite get behind when it’s used in large quantities. It’s a little too health-foodie even for me. So I ended up using just slightly less then the 1/4 cup of nooch that was called for. I also didn’t have any soy creamer and so I used unsweetened almond milk instead. It worked really well. I added a bit more garlic powder, onion powder, and paprika then the recipe called for, didn’t add any salt but did use a bit more liquid smoke and the sauce was - impressive! I have to say it was probably the best cheesy sauce I’ve ever eaten. Though I should stress that it’s not quite as good on it’s own as it is as a compliment to the rest of the dish. It is good on it’s own, but not very cheesy. It’s once it’s combined with the rest of the ingredients that the cheese flavor really comes out.


Once my sauce was finished, but my tots were still cooking I cracked open a package of tofurkey tempeh bacon and fried up about 6 slices. The recipe says to use imitation bacon bits but I couldn’t find those for sale anywhere near me. Neither was I interested in their second option which was to make their hickory-smoked breakfast strips and crumble them. Cooking the tempeh bacon was a lot faster and produced the same result so I did.

Then it was time to assemble the dish. I layered the potatoes onto a plate, practically drowned them in cheesy sauce then topped them with lots of green onion, tomato, diced jalapeno and the crumbled tempeh bacon. I totally forgot to add the sour cream - which I had, and would have been delicious - so I’ll have to remember it for next time. Yes next time, these nachos, despite all my skepticism and snobbery were freaking awesome! Even my husband thought so, and you have to understand that he didn’t like cheese before he went vegan so he’s definitely not much into vegan cheese, nor is he crazy about tater tots and only likes tempeh bacon once in a blue moon. These nachos were mind blowingly good, so much so that I knew I needed to share them with you. They so exceeded my expectations that I’m still in awe of how this dish turned out. Trust me when I say you need to try this!


Lastly I’d like to add that if this dish is in any way indicative of the rest of the recipes in this book then it definitely deserves to be on your wish list, especially if you’re a comfort food loving vegan. Heck I plan to buy it and I only eat a meal like this maybe once a month. With dishes that sound as good as ‘Roasted broccotato soup with bacon-flavored chickpeas’, ‘Sweet potato po’ boys’, ‘Baked BBQ buns’, ‘BBQ slaw tacos’, ‘Chorizo and Potato Lasagna bake’, and ‘Kale bagels’ my mouth is practically watering as I type.

Friday, October 28, 2011

Vegan Mofo # 25 Terry’s Pan-Seared Sweet Corn...


Vegan Mofo # 25 Terry’s Pan-Seared Sweet Corn

The Book - Clean Start
The Author - Terry Walters
The Recipe - Pan-Seared Sweet Corn
Page - 102
Difficulty - Easy
Duration - 30 minutes

This is another one of those dishes that I’ve been wanting to make for a while, but it seems that every time I was geared up to make it in the past something happened to foil my plans. That is until last night, when everything finally came together. This dish is phenomenal, hands down amazing!


Like most of Terry’s recipe this dish is quick and easy to prepare however it does require some advanced planning. Mainly just making sure you have the corn on the cob and set aside the time to soak it. Also like most of her recipes the ingredients are few, but the flavor is loaded. In this wonderful dish there is the most perfect blend of sweet, heat and a delicate twist of sour from the lime juice.

Though this dish is listed in the fall chapter I think this would be a perfect dish to serve as a side during Spring, Summer or Fall. It would be perfect to bring to a bbq to serve alongside some veggie burgers and potato salad. It’s wonderful as part of a Thanksgiving feast, or serve it with something simple. I ended up serving it alongside Terry’s Sauteed Greens with Leeks and Garlic and it was incredible.


As far as recipe alterations go all I did was add a full onion and a full red pepper rather then a half of each. I also added in a squirt more lime juice and a pinch more chili powder. Otherwise I followed the directions exactly. Seriously this Pan-Seared Sweet Corn is a must try!

Friday, September 2, 2011

Marinated Kale Salad with Tomato Bhaji...


A few days ago I was at a salad bar/hot bar, looking for something to eat but finding nothing very appealing. I was about ready to settle on a simple bed of romaine with a few falafels and some humus when I ran into a friend, who was on her way out. After exchanging the usual "Hello, How are you’s" she exclaimed that she’d just eaten the best thing ever! She told me she’d combined the Rainbow Kale Salad from the Salad bar, with the Tomato Bhaji from the hot bar, mixed them together and found herself in heaven. She insisted I try it. I was a bit skeptical, I’d never even heard of tomato bhaji before and when I went over to check it out it just looked like Marinara sauce. However after we said our goodbyes I decided what the heck, it wouldn’t hurt to try it, she’d never steered me wrong before. I read the ingredients on the tomato bhaji and discovered it was an Indian, or at least an Indian inspired dish. Being a lover of Indian Food how could I resist now? Needless to say it was a phenomenal combination, and for days afterward all I could think about was the kale-bhaji combination.


The Bhaji on it's own....

I was so taken with the dish, that I desperately wanted to re-create it so that my husband could revel in it too. Since he’s not very keen on Salad bars - all that food sitting out in the open with Buddha knows who touching it, kind of puts him off - I knew the only way he’d taste if was if I made it at home. Thankfully I’d had the foresight to try and memorize as many of the dish’s ingredients as I could.


The Kale Salad on it's own....

So once home, I started a Google search for Tomato Bhaji recipes. The kale salad I could make my own version of, of course so that was a non issue. The problem was that while I found plenty of tomato bhaji recipes not a single one of them had all of the ingredients I’d memorized, and some of them had ingredients I know for certain were not listed on the tag of the dish I ate. To make things even more complicated most of the tomato bhaji recipes differed form each other as well, not only in ingredients but in quantities. My next step was to check my Indian cook books, both of which did not contain any recipe labeled tomato bhaji. There were a few tomato curry recipes but they were wildly different then the bhaji.


I was totally stumped. What was I to do? The only thing I could I guess, which was to make a few notes on a scrap piece of paper, roll up my metaphorical sleeves and proceed into the kitchen with all of my best intentions. I focused hard on the taste, texture and flavor of the dish I remembered eating days earlier. Remembered it’s perfect combination of sweet, sour and a hint of spice, combined that with all of my accumulated culinary knowledge and my ingenuity in the kitchen and.... voila! Success! A great success actually and I don’t say that lightly. There were definitely some harry moments along the way. A few times where I thought for sure I was going to fail and the whole thing would be awful, but I’m confident this tastes 95% accurate to the dish I ate at the salad bar. Now I can’t make any claims that it’s authentically Indian, since I don’t even know if the original dish I ate was authentic, but it certainly is delicious. It’s a wonderful, new, healthy and creative way to eat your greens, and it’s so damned good you’ll want to eat the entire pan. I know my husband and I nearly finished the entire thing off. My husband went back for thirds, something he doesn’t normally do, so my hope is that you’ll enjoy it that much too!


Marinated Kale Salad with Tomato Bhaji

Simple Kale Salad

1 bunch Kale
½ Red Onion sliced thin
2-3 tbsp olive oil
2-3 tbsp lemon juice
1-2 tbsp maple syrup
sea salt to taste

Tomato Bhaji

1 Tbsp Olive Oil
18 Garlic cloves crushed
½ tsp Black Mustard Seeds
1 Large Yellow Onion (½ finely diced, the other half pureed along with the green chili)
½ Red Onion (leftover from your Kale Salad)
½-1 Green Chili (or more depending on how much heat you like)
1 ½ tsp ground Coriander
3/4 tsp Gram Masala
1/4 tsp ground Turmeric
5 Tomatoes finely diced
3 Tbsp lemon juice (to taste)
2 heaping tsp Red Curry Paste (more if you like heat)
1 6oz can tomato paste
4-5 tsp Dark Brown Sugar (more or less to taste)
Sea Salt to taste

- Make Salad first. To Assemble remove large ribs from kale and rip into bite sized pieces. Place in a bowl with the lemon juice, olive oil, and maple syrup and massage dressing into the kale. You can do this by hand or if you don’t wand to get your hands dirty mix very well with the back of a wooden spoon until kale is evenly coated and starting to break down a bit. A few minutes. Add in onion, and salt and give another good mix. Place in the fridge until ready to serve.

- Add mustard seeds to a dry skillet and cook over medium heat for a few minutes until they begin to pop and smell fragrant. Remove seeds to a bowl and place pan back over the heat.

- Heat the olive oil in a pan over medium heat, add crushed garlic and saute for 2 minutes.

- Cut your yellow onion in half. Take one half and cut it into smaller chunks then add it to a food processor with your green chili. Puree until smooth. Add this mixture to the garlic and stir.

- Finely chop the remaining half of your yellow onion, along with the remaining half of the red onion from your kale salad. Place into the pan, along with the mustard seeds and saute covered for 3-4 minutes until very fragrant.

- Add Coriander, Turmeric, and Gram Masala to the pan and stir making sure onions are evenly coated. Saute covered another 3-5 minutes until onions are soft and translucent.

- Add your diced tomatoes, stir to make sure everything is evenly coated, then saute covered for 2-3 minutes. Add salt, stir to coat, and saute covered another 2-3 minutes until you see liquid forming in the pan and the tomatoes are beginning to break down.

- Add in the tomato paste, red curry paste, lemon juice and brown sugar. Stir until well combined then cover and bring to boil. Once boiling, reduce heat to simmer and allow to simmer covered for 15-20 minutes. By this time the dish should be thick and saucy like a marinara.

- Taste for sweet, sour and heat, and adjust seasonings as needed.

- To serve distribute your kale salad amongst plates, and top with several scoops of the tomato bhaji. Mix thoroughly before eating and enjoy on its own or with a slice of whole wheat naan or roti.


The whole thing mixed together...

*** Note - Remember that the dish is meant to be a perfect blend of sweet and sour, neither the sweet nor sour should be more prominent then the other. Also while some heat is required you don’t want it to be too spicy, nor do you want it to lack spice otherwise you’re essentially just eating tomato sauce. So keep that in mind if you’re going to adjust the seasonings. ***

Wednesday, June 22, 2011

Roasted Butternut Squash with Cilantro Garlic Miso Sauce


Last week I had a delicious home cooked meal at the home of my good friends J and L. It’s not very often that I get to have someone cook for me, and so I really enjoyed the experience. It didn’t hurt either that the food was phenomenal! J slathered butternut squash in pesto and roasted it in the oven, and served it alongside an Italian Bread Salad. Both were excellent and I’ve literally been dreaming of squash since. It’s strange but my palate has never really taken to squash, except for zucchini, but I never quite developed a taste for the acorns, butternuts, spaghetti’s and pumpkins. A little here and there, prepared in very specific ways was alright with me, but on the whole I could take them or leave them. That was the old me though, because after having J’s delicious roasted butternut squash I’ve become a squash loving convert. I have seen the error of my ways, and I anticipate a lot of squash dinners to come this summer.

Last night my intention was to cook something similar to what J had cooked for me, but having no recipe, and in fact no ingredients to make my own pesto, I was left to my own creative devices. I wanted to make something kind of pesto-like, but I was also in the mood for Miso, and I have several jalapenos in the fridge begging to be used, and so I threw this together. Seeing as how each Butternut squash was vigorously devoured I’d say I did okay for myself.

Roasted Butternut Squash with Cilantro Garlic Miso Sauce

2 Medium sized Butternut Squash, cut in half lengthwise and seeded.

Cilantro Garlic Miso Sauce

1-2 heaping tbsp Mellow white Miso
4-8 cloves garlic
5-7 tbsp olive oil
1-2 tbsp balsamic vinegar
1 tbsp agave
1/4 Jalapeno seeded, membrane removed (more if you want spice)
3-6 tbsp chopped cilantro (enough to make the sauce a light green)
Water to thin as needed

Now I’ll be honest I was in a bit of a hurry while preparing dinner so I wasn’t exactly measuring everything out, so I’ve done my best guess work here on what I threw together but if you want to play around with the measurements a bit by all means do so. I know that when I’m cooking even with a recipe I generally consider each ingredient to be more or less ‘to taste’

- Preheat oven to 400'F / 200'C Place halved Butternut Squash’s into a baking dish lightly sprayed with cooking spray. (To halve Squash I used a large, sharp chef knife, then used a regular spoon to scrape out seeds)

- Place all sauce ingredients in food processor and process until smooth. Taste for flavor and adjust as needed.

- Spoon sauce mixture over butternut squash, making sure to entirely cover each halve, leaving a generous spoonful inside the hallowed out section. Some sauce should be left over. Set it aside to reserve for later.

- Place sauce smothered squash in oven and roast for 45-60 minutes until flesh is easily pierced with a fork, and squash has reached desired softness. (Some people prefer a firmer texture others mushier, that’s up to you)

- When finished remove squash from oven and let cool for five minutes. During this time place remaining sauce in the microwave and heat for approximately 1 minute.

- Serve squash along side a nice salad, (I made a simple romaine salad with a lemon date dressing) and spoon over remaining sauce. Enjoy for a nice light summer meal.

Monday, June 20, 2011

Easy Low-Fat Lima Bean Guacamole...


I love a good guacamole, especially in the spring and summer months. I make it often, usually in small amounts - Since my husband doesn’t like avocados - by hand with my mortar and pestle. I love to use it on wraps, or burgers, it’s great on nachos or in a seven layer dip. It’s also great on it’s own with some tortilla or pita chips.

I know a lot of people tend to shy away from avocados because of the ‘fat’ content. Personally I think this is just plain silly. Avocados are filled with healthful nutritional benefits, and yes they contain fat, but healthful fat, and some fat in the diet is required. (Not much, but some) Honestly if you’re eating a relatively low-fat vegan diet of whole foods, it’s not the bowl of guacamole that’s going to get you. Which is why I don’t worry about it, I don’t even consider the fat content of a bowl of guacamole, I just eat it. Though I can understand the desire to eat lower fat, especially if say you want to eat a massive helping of guac particularly in a week where you may have fallen a little of the ‘health food’ wagon, or for whatever reason haven’t been exercising regularly. (You do exercise regularly right?) And so after being extremely impressed, and inspired by a low fat guac my good friend J brought to a party, I decided to try and develop my own.

This works great on two fronts - 1 it’s low-fat, and 2 my husband loves it because it’s not avocados! So if you have an avocado hater in your midst have them give this one a try and see if they don’t come around.

Easy Low-Fat Lima Bean Guacamole

12-16oz frozen lima beans (thawed) (I used roughly 12oz, you could use more but might have to adjust the seasonings)
1 medium Avocado
1 tbsp lime juice
1 handful chopped green onion (or to taste)
1 handful finely chopped cilantro (or to taste)
1 medium-large tomato diced (or more if desired)
½ Jalapeno (or more if you like heat)
1/4 C water (or more to thin)
2 Tbsp Non-dairy sour cream (I used Toffutti)
4-6 Garlic cloves or to taste
Black pepper, smoked paprika, and oregano to taste

- Place thawed lima beans, avocado, lime juice, jalapeno, non-dairy sour cream, and garlic cloves into a high-speed blender or food processor. Blend on high.

(Note this recipe makes a good deal of guac, so the 1 avocado is pretty insignificant fat wise. I used it along with the 2 tbsp of non-dairy sour cream to add more creaminess to the guac, but you can opt out of using either if you like, and use silken tofu instead for the same creamy effect)

- Because the mixture is so thick, your blender or food processor might give you a bit of trouble, you will likely need to scrape down the sides with a spatula. This is also where the water comes in. Use as little or as much as you need to get the blades of your blender/processor moving so that everything can combine easily. Remember you want the mixture to remain thick, you don’t want it to thin much, just enough to flow easily when the blender is on.

- Once everything is combined you can then choose to add your green onion and cilantro to the blender and pulse to combine it. Or if you prefer you can scrape the guacamole out of your blender and just fold in the green onions, and cilantro for a chunkier texture.

- Once everything is combined taste for flavor, and add salt and black pepper, oregano and smoked paprika to taste. You can add more jalapeno at this point or more garlic if you like.

- Once you are satisfied with the taste and texture of your guacamole scrape it into a bowl, mix in the diced tomato, and garnish with a little chopped green onion, cilantro, and even a bit of diced tomato and non-dairy cheddar if you like.

- Enjoy with good friends and Spanish music, on a sunny day, with a bowl of tortilla chips, or pita chips, and don’t forget to slather some onto a veggie burger.


Honestly I think this guacamole taste best when fresh, but it will keep over night.

P.S. Because I love fun-filled facts - Guacamole originated in Mexico and was made by the Aztecs as early as the 16th century. After the arrival of the Spanish conquistadores in Mexico, guacamole became popular in Spain..

***Note- Soy and Gluten Free if using a Soy and/or Gluten-Free Non-Dairy Sour Cream such as Wayfair***

Happy and Healthy Eating!