Showing posts with label Coconut Milk. Show all posts

Saturday, February 13, 2016

Toasted Cashew Noodles....


This dish came about because I was starving, and craving noodles. I don't normally crave noodles, but I really felt like rice noodles in some kind of Asian style sauce. I didn't feel like Peanut noodles, though I love them, and I suddenly had a simultaneous hankering for Cashews. I didn't really have many fresh veggies on hand, and wanted to keep the dish simple anyway so the preparation would be quick - the faster it's made the faster I eat! - and this is what came about.


Surprisingly this turned out super good, it's got the perfect balance of sweet, salty, spicy, tangy. I also think the cashew butter makes a great stand in for peanut butter, and lends a more mellow, yet complex and nutty flavor to the dish. I also really love the nice bit of crunch in each bite from the red cabbage garnish. I didn't have any cilantro on hand, but I imagine that would make a good garnish too, if you happen to have some. Of course if you want to 'beef' it up, you could also add some cubed baked or fried tofu, or maybe even some tempeh. But I kind of like it exactly as it is, light and easy. Two of my favorite things right now.


Toasted Cashew Noodles

For the Noodles

2 tsp Toasted Sesame Oil
3 Carrots Sliced thin
6 Radishes cut into thin half moons
3 Green Onions sliced (White and green parts separated)
2 Garlic cloves sliced thin
1/4 Cup Cashews
12oz Rice Noodles
1/4 C or less of thin sliced Red Cabbage

For the Sauce

1/4 Cup Creamy Cashew Butter
1/3 - 1/2 Cup Coconut Milk (Depending on how thick you want the sauce)
4 Tbsp Tamari
2 Tbsp Mirin
2 Tbsp Lemon or Lime Juice
2 tsp Cane Sugar
1/2 tsp Ground Ginger
1/4 tsp Smoked Paprika
1/4-1/2 tsp Sriracha or to taste

- Place the noodles in a pot of boiling water and cook for 5 minutes or until they are tender. Drain and set aside.

- Heat the Sesame Oil in a large frying pan. When it's hot add the carrot, and radish. Cook on high for about 5-7 minutes until the veg becomes soft and starts to brown. Add in the white parts of the onions, and the garlic. Lower the heat and sauté for another 3-4 minutes until everything is cooked to your liking.

- Combine all sauce ingredients in a small pot and stir until smooth. Turn the heat on high, and when it begins to simmer whisk it for about a minute. You just want to heat the sauce through long enough for it to smooth out.

- Add the Cooked Noodles to the pan of veg. Pour the sauce over, and mix to combine.

- Divide into bowls, and top with Green onions, and red cabbage.

- In a dry skillet toast the cashews over high heat for 5-8 minutes until they smell nutty and begin to brown.

- Top each bowl with a handful of cashews and enjoy!

Tuesday, February 9, 2016

Red Curry Rice Soup...


I made this soup a lot over January. It's so quick and easy which I love, but it's also super warming, comforting and packed full of nutrition and flavor. Unfortunately I didn't really write down a recipe, but this is more or less how it goes.


Red Curry Rice Soup

1Tbsp Olive Oil
1 Small Onion Diced
6-8 Garlic Cloves Minced
1 tsp Ground Ginger
3 Cups Vegan Chicken Broth
1 15oz Can Coconut Milk
2 Tbsp Red Curry Paste
1 tsp Sea Salt
2-3 Tbsp White Jasmine Rice
2-3 Baby Bok Choy
3-4 Green Onions sliced thin
1/4 tsp Gochujang or Red Pepper Flakes

- Heat the Olive Oil in a medium sized pot. Add the onion and cook for 5-6 minutes. Add the garlic and ginger and cook for another 4 minutes.

- Add the Vegan Chicken Broth and Rice. Bring to a boil and then lower to simmer. 10 Minutes.

- Add in the coconut milk, salt, and Red Curry Paste. Simmer another 10-15 minutes or until the rice is tender.

- Add the sliced Bok Choy Leaves, green onions and Gochujang. Stir to combine and cook 1-2 minutes just until the choy has wilted.

- Serve garnished with extra green onions, and Gochujang if desired.

Friday, April 10, 2015

Cream of Leek Soup with Pink Peppercorns...


Believe it or not I came up with this recipe on the plane from Brussels to Chicago. It was partially inspired by a side dish of curried leeks I ate while in Luxembourg City. I was thinking about that dish on the plane ride home, and thinking how happy I was that spring was finally upon us. Leeks seemed to be a pretty popular meal item most places we went in Europe, which was fine by me since I love them so. You might think that after weeks of eating them I might be bored of them, but that wasn’t the case at all, in fact I only wanted more, and for whatever reason I kept thinking curry, coconut leek soup. This idea just wouldn’t leave my brain the entire plane ride home, and somewhere over the Atlantic I came up with the idea of adding fancy pink peppercorns and tarragon into the mix. Sounds crazy I know, but damn if it wasn’t delicious! This made a nice sized pot of soup, but my husband devoured most of it in one sitting. I wouldn’t be surprised if you did as well.


Cream of Leek Soup with Pink Peppercorns 

3 Medium-Large sized Leeks
6 Cloves Garlic Minced
1 Tbsp Coconut Oil
1 tsp Curry Powder
1 tsp Tarragon
1 15oz Can Coconut Milk
2 C Vegan Chicken Broth
½-1 tsp Pink Peppercorns crushed
Green Onions or Chives to Garnish
Sea Salt to taste

- Thoroughly wash the leeks and slice thinly.

- Melt the coconut oil in a pot over medium heat. Add sliced leeks, garlic, and curry powder and saute for 6-10 minutes until leeks are bright green, soft and fragrant.

- Add the Vegan Chicken broth and simmer for about 10 minutes.

- Carefully remove leek and broth mixture form the pot, place in a high-speed blender and blend on high until completely smooth.

- Return the soup to the pot, and add in the coconut milk, tarragon and ½-1 tsp of Sea Salt - or to taste. Stir until the coconut milk is completely blended into the soup, then let simmer for about 5 minutes.

- Turn off the heat and stir in the pink pepper corns and green onions or chives. Saving a little of each to garnish each bowl. Serve and enjoy.


Friday, February 27, 2015

Creamy Carob Banana Dream Smoothie...


This has seriously been my favorite breakfast smoothie of late. I came up with it a few weeks ago when I was craving a creamy, chocolate flavor but wasn’t really in the mood for my usual chocolate smoothie. For whatever reason I found myself really craving carob - which I do like, but don’t normally get that crazy about. - Since I had some carob powder on hand I decided to give it a try. The carob, coconut, date, banana, cashew combo works so well! You’ll be amazed, and become totally addicted to it like I did. Plus it’s so simple you can’t not try it, and it’s naturally sweetened, no sugar or artificial sweetener here.


Creamy Carob Banana Dream Smoothie

1 ½ Frozen Bananas
1 C Unsweetened Vanilla Coconut Milk
3 Medjool Dates Pitted
1 ½ Tbsp Carob Powder
1 Tbsp Cacao Nibs
*** 1 heaping Tbsp Cashew Butter

- Place all ingredients in a high-speed blender and blend for 60-90 seconds until completely smooth and creamy.


*** Note - For a different but equally amazing flavor swap out the Cashew Butter with Hazelnut Butter. SO GOOD!*** 

Monday, December 8, 2014

Zuppa Toscana...


This may come as a surprise to ‘die-hard’ Zuppa Toscana fans but I have never had a bowl of this - seemingly - famous soup, until today. Unbeknownst to me this is everyone’s favorite soup at the ‘Italian’ Restaurant chain Olive Garden, and though I’ve eaten there many times I’ve never had it. So why did I decide to make a vegan version? Well, the answer is really quite simple, this past week I kept seeing recipes for homemade Zuppa Toscana popping up on Facebook and other social media. My first reaction after reading the ingrieients list was ‘gross’ and ‘so unhealthy’ as the original contains loads of sausage, bacon and heavy cream, but then my second thought was ‘but what if it was vegan?’ and so for the past few days I’ve been dreaming of a veganized version of a soup I’ve never eaten, crazy right?


Today, as it happens was also a perfect day for soup as it’s quite damp, cold and rainy outside. Wonderful soup weather and so I happily set to the kitchen to try my hand at this unknown delicacy. I’m not quite sure what I was expecting, something creamy, salty, smokey and spicy I guess, and really this soup did not disappoint. It’s loaded with so much delicious flavor, and made me go back for a second bowl. Further proof that food doesn’t need animal flesh or secretions to be tasty and decadent.


Zuppa Toscana 

1 Tbsp Olive Oil
1lb Vegan Italian Sausage Sliced - I used Field Roast
1 Large Yellow Onion diced
12 Garlic Cloves minced
1 tsp Red Pepper Flakes
1 tsp Fennel Seeds
4 ½ C Vegan Chicken Broth - or Vegetable Broth
6-8 Russet or Yukon Gold Potatoes diced- I used 8 and made a  mix of both
1 tsp Sea Salt
2 C Kale torn into bite-sized pieces
½ to 2/3 of a 15oz Can Full Fat Coconut Milk - How much you use depends on how many potatoes you use.
1-2 tsp Liquid Smoke - I used 2 tsp.
Ground Black Pepper to taste
1/4 C Minced Parsley

- Heat half the Olive Oil in the medium sized sauce pan over medium-high heat.

- When sizzling, add in the sliced Italian Sausage and cook until browned. About 5 minutes. Remove the sausage from the pot, and place on a plate, set aside.

- Heat the remaining oil in the pot, and add the onions and garlic. Saute for 3-5 minutes until golden and fragrant.

- Add in the red pepper flakes, and fennel seeds, saute another 2 minutes.

- Add in the Vegan Chicken broth, the potatoes, and the salt. Bring to a boil, and cook for five minutes. Reduce to a simmer and cook an additional 10-15 minutes until the potatoes are tender.

- Using a potato masher or the back of a wooden spoon crush some of the potatoes to thicken the soup. Leave some potatoes whole because you want the soup chunky, you want to crush just enough to get a nice creamy thickness.

- Once potatoes have been crushed, add in the cooked Italian Sausage, and simmer for five minutes.

- Add in the Kale, and coconut milk and simmer for an additional 6 minutes until the kale is wilted and tender.

- Turn off the heat, add in the minced parsley, and liquid smoke and stir to combine. Add in black pepper as desired and taste for seasonings, adjust as needed. Let stand 10 minutes before serving so that the flavors have time to develop.

- Enjoy with some nice crusty bread and a glass of red wine.


*** Note - Field Roast is NOT gluten-free, but you can make this soup Gluten-Free buy using a GF Vegan Sausage.***

Tuesday, July 22, 2014

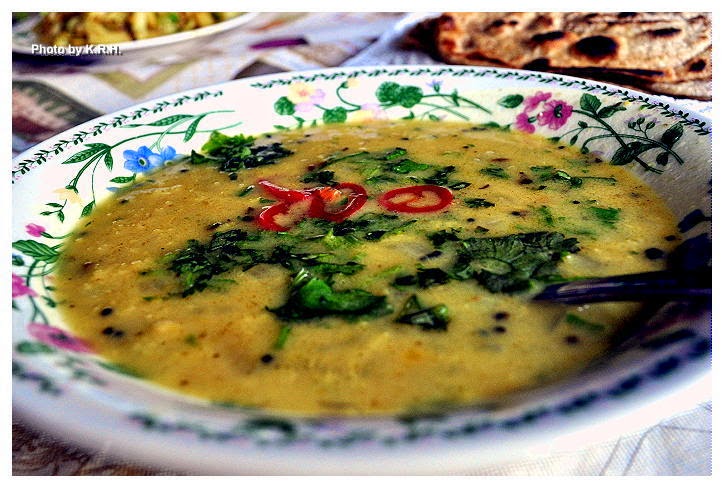
Moong and Toor Dal Tadka with Coconut and Red Chilies...


I know what you’re thinking, hot soup or dal in the middle of summer? You’re crazy! And normally I would agree with you only I just recently came off five days of being ridiculously ill with what was probably Norovirus and so I didn’t want to push the limits of my digestion. Since Thursday afternoon I’d been living off of crackers, bread, tea, and on Saturday evening when I finally began to feel stable enough to take in something heartier I made a very brothy vegetable soup. It was pretty basic - potatoes, carrots, celery, onion, broth, water, and spike seasoning. It was tasty, but come Monday when I was feeling roughly 85%-90% better I wanted to eat something fun!

I’ve really been craving Indian food lately, specifically lentils, and when I think of lentils I automatically think of dal, there are few things more nourishing and comforting then a big ‘ole bowl of dal. Specifically I wanted dal tadka, which I’ve only recently discovered There’s a great little Vegetarian Indian Restaurant not far from where I live that serves a wicked good Dal Tadka, I had it the week my mother was in town visiting me, and I’ve been kind of dreaming about tadka ever since.


Tadka incase you don’t know is really just a cooking technique in which you fry whole spices in oil so that they release their natural oils, and after a minute or so you pour the whole thing - oil and all - into the dish you’ve prepared. It sound a bit strange maybe since we’re used to putting spices in our food at the beginning of cooking rather then at the end but let me assure you that this technique imparts some truly phenomenal flavor! And that’s exactly what I wanted.


Now, I’m not going to lay any claims saying that this is in any way a traditional dal tadka, or even a traditional dal, but it is delicious. It’s full of ingredients that are delicious and healing, however if you’re unaccustomed to cooking Indian food at home you may not have them all on hand. Still, they should be easy enough to find at your local Indian grocery - that’s where I get mine - and they are well worth hunting down. Trust me once you taste the slightly bitter, onion flavor of Nigella seeds you’ll be hooked! Similarly the buttery, garlic/onion flavor of asafetida can not be matched, and black mustard has a unique flavor itself, different from that of yellow mustard. As for pickled red chilies I make them myself, and so I’m not sure if you can actually buy such a thing anywhere. Though if you have a basic pickling recipe you can easily pickle some of your own chilies. It’s not necessary but I love the added flavor note.


Moong and Toor Dal Tadka with Coconut and Red Chilies 

Dal

1 tsp Olive Oil
1 Large Yellow Onion Diced
1 C Moong Dal - soaked for 1 hour and rinsed
½ C Toor Dal - soaked for 1 hour and rinsed
4 C Water
½ tsp Ground Turmeric
1 - 1 ½ tsp Salt - to taste
1 13.5oz can Full Fat Coconut Milk
½ Bunch Cilantro Minced

Tadka 

2-3 tsp Olive Oil
1 ½ tsp Black Mustard Seeds
½ tsp Nigella Seeds
½ tsp Coriander Seeds
½ tsp Fenugreek Seeds
1 tsp Asafetida Powder
6 Garlic Cloves Minced
1-2 Red Chilies Minced - depending on heat preference.

To Garnish -

Extra Minced Cilantro
Sliced Pickled Red Chillies - optional but highly recommended!


For the Dal 

- Heat the Olive oil in a large soup pot over medium high heat. Add the diced onion and saute for 5-6 minutes until lightly golden.

- To the pot add the soaked and rinsed Moong Dal as well as the Toor Dal. Stir to combine.

- Add the 4 cups of water, the turmeric, and the salt. Cover and bring to a boil. Boil for 10 minutes then reduce the heat and let simmer for 20 minutes.

- Check on the doneness of your dal. If the lentils are still hard, or too firm for your liking continue to simmer for an additional 10 minutes until they become soft. If the lentils are soft already, and have reached a somewhat mushy consistency add in the coconut milk and stir to combine. Simmer for 5 minutes.

- Remove the pot from the heat and add in the minced cilantro. Stir to combine.

For the Tadka 

- Heat the oil on high in a heavy bottomed frying pan. Once hot add in the mustard seeds, nigella seeds, coriander seeds, fenugreek seeds, asafetida powder, minced garlic and minced chili. Fry for one minute or until the seeds pop, the garlic has turned golden and the chilies have softened slightly. It’s okay if the spices brown a little, it adds to the flavor.

- Remove the pan from the heat and scrape the entire contents - spices and residual oil - into your pot containing the dal.

Assembly - 

- Stir the Tadka into the dal until it’s been well combined. Let sit for 5-10 minutes to let the flavors mingle. Then divide amongst serving bowls and garnish with additional cilantro and pickled red chilies if desired.

- Serve with basmati rice, and/or Indian Flatbread. I made a batch of Roti to scoop the dal up and it was a delicious accompaniment.


Sunday, March 16, 2014

Randy's Grilled Shishito Peppers with Sriracha Satay...


Shishito Peppers, ever heard of ‘em? Yeah, I hadn’t either until my brother-in-law bought me Randy Clemens “The Veggie-Lover’s Sriracha Cookbook” for Christmas. I flipped through this book with amused interest at the variation of recipes that included Sriracha and then I came across the beautiful photo of grilled Shishito peppers and thought “Oooo, now that looks good!” followed by “Now what the heck are they?” A quick Google search informed me that Shishito peppers are a - generally - sweet, finger sized pepper from Japan. Interesting, I thought. The photo that accompanies the recipe is absolutely mouth watering and the Sriracha Satay Sauce it’s paired with is incredibly drool worthy. I’ve been dying to make this recipe since December, but didn’t think I had a hope in hell of finding Shishito Peppers.


Then last week my husband and I decided to make a spontaneous trip to the Japanese Market - Initially for noodles and miso - and what should I happen to find sitting in the produce department? A huge bag of Shishito Peppers! Wow, I couldn’t believe my luck. Not knowing how I’d like them, I grabbed only one bag with the intention of making Clemens recipe ASAP.

Boy oh boy do I wish I’d bought another bag of these peppers, because they were really fantastic and so unique. To me they weren’t quite as sweet as say a bell pepper, they had a slightly bitter edge - though I can’t be certain if that’s from the pepper flesh, the seeds, or the charring - but nevertheless I liked them. Once I started in on my plate I couldn’t stop until every last pepper had been drenched in Satay and consumed in it’s entirety, and that’s another thing, the Satay!

Look at that beautiful Sriracha Satay!


Now I love me some peanut butter anything, and I sure as hell love me some Satay sauce. In fact, at restaurants when I find a good satay and there isn’t enough food to dip into it I’ve been known to spoon the stuff directly into my mouth.- what? It’s delicious! - So I’ve had a lot of good satay in my time, but Clemens Sriracha Satay is probably one of the best I’ve ever had. It’s creamy, it’s smooth, it’s spicy, it’s garlicky, it’s sweet, it’s fan-freaking-tastic! It’s also not overly peanuty which might be a major plus to any peanut haters out there - my husband, a confirmed peanut hater loved the sauce.


One of the most brilliant things about this satay is that it’s made with coconut milk, that milk gives it an extremely rich, and velvety consistency, and the sriracha packs so much flavor but not an unbearable amount of heat. I also love that this satay is simmered on the stove and served warm, that makes a lot of difference in my opinion, and it’s so good that it would be perfect over any grilled vegetable, tofu, seitan, or tempeh. It would even be good thinned out as a dressing over a grain salad and some steamed broccoli. The Satay made a large batch so I can’t wait to get creative with the leftovers.

If you can find Shishito Peppers in your local Asian market, pick them up, give them a try and let me know what you think!

Monday, November 4, 2013

My Favorite Creamy Macaroni and Cheese...


I know I’ve been ridiculously absent since Canadian Thanksgiving and for that I’m sorry. I just haven’t had the cooking spirit lately. My Oma’s somewhat unexpected passing has been hard on me, and the rest of the past month wasn’t much better. A variety of things culminated to leave me feeling uninspired and uninterested in doing much cooking, or blogging. For almost the entire week post-Thanksgiving we ate leftovers. Then we ate simple rice bowls that tasted delicious but aren’t exactly blog-worthy in my opinion. Then the past week we’ve been having something of a pizza extravaganza - of which I meant to take photos but my camera battery is dead and every day I absentmindedly forgot to re-charge it - thanks to my latest cook book purchase of “Vegan Pizza” by Julie Hasson. But now we’re into a new month, and I’m feeling better, re-inspired, and I’ve missed the blogesphere, and so Im going to make a greater effort to be more active this month.


To kick things off I thought I’d share a favorite Mac and Cheese recipe with you. I know there are tons of mac-loving vegans out there, vegan mac is like the holy grail for some, and yet I’ve never been much of a mac lover. Blasphemy I know, but I was never one to eat food from a box, that had a lot to do with my upbringing I suppose. Certainly as a kid I ate macaroni and cheese now and then, and I’m sure I liked it well enough but I never developed that ‘ohmygodgottahaveit!’ love affair with it. After I grew up and moved out I don’t think I ate Macaroni and Cheese at all, except for maybe trying my hand at making a home-made baked mac once or twice. My husband was also not a mac and cheese fan - he didn’t like cheese at all in any form in fact - and so it was not a meal that ever made it onto our radar.


Of course, as happens with so many things, the minute you go vegan all your previous ideas and notions about food go out the window. I like Mac and Cheese much more now, then I ever did growing up, and these days I really love and appreciate creative mac and cheese recipes. While I still wouldn’t consider it anything close to being a favorite food, I do now and then find myself getting a wicked bad craving for it. One such crazy craving hit me out of the blue in mid-October as I was reminiscing about the Toronto Vegetarian Festival - more to come about that in a very belated review post. - and the epic Mac and Cheese Burrito we ate there courtesy of Hot Beans. - More on that to come as well. - My husband and I were so blown away by this absurd concoction that we just knew we’d have to eat it again. Of course Toronto is a far way to travel from Chicago just for a burrito and so I decided to try and recreate this masterpiece at home.

Now, the first step to making any mac and cheese burrito is making mac and cheese. Essentially you can use any mac and cheese recipe you like, but the following recipe is one of my very favorite mac recipes. - Inspired by THIS recipe from Vegan Mischief who also happens to be a Vancouver Vegan -  Coconut milk is really the silent star here, as it gives the mac a thick and creamy texture without imparting any coconut flavor. It is hands down my favorite non-dairy milk to use when making macaroni and cheese, and I love the unique combination of spices. I hope you enjoy it as much as I do.


My Favorite Creamy Macaroni and Cheese 

½ Small Yellow Onion minced
1 tbsp Olive oil
4 Garlic Cloves Minced
½ tsp Smoked Paprika
1/4-1/2 tsp Turmeric
1 tsp Mild Curry Powder
½ -1 Tbsp Ground Fenugreek
1/4 tsp White Pepper
½ tsp Dried Oregano
½ tsp Dried Basil
1 Vegan Chicken Flavor Bouillon cube
2 Tbsp White Miso
4 Tbsp Water
1/4 C Nutritional Yeast
2 C Full-Fat Canned Coconut Milk
1 Tbsp Dijon Mustard
1 Tbsp Cornstarch
1 Tbsp Water
1 Bag Daiya Cheddar Shreds
12-16oz Elbow Macaroni Noodles (Gluten-Free)
Salt and Pepper to taste (Optional)

- Cook pasta according to package directions. Drain in a colander and then return to the pot until your sauce is ready.

- Heat the olive oil in a medium sized pot over medium heat. Add in the minced onion and saute for 3-5 minutes until softened. Add in the garlic and saute another 2 minutes.

- Add Smoked Paprika, Turmeric, Curry, Fenugreek, white pepper, oregano, and basil. Saute another 2 minutes.

- Meanwhile combine the 2 tbsp of Miso with 2 tbsp of water, stir until smooth.

- Also combine the vegan chicken bouillon cube with 2 tbsp of water and mix until smooth.

- Add the Nutritional Yeast and the Coconut milk to the pot with the onions, whisk until combined and smooth. Add in the Bouillon mix, along with the miso mix, and let simmer stirring frequently for five minutes.

- Whisk together the cornstarch and the 1 tbsp of water to make a slurry.

- Add the cornstarch mixture to the Pot, along with the Dijon Mustard, and the Bag of Daiya shreds. Continue to simmer, whisking until all the daiya has melted into the sauce and the sauce has thickened. This could take roughly 5-10 minutes.

- Once the daiya has melted and the sauce has reached a creamy thickness that you like, taste for flavor and if you feel it’s needed you can add ½ -1 tsp of sea salt, along with a bit of fresh cracked black pepper.

- Then add the sauce to your cooked Macaroni and serve as is garnished with a bit of Italian parsley or use it to make an epic mac and cheese burrito - recipe to come tomorrow!

As always, enjoy!

*** Note - I typically always use gluten-free noodles, if you do then the dish is gluten-free. You can also make the dish soy free by using a soy-free miso such as chickpea miso.***

Tuesday, September 17, 2013

Vegan Mofo #12 - Taymer’s Pina Colada Ice Cream...


Vegan Mofo #12 - Taymer’s Pina Colada Ice Cream 

The Region - The Caribbean
The Book - Caribbean Vegan
The Author - Taymer Mason
The Recipe - Pina Colada Ice Cream
Page # 202
Difficulty - Easy
Duration - The active time on this recipe is about 15 minutes, but it requires some before hand prep. Once the ice cream base is made it needs to refrigerate overnight, I actually made the ice cream base very early in the morning and then popped it in the ice cream maker in the evening. Once it’s gone through the ice cream maker for 30 minutes it needs to freeze for 3 hours. Since I like soft serve ice cream I skipped the freezing step.

Okay, it’s finally time to get into the Island spirit, with a Caribbean inspired dessert. This recipe comes from Taymer Mason’s book “Caribbean Vegan” which is a book I’ve owned for a while now, but don’t use very often. This recipe in particular is one I’d been coveting for some time - probably as long as I’ve had the book - and I never made it because up until last year I completely forgot I owned an ice cream maker. I know, how do you forget something like that? Well, it was a wedding gift and it got lost in the shuffle somehow and at the time that I received it while I was a pretty good cook I wasn’t so experimental. Certainly it had never occurred to me to make home-made ice cream back in those days. These days it’s all different, becoming vegan has inspired all sorts of new creative culinary pursuits and I love making things from scratch from condiments to soy milk, to tofu, and even ice cream. Since I knew I wanted to include The Caribbean as a region I explore during this mofo, I thought there was no better time then now to finally try this delicious pina colada ice cream. Even if summer is only a few days away from being over.


Now, some of you might think making homemade ice cream is a chore, or that it’s laborious, but really it’s not. Not if you have an ice cream maker anyway. All you really do is spend a few minutes whipping together a base, you let it cool, and then you pop it into the ice cream maker and it does all the rest of the work for you. When it’s done you can eat it straight out of the machine provided you like soft serve. If however you prefer a more frozen ice cream it’s generally a good rule of thumb to freeze the finished product for 2-4 hours. Once you get the hang of this little dance making ice cream at home is fun and easy, and out of all the ice creams I made over the summer I’d have to say that Taymer’s Pina Colada is probably my hands down favorite. I just really love the mixture of flavors, and they all come together so nicely.

The base is pretty simple, non-dairy milk, non-dairy creamer, arrowroot powder - I used cornstarch -, coconut milk, sugar and coconut extract. Then you stir in white rum - I used Captain Morgan cause that’s all I had - crushed pineapple, and candied cherries. I also didn’t have candied cherries but I used jarred maraschino cherries that I blotted with a paper towel to remove the excess juice. The recipe also calls for Angostura bitters which I didn’t have and couldn’t find and so I just left that out.


Really this ice cream is so superb, it’s better then any store bought ice cream I’ve ever had, vegan or otherwise, and the craziest part is that I don’t even like Pina Coladas! No really, I don’t. There’s just something about a pina colada I can’t stand, it’s a strange taste, and texture, but I love pina colada flavored things which is bizarre. Anyway, a scoop or two of this flavorful ice cream will make you feel like you’re in the tropics. I know I’ll be making this again and again.

PS: Since we ate this straight away as a soft serve it didn’t photograph real well in a bowl. So since we were eating it with a pie I made I decided to photograph it topped onto the pie. For anyone curious the pie in question is Colleen Patrick-Goudreau’s Purple Plum Pie with Crumble Topping from “Color Me Vegan” and seriously it’s one of the best pies I’ve ever had. So damn delicious, and it tasted great combined with the tropical flavors of the ice cream.


Thursday, June 7, 2012

Curry Kapitan with Coconut and Chili Relish...


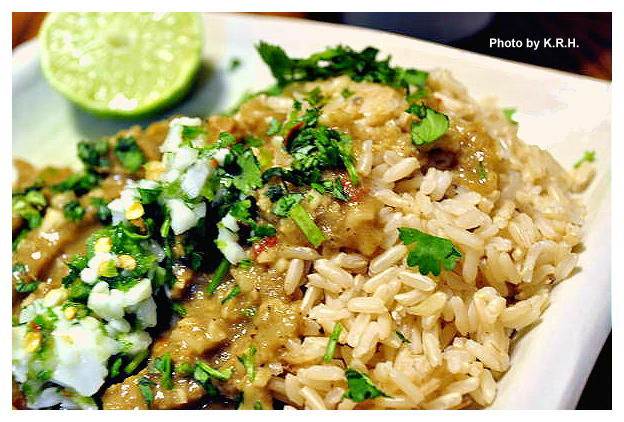
My latest foray into Malaysian Cooking. Curry Kapitan is traditionally made with chicken, and it’s said that the dish recalls the traditional role of the Chinese Kapitan, who was a man of considerable social standing amongst the Malay and Chinese people in old Melaka. Possibly invented by the Peranakans - the Malay-Chinese - to present to the Kapitan or to celebrate his role. It owes it’s flavor to the cultural melting pot of Old Melaka, and to the traditions of Chinese, Malay, Portugese, and Indian cuisine. Of course for my version I used homemade seitan instead of chicken, and decided to use soy sauce for a salty taste instead of dried shrimp paste.


This dish is nothing if not flavorful. The aroma alone is mouth-watering, but the taste... incredible! Though the ingredient list may seem long, this dish actually comes together rather quickly and it is worth every ounce of effort. When I first set out to make this dish I had no idea what to expect, and there were a few moments at least where I thought the whole thing would end in disaster. However when it came time to eat, and I took my first bite of curry Kapitan I was in love. The flavor is so complex that it’s hard to describe, but it has every flavor note you could possibly want in a dish. You can adjust the seasonings to make it as hot or mild as you like, but a little bit of kick is part of what makes this dish so fantastic. Use the chilies as a garnish, with a squeeze of lime and you won’t be disappointed. It tastes even better the next day!


Curry Kapitan with Coconut and Chili Relish 

For the Rempah 

½-1 tsp red pepper flakes
1 large red onion
10 cloves garlic
thumb sized piece of ginger
1 tbsp soy sauce
½ tsp ground turmeric
2 tsp Chinese five spice powder
1/4-1/2 tsp ground cinnamon

For the Curry 

2 Tbsp tamarind paste
Flesh from half of 1 Fresh Thai Coconut (roasted)
2 tbsp peanut oil
1 15oz can coconut milk + 1/3 c water
1-2 Pack Stevia
1 ½ lb Seitan (Homemade or Store bought)

For the Chili Relish 

½ - 1 Jalapeno Minced (Depending on how spicy you want it)
½-1 Red Chili Minced or ½-1 tsp red pepper flakes
½ Bunch Cilantro Minced
Flesh from half of 1 Fresh Thai Coconut
Juice of 1 Lime


To Serve

1 Lime
Extra Cilantro minced
Cooked Brown Rice

- First you must open your coconut. To do this the easiest way is to get a cleaver. It doesn’t have to be a good cleaver, it doesn’t have to be a $500 one, a $50 one will work just as good. Use the cleaver to whack your coconut a couple of times to break through. Drain the liquid out into a bowl or measuring cup and refrigerate to dink later, it’s not needed for the recipe.

- Once the liquid has been drained from the coconut you can split it in half. Use your cleaver and give the coconut a great whack in the middle. If like me you’re not strong enough to get the cleaver all the way through the coconut in one whack, and not skilled enough to keep hitting it in the exact same spot, use a rubber mallet to hammer the cleaver down through the coconut. This works really great, and fast.

- Once your coconut is in half use a spoon to scoop out the delicious white flesh. Once all the flesh has been removed rinse it under cold water and rub any filament away. Pat the coconut dry, and then slice it thin. Reserve half the amount of coconut in a bowl, to use as part of the relish and dry roast the other half in a pan over medium heat until it’s golden brown. Be careful not to burn it. The coconut should emit a slight nutty aroma.

- Once the coconut is a nice golden brown remove it and grind it either in a food processor or mortar and pestle until it resembles corse sugar grinds. Place in a bowl and set aside.

- Now to make the Rempah. In a food processor blend together the garlic, ginger and onion. Add in the soy sauce and pulse to combine. Stir in the turmeric, cinnamon and five spice powder.

- Heat the oil in a large pan over medium-high heat and stir in the rempah. Fry for five to eight minutes until the mixture becomes fragrant.

- Add the seitan to the pan and fry another 3-5 minutes, to let the seitan brown a little.

- Add in the coconut milk, water, Tamarind, stevia and season with sea salt and black pepper. Bring the mixture to a boil, then reduce heat and let simmer for 10-20 minutes. Add in the reserved roasted coconut.

- In the meantime combine all the relish ingredients in a bowl.

- Serve the Curry Kapitan over a bed of brown rice, garnished with extra cilantro, some squeezed lime, and the chili relish.


*** Note - To make this dish Gluten-Free use Wheat Free Tamari and a soy-based ‘meat’ or tofu. To make this dish Soy-Free use Coconut Amino’s instead of soy sauce.***

Thursday, February 23, 2012

Coconut ‘Shrimp’ Tacos with Fried Plantains and Collard Greens...


Ah - I’ve been trying to post for the past two days and was unable to due to some sort of technical difficulty that appears to now be sorted out. This is the recipe I’d planned to post Tuesday, and since I haven’t been able to post in a couple I’ve got a nice backlog of posts waiting to be published. So stay tuned for all the delicious treats I have in store!


As winter is slowly coming to it’s end for another year I find I too am gradually moving away from the cozy, comforting meals associated with the colder months. It seems to always happen this way, about a month or so before the true end to a season my body is already geared up to enter the next phase. While I’m still enjoying soups, and other wintery treats, for the most part my heart and tastebuds are set on spring and summer.


Now before I was a vegetarian, shrimp was always a food I associated with spring, and especially summer. Coconut shrimp in particular, and over the course of the weekend I found myself longing for that sweet, crisp, coconut flavor. Of course I had no desire to eat actual shrimp, and no intention of doing so, but I wanted to find a way to recreate that flavor and texture, and I wanted to enjoy it wrapped in a summery Caribbean inspired kind of taco.


I have to say that despite some of my reservations while cooking, this dish turned out phenomenally and totally satisfied that tropical flair I was craving. Of course these little tempeh bites taste nothing like what I remember of shrimp but that’s not the point, the point is the fried coconut! Combined with the plantains, the collards, the coconut milk drizzle and the mango salsa this dish was heaven on a plate!


Now to put this whole thing together it does require a bit of work. There are several steps you have to go through to make the different taco components but it is so worth it, and if you prepare ahead of time it actually doesn’t take that long. So give it a go, really in the grand scheme of things it’s not a lot to ask for some good homemade coconut ‘shrimp’ tacos! Enjoy, and stay tuned for the salsa recipe which I plan on posting tomorrow.


Coconut ‘Shrimp’ Tacos with Fried Plantains and Collard Greens

Coconut ‘Shrimp’

1 lb Tempeh cut in cubes
1 15 oz can coconut milk
½ tsp garlic powder
½ tsp dried dill
1 tsp hot sauce
1 tsp kelp granules
½ C Panko Breadcrumbs (or gluten-free breadcrumbs if you're GF)
3/4 C Coconut Flakes (I used unsweetened)
1 tsp Cajun Seasoning Blend (or to taste)

Taco Fixin’s

1 Bunch Collard Greens chopped in bite sized pieces.
Whole Wheat or Corn Tortillas
1 Recipe Sweet Shredded Fried Plantains (Recipe Follows)
Roasted Vegetable Mango Salsa (Recipe to come)
Diced Avocado
Diced Green Onion
Coconut Milk Drizzle (Optional)

Sweet Shredded Fried Plantains

3 Plantains
2 Tbsp Coconut Oil
½ tsp Cinnamon
½ tsp Cajun spice blend
1 tbsp Brown Sugar
Water if needed

- First prepare your tempeh. If you’re working with two 8oz blocks of tempeh as I was cut each block horizontally into 6-8 slices. Then slice vertically in half or in thirds depending on how big you want your cubes. Place tempeh into an airtight container when cubed.

- Mix together the coconut milk, garlic powder, dill, kelp, and hot sauce. Pour over the tempeh. Close the container give it a good shake until all the tempeh is covered and then place in the fridge and let marinate for 1-2 hours.

- After the tempeh has marinated mix breadcrumbs, coconut flakes and Cajun seasoning in a shallow bowl. Grab a tempeh cube from the marinating dish give it a shake to remove any excess coconut milk then roll it in the breadcrumb mixture until it’s breaded on all sides. Set aside and repeat until all cubes have been breaded. Reserve the marinade mixture if you want to make a coconut drizzle.

- Once all of your tempeh has been breaded you can cook it 1 of 2 ways. The first way being to fry them. If you have a deep fryer just pop them in there for a few minutes until they’re golden brown. Then remove them and drain on a plate lined with paper towels. If you don’t have a deep fryer you can fry them in about a ½ cup of coconut oil or nuteral vegetable oil in a large frying pan, until golden brown. If however you’re like me and like to try and keep on the healthier side of things you can bake your coconut tempeh in the oven.

- Preheat your oven to 400'F (200'C) lightly grease a baking sheet then place your tempeh cubes on it. Spray the top of each cube with a tiny bit of non-stick spray then place in the oven and bake for 15 minutes. Remove from the oven turn each cube over and return to the oven to cook for another 10-15 minutes. Make sure to keep an eye on them so they don’t burn. Smaller cubes will cook faster and larger cubes will take longer so times may vary.

- While your tempeh is cooking you can work on your plantains. Grab 3 large, green plantains. Cut off the ends and peel. I find the easiest way to be running the tip of a knife down two sides then just dig in with my nail and roll the peel off.

- Once the peel has been removed take a vegetable peeler and run it along the plantains like you would to peel a carrot. You’ll get nice long thin strips of plantain, continue until all plantains have been turned into strips. You’ll probably be left with a core of plantain that your peeler can’t turn into strips, and that’s okay just cut it into thin rounds and toss it in with the strips. Waste not want not right?

- Heat the coconut oil in a large frying pan over high heat. Once melted add the plantains and stir until all strips are coated. Add in the cinnamon, sugar and Cajun Seasoning. Stir again until thoroughly coated and then cook on medium heat until plantains are golden brown and soft. About 8-10 minutes. Make sure to stir frequently so no plantains stick to the bottom, and you may need to add more oil, or water. I added in about a 1/4 of water because I didn’t want to use more oil, and it worked brilliantly. When plantains are finished remove them from the heat and if you like you can drain them on a paper towel. I personally didn’t bother draining them.

- To make your collards just add an inch of water into a pot fitted with a steamer basket. Add your chopped up collards and steam for 3-5 minutes until they’re bright green and wilted. They shouldn’t be mushy but soft, with still a bit of texture. Remove them immediately from the steamer basket and place onto a plate or in a bowl.

- To make the coconut drizzle all you have to do is stir 1-2 packets of stevia into the reserved coconut marinade along with 1-2 tbsp flaked coconut. Set aside, until ready to use.

- To assemble your taco place one tortilla on a plate. Layer on some collard greens and then a generous spoonful of shredded plantains. Top with 4-5 cubes of coconut tempeh, and a bit of coconut milk drizzle. Top with diced green onion, avocado, and a generous spoonful or two of roasted vegetable mango salsa. Wrap up tight and enjoy!


*** Note - This dish can be made Gluten-Free if using Corn Tortilla's and GF Breadcrumbs***

Tuesday, December 13, 2011

Fusilli In Cream Sauce With Caramelized Onions, Sun-dried Tomatoes, and Crushed Pink Peppercorns...


A few nights ago I was in the mood for pasta, but not just any kind of pasta. I wanted a rich and creamy white sauce, rather then olive oil, pesto, or marinara and I wanted it to be kind of cheesy. Whenever I think of cream sauce I think of Alfredo, but that’s not really what I wanted. I wanted something ‘cleaner’ if that makes sense, that was just a tad sweet, with just a touch of delicious cheesy goodness.

White Miso, Nutritional Yeast and Coconut Milk immediately sprung to mind. Now you may have done a double take on the words coconut milk, but trust me on this. The best, richest, and creamiest sauces I’ve made yet for pasta whether they be for mac and cheese, Alfredo or other have all been made with coconut milk. I don’t know what it is about coconut milk but it works so much better then any other non-dairy milk or cream that I’ve tried for that rich flavor and thick texture. I know you might be skeptical but it’s true, and you may be asking yourself ‘doesn’t it make what you’re cooking taste like coconut’ and the answer is no. I find that if you don’t add sugar into your coconut milk, and use savory seasonings there isn’t any coconut flavor at all. I know it sounds crazy right? And I get your reluctance, because I was a total skeptic too when I first happened upon this amazing culinary discovery, but then I tried my first coconut milk mac and cheese and nearly lost my mind! I really is that good, so phenomenal in fact that coconut milk has since become my ‘go-to’ for cream sauce as well as a few other things.


As for the White miso and the Nutritional Yeast, it’s only natural they sprung to mind for this recipe considering the cheesy taste they impart to dishes. People think I’m a little crazy for thinking that White Miso has a cheese like flavor, but I don’t know, that’s what I taste. Something about the fermentation I think gives it a quality similar to aged cheeses. It has that sharp, salty full-bodied flavor you -or at least I - associate with a rich aged cheddar. So whenever I want to make something cheesy White Miso is my ‘go-to.’ Darker Miso, such as red or brown doesn’t really have the same flavor or quality. It’s more salty and bitter to me rather then cheese like so I wouldn’t recommend using them for this. Stick to white miso, or perhaps yellow. As for the Nooch. Since I’m not a big fan of nutritional yeast I played it kind of conservative here, but if you like the taste of nooch then by all means feel free to add in more. I went with the 1/4 cup but think a 1/3 cup would be just as good too, but if you really want to heighten the flavor you could go up to a ½ cup.


Of course once I had the sauce all figured out there was still the matter of what else to put in the pasta. After some careful consideration I decided to go with red onion, garlic, sun-dried tomatoes, fresh parsley and pink peppercorns. Since the pasta is a tan color, and the sauce is so white I wanted to include ingredients that would really stand out and pop with brightness when they came together in my bowl. Red onion, sun-dried tomatoes and parsley are perfect for that, and the pink peppercorns give the dish a cute pink dusting and interesting flavor.


However Pink Peppercorns definitely have a distinct and unique flavor, they’re not hot, but rather have a delicate almost fruity flavor. For some they may be an acquired taste, so if they’re not your cup of tea so to speak, or you’re unable to find them then by all means leave them out and add in white pepper or even black pepper instead. I don’t think the dish will suffer any from their absence, and in fact I think white pepper might give it another distinctive component. The pink peppercorns do lend a hint of sophistication though, and I do really enjoy them.

Now, before we get started I do want to say that there are a couple of steps to this recipe, but if you plan it well it can all come together rather quickly, so don’t feel intimidated!


Fusilli In Cream Sauce With Caramelized Onions, Sun-dried Tomatoes, and Crushed Pink Peppercorns

1 lb Whole Wheat or Gluten-Free Fusilli

1 Tbsp Olive Oil
1 Red Onion
8 Cloves Garlic minced
½-1 C Sun-dried tomatoes (not oil packed)

3/4 C Raw Cashews
½ C water
1 Tbsp Lemon Juice
3-5 Tbsp Mellow White Miso

1 15oz Can Coconut Milk (not light)
½ tsp Smoked Paprika (or to taste)
½ tsp rubbed Sage (or to taste)
1/4 tsp ground Nutmeg (or to taste)
1/4-1/3 Cup Nutritional Yeast
½ Bunch Fresh Parsley Finely Minced
*** ½-1 Tbsp Pink Peppercorns (crushed or ground with a mortar and pestle) (Optional)

- Bring a pot of water to boil and cook Fusilli as directed by the package. When cooked drain, and return to pot.

- Meanwhile, place oil in pan or pot, over medium-high heat. Add onions and saute over medium-high heat for five minutes. Lower to medium and saute another five minutes. Add in garlic and reduce heat to medium-low. Add in the sun-dried tomatoes. Cover and let saute until onions become very soft and light golden brown. Roughly another ten minutes. Make sure to stir every once in a while so the onions and garlic don’t stick. Add a little water If they do.

- When onions are caramelized to your liking transfer them to a plate or bowl and set aside.

- While onions are caramelizing you can blend the cashews, water, lemon juice, and miso in a highspeed blender on high for 30-60 seconds until super smooth and creamy. Taste for flavor and adjust miso as needed.

- Next begin your sauce. Poor coconut milk into medium pot. Add the cashew-miso mixture from your blender making sure to scrape out as much as possible, and whisk until combined. Whisk in Nutritional Yeast, smoked paprika, sage and nutmeg and taste for flavor. Adjust as needed. Let simmer on the stove for roughly ten minutes. Add in crushed pink peppercorns and minced parsley.

- Add your caramelized onion mixture into the pot with your fusilli, then pour in your cream sauce. Mix until everything is thoroughly combined and then serve garnished with a little extra parsley and crushed pink peppercorn if desired.

*** Note - Soy-Free if using Chickpea Miso***