Sunday, February 21, 2016

Vanilla Lavender Cake...


I wanted to make a nice dessert for Valentine's Day, but none of the recipes I looked at appealed to me. Everything was chocolate this and chocolate that, everything was heavy, decadent and 'romantic' I'm okay with the romance but everything being pink or red, and everything being chocolate was a bit overwhelming and overdone to me. I wanted something lighter, that was fun, fluffy, and romantic, yet light, and springy. I kept coming back to the idea of something 'floral' which seemed to really fit the bill in my mind. I thought vanilla rose, only I didn't have any rose petals, and then I remembered the Lavender extract I picked up at the Botanical Garden last summer. I was further reminded that I still had a lot of leftover lavender from when I made a lavender Chocolate cake a while back.


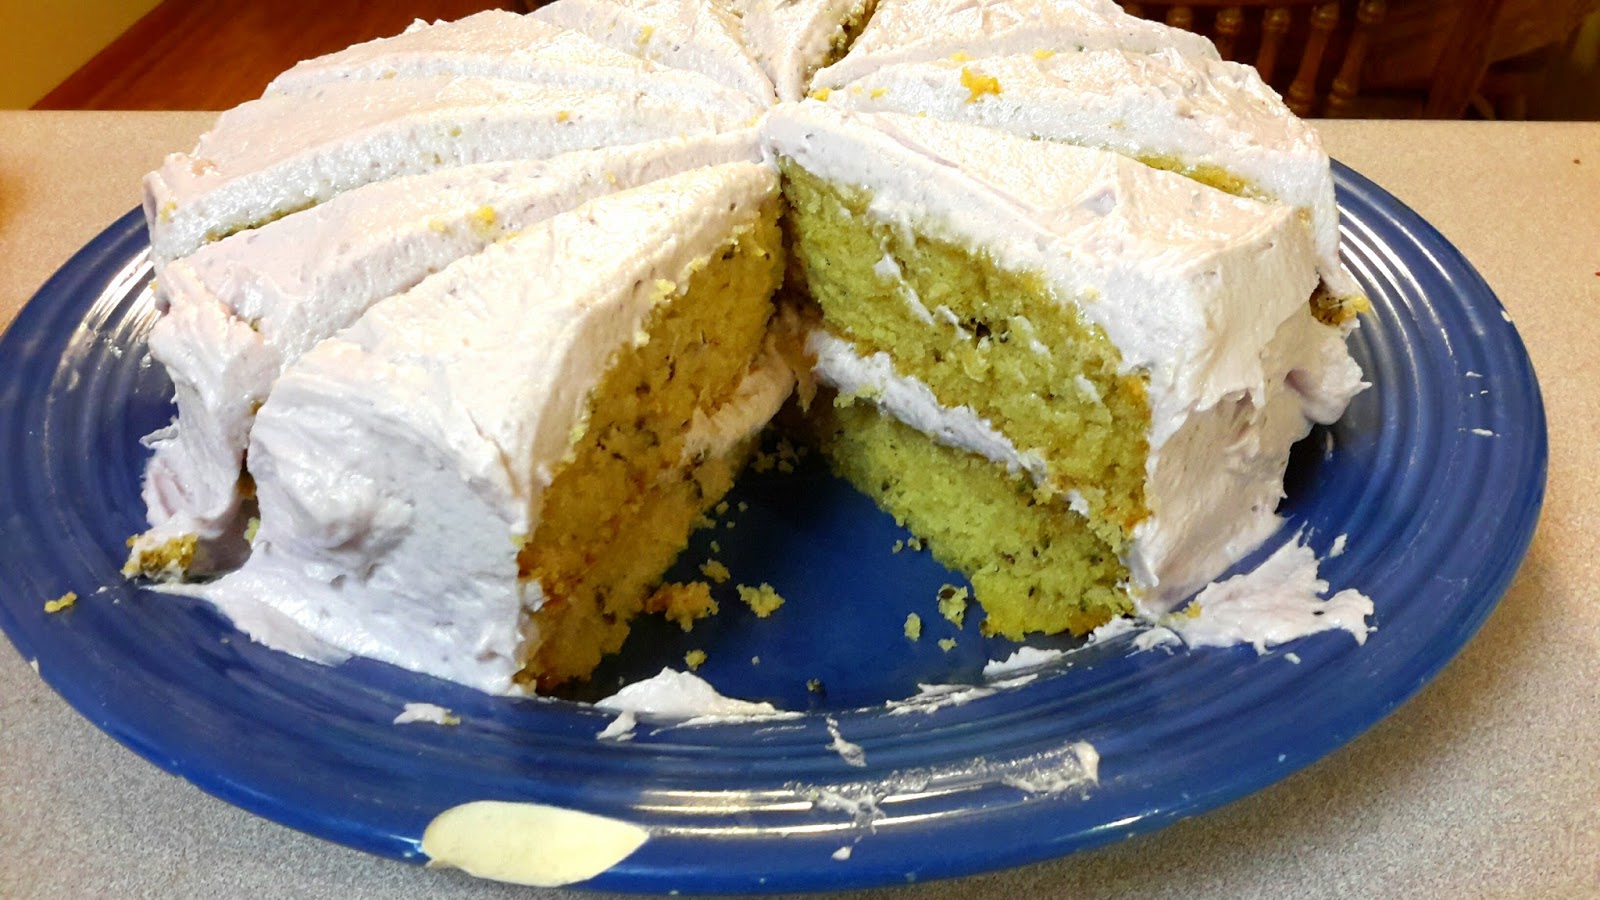
Suddenly everything clicked. Vanilla is light, but a bit boring on it's own, Lavender really jazzes it up and breaths new life into an otherwise ordinary cake. I do not normally use food coloring but considering it was Valentine's Day and I wanted the color of the frosting to match the mood and the romance I decided to give in, and I'm glad, I think it really heightens the overall presentation and makes you feel like you're eating something special.


Vanilla Lavender Cake

3 Cups All Purpose Flour
2 Cups Sugar
2 tsp Baking Soda
1 tsp salt
1 3/4 C Vanilla Almond Milk
1 C Canola Oil
1/4 C Apple Cider Vinegar
1 Tbsp Vanilla Extract
4 Tbsp Dried Culinary Lavender

- Preheat Oven to 350'F and grease two cake pans.

- Mix the dry ingredients into a bowl. Whisk the Wet Ingredients1 together in a measuring cup.

- Make a well in the center of the dry mix, pour the liquid in and stir to combine but do not over mix.

- Divide the batter between the two pans and bake in the oven for 25-35 minutes.

Lavender Frosting

1/2 C Earth Balance
1/2 C Coconut Oil
3 C Powdered Sugar
1 tsp Lavender Extract
2-3 Tbsp Almond Milk
6 Drops Red Food Coloring
4 Drops Blue Food Coloring

- Combine the Earth Balance and the Coconut Oil in a medium sized bowl and blend it together using a hand mixer.

- Add in the powdered sugar and blend until smooth.

- Add in the extract, almond milk and food coloring. You may have to tweak the number of coloring drops you put in to get the right kind of purple.

Assemble -

Place one cake on a plate. Frost the top with a generous amount of lavender frosting. Place the second cake on top and use the remaining frosting to frost the top and sides of the entire cake. Serve and enjoy!

Sunday, February 14, 2016

Roast Seitan With Spring Vegetables...


Happy Valentine's Day everyone!  Though I normally go 'all-out' when it comes to holiday cooking, I just don't really have that level of dedication in me these days. Most often I'm looking to cook something simple and quick that's healthy and tastes good, and on those days where I like to spend a little more time on something I typically only make one really nice dish rather then a dozen.

So this year we kept Valentine's Day low-key. At first I struggled with what to make, and then I decided to make something French (of course!)  Last year when we were in Paris I bought a cook book, it's non-vegan but I wanted it because it was full of 'traditional' French recipes as opposed to 're-imagined' French-fusion. I love the idea of French food, even if I can't eat most of it, and I bought the book with the intention of trying to veganize some of the less common recipes.


As I was thinking about what to cook, it occurred to me that Valentine's Day was the perfect opportunity to try something new, so I dug the book out and flipped through it. Suddenly a recipe for Roast Lamb with Spring vegetables caught my eye. I have no idea what makes this dish inherently French, or if you can really consider it much of a recipe but something about the photo was appealing to me. All those tasty spring vegetables I imagined sitting around a Seitan Roast and it just seemed perfect. I'm tired of winter, tired of winter food, lets bring on the Spring already!  So here's my version of it, you could use any seitan roast you desire I suppose, but I made my own. I used the 'Moo-Free Seitan" recipe from "Vegan Sandwiches Save the Day" cooked it in the slow cooker then left it in roast form rather then slicing it as the book suggests. If you make your own roast for the recipe or buy a roast I suggest buying or making one that's beef flavored as opposed to chicken flavor. Beef and Lamb taste little alike, but Beef Seitan is as close as I'm coming to lamb in this life. I also used the original cooking liquid from the seitan roast as my stock, but you could use any vegan beef stock. Also take into consideration that a store bought roast will be much drier then a homemade one, so cooking time may vary.


Roast Seitan with Spring Vegetables

1 Large Seitan Roast
3 Sprigs Rosemary
3 Sprigs Thyme
6 Garlic Cloves Sliced Thin
1 Pound Baby Potatoes Cut in Half
8oz Baby Carrots Left Whole
2 Medium Sized Zucchini Cut into Rounds
6 Small Leeks or in lieu of that 6 Large Green Onions
2 Tbsp All-Purpose Flour
1/2 Cup Red Wine
2/3 Cup Vegan Beef Stock
Earth Balance as needed
Sea Salt, Black pepper and Garlic Powder to taste


- Pre-Heat Oven to 350'F

- Spray a large roasting pan with a little non-stick spray. Place the roast inside. With a small knife make several incisions in the top of the roast. Slip the sliced garlic into the incisions. Lightly season the roast with sea salt, black pepper, and garlic powder. Add two small dollops of Earth Balance to the pan and place the roast in the oven.

- Cook for 15 minutes. Add the Potatoes to the pan remove the Rosemary and Thyme from their sprigs and scatter it over the roast and potatoes. Season the potatoes with a little salt and pepper then return to the oven and cook another 15 minutes.

- Flip the Roast over, season the underside with salt and pepper and garlic powder. Add the carrots to the pan along with another 2 dollops of Earth Balance. Return to the oven and roast for 20 minutes.

- Flip the Roast Over once more.  Add Zucchini and Leeks to the pan. (If using Green onions instead do not add them yet) Continue to roast until all the vegetables are fork tender.

- When the vegetables are fork tender add in the green onions if you're using them instead of leeks and roast for an additional five minutes until they are wilted and browned a little.

- Remove the whole pan from the oven. Transfer the Roast to a carving board and spoon the vegetables into a serving dish. Making sure to leave behind any juice

- Now to make the gravy. Heat your roasting pan over medium heat on the stove top. If there wasn't a lot of juice left over in your pan at the end of cooking add in two nice dollops of Earth Balance and wait for it to melt.

- Add the flour and whisk the flour around in the juice and EB until it has become a roux.

- Slowly pour in the stock, and then the wine, whisking the whole time. Season lightly with salt and pepper if you like and whisk slowly until the gravy has thickened to your liking.

-Slice the roast, divide it amongst plates, add a scoop of vegetables and drizzle with gravy. Enjoy with some nice red wine.

Saturday, February 13, 2016

Toasted Cashew Noodles....


This dish came about because I was starving, and craving noodles. I don't normally crave noodles, but I really felt like rice noodles in some kind of Asian style sauce. I didn't feel like Peanut noodles, though I love them, and I suddenly had a simultaneous hankering for Cashews. I didn't really have many fresh veggies on hand, and wanted to keep the dish simple anyway so the preparation would be quick - the faster it's made the faster I eat! - and this is what came about.


Surprisingly this turned out super good, it's got the perfect balance of sweet, salty, spicy, tangy. I also think the cashew butter makes a great stand in for peanut butter, and lends a more mellow, yet complex and nutty flavor to the dish. I also really love the nice bit of crunch in each bite from the red cabbage garnish. I didn't have any cilantro on hand, but I imagine that would make a good garnish too, if you happen to have some. Of course if you want to 'beef' it up, you could also add some cubed baked or fried tofu, or maybe even some tempeh. But I kind of like it exactly as it is, light and easy. Two of my favorite things right now.


Toasted Cashew Noodles

For the Noodles

2 tsp Toasted Sesame Oil
3 Carrots Sliced thin
6 Radishes cut into thin half moons
3 Green Onions sliced (White and green parts separated)
2 Garlic cloves sliced thin
1/4 Cup Cashews
12oz Rice Noodles
1/4 C or less of thin sliced Red Cabbage

For the Sauce

1/4 Cup Creamy Cashew Butter
1/3 - 1/2 Cup Coconut Milk (Depending on how thick you want the sauce)
4 Tbsp Tamari
2 Tbsp Mirin
2 Tbsp Lemon or Lime Juice
2 tsp Cane Sugar
1/2 tsp Ground Ginger
1/4 tsp Smoked Paprika
1/4-1/2 tsp Sriracha or to taste

- Place the noodles in a pot of boiling water and cook for 5 minutes or until they are tender. Drain and set aside.

- Heat the Sesame Oil in a large frying pan. When it's hot add the carrot, and radish. Cook on high for about 5-7 minutes until the veg becomes soft and starts to brown. Add in the white parts of the onions, and the garlic. Lower the heat and sauté for another 3-4 minutes until everything is cooked to your liking.

- Combine all sauce ingredients in a small pot and stir until smooth. Turn the heat on high, and when it begins to simmer whisk it for about a minute. You just want to heat the sauce through long enough for it to smooth out.

- Add the Cooked Noodles to the pan of veg. Pour the sauce over, and mix to combine.

- Divide into bowls, and top with Green onions, and red cabbage.

- In a dry skillet toast the cashews over high heat for 5-8 minutes until they smell nutty and begin to brown.

- Top each bowl with a handful of cashews and enjoy!

Thursday, February 11, 2016

Roasted Root Bowl...


I've really been craving root vegetables lately. Radishes, Turnips you name it. The problem is I eat them so seldom I don't really know what to do with them most of the time. This is one of those magical dishes born somewhat out of necessity. Meaning, it was really all I had on hand and I needed to make something for dinner.


I am beyond amazed at how well this turned out. It's a super simple dish to throw together, and despite the hour and fifteen minute cooking time it is super low effort. I kept it lightly and simply seasoned so as not to overpower any of the natural roasted flavor of the veg. All the flavors work so well together and I love the variety of texture between the different roots and the cous cous. I hope you enjoy it too!


Roasted Root bowl

2 medium Sized Turnips Diced
1 Large Parsnip cut into Half Moons
1 large Onion Diced
12 Radishes cut in Half
1/2 Bag of Baby Carrots Left whole if small otherwise cut in half
Olive Oil to taste
Maple Syrup to taste
Sea Salt to taste
Garlic Powder to taste
Black Pepper to taste

Garlic Olive Oil Cous Cous

2 Cups Pearled Cous Cous
4 cups Water
1 Vegan Chicken Bouillon Cube
1 tsp Garlic Powder
1-2 Tbsp Olive Oil
1/4 tsp Ground Turmeric
Garlic Infused Olive Oil to taste (Optional but recommended)
Minced Parsley to Garnish

- Combine everything for the Roasted Roots in a large glass baking dish. Stir it so it's all mixed together then cool it at 400'F for 1 hour.

- Increase the heat to 500'F and cook for an additional 15 minutes until the roots are nice and browned.

- Combine everything for the garlic cous cous (except the garlic infused oil, and the parsley) in a pot and bring to a boil. Reduce heat and simmer until all liquid has been absorbed.

- Drizzle garlic infused olive oil over the cous cous, and stir to combine.

- Plate the cous cous, top it with the roasted roots, and sprinkle the minced parsley over top. Add additional salt and pepper to taste if desired.

Wednesday, February 10, 2016

Toast From Pajottenland....


This has seriously become my favorite lunch. It is super simple and super satisfying. I Love the combination of flavors and I think this is a great way to utilize radishes. Radishes are a vegetable I really love but hardly have occasion to use in anything other then a salad, I imagine other people find this to be true, and while in a salad is not a bad way to eat radishes, I do enjoy new creative ways to eat them.


This simple open-faced sandwich originated as a Belgian snack food. Coming from the Pajottenland area West of Brussels.  Pajottenland is famous for unfiltered, fermented Lambic beers, and stinky cheese. The traditional recipe calls for either Quark (A stinky cheese from the area) or sour cream, so it was easy enough to veganize using Vegan Sour Cream. You can make this with or without Daiya, I've done both, and love it both ways.  However you choose to make it, enjoy!


Toast from Pajottenland

1 loaf Dark Rye or Pumpernickel Bread Sliced.
1 Bunch Radishes Sliced thin
12oz Vegan Sour Cream
1-2 Shallots finely diced
1 tsp Garlic Powder
1 tsp Sea Salt
1/4 tsp Black Pepper
3Tbsp chopped fresh Chives or Green Onions
Daiya Cheddar Cheese (Optional)
Minced Parsley to Garnish (Optional)

- Toast the Bread.

- In a bowl mix the sour cream, garlic powder, salt, pepper, shallot, and chives/onion.

- Spread a layer of the sour cream mixture over each slice of toasted bread.

- If using Daiya sprinkle a layer of the cheese over the sour cream.

- Place the sliced radishes on top.

- Sprinkle with parsley and season with additional salt and pepper if needed.


Tuesday, February 9, 2016

The Ultimate Stoner Breakfast....


It's not called The Ultimate Stoner Breakfast for nothing. This meal is pure 'meat' and potatoes, it's 'carbs, carbs, and more carbs.' it is exactly the kind of food you want to eat and should indulge in when you're grooving in your happy place, and everything is beautiful. One of the best things about it is how low effort it is, yet the flavor is not sacrificed. It's also super hearty, it'll tame even the wildest munchies, of course, don't limit yourself to just eating it at breakfast time!

Now, there are two ways you can eat this. The 'traditional' way with each food having it's own separate space on the plate. Or you can eat it like a taco. Yeah, you heard me, a pancake breakfast taco. How awesome is that? I know it sounds strange but trust me when I say it's amazing. My husband was really skeptical at first too, but after he watched me down 3 of these bad boys he was convinced enough to try it. If you enjoy it in Taco form then you can essentially add anything you like as a topping which is awesome, it makes it versatile. So trust me on this one, and give it a try.

(PS: You can use any pancake recipe you like, but I've included my go-to just incase you don't have one. I have also made these with gluten-free flour before and they have turned out well.)


Cheese Tots

Olive Oil
1lb Frozen Tater Tots
1 Small Yellow Onion Diced
Garlic powder
Sea Salt
4 Sliced Green Onions
1/2-1 Cup Daiya Cheddar or Mozzarella Cheese.

- Preheat Oven to 400'F

- Dump the tater tots into a baking dish with the diced onions. Drizzle a little olive oil over them then sprinkle them with salt, and garlic powder. Stir to combine everything.

- Pop it in the oven and bake for 15-20 minutes until tots are cooked to your taste.

- Remove from the oven, Sprinkle cheese, and green onions over top. Return to the oven and cook for 2-3 minutes or until the cheese has just melted and the onions are soft.

- Enjoy on their own as part of your breakfast, smothered in ketchup, sour cream, or mayo. Or enjoy in a taco!


Classic Go-To Pancakes

2 Cups White Flour
2 Tbsp Baking Powder
1 tsp Sea Salt
1 1/2 Cups water
3 Tbsp Olive Oil
3 Tbsp Maple Syrup

- Mix all dry ingredients in a bowl.

- Combine the water, maple syrup and olive oil.

- Pour the wet into the dry and stir until just combined.

- Heat a pan, spread a 1/4 C of batter out into the pan, spread it thin, but not too thin, similar to the thickness of a flatbread.

- Cook for a few minutes until bubbles appear on the surface of the pancake. flip and cook another couple of minutes until golden brown. Repeat.


The Ultimate Stoner Breakfast.

Add-Ons and Extras

Avocado
Sour Cream
Mayo
Ketchup
Maple Syrup
Your Favorite Tofu Scramble
Jalapeno Slices or Hot Sauce if you like it spicy

To Serve the "Traditional Way" Heap a mound of Cheese Tots onto your plate, Slap down 3-4 Pancakes next to it, then add on a portion of your favorite Breakfast Sausage, a portion of your favorite bacon, with half an avocado on the side. Serve with ketchup and mayo for the tots, and Maple Syrup for the pancakes and sausage.


To Serve it the "Taco Way" Spread a thin layer of Syrup over one pancake. Place 1/2 a slice of bacon (or a full slice if you prefer) on top of the pancake, then a breakfast link.  Pick the pancake up, and hold it in your palm like you would a taco shell. Take a spoon and scoop a small portion of the cheese tots inside your pancake shell. If you're using tofu scramble as well, scoop a small portion of that into the pancake taco along with the tots. Drizzle a bit of ketchup over top, and then serve with dollops of sour cream and/or mayo and whatever other add-on's you wish. It's great with or without avocado, and I personally like the mix of sour cream and mayo. So delicious!


Red Curry Rice Soup...


I made this soup a lot over January. It's so quick and easy which I love, but it's also super warming, comforting and packed full of nutrition and flavor. Unfortunately I didn't really write down a recipe, but this is more or less how it goes.


Red Curry Rice Soup

1Tbsp Olive Oil
1 Small Onion Diced
6-8 Garlic Cloves Minced
1 tsp Ground Ginger
3 Cups Vegan Chicken Broth
1 15oz Can Coconut Milk
2 Tbsp Red Curry Paste
1 tsp Sea Salt
2-3 Tbsp White Jasmine Rice
2-3 Baby Bok Choy
3-4 Green Onions sliced thin
1/4 tsp Gochujang or Red Pepper Flakes

- Heat the Olive Oil in a medium sized pot. Add the onion and cook for 5-6 minutes. Add the garlic and ginger and cook for another 4 minutes.

- Add the Vegan Chicken Broth and Rice. Bring to a boil and then lower to simmer. 10 Minutes.

- Add in the coconut milk, salt, and Red Curry Paste. Simmer another 10-15 minutes or until the rice is tender.

- Add the sliced Bok Choy Leaves, green onions and Gochujang. Stir to combine and cook 1-2 minutes just until the choy has wilted.

- Serve garnished with extra green onions, and Gochujang if desired.

Classic Ratatouille...

It had been way to long since my last blog entry, I realize that. I had hoped to get back to regular blogging after we returned from our Washington/Oregon Road Trip, but things were just hectic, and I didn't have the time nor the energy, nor the inclination to do much cooking, or blogging. I don't know if today will mark my return to blogging or not, but I did want to post this recipe that I made last week because I thought it turned out rather good, and who couldn't use more vegetables?


Classic Ratatouille

2 Tbsp Olive Oil
4 Garlic Cloves Minced
4 Large Tomatoes
1 Large Onion Diced
1 Red Pepper Diced
1 Yellow Pepper Diced
1 Medium Eggplant Diced
2 Large Zucchini Diced
2 Tbsp Tomato Paste Mixed with 1 Tbsp Water
1 tsp Sugar
1 Bay Leaf
3 Springs Thyme
1 Tbsp Minced Basil
1 Tbsp Minced Parsley
1-2 Additional Garlic Cloves to taste
1 tsp Sea Salt
1/2 tsp Black or White Pepper to taste


- Score a cross into the bottom of each tomato.  Plunge into boiling water and boil for 20 seconds. remove from the water and blanch in ice water. peel the skins away from the tomato, and chop the tomato. Reserve.

- Heat 1Tbsp Oil in a pot. Add the onion and cook for 10 minutes. Add the 4 garlic cloves, the red and yellow peppers. Cook for about 4 minutes and then remove the vegetables from the pan.

- Heat the second Tbsp of Oil in the same pan. When it's hot add the eggplant and cook for 4 minutes until beginning to brown. Add the zucchini and cook for another 5 to 10 minutes or until the veggies are a nice deep brown.

- Add the Onion and Pepper mix back to the pot.  Add in the tomato paste mixture and stir well to combine. Cook for 2 minutes and then add in the tomatoes, sugar, salt, pepper, bay leaf, thyme and basil. Stir well and cover to cook for 20 minutes. Check the vegetables after 10 minutes and if they look too dry add in about 1/4 cup water.

- Mix the remaining 1 or 2 garlic cloves with the minced parsley. When your Ratatouille has finished cooking add the garlic/parsley mix and stir lightly just to combine.

- Serve your Ratatouille hot with crusty French Bread or Garlic Bread. Enjoy with a glass of red wine for good measure.