I thought I'd have enought time to update one last recipe before I left for vacation, but staying true to form I'm running a little behind. But don’t worry, there will be a lot of tasty recipes upon my return, and I’ll be sure to fill you in on all the details of my vacation. Our plane leaves for London in a few hours, and then mid next week my husband and I will be in Germany. We won’t be back until July. So I hope you all have a wonderful few weeks, and I look forward to updating you all on the wonderful vegan finds in London and Germany when I get back!
Peace & Love

Friday, June 8, 2012
Thursday, June 7, 2012
Curry Kapitan with Coconut and Chili Relish...

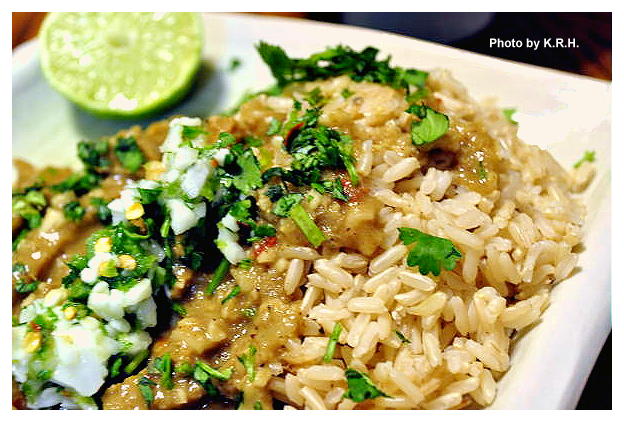
My latest foray into Malaysian Cooking. Curry Kapitan is traditionally made with chicken, and it’s said that the dish recalls the traditional role of the Chinese Kapitan, who was a man of considerable social standing amongst the Malay and Chinese people in old Melaka. Possibly invented by the Peranakans - the Malay-Chinese - to present to the Kapitan or to celebrate his role. It owes it’s flavor to the cultural melting pot of Old Melaka, and to the traditions of Chinese, Malay, Portugese, and Indian cuisine. Of course for my version I used homemade seitan instead of chicken, and decided to use soy sauce for a salty taste instead of dried shrimp paste.

This dish is nothing if not flavorful. The aroma alone is mouth-watering, but the taste... incredible! Though the ingredient list may seem long, this dish actually comes together rather quickly and it is worth every ounce of effort. When I first set out to make this dish I had no idea what to expect, and there were a few moments at least where I thought the whole thing would end in disaster. However when it came time to eat, and I took my first bite of curry Kapitan I was in love. The flavor is so complex that it’s hard to describe, but it has every flavor note you could possibly want in a dish. You can adjust the seasonings to make it as hot or mild as you like, but a little bit of kick is part of what makes this dish so fantastic. Use the chilies as a garnish, with a squeeze of lime and you won’t be disappointed. It tastes even better the next day!

Curry Kapitan with Coconut and Chili Relish
For the Rempah
½-1 tsp red pepper flakes
1 large red onion
10 cloves garlic
thumb sized piece of ginger
1 tbsp soy sauce
½ tsp ground turmeric
2 tsp Chinese five spice powder
1/4-1/2 tsp ground cinnamon
For the Curry
2 Tbsp tamarind paste
Flesh from half of 1 Fresh Thai Coconut (roasted)
2 tbsp peanut oil
1 15oz can coconut milk + 1/3 c water
1-2 Pack Stevia
1 ½ lb Seitan (Homemade or Store bought)
For the Chili Relish
½ - 1 Jalapeno Minced (Depending on how spicy you want it)
½-1 Red Chili Minced or ½-1 tsp red pepper flakes
½ Bunch Cilantro Minced
Flesh from half of 1 Fresh Thai Coconut
Juice of 1 Lime

To Serve
1 Lime
Extra Cilantro minced
Cooked Brown Rice
- First you must open your coconut. To do this the easiest way is to get a cleaver. It doesn’t have to be a good cleaver, it doesn’t have to be a $500 one, a $50 one will work just as good. Use the cleaver to whack your coconut a couple of times to break through. Drain the liquid out into a bowl or measuring cup and refrigerate to dink later, it’s not needed for the recipe.
- Once the liquid has been drained from the coconut you can split it in half. Use your cleaver and give the coconut a great whack in the middle. If like me you’re not strong enough to get the cleaver all the way through the coconut in one whack, and not skilled enough to keep hitting it in the exact same spot, use a rubber mallet to hammer the cleaver down through the coconut. This works really great, and fast.
- Once your coconut is in half use a spoon to scoop out the delicious white flesh. Once all the flesh has been removed rinse it under cold water and rub any filament away. Pat the coconut dry, and then slice it thin. Reserve half the amount of coconut in a bowl, to use as part of the relish and dry roast the other half in a pan over medium heat until it’s golden brown. Be careful not to burn it. The coconut should emit a slight nutty aroma.
- Once the coconut is a nice golden brown remove it and grind it either in a food processor or mortar and pestle until it resembles corse sugar grinds. Place in a bowl and set aside.
- Now to make the Rempah. In a food processor blend together the garlic, ginger and onion. Add in the soy sauce and pulse to combine. Stir in the turmeric, cinnamon and five spice powder.
- Heat the oil in a large pan over medium-high heat and stir in the rempah. Fry for five to eight minutes until the mixture becomes fragrant.
- Add the seitan to the pan and fry another 3-5 minutes, to let the seitan brown a little.
- Add in the coconut milk, water, Tamarind, stevia and season with sea salt and black pepper. Bring the mixture to a boil, then reduce heat and let simmer for 10-20 minutes. Add in the reserved roasted coconut.
- In the meantime combine all the relish ingredients in a bowl.
- Serve the Curry Kapitan over a bed of brown rice, garnished with extra cilantro, some squeezed lime, and the chili relish.

*** Note - To make this dish Gluten-Free use Wheat Free Tamari and a soy-based ‘meat’ or tofu. To make this dish Soy-Free use Coconut Amino’s instead of soy sauce.***
Wednesday, June 6, 2012
Garlic Scape and Collard Green Pizza...

There are few things better then a truly good pizza, and I’ve made plenty of tasty pizza’s in my life, but this one beats them all by a thousand miles. The flavors in this pizza are out of this world amazing! It’s truly amazing what you can create when you’re making every effort to use every last bit of fresh produce in your fridge. Collard greens, tomatoes, and non-dairy cheese were all staring at me yesterday afternoon threatening to spoil unless I used them before vacation. A quarter of a jar of garlic and green onion olive oil had been sitting on my counter for the better part of a month. A jar of sun-dried tomatoes sat nearly empty in my fridge, and I had just purchased 4 bunches of garlic scapes from my local grocery.

I was not suppose to buy groceries this week, but when I saw that scapes were back in season I knew I’d have to have them before I left, because by the time I get back they’ll surely be gone. It was a total impulse by, and my stomach not my brain was responsible. When I got them home, I thought “What am I going to do?” I have hardly anything left in my fridge. I stared down the contents of my fridge for a good long while and then the above mentioned ingredients started calling to me. They started saying “pizza, pizza, piiiizzzzaaaa!” Until I just had to listen.

Though this was my own idea, I was skeptical at first. Collard greens on a pizza? I’d never hear of such a thing, and collards - love them though I do - are just one of those things that one immediately identifies with ‘health food’ not pizza. Still, I decided it was better to try and fail and have to through the collards out because dinner was terrible, vs throwing the collards out because they went bad. I can not tell you how amazed I was by the end result. This is literally the best pizza I have ever made, perhaps even the best pizza I have ever eaten and I do not say that lightly. We’re talking mind-blowing, mouth-watering, tastebud-tickling good, so good that you’ll crave it! Even my husband, a pizza eating fanatic said it was one of the best pizza’s he’d ever eaten, and last night he simply couldn’t get enough of it!

Instead of sauce I decided to coat the crust in home-made garlic and green onion infused olive oil. I wanted a lighter, cleaner tasting pizza, and wasn’t in the mood for a heavy acidic tomato based sauce. Of course if you’re anti-oil this may not be the pizza for you, but you can control how much oil you brush onto the crust. You don’t have to go overboard and if you’re only eating a slice or two it’s really not all that bad. You can of course try it with a tomato based sauce though I can’t grantee that it’ll taste at all the same. The infused oil is highly recommend. Also though I list the non-dairy cheese as optional I highly recommend that too. I used Daiya’s Garlic Jalapeno Havarti which was amazing and really kicked the pizza up to a new level, but you could use vegan mozzarella if that’s all you can find. Remember though to use just a little bit, you want it more as a garnish than anything else, the pizza shouldn’t be dripping with it. Just sprinkle on enough that you get a few good bites of it per slice. On it’s own the pizza is hearty and filling, but to make it even more of a meal you could serve it with a nice side salad and perhaps even a glass of red wine if wine is your thing. However you serve it, just be sure to enjoy it! And trust me when I say this comes together a lot quicker then the length of the recipe may imply. Also the topping can be made ahead and saved till needed, which makes it that much easier!

Garlic Scape and Collard Green Pizza
Topping
2 Leeks white and light green parts only sliced thin
2 bunches collard greens chopped into bite size pieces
3 Roma tomatoes sliced thin
1-2 Bunches garlic scapes sliced into 1 inch lengths
Garlic and Green Onion infused Olive Oil for brushing ***
1/8 C Shredded non-dariy cheese (optional)
10-15 sun-dried tomatoes sliced into strips
Rosemary sea salt ***
Fresh Black pepper to taste (Optional)
1 ½ Tbsp Balsamic Vinegar to drizzle over top
Dough
2 1/4 C All Purpose Flour
1 ½ Whole Wheat Flour
1 pack active dry yeast
1 C warm water
3/4 tsp salt
2 Tbsp Olive Oil
Preheat Oven to 400'F
- Water Saute leeks, collard greens, and garlic scapes in large pan over medium-high heat. Saute about 10 minutes until veggies are tender and all the water has been absorbed. You want the mixture to be a bit dry. Transfer to a bowl when finished and set aside, or if making ahead refrigerate until ready to use.
- To make the dough, combine all purpose and whole wheat flour, and salt in a food processor and pulse to incorporate.
- Combine Active Dry Yeast with Warm water and set aside for five minutes
- Drizzle the olive oil into the food processor and add the yeast/water mixture. Process until mixture forms a cohesive dough. If the dough is too moist or sticky add in more flour until you’ve reached your desired consistency.
- Remove the dough from the food processor, shape into a ball and set aside to rest for 10 minutes.
- After the dough has sat, you can either divide it to make two smaller thin crust pizzas or leave it as is to make one large regular crust pizza.
- Flour a clean work surface and flour a rolling pin. Gently roll dough out into a large circle. Start with the edge closest to you and roll the dough outwards in a circular motion. Flip the dough over and continue rolling outwards in a circle. Flip the dough one more time and continue to roll outwards until the circle is large enough to fit your pizza pan.
- Lightly grease your pizza pan with some non-stick cooking spray. Then gently transfer your pizza dough to the pan. There should be excess dough flowing over the edge of the pan. Roll it up to form a crust around the edge of the pan. Trim some off as needed if the excess is too much.
- Poke your pizza dough with the tings of a fork a few times. Then brush the dough with a generous amount of garlic and green onion olive oil (or regular olive oil) make sure to brush both the base of the dough as well as the crust.
- Place pan in preheated oven and cook for 10-15 minutes until dough is firm. Remove from the oven.
- Brush with a little more garlic and green onion oil, then layer sliced Roma tomatoes around the crust. Evenly distribute the collard green, leek and garlic scape mixture over top of the tomatoes. There will be a lot but that’s okay, pile it all one and spread it as evenly as possible.
- Next scatter the sun-dried tomato strips over top of the pizza, and the shredded non-dairy cheese if using.
- Finish the pizza by drizzling the balsamic vinegar over top, sprinkling with Rosemary sea salt and a few twists of a black pepper mill.
- Return the pizza to the oven and bake for 15 or so minutes until the cheese has melted, and the edges of the crust begin to golden.
- Slice and serve hot with a bowl of garlic and green onion olive oil dotted with balsamic vinegar for dipping your pizza crusts! Enjoy!

*** Note - The Garlic and Green Onion Olive Oil is super easy to make and tastes amazing on this pizza. If you prefer you can use regular olive oil, but this oil really does kick the pizza up a notch and infuses it with such great flavor. I highly recommend it, especially since it’s so easy. All you do is pour 2 cups of olive oil in a mason jar. Add 1 cup of sliced green onions (just the green parts) ½ cup of finely minced parsley or basil (or a mixture of both) a pinch of sea salt, and 10-12 garlic cloves finely minced. Screw a lid on tight, give it a good shake then leave it on your kitchen counter for 24 hours to let the flavors develop. So delicious! ***

*** Note - Rosemary Sea Salt is easy to make. All you need is fresh Rosemary springs and sea salt. Remove the Rosemary leaves from the stems and grind in a food processor. Then add to a shaker with an equal (or slightly less) amount of sea salt. Use on everything because it tastes delicious! ***

*** Note - This pizza is only soy-free if you use a soy-free non-dairy cheese.***
Tuesday, June 5, 2012
Tropical Omega-Boost Smoothie...

When it comes to getting my Omega-3's some weeks I do really good and make sure I take in a wide variety of flax, chia, walnuts and leafy greens, while other weeks I fall into a rut of nutritional neglect. I’m sure you can relate. Maybe you get busy, or maybe you get a taste for food that’s a little more decadent -and possibly less nutrient dense, - maybe you simply forget, or just don’t ‘feel like it’ some days. Well I know how that goes. So on Saturday I came up with a super easy, and delicious omega-rich smoothie that’ll have you begging for more. The flavor is so sublime that you won’t have to coax yourself into making it because you’ll wake up craving it!

Interestingly this smoothie came about not only out of a desire to make sure I get my daily flaxseed, but also in an attempt to clean out my refrigerator before going away on vacation. All the ingredients in this smoothie I had in abundance, and all of them - except for the flaxseed - needed to be consumed before I leave. I wasn’t sure what I’d end up with after mixing them all together but that’s what experimentation is all about right? The end result was far better then I imagined. The smoothie Is rich and creamy, it’s sweet, sour and tropical, and as an added bonus it’s both sugar and stevia free. Despite being free of sugar or other sweeteners this smoothie tastes exactly like the sort of thing you’d pick up at one of those chain smoothie joints in the mall. Dare I say it almost taste decadent? It’s a tropical paradise in a glass, and I strongly urge you to give it a try.

A quick note about the mango. You can use any kind. I’ve made this smoothie every day since Saturday and I’ve made it both with the big red mangos, and the smaller yellow mangoes. I’ve also made it with overripe, perfectly ripe, and under ripe mango, each time it came out fantastic. Keep in mind however that if you use overripe mango the overall drink will be sweeter. If you use under ripe mango the drink will have a more sour taste, which I actually liked quite a lot. In fact it reminded me of a thick yogurt. I’ve also used both unsweetened Flax milk, and Vanilla Flax Milk. It came out brilliant both times, though of course using the vanilla flax milk will give it a subtle hint of vanilla flavor, as well as make it a bit sweeter. Any way you decide to make it I hope you enjoy it!

Tropical Omega-Boost Smoothie
1 ½ -2 C Your Favorite Flax Milk (Depending on how thick you want it.)
1 Large Mango Peeled, Stone removed, and cut into chunks
1 Large Banana
1 Pink Lady Apple Peeled and cut into chunks
2 Tbsp Ground Flaxseed
4 Tbsp Organic Unsweetened Applesauce
- Place all ingredients in a high-speed blender and blend on high for 60-90 seconds until completely smooth and creamy. Pour into a glass and enjoy!
Monday, June 4, 2012
Indo-Malaysian Shami Kebabs...

Just incase you thought I was finished experimenting with Malaysian cooking, this post it to assure you that I’m not. I’ve just been very busy lately preparing for vacation, so I haven’t been cooking quite as much as usual, and much of the cooking I have been doing has been for the express purpose of cleaning out my fridge before I take off. Before I do however, this dish really needs to be shared!

Even though a Shami Kebab isn’t exactly the sort of kebab we here in the west are used to, they are delicious. Originally of Indian Origin these kebabs are traditionally made from a mix of lentils and ground lamb. They are a popular item at the Malay and Muslim Hawker stalls and are often served alongside a dish or rice, and a sambal, however they are also sometimes eaten as a burger which is sort of how I chose to enjoy mine.

Of course my Shami Kebabs were not made with ground lamb, (Ew!) Instead to get that kind of texture and ‘sticking together’ effect I decided to use two different kinds of lentils, as well as cashews and mushrooms. The end result was so fantastic and delicious that both my husband and I failed to see how the dish could have in any way been improved by the addition of lamb. These kebabs, or patties as they should more accurately be called - are hearty, flavorful, and down right scrumptious. I dare you to eat just one.

Also instead of eating these kebabs with a heavy side or rice, or on a burger bun I decided to slayer them onto a sliced French Baguette, piled with lettuce, tomato, cilantro, mango chutney, and a drizzle of tamarind sauce, and mint yogurt. Now that I think of it a few sliced onions would have gone perfectly on there as well. Next time!

Shami Kebabs
1/3 C Red Lentils
1/3 C Green Lentils
2 Onions finely diced
10 Garlic Cloves minced
1 Thumb Size Piece Ginger grated
1 Small Green Chili minced (Optional)
6oz Baby Bella Mushrooms finely diced
½ C Cashews Ground into a meal
1/4-1/3 C Chickpea Flour (depending on how wet your mixture is)
2 tsp Curry Powder
1 tsp Ground Coriander
1 tsp Ground Cumin
1 tsp Gram Masala
½ tsp Ground Turmeric
Sea Salt to taste
2-3 Tbsp Earth Balance
½ Bunch Cilantro minced
Optional Garnishes
Cilantro
Sliced Tomato
Lettuce
Thin Sliced Red or Yellow Onion
French Baguette or Italian Loaf
Mango Chutney
Quick Tamarind Sauce
2 tbsp tamarind paste
2 packets stevia or to taste
water to thin
Quick Mint Yogurt
1/4 C Sour Cream
1 Tbsp Lemon Juice
1 Tbsp White Miso
2 Tbsp Water
Minced Fresh Mint to taste
Salt and Pepper to taste
- Rinse Lentils then place them in a medium sized pot and add enough water to cover. Bring to a boil then reduce heat to simmer and cook lentils until the water has absorbed and the lentils are tender. Roughly 20-40 minutes. If your water absorbs before your lentils are tender add more water.
- When lentils have finished cooking drain and set aside.
- Meanwhile melt the Earth Balance in a large pan. Stir in the diced onions, garlic, ginger, and green chili. Saute over medium-high heat for 5-10 minutes until mixture is fragrant and onions are translucent.
- Add in the diced mushrooms, the curry powder, coriander, cumin, gram masala, and turmeric. Saute for 3-4 minutes then add the lentils. Saute another 5-10 minutes until mushrooms are soft and moisture has evaporated. Transfer the mixture to a large mixing bowl and set aside to cool.
- Once mixture is cool enough to handle season with sea salt and pepper and add in the ground cashews, the minced cilantro and the chickpea flour. Thoroughly combine until the mixture becomes cohesive enough to form patties.
- Form the mixture into 10-12 palm sized patties. Place on a lightly greased baking sheet and bake at 400'F for 10-15 minutes. Remove the baking sheet, gently flip the patties over and bake for another 10-15 minutes until the patties are browned and have firmed up. Let cool for 5-10 minutes before serving if serving as a sandwich. It serving with rice serve immediately.
- To assemble your Shami Kebab sandwich. Slice a French Baguette in half crosswise then slice each half lengthwise down the middle so you have two roughly 6inch sandwiches. Slice three patties in half then layer three halves on each baguette. Top with mint yogurt, mango chutney, tamarind sauce, lettuce, tomato and cilantro and serve!

- To make Tamarind Sauce and Mint Yogurt simply whisk the ingredients for the Tamarind sauce in a bowl. Taste, adjust for seasoning and thickness and serve. For Mint Yogurt whisk all ingredients together in a bowl taste for seasoning and thickness and serve.
Subscribe to:
Posts (Atom)