Showing posts with label Agave. Show all posts
Friday, December 12, 2014
Stir-Fried Tempeh and Snow Peas in Black Bean Sauce...
This is just a really quick and easy stir-fry that would be good for dinner any night of the week. Simply prepared, it comes together without much effort making it perfect for busy nights. It was inspired by the limited produce I had in my fridge last week, and by my last trip to the Asian market where I got a huge jar of Black Bean Paste for a reasonable price. If you love Black Bean Sauce as much as me, and you’re in need of a good stir-fry recipe to throw into rotation, this one certainly satisfies.
Stir-Fried Tempeh and Snow Peas in Black Bean Sauce
1tsp Sesame Oil
½ Large Yellow Onion Diced
*** 8oz Tempeh Sliced
10oz Snow Peas trimmed
3 Large Green Onions Sliced
3 Tbsp Black Bean Paste
4 Tbsp Water (or more to thin as desired)
2 Tbsp Agave Nectar
4 Cloves Garlic Minced
Brown Rice for serving
- In a small bowl whisk together the black bean paste, water, agave nectar and minced garlic.
- Place the tempeh in a shallow dish or sealable container, pour the marinade over top and cover. Let marinate at room temperature for 1 hour, or refrigerate and marinate for several hours.
- Heat Sesame Oil in a large pan over medium-high heat. When sizzling add the yellow onion and saute for 3-5 minutes until soft.
- Using a fork remove the tempeh form the marinade, shaking off as much marinade as possible before placing the tempeh into the sizzling pan.
- Cook Tempeh without stirring for 2-4 minutes until browned. Then flip and cook another 2-4 minutes. If needed, add a little bit of water to the pan to deglaze the pan and prevent the tempeh from sticking.
- Add the snow peas and cook for 3 minutes until bright green.
- Pour the reserved marinade into the pan and stir to combine everything. Cook for 3-4 minutes until everything is heated through and the marinade has reduced slightly. Add in the green onions and stir to combine. Let the dish sit for a couple of minutes to let the green onions wilt slightly.
- Serve the stir-fry over brown rice and enjoy!
*** Note - To make this soy-free you could use seitan in place of the tempeh***
Wednesday, May 29, 2013
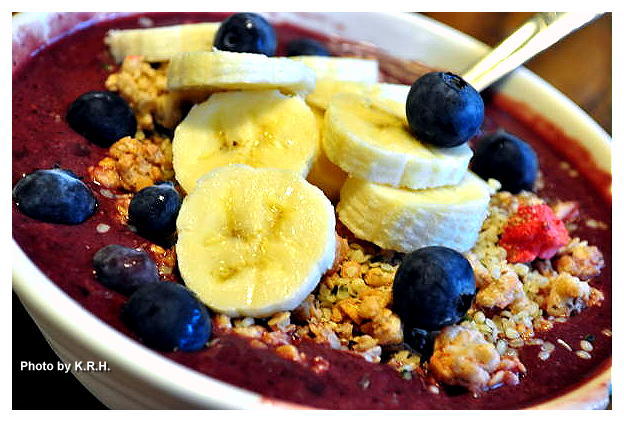
Acai Berry Breakfast Bowl...
I’ve been in love with the idea of an Acai breakfast bowl ever since I tried my first one at a Choice Health Bar in Lahaina, Maui a couple of years ago. It became a favorite breakfast for me while I was in Maui. There was nothing better then waking up to the sun, walking on the beach listening to the waves roar and then going into town for a delicious and filling yet totally nutritious breakfast. Every time I ate one of those Acai bowls in Maui I felt like I was eating energy, like I was eating power. It’s such a great way to fuel your day, and eating a rainbow of fruity filled goodness for breakfast just puts you in an immediately positive mood.
When I came back to Chicago however there were no Acai bowls to be found in any of my local haunts and so I gradually began to forget about the awesome power of acai in the morning. It wasn’t until I returned home to Vancouver this past month that I was once again reunited with my love of the acai bowl. My husband and I were in North Vancouver doing some touristy stuff since we’d been able to snag some free time away from family drama. Since we were out there I wanted to take him to a cool, raw, vegan, smoothie bar I’d discovered last year. Lo and behold when we arrived at the tiny busting smoothie bar they had a sign for their own version of an Acai breakfast bowl. - More about that bowl in particular and the smoothie bar in a review post - promise. - Needless to say I was desperate to order it for breakfast, and once that acai touched my tongue you could consider my love rekindled.
Why it had never occurred to me to make my own acai breakfast bowls upon returning home from Maui I will never know, but after having one again in Vancouver I knew I wouldn’t be able to live without it again. The following recipe is my take on an acai breakfast bowl, and it’s one of the very first things I made once we were back in Chicago. The cool thing about an Acai bowl is that they’re pretty versatile, you can load them up however you like, and add in what you want. I remember Choice Health Bar in Maui had more then just one version of the bowl listed in their breakfast menu - some of them quite elaborate - but for my take I wanted something simple, refreshing and delicious.
This bowl wins on all points, you simply must make it. Think of it as a smoothie you can chew, and prepare to be amazed!
Acai Berry Breakfast Bowl
1/4 C Frozen Blueberries
6 Frozen Strawberries (8 if berries are small)
1 3.5oz pack of Frozen Acai Berry Puree
1/3 C Acai Berry Juice
3 Ice Cubes
1 ½ tsp Agave Nectar
1/4 C Granola
1 Tbsp Hemp Seeds
2 tsp Ground Flaxseed
2 tsp Chia Seeds
1 Sliced Banana
Handful of Fresh Blueberries
- Combine frozen blueberries, frozen strawberries, acai berry puree, acai berry juice, agave nectar, chia seeds, flaxseed, and ice cubes in a high speed blender. Blend on high until the mixture is smooth and completely pureed. You can add a couple more ice cubes for a thicker consistency if you like.
- Pour the mixture into a bowl. Then top with your favorite organic vegan granola - I used a vanilla strawberry blend - hemp seeds, the sliced banana and fresh blueberries.
Enjoy immediately, sitting somewhere where you can enjoy the sun!
*** NOTE - If you need this recipe to be gluten-free make sure you purchase and use a gluten-free granola ***
Wednesday, February 20, 2013
Thai Inspired Cabbage Salad with Creamy Tahini Lime Dressing...
This is one of my favorite salads. Seriously. I’ve been making it frequently over the past couple of years and though it’s super simple and easy it never fails to amaze me just how satisfied I am after eating it. This is one of those recipes that came about because a growling hunger was gnawing at my stomach at a time when my refrigerator was looking pretty sparse, so I had to make due with what I had. Sometimes that’s the best way to cook. Though it can be restrictive to cook with an empty fridge and an empty pantry, it can simultaneously be inspiring. It can provide you with the kind of freedom to be creative that you might not have otherwise. There’s always something a little magical in that.
Over the years this recipe has changed and transformed. The basic heart of it however has stayed the same. It was initially inspired by Thai flavors, - Thai cuisine being one of my favorites - and those hot lazy days of mid-summer when you don't want to do a lot of cooking anyway. Though no matter how I choose to make it these days, it always has the same six basic ingredients. Cabbage, cilantro, green onions, tahini, lime juice and soy sauce. Some days I use a little more of this, or a lot more of that. Some days I throw certain ingredients in, and leave others out, it all depends on my mood and what I have on hand, and that’s the beauty of this. It’s versatile! There are no hard and fast rules to making it, as long as you have those six basic ingredients it’s a winner every time.
I really do love the cool crisp cabbage slathered in thick rich, creamy, and nutty tahini. The sourness of the lime, the saltiness of the soy sauce, the bite of the onion, and the earthiness of the cilantro. It’s such a satisfying combination, made even better by various additions. A little sweetness from agave, or bell pepper, extra crunch from bean sprouts, a little spice from the radish. Cool and creamy avocado, or sweet mango, a hint of ginger or a hint of garlic. This version that I present to you is definitely a more jazzed up version of that original salad that I first made years ago, but it is extremely delicious. Of course it’s meant to be simple, so if you don’t have everything on the list don’t fret. In keeping with the spirit of the original work with what you have, and enjoy!
Thai Inspired Cabbage Salad with Creamy Tahini Lime Dressing
1 Small Nappa Cabbage sliced thin
½ Head Red Cabbage sliced thin
1 Large handful bean sprouts
2 Large Carrots shredded
1 bunch green onions Sliced
1 bunch cilantro Minced
6 Red Radishes Sliced Thin
1 Cucumber Sliced thin
1 Red Bell Pepper Sliced thin
Handful of Raw or Roasted Unsalted Peanuts
Half a Mango sliced thin (Optional)
Half an Avocado sliced thin (Optional)
Creamy Tahini Lime Dressing
4 TBSP Tahini
4 Tbsp Lime Juice
2 Tbsp Tamari
2 Tbsp Water (as needed)
1 Tbsp Agave
1 small piece Ginger Grated finely
1 Clove Garlic Minced
1/8 tsp Cayenne
- To make the salad slice, chop or mince all ingredients as directed and place into a large mixing bowl.
- Whisk together all the dressing ingredients in a small bowl and taste for flavor. Adjust seasonings as needed if you want more lime, more tamari, more garlic etc.. or if you need to thin it more with a little water.
- When the dressing is to your taste pour it over the salad in the mixing bowl. Mix the salad thoroughly to combine and serve!
- Enjoy garnished with extra cilantro and peanuts if desired. Or with sliced avocado and/or sliced mango.
PS: I chose to use Tahini here in the dressing because I love it, and it's what I had on hand. However if you were interested in a more traditional Thai taste, you could easily substitute almond butter or peanut butter for the Tahini. Though it's not something I do myself i'm sure it would be just as lovely.
Labels:
Agave,
Asian Fusion,
Bell Pepper,
Carrots,
Cilantro,
Cucumber,
Garlic,
Ginger,
Gluten-Free,
Green Onions,
Nappa Cabbage,
Oil-Free,
Peanuts,
Radish,
Red Cabbage,
Salad,
Soy Sauce,
Sugar-Free,
Tahini
Friday, January 4, 2013
Green Salad with Crumbled Chèvre, and Walnuts in a Sweet Dijon Vinaigrette
One thing I really wanted to do for Christmas was utilize some of the delicious sounding recipes from Miyoko Schinner’s book “Artisan Vegan Cheese.” For me, holiday celebrations are the best and most practical time for me to make recipes like this. Since these recipes always tend to make a lot, and since my husband was never a fan of dairy cheese - and thus not a fan of vegan cheese either - it’s far to much for me to make these recipes just for myself. I’d never be able to eat it all, and truth be told I wouldn’t want to eat an entire pound of cheese anyway, even if it is vegan cheese.
There are so many great sounding recipes in this book that I really wanted to try that it was really difficult to try and decide what ones I wanted to make first. I thought long and hard about what would make a great party cheese plate, and then thought about what kind of cheese I’d like to eat. Eventually I settled on three cheeses in particular but for now I’m only going to talk about the Chèvre. Back when I was still a dairy eater, I loved goat cheese, and so this recipe really intrigued me. Overall I think it turned out really well, although next time I think I’ll use a bit less lemon juice and age it a tad less as well because it came out tasting very tart, and overall it was very strong. At the party I served it on a platter with crackers along with the Aged Cheddar - also from the book - and a Raw Christmas Cheese Ball - More on this later - that I made and It went over really well, even with the omnivores who thought it was delicious, and couldn’t believe that I’d actually made it from scratch.
The problem came after Christmas was over and I realized I still had half a brick of Chèvre left in my fridge. I’m not the cheese and crackers type really, so I’m not about to sit around and eat it all up in that way, and it’s been so long since I’ve had any use for cheese of any kind that I wasn’t quite sure what else to do with it. Eventually I decided on giving half of what I had left to my dear twin brother E, because I knew he would enjoy it. As it turns out he did enjoy it, and he gave me a great idea for how to use up the rest of what I had left. Crumbled on top of salad with walnuts, and a Dijon Vinaigrette. Of course! And how simple, I can’t believe it hadn’t occurred to me.
So a couple of days ago I got thee to my kitchen and threw together this super tasty and ridiculously simple salad.
Green Salad with Crumbled Chèvre, and Walnuts in a Sweet Dijon Vinaigrette
1 C Baby Spinach
1 C Chopped Romaine Lettice
1 Ripe Anjou Pear sliced thin
½ C Dried Cranberries
1 Large Ripe Tomato Diced
½ C Raw Walnuts
1/4 C Sliced Green Onions
1/3 C Crumbled Vegan Chèvre (Preferably homemade using the Artisan Vegan Cheese Recipe!)
Dressing
1 Tbsp Agave Nectar
1 ½ Tbsp Dijon Mustard
1 Tbsp Hemp Seed Oil
1-2 Garlic Cloves
2 Tbsp Water
Sea salt and Black Pepper to taste
- Combine all salad ingredients - except Chèvre - in a bowl and mix thoroughly to combine. Top with crumbled Chèvre.
- Combine all dressing ingredients in a food processor and process until smooth and creamy. Roughly 1 minute. Taste and adjust flavor as needed.
- Drizzle dressing over salad and enjoy!
Labels:
'Cheeze',
Agave,
Cook Book,
Cranberry,
Dijon Mustard,
Garlic,
Gluten-Free,
Green Onions,
Hemp Seed Oil,
Lite Meal,
Lunch,
Pears,
Romaine Lettuce,
Salad,
Soy-Free,
Spinach,
Sugar-Free,
Tomato,
Walnuts
Monday, November 12, 2012
Umeboshi Noodles with Black Soybeans and Collard Green Ribbons in Soy Broth...
| I know with all the toppings it's kind of hard to see all the awesomeness in this bowl |
If you know me, or If you’ve been following this blog for any length of time you probably know that Asian Cuisine is one of my favorites. I love the duality between the simple fresh ingredients and the bold complex flavors that are so characteristic of Asian cooking. I also love bowls and one pot meals, especially on cold days. Well, today was a cold day, and I was feeling particularly inspired thanks in part to the reading I’ve been required to do for my Chinese Medicine class, as well as my most recent trip to Mitsuwa, the Japanese Market in Arlington Heights.
My last trip to Mitsuwa was a couple of weeks ago, and I was on a mission for Miso and a variety of Japanese noodles. These are things I can find easily in the health food stores in my area, however they’re roughly half the price at Mitsuwa, which is way more economical considering how much miso I go through. As for the noodles I found exactly what I wanted, a ton of Udon, Soba and Somen, and then I found some packages of Green Tea flavored noodles, and Ume flavored noodles. Ume of course referring to Umeboshi, the tart, sour, slightly sweet plum typically used as a paste or made into vinegar in Japanese cooking. I’d never seen Ume noodles anywhere else before, nor had I even heard of them, but they were bright pink and beautiful, and contained no weird or nefarious ingredients and so I bought a package.
I really had no idea what I was going to do with them once I got them home, and so they’ve just been sitting in my pantry for the past couple of weeks. Until today. Today, for whatever reason was the day I decided to give them a try. Initially I was a bit stumped as to what to pair them with, or what kind of dish to put them into because I wasn’t sure what their flavor would really be like. Eventually I decided to go with traditional Asian seasonings such as garlic, ginger, sesame, and tamari, and picked my vegetables according to what I had on hand and what I thought might make the most startling contrast. Green, orange and black I thought would all look fantastic against the bright pink noodles, and I had really been trying to find a use for the solitary can of Black Soybeans left over in my pantry from a squash stew I made a couple of months ago.
Now, I’ll be honest, at first I wasn’t sure how this would turn out. I was kind of just flying by the seat of my pants so to speak. Whenever you just start tossing things together there is always the risk that you’ll under season or over season whatever your making, or just make a bad call on an ingredient. So when we sat down to eat I was a little hesitant and a bit skeptical, particularly of the noodles since I had no idea what to expect from them. Turns out there was no real need to worry because this delicious hearty bowl really blew me away. The flavors were exactly what I was looking for, rich - complex - and warming, and the entire thing came together in the most delicious way. The Ume noodles in particular were fantastic, and now I can’t wait for my next trip to Mitsuwa so I can buy myself some more packages. If you see Ume Noodles in your area pick some up, and make this dish!
Umeboshi Noodles with Black Soybeans and Collard Green Ribbons in Soy Broth.
8oz Umeboshi Noodles
1-2 Tbsp Toasted Sesame Oil
6 Garlic Cloves Minced
1 Thumb Sized Piece of Ginger grated
1 Medium Sized Leek sliced
1 Bunch Collards - ribs removed cut in ribbons
4 oz Enoki Mushrooms
1 15oz can Black Soybeans
A Few Dashes of Ume Vinegar
1 tsp Japanese 7 Spice
For Broth
1 1/3 C Low-Sodium Vegetable Broth
2 Tbsp Low-Sodium Tamari
½ Tbsp Agave nectar
For Garnish
1 Large Grated Carrot
½ Tbsp Brown Rice Vinegar per bowl
2 tsp Sesame Seeds per bowl
- Cook Ume Noodles according to package directions. Then drain in a colander and rinse with cold water to stop cooking and set aside, until ready to serve.
- While Noodles are cooking heat 1 Tbsp of sesame oil in a large skillet. Add the minced garlic, grated ginger and sliced leek. Saute over medium-high heat until the leek has softened, and garlic is fragrant. About 5-7 minutes.
- Add in the collard green ribbons, then cover and cook for three minutes. Then add in the enoki mushrooms and cook another 3-5 minutes until the mushrooms are soft and the collard greens are bright green and tender. If the pan starts looking dry during this time you can add an additional 1 tbsp of toasted sesame oil.
- Lower the heat and stir in the black soybeans, ume vinegar, and 7 spice seasoning. Replace the lid and let sit over low heat until the soy beans are warmed through then turn the heat off. And set the pan aside until ready to serve.
- To make the broth whisk the vegetable broth, soy sauce, and ume vinegar in small sauce pan. Then bring to a boil and reduce to simmer. Let simmer one minute then turn off the heat.
- To serve divide the noodles into two bowls. Then divide the broth and the collard green mixture evenly among them. Top each bowl with grated carrot, sesame seeds and the rice vinegar.
PS: Black Soybeans by the way are pretty interesting. They look like a black bean but a bit lighter, and taste a regular soybean or maybe a blander edamame. Outside of health food or specialty stores I don’t know how easy it is to find them, the brand I used was Eden Organic’s but if you can’t find them you could always sub in regular soybeans, edamame or black beans if you want to keep the contrast. Shiitake mushrooms would also be good if you don't have Enoki.
| Once I mixed it all up you could better see those lovely Pink Ume Noodles! |
Thursday, May 31, 2012
Roasted Chili Lime and Indian Spiced Chickpeas...
Garbanzo Beans or Chickpeas as they’re also called are my hands down favorite bean ever! Well, I love other beans of course, and If I had to pick I’d say black beans, lima beans and edamame are right up there with chickpeas but chickpeas were the first bean I fell in love with so they’d always hold a special place in my heart.
I truly love them in anything. Soup, chili, stew, salad, sauteed with greens and other veggies. In rice, cous cous, or farro dishes, obviously as hummus. I love them in traditional Indian, Middle Eastern and Hispanic dishes, I just love, love, love them. They are probably the bean I buy and eat most frequently but sometimes - if you’re like me - you don’t want to go through the whole rigamarole of making something just to enjoy the one ingredient you love. Am I right? Now, I am no stranger to eating chickpeas right out of the can, I do it often, and it’s delicious, but some days you jsut need a little more than that, but you want something less than a meal. Well roasted snack chickpeas are just the thing!
| Roasted Indian Spiced Chickpeas |
Now roasting chickpeas isn’t exactly a new idea, so I can’t take credit for it. I’d seen mention of it before in magazine’s and online articles that connected to ‘healthy snacking’ though always intrigued by the idea I’d never actually thought to do it until last week. By then the recipes I’d previously seen were distant memories but roasting chickpeas seemed an easy enough task. All I needed to do was decide what flavorings I wanted to use. In the end I decided to go with a Mexican inspired flavor, and an Indian inspired flavor. Since they are two of my favorite types of cuisine and both traditionally use chickpeas it seemed a no-brainer.
| Chili Lime Roasted Chickpeas |
I was so impressed with the finished result. Not only do these things cook up fast, but they’re delicious! Absolutely-freaking delicious. They’re a truly healthy snack, and hearty too. The perfect thing to munch on pre-dinner when you usually reach for the sweets. They’re great served hot out of the oven or at room temperature, and truth be told they’re not half bad cold either. Bring a batch to your next BBQ or pot-luck and stick them on the snack table beside the chips, dips, pretzels, and party mix. They’ll be a sure fire hit.
Roasted Chickpeas 2 ways
(Cooking Instructions are the same for both)
Chili Lime Roast Chickpeas
1 15oz can Chickpeas
1 ½ Tbsp Lime Juice
½ Tbsp Agave Nectar
3/4 tsp Chili Powder
3/4 tsp Ground Cumin
Sea Salt
Indian Spiced Roast Chickpeas
1 15oz Can Chickpeas
1 Tbsp Lemon Juice
½ Tbsp Agave
½ Tbsp Olive Oil
3/4 tsp Curry Powder
3/4 tsp Gram Masala
1/4 tsp Ground Coriander
1/4 tsp Ground Cumin
Sea Salt
- Preheat oven to 400'F
- Drain and Rinse Chickpeas, then pat dry. Try to get them as dry as possible, before transferring them to a bowl.
- In a separate small bowl whisk together all flavor ingredients, both liquids and spices.
- Pour over the chickpeas and stir until thoroughly combined.
- Spread chickpeas in a single layer over a parchment lined baking sheet. Bake for 10-15 minutes then stir and bake another 10-15 minutes until chickpeas are brown and crispy.
- Remove from oven and transfer to a serving bowl, serve hot or refrigerate in an airtight container for later.
*** Note - For an Oil-Free version of the Indian Spiced Chickpeas Omit Olive Oil and use Lemon Juice or Tamarind Paste instead.***
PS: This probably goes without saying but if you decide to make both flavors at once do not put them on the same baking sheet. Use two different sheets!
Monday, May 21, 2012
Lemongrass Tofu Marinated Maki...
For those days when you’re looking for a heartier more protein rich maki may I make a suggestion? Lemongrass tofu! This dish came about simply out of my desire to do something different with my maki. Asparagus, and avocado, sweet potato, and cucumber rolls are brilliant, but sometimes you just want something different. My local health food store sells a really tasty fried tofu maki that I enjoy occasionally, and I happened to have a block of extra firm sitting in my fridge, so I put two and two together. However unlike the tofu maki at my local grocery I wanted to create a sweet, tangy and spicy sauce to marinate the ‘fu in.
Since I’ve been playing around a lot with Asian flavors lately I found myself reminiscing about Vietnamese food. I absolutely love the richness and complexity of Vietnamese fare, one dish can have so many flavor notes. I also love the liberal use of lemongrass stalk in South East Asian cooking, it’s an ingredient that’s completely neglected in every other cuisine. Which in my opinion is unfortunate. The world at large should not be deprived of the awesomeness of a really good lemongrass coconut milk ice cream, but I digress.
The marinade I made for my tofu, is inspired by the countless recipes and menu listings I’ve seen over the years for lemongrass chicken. It seems to be everywhere in Vietnamese restaurants, and though I’ve only eaten it once - years and years ago - I can tell you that lemongrass tofu is infinitely better. However I should say that I’d never go so far as to claim this marinade is in any way authentic - just the happy outcome of me tossing things together, - it is absolutely delicious, and makes for an equally good dipping sauce for the finished maki, instead of or in addition to soy sauce.
Lemongrass Tofu Marinated Maki
4 Sheets Nori
1 ½-2 C Brown Rice
3 C Water
2 Tbsp Brown Rice Vinegar
1 Tbsp Sugar
2 Carrots grated
4 Green onions thinly sliced
1lb Block of Extra Firm Tofu
Sweet Lemongrass Marinade
1/3 C Soy Sauce
1/4 C Agave
1/4-1/2 C water
2-4 Tbsp Minced Lemongrass
2-3 Tbsp Kieffier Lime Leaves minced
4 garlic cloves
1 piece ginger
½ tsp red pepper flakes
Soy Sauce or Thai Chili Sauce for Dipping
Pickled Ginger and Wasabi to Garnish
- First prepare your tofu. Drain your tofu and squeeze out as much water as possible. You want it to become dense. I used my tofu press for this, and left it in for about 2 hours. If you don’t have a tofu press you can simply wrap the tofu in a clean dish towel and place heavy objects on top of it.
- In the meantime pour all marinade ingredients into a blender and blend on high until thoroughly combined. 30-60 seconds. Set aside.
- Now is a good time to think about making your rice. For this recipe I used brown rice because that’s what I had, but if you prefer you can easily switch it out for sushi rice and there won’t be any difference. So combine your rice, your water, the vinegar and sugar in your rice cooker and cook as directed. If you don’t have a rice cooker combine rice, water, vinegar and sugar into a pot, stir to combine cover and bring to a boil. Reduce heat and let simmer until all water is absorbed and rice is cooked. Cooking time varies but for brown rice I’d say it’s usually done within 35 - 40 minutes so just check on it every now and again and make sure to stir so the bottom doesn’t burn. Add more water if necessary. However if you are using sushi rice the cooking time will be shorter, count on 20-25 minutes cook time but be sure to check.
- When your rice is cooked set aside until cool enough to handle.
- When tofu has finished marinating. Heat a large non-stick or cast iron pan over medium-high heat. Spray with a touch of non-stick spray. Remove the tofu from the marinade and reserve marinade. On a clean cutting board slice the tofu into 1/4 inch thick strips. Dip the strips back into the marinade to coat and then place in the heated pan.
- Fry tofu slices until firm, crisp, golden, and slightly blackened. Roughly five minutes per side, perhaps a little longer if using a non-stick pan. Once all slices have been fried on both sides remove the tofu to a plate and set aside. Once cooled slice each strip into thinner slices lengthwise.
- Now you’re ready to assemble your Maki, which is by far the trickiest part, but trust me you’ll be okay. On your clean work surface. - I use a clean bamboo cutting board - lay down your bamboo sushi rolling mat. On top lay down 1 sheet of Nori with the shiny side facing up. Have a bowl of cold water at your work station and with wet - but not profusely dripping - hands grab handfuls of rice and spread evenly over the sheet of nori. Spread the rice as close to the edges as possible but leave about a half to a quarter inch of space on the horizontal side of the Nori furthest from you. This little boarder will help your rolled Maki stick together. Rinse your hands before moving onto the next step.
- Next layer in 2-3 strips of tofu on the left parallel with the horizontal edge of the nori closest to you. Laying them down over the rice you just spread out. If they’re not long enough to reach from left to right then layer in 3 more strips on the right so that the edge closest to you is completely filled with tofu. If some poke out past the nori you can trim them off, or leave them as is.
- Sprinkle desired amount of grated carrots and sliced green onions over top of the tofu,
- Now, using your mat, and working slowly pull the mat up slightly and roll it over. Moving slowly and using both hands slowly roll your Maki, using the bamboo mat to press down and make the roll tight. You may have to stop at some point to push the filling back under the Nori or to help guide the roll. Stop just before you get to the opposite edge that you’ve left empty. Dip your fingers into the water, run them along the empty edge then roll your nori closed. Press down tightly to seel.
- It’s okay if it’s not perfect, rolling Maki takes practice and even though I’ve done it a ton of times I still don’t make a perfect roll each time. Sometimes my rolls are to fat, sometimes they don’t seel properly, sometimes I don’t cut them well. It happens, don’t beat yourself up about it. Remember that you’re doing it for the fun of it, and it’s - maybe - your first time, you’ll get better the more you practice.
- Next, and this step is very important. Before cutting your Nori into one inch sections run your chef knife under cold water. By the way you should always use a chef knife or other similar smooth edged knife to cut sushi. If you use a steak knife, or a bread knife or some other kind of knife with a jagged edge your Maki is going to get shredded and will likely fall apart. Once seaweed is wet it is very, very durable, your roll will fall apart before the seaweed cuts properly. I know from experience. So run your Chef knife under cold water. Give it a shake and then starting from one edge and working towards the other cut your roll into rounds.
- The best way to cut your roll is to do it in one smooth motion. Do not use your knife as a saw. Press down firmly it’s okay if the roll doesn’t cut right away, it’s okay if it looks like it’s getting squished a bit this is normal. Use one fluid motion, press down on the knife with your knife hand and hold the long end of the roll steadily in place with the opposite hand. Press the knife firmly down until it has cut all the way through. To separate the round from the rest of the roll you may have to give one quick saw motion depending on the sharpness of your knife, but otherwise that is it. Run your knife under cold water before EACH cut! This is important. Before each cut your knife must be wet. The drier your knife Is the more difficult this will be and the more likely your roll will fall apart.
- Congratulations! Now that one roll is finished - You should have gotten 6-8 rounds out of it by the way - give yourself a pat on the back, and then begin again from step one. Repeat all steps until ingredients are used up. At the end you may have some leftover rice. If this is the case no worries, stick it in the fridge and toss it into a salad tomorrow, or make a veggie roll for lunch!
- To serve arrange on plates and serve with dipping bowls of soy sauce, the reserved lemongrass marinade and my favorite Sweet Thai Chili Sauce. Serve with dollops of wasabi if desired and pickled ginger, yum!
*** Note - Gluten-Free if using GF Tamari. If you don't have Kieffier lime leaves you can just use some fresh grated lime zest and fresh lime juice.***
Labels:
Agave,
Asian,
Asian Fusion,
Carrots,
Ethnic,
Garlic,
Ginger,
Gluten-Free,
Green Onions,
Lemongrass,
Limes,
Nori,
Oil-Free,
Red Pepper Flakes,
Rice,
Soy Sauce,
Sushi,
Tofu
Friday, May 11, 2012
Mesquite and Lime Marinated White Bean and Kale Salad...
This salad was born of a need to start re-introducing large quandaries of leafy greens back into my diet. While I never give up on leafy greens altogether sometimes over the course of the winter I get so bogged down with warming soups, and stews that I neglect my salads. By spring I’m really starting to feel the need for green and sometimes it’s a hard cycle to break. I’ve also been trying to find ways to work more beans into my diet, and different kinds of beans. I absolutely love black beans and chickpeas but that’s about it. The other beans for the most part I can take or leave, which makes me a very inconsistent bean eater. Some weeks I eat lots of beans and lentils and some weeks I eat none. In trying to make different kinds of beans a more regular part of my diet I needed to come up with some new and interesting ways of eating them. After my Cannellini Beans and Ramps feast I realized that Cannellini beans were actually quite good if prepared in the right way, and so my desire to use them creatively has been piqued.
On the day that I decided to make this for lunch, I had a couple of beautiful limes sitting around and a lovely avocado just begging to be used. I also happened to be in the mood for something spicy, smokey and vaguely Latin inspired. This is what I came up with and it knocked my socks off. A really great, tasty, hearty lunch that fills you up, and is relatively healthy yet feels like a decadent treat! What more could you ask for, really?
Mesquite and Lime Marinated White Bean and Kale Salad
15oz can Cannellini Beans
Zest and Juice of 1 Lime
1 ½-2 tsp Mesquite Seasoning
4 cloves Garlic Minced
1/4 C Olive Oil
2 Tomatoes diced
1 Avocado diced
Minced Cilantro to taste
1/3 C Sliced Green Onions
2 tbsp Capers
Smoked Paprika
Black Pepper and Sea Salt to taste
1 tsp Agave
3 C Kale chopped in bite-size pieces
- Combine beans, minced garlic, 2 tbsp of lime juice, 1 tbsp of olive oil, half the lime zest and the mesquite seasoning in a small bowl. Marinate in the fridge for 45 minutes to an hour.
- Heat remaining oil in large pan over medium heat. Add the white bean mixture, the diced tomatoes, half the green onions and capers. Season to taste with black pepper, salt and smoked paprika. Saute for 5 minutes.
- Add remaining lime juice, and lime zest, along with agave stir and saute another 2 minutes.
- Divide Kale amongst individual bowls and evenly distribute the white bean mixture over each bowl. Top with remaining green onion, avocado, and cilantro.
Wednesday, April 25, 2012
Creamy Spring Pea Soup...
What better vegetable to represent Spring than peas? Fresh or frozen they are absolutely delicious with their bright green color, pleasant aroma, and sweet snappy crunch. When I was thinking up ideas for what to serve as part of my Earth Day dinner I decided peas would have to get worked in somehow. However after quite a bit of thought on the matter I was no closer to figuring out how exactly I wanted to prepare them, so it was off to my shelves of cook books for inspiration.
After searching and searching through book after book I came upon the realization that peas are A) a strangely under-utilized vegetable, and B) Seem to only get tossed into a lot of rice, and pasta dishes merely as an afterthought. During my search I did happen across a few pea soup recipes that use call for green peas but I found them uninspired. Mostly the recipes called for peas to be pureed with water and spices like parsley or mint - bleh, boring.
I myself love green peas, have always been a fan, and have never had any problem eating them plain. They are both sweet and savory enough to be totally satisfying on their own without any further alteration. In fact as a kid, when my mother or Oma or somebody was cooking with peas I’d often hang around and pop semi-frozen peas into my mouth like they were candy. It sounds strange I know, but they’re surprisingly good in that state. Anyway, I knew if I was going to present my Earth Day dinner to share with all of you, I’d have to do something a little more creative then serve a bowl of plain peas, and lets be honest as good as they are there isn’t anything the least bit elegant or ceremonious about plain peas. Right?
I did quite like the idea of a soup though, and with that idea in mind ingredient parings started bubbling to the surface and a recipe began to take shape. I wanted to keep it quick and simple, lightly seasoned but thick and flavorful and serve it roughly around room temperature rather then piping hot. Since it is suppose to be a spring soup, and many spring days are quite warm I wanted to create a dish that would refresh. What I came up with far exceeded my expectations and my husband went crazy for it.
The soup has a really lovely pale green color - something that’s not very well reflected in my photos, I’m sorry. Unfortunately the photos I took on Earth Day were unusable and so I had to redo them today using the leftovers, however as luck would have it, it’s very overcast out today. Which means very little natural light, which in turn means I had to use my inadequate kitchen lighting, which as I’ve mentioned before tends to give everything a slightly golden hue. Red, Orange, Green, and Yellow foods never properly photograph, but at least you get the idea. - It also has a lovely thick and creamy texture thanks to the cashews. If you want an even creamier soup you can soak the cashews in water for 1-2 hours before you use them, just make sure to drain them and rinse them afterwards and to use fresh water for the soup. Also since peas are quite sweet naturally you may want to opt out of using the Agave, it’s up to you, and finally if you prefer you can use fresh instead of frozen peas. Just keep in mind they’ll take a couple more minutes to cook.
Creamy Spring Pea Soup
1 C Raw Cashews
1 C Water
1-2 Tbsp White Miso (to taste)
1 Tbsp Lemon Juice
1 tsp Agave (Optional)
1 tsp Onion Powder
½ tsp Ground Mustard Powder
3-4 Garlic Cloves
Black Pepper to taste
Smoked Paprika to taste
16oz Frozen Peas + 1 C additional Frozen Peas
½ C water
A bit of minced Parsley to garnish (Optional)
- Place Cashews, water, Miso, lemon juice, onion powder, smoked paprika, garlic, mustard powder, and agave in a high speed blender. Blend on high for 30-90 seconds until completely smooth. Taste for flavor and adjust as needed. Then leave the cashew mixture inside your blender as you move onto the next step.
- Place 16oz of the Frozen peas and ½ C of water in a medium sized pot over medium heat. Bring to boil, and then reduce heat to simmer for 2-4 minutes until peas are bright green and thawed out.
- Carefully add the contents of the pot to your blender. Blend on medium speed until peas have been incorporated. You don’t need to puree the whole thing, it’s okay if some peas don’t get broken up.
- Once peas have been incorporated, pour the mixture back into the pot, over medium-low heat. Add the extra 1C of frozen peas. Along with black pepper to taste. Simmer until warmed through. Taste and adjust seasonings as needed then serve garnished with fresh minced parsley a sprinkle of smoked paprika and enjoy!
*** Note - This recipe can be made soy-free if you use chickpea Miso***
Labels:
Agave,
Cashew,
Garlic,
Gluten-Free,
Lemon,
Miso,
Oil-Free,
Peas,
Smoked Paprika,
Soy-Free,
Sugar-Free
Monday, February 27, 2012
Caramelized Fennel and Kale Soup...
Fennel I think is one of those things that people either love or hate, and for the longest time I hated it. I had eaten fennel in all sorts of ways trying to condition myself to enjoy it’s potent and aromatic flavor. I’d eaten it roasted, raw, sauteed, as a seasoning, as a spice as a seed but to no avail. There was absolutely nothing about fennel that ever succeeded in charming me, in fact I found it to taste quite a bit like licorice which I also dislike.
Then about a month or so ago I came across a recipe that required caramelized Fennel. Desperate to make the recipe I decided this would be my last dance with the culturally and historically rich foodstuff and if again I disliked it then I would never again attempt to enjoy it. To say that recipe was a success would be an understatement, and in fact the caramelized fennel was one of the best things about it. I dreamed of fennel afterwards it was that good! Newly won over to this intricate little bulb I’ve been playing around a bit with fennel in my cooking lately. I’ve made a few soups and stir-fries all of which were tasty but because I’m so ignorant as to what flavor combinations go well with fennel I’m still going through the learning curve stage.
However last week I did develop the most delicious soup recipe. It wildly exceeded my expectations and was the perfect accompaniment to a cold night. My husband and I huddled around the kitchen table with the wind howling outside and gulped down two huge steaming bowls of soup each. So delicious is the combination of fennel and kale that we could barely stop eating long enough to get a conversation in.
Aside from the great flavor of this soup there is the added benefit of it being relatively low fat and super packed with all sorts of antioxidant goodness thanks for the fennel, kale and garlic. I highly recommend it, and if you’re a fennel hater like I was I implore you to eat it caramelized with a bit of Agave, I swear you’ll never think of it in the same way again.
Caramelized Fennel and Kale Soup
2 tsp Olive Oil
18 Cloves Garlic minced
2 Bunches Kale
2 Fennel Bulbs sliced thin
1 Red Onion sliced thin
4 C Vegetable Broth
3 C Water
3-4 Tbsp Agave Nectar
2-3 tsp Gram Masala
2 Tbsp Fennel Leaves minced
Sea Salt and Black Pepper to taste
- First start by caramelizing your fennel and onion. Slice them very thin either using a knife or a mandolin as I did. Heat 1 tsp of the olive oil in a large pan over medium then add the sliced fennel and onion. Saute for about 10-20 minutes stirring briefly every 5 minutes or so to make sure the fennel doesn’t burn. If oil evaporates you can add in a bit more or use water instead as I did. Keep sauteeing until the fennel and onion turn a nice golden color. 5 or so minutes before the fennel is done add in 2 tbsp of the agave and stir until well combined. When finished caramelizing remove from the heat and set aside.
- Meanwhile heat remaining tsp of olive oil in a soup pot over medium heat and add minced garlic. Saute for 5-7 minutes until softened, fragrant and starting to turn golden.
- Add vegetable broth into the pot with the garlic and add the caramelized fennel and onion mixture. Stir to combine then bring to a boil.
- Tear or cut your kale into bite sized pieces removing the stems. Add the kale to the pot with the broth and reduce heat to let simmer. Stir in the kale. There will be a lot of kale so it’ll probably take some stirring to incorporate it all into the pot, but don’t worry it’ll get there. If soup is becoming too thick add in water 1 cup at a time. Depending on how large your fennel and kale are you may not need all the water or you may need a bit more.
- Once all kale and water has been incorporated add in the gram masala, salt, pepper and remaining tbsp of agave (optional) stir to combine and let the soup simmer for about 10 minutes until kale is wilted and bright green. You don’t want to over cook it, you want the kale to retain a little bit of texture.
- Serve with some crusty bread to dip into the broth and enjoy!
Labels:
Agave,
Fennel,
Garlic,
Gluten-Free,
Green Onions,
Kale,
Main Meal,
Quick and Easy,
Soup,
Soy-Free,
Sugar-Free
Subscribe to:
Posts (Atom)