Showing posts with label Soy Sauce. Show all posts

Saturday, February 13, 2016

Toasted Cashew Noodles....


This dish came about because I was starving, and craving noodles. I don't normally crave noodles, but I really felt like rice noodles in some kind of Asian style sauce. I didn't feel like Peanut noodles, though I love them, and I suddenly had a simultaneous hankering for Cashews. I didn't really have many fresh veggies on hand, and wanted to keep the dish simple anyway so the preparation would be quick - the faster it's made the faster I eat! - and this is what came about.


Surprisingly this turned out super good, it's got the perfect balance of sweet, salty, spicy, tangy. I also think the cashew butter makes a great stand in for peanut butter, and lends a more mellow, yet complex and nutty flavor to the dish. I also really love the nice bit of crunch in each bite from the red cabbage garnish. I didn't have any cilantro on hand, but I imagine that would make a good garnish too, if you happen to have some. Of course if you want to 'beef' it up, you could also add some cubed baked or fried tofu, or maybe even some tempeh. But I kind of like it exactly as it is, light and easy. Two of my favorite things right now.


Toasted Cashew Noodles

For the Noodles

2 tsp Toasted Sesame Oil
3 Carrots Sliced thin
6 Radishes cut into thin half moons
3 Green Onions sliced (White and green parts separated)
2 Garlic cloves sliced thin
1/4 Cup Cashews
12oz Rice Noodles
1/4 C or less of thin sliced Red Cabbage

For the Sauce

1/4 Cup Creamy Cashew Butter
1/3 - 1/2 Cup Coconut Milk (Depending on how thick you want the sauce)
4 Tbsp Tamari
2 Tbsp Mirin
2 Tbsp Lemon or Lime Juice
2 tsp Cane Sugar
1/2 tsp Ground Ginger
1/4 tsp Smoked Paprika
1/4-1/2 tsp Sriracha or to taste

- Place the noodles in a pot of boiling water and cook for 5 minutes or until they are tender. Drain and set aside.

- Heat the Sesame Oil in a large frying pan. When it's hot add the carrot, and radish. Cook on high for about 5-7 minutes until the veg becomes soft and starts to brown. Add in the white parts of the onions, and the garlic. Lower the heat and sauté for another 3-4 minutes until everything is cooked to your liking.

- Combine all sauce ingredients in a small pot and stir until smooth. Turn the heat on high, and when it begins to simmer whisk it for about a minute. You just want to heat the sauce through long enough for it to smooth out.

- Add the Cooked Noodles to the pan of veg. Pour the sauce over, and mix to combine.

- Divide into bowls, and top with Green onions, and red cabbage.

- In a dry skillet toast the cashews over high heat for 5-8 minutes until they smell nutty and begin to brown.

- Top each bowl with a handful of cashews and enjoy!

Tuesday, November 25, 2014

Quickie Pan Gravy...


The other day when My husband and I had our little impromptu Thanksgiving celebration I needed to make a gravy to go with our holiday roast. Unfortunately since the dinner was impromptu my resources were limited as I had not been shopping. Using what I had on hand at the time I came up with this super simple, yet super flavorful gravy. I couldn’t believe just how good it turned out, and it tasted amazing on our roast and our mashed potatoes. So if you’re in a bind this year, and you need a quickie gravy, this is the one for you. Or if you just want to cut a few corners, and do less work - who’d blame you? - I got you covered.


Quickie Pan Gravy 

1/4 C Earth Balance
1/4 Whole Wheat Pastry Flour
2 tsp Minced Dried Onion
½ tsp Garlic Powder
1 Vegan Beef Bouillon Cube
1 ½ C Water
2 Tbsp Tamari
2 Tbsp Red Wine
1 tsp Thyme Leaves
Black Pepper to taste

- Melt the Earth Balance in a medium sized sauce pan over medium heat.

- Whisk in the flour. Whisk vigorously to form a roux, when the Earth Balance and Flour have come together and are beginning to turn golden, and smell toasty, add in the water, vegan bouillon, onion, and garlic.

- Bring to a boil, and then lower heat and let simmer, whisking frequently.

- Add in the Tamari, Red Wine, Thyme Leaves and black pepper.

- Continue to whisk on low heat until the gravy has thickened. This should take about 5 minutes.

- Once you’ve reached your desired consistency, remove the gravy from the heat. Pour it into a serving bowl and use liberally on your favorite holiday roast or a mound of mashed potatoes.

Thursday, November 20, 2014

Stir-fried Bean Curd and Chinese Flowering Chives in Garlic Black Bean Sauce....


Black Bean Sauce is one of my favorite things in Chinese Cuisine, something about that salty, earthy flavor really gets me. Since I haven’t had it in a while, and we’ve been on an Asian Food kick lately, I was really craving this long-time favorite. I just didn’t know what kind of stir-fry I wanted to make. The thing about Black Bean Sauce is that it requires a hearty protein, something that can really soak up that black bean flavor. You need a sturdy protein that can get coated and glazed in the delicious black bean sauce. Naturally I’d think to use seitan, only I don’t have any at the moment. My next thought was tempeh but wasn’t in the mood for the distinctive tempeh flavor. The next logical choice then is tofu, only I didn’t have the time to pre-bake or pre-fry the tofu to get it really firm. Then it hit me, why not use that package of Bean Curd I’d picked up at the Korean Market the other day? Oh, and why not pair it with those Chinese Flowering Chives I had sitting in my crisper drawer. Perfection!


Chinese Flowering Chives - or Garlic Chives, as they’re also sometimes called - are a relative of the onion family. They look kind of like a thin green onion - or chive - but they have little white flower buds on the end that taste more like garlic. They have a potent smell, but not a particularly overwhelming flavor. They’re great in stir-fry’s. Fried Bean Curd is a kind of tofu, it has a much lower moisture content then the regular tofu you buy at the store, and it’s been previously fried till golden. The texture is very chewy, very meaty, and it shreds rather then crumbles. It’s a great stand-in for meat in any dish, and doesn’t taste anything like regular tofu which may make it more appealing to people who claim not to like tofu. Actually both the texture and the flavor remind me more of tofu skin, then tofu. Fried Bean Curd stands up really well to stir-frying, and it paired amazing with the Chinese Flowering Chives and the Black Bean Sauce to make the perfect lunch.

Most well stocked Asian Groceries should have everything you need to make this dish, and If you love Asian food as much as we do then I urge you to go on a little scavenger hunt, and then make this dish.


Stir-fried Bean Curd and Chinese Flowering Chives in Garlic Black Bean Sauce

1 Tbsp Toasted Sesame Oil
1 Tbsp Minced Ginger
3 Garlic Cloves sliced thin
8oz Fried Bean Curd Sliced into Strips
12oz Chinese Flowering Chives cut into ½ inch pieces
2 Tbsp Fermented Black Bean Paste
2 Tbsp Tamari
2 Tbsp White Wine
2 Tbsp Brown Sugar
1 Tbsp Chinese Black Vinegar
Sesame Seeds to Garnish

- First make the marinade. Add Black Bean Paste, Tamari, White Wine, Brown Sugar, and Chinese Black Vinegar to a small bowl and whisk together. Set aside until ready to use.

- Heat Sesame Oil in large pan over medium-high heat.

- Add in Garlic and ginger and stir-fry for 2-3 minutes until fragrant and garlic is golden-brown.

- Add in Sliced Bean Curd and stir-fry for 8 minutes until golden-brown on both sides.

- Add in the Chinese Flowering Chives and stir-fry for 2-3 more minutes until softened and bright green.

- Add in Marinade, and let cook for 2-4 minutes until slightly reduced.

- Remove from heat, garnish with sesame seeds and serve over a bed of brown rice or eat as is.


*** Note - Make sure you read the labels on your Black Bean Paste. Make sure it is FERMENTED, and made with black soybeans. Do not confuse it with sweet black bean paste which is sweeter in nature and made with mung beans. Fermented black bean paste is more like a miso, where as the other kind of black bean paste is used like red bean paste in pastry’s, desserts, and other confections. *** 


Monday, November 17, 2014

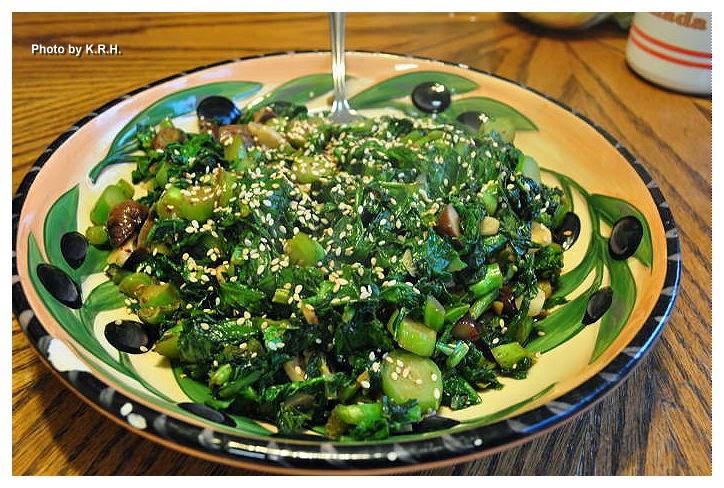
Garlic Sesame Gai Lan with Chestnuts...


My husband and I have been really diggin’ on Chinese food lately. I think every day this week I’ve made something from Donna Klein’s “The Chinese Vegan Kitchen,” and we just can’t get enough. Asian cuisine in general is our favorite, and my husband would be quite happy to live the rest of his life on noodles and rice. So this week when we were doing our grocery shopping I found myself particularly enamored with the fresh Asian greens. The Choy’s, the Chives, the Cabbages, and then there were these huge bunches of Gai Lan that really caught my attention. Growing up in Vancouver - with Chinese food being a particular staple, I’m quite familiar with Gai Lan, but despite having eaten it at many restaurants I’ve never actually cooked it at home. Despite not knowing what exactly I was going to do with it I just couldn’t help but grab a bunch.


Gai Lan - in case you don’t already know - also goes by the name of Chinese Broccoli, and as that name would suggest it’s very similar. Though the stems are longer and thinner, and it has a lot long, flat, spinach-like leaves. The taste of Gai Lan is mild, but slightly more bitter then broccoli. Gai Lan is eaten throughout China, but is particularly common in Cantonese Cuisine. Oh, and fun fact, Broccolini - those cute little baby broccoli’s - are actually a hybrid of regular broccoli and Gai Lan. Cool right? Anyway, you can use Gai Lan in just about any way you like, stir-fry’s, soups, vegetable side dishes. You can boil it, roast it, fry it, or saute it. You can season it lightly, or drench it in a nice sauce. The possibilities are endless, but I decided to go with a very simple preparation for my lunch yesterday. I was really craving sesame and garlic and I knew that combination would taste great paired with Gai Lan. I wasn’t wrong. I also had a package of chestnuts leftover from another dish I made a while back and so I decided to toss those in too. You can leave them out if you prefer but I think they really add something to the overall dish. If you’ve never had Gai Lan I urge you to give it a try next time you see it at the market.

Just a little note about this recipe, it is not in any way meant to be a 'traditional' Chinese recipe, as you might have guessed from my use of Korean Chili Pepper, but it is delicious!


Garlic Sesame Gai Lan with Chestnuts 

1 Large Bunch Gai Len
8 Cloves Garlic Sliced thin
1 Tbsp Toasted Sesame Oil
1 ½ Tbsp Soy Sauce
1 Tbsp Agave
3oz Roasted Chestnuts Chopped
1-2 Tbsp Sesame Seeds
1/4 Gochugaru (Korean Red Chili Powder)
Sea Salt and Black Pepper to taste (Optional)

- Slice the ends off the stems of the Gai Lan and discard.

- Remove the stems from the leaves, set the leaves aside and slice or chop the stems.

- Heat the Sesame Oil in a large pan over the stove, when hot add in the sliced garlic and chopped Gai Lan stems. Saute on high for 5-6 minutes until garlic is golden and fragrant and stems are bright green.

- Add in the soy sauce, agave, and Gai Lan leaves. Saute for 2-3 minutes until leaves are wilted.

- Add in the Chestnuts, sesame seeds, gochugaru, and salt and pepper. Saute 1 minute.

- Remove the pan from the heat and serve with additional Sesame seeds and gochugaru if desired.

*** Note - You can make this Gluten-Free by making sure to use a Gluten-Free Soy Sauce. You can make this Soy-Free by making sure to use a soy-free sauce like Bragg's Liquid Aminos, or Coconut Aminos***

Wednesday, February 20, 2013

Thai Inspired Cabbage Salad with Creamy Tahini Lime Dressing...


This is one of my favorite salads. Seriously. I’ve been making it frequently over the past couple of years and though it’s super simple and easy it never fails to amaze me just how satisfied I am after eating it. This is one of those recipes that came about because a growling hunger was gnawing at my stomach at a time when my refrigerator was looking pretty sparse, so I had to make due with what I had. Sometimes that’s the best way to cook. Though it can be restrictive to cook with an empty fridge and an empty pantry, it can simultaneously be inspiring. It can provide you with the kind of freedom to be creative that you might not have otherwise. There’s always something a little magical in that.


Over the years this recipe has changed and transformed. The basic heart of it however has stayed the same. It was initially inspired by Thai flavors, - Thai cuisine being one of my favorites - and those hot lazy days of mid-summer when you don't want to do a lot of cooking anyway. Though no matter how I choose to make it these days, it always has the same six basic ingredients. Cabbage, cilantro, green onions, tahini, lime juice and soy sauce. Some days I use a little more of this, or a lot more of that. Some days I throw certain ingredients in, and leave others out, it all depends on my mood and what I have on hand, and that’s the beauty of this. It’s versatile! There are no hard and fast rules to making it, as long as you have those six basic ingredients it’s a winner every time.


I really do love the cool crisp cabbage slathered in thick rich, creamy, and nutty tahini. The sourness of the lime, the saltiness of the soy sauce, the bite of the onion, and the earthiness of the cilantro. It’s such a satisfying combination, made even better by various additions. A little sweetness from agave, or bell pepper, extra crunch from bean sprouts, a little spice from the radish. Cool and creamy avocado, or sweet mango, a hint of ginger or a hint of garlic. This version that I present to you is definitely a more jazzed up version of that original salad that I first made years ago, but it is extremely delicious. Of course it’s meant to be simple, so if you don’t have everything on the list don’t fret. In keeping with the spirit of the original work with what you have, and enjoy!


Thai Inspired Cabbage Salad with Creamy Tahini Lime Dressing 

1 Small Nappa Cabbage sliced thin
½ Head Red Cabbage sliced thin
1 Large handful bean sprouts
2 Large Carrots shredded
1 bunch green onions Sliced
1 bunch cilantro Minced
6 Red Radishes Sliced Thin
1 Cucumber Sliced thin
1 Red Bell Pepper Sliced thin
Handful of Raw or Roasted Unsalted Peanuts

Half a Mango sliced thin (Optional)
Half an Avocado sliced thin (Optional)

Creamy Tahini Lime Dressing

4 TBSP Tahini
4 Tbsp Lime Juice
2 Tbsp Tamari
2 Tbsp Water (as needed)
1 Tbsp Agave
1 small piece Ginger Grated finely
1 Clove Garlic Minced
1/8 tsp Cayenne


- To make the salad slice, chop or mince all ingredients as directed and place into a large mixing bowl.

- Whisk together all the dressing ingredients in a small bowl and taste for flavor. Adjust seasonings as needed if you want more lime, more tamari, more garlic etc.. or if you need to thin it more with a little water.

- When the dressing is to your taste pour it over the salad in the mixing bowl. Mix the salad thoroughly to combine and serve!

- Enjoy garnished with extra cilantro and peanuts if desired. Or with sliced avocado and/or sliced mango.


PS: I chose to use Tahini here in the dressing because I love it, and it's what I had on hand. However if you were interested in a more traditional Thai taste, you could easily substitute almond butter or peanut butter for the Tahini. Though it's not something I do myself i'm sure it would be just as lovely.

Tuesday, January 1, 2013

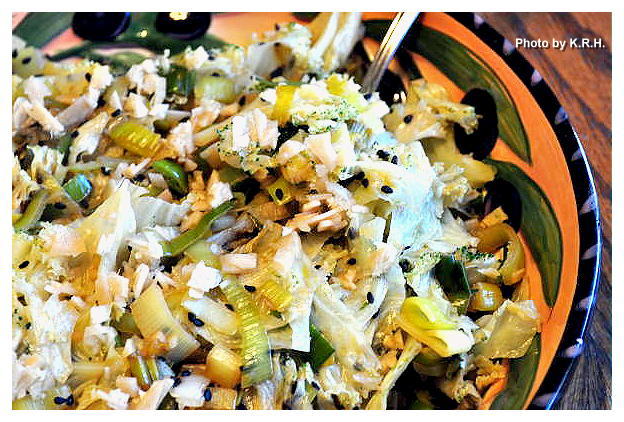
Sauteed White Kale with Hot Chili Oil, and Pickled Ginger...


Happy New Year Everyone!

I hope everyone had an enjoyable New Year’s Eve, and New Years Day. After an extremely busy December I’m thankful to have some peace, quiet and relaxation today. I’m looking forward to 2013, because I know it’s going to be a good year. I’m not the type to make New Years Resolutions. I think they’re a waste of time, because as I always say if you want to change something about your life just do it. I do have a couple of goals for this year though. The first one is just to live simpler. The second one is that I’d like to develop a good daily routine, so I can better manage my time and fit in everything I need to fit in. 3) More disciplined spiritual practice, and by this I mostly mean daily meditation. 4) I would like to work on developing greater muscle definition, particularly in my abdomen and upper arms.  Finally I’d like to significantly decrease my sugar consumption. Now I say these are goals rather then New Years Resolutions because in truth I’ve already been working at them for the past couple of months, but now that a new year is here I want to really get serious about them.


So today I kicked off the New Year right, but cooking up a big bowl of delicious veggies for lunch, and dinner tonight is going to be the New Years Soup from “Clean Start” which is basically a Black Eyed Pea and Collard Green Soup. Simple, delicious and satisfying, but back to lunch. A few days ago when I was shopping for my groceries I came across a type of Kale I’d never seen or heard of before. It was called Ornamental Flowering Kale, and it came in white and purple. They were so pretty both in color and in design that I couldn’t help but buy some. They look like big flowers you might find in someone’s garden, but they’re edible. I really don’t know that much about this variety except that it’s supposedly not as tender or tasty as the regular varieties of kale, and that it comes in many other colors besides purple and white.


Since I was looking to make something quick and simple for lunch today I decided just to saute the kale in a big ‘ole pan with some leeks, garlic, and hot chili oil. The flavor of the overall dish was really fantastic, and as for the kale itself. I didn’t think it was any less delicious or any less tender then other kales I’ve eaten. It was perfect. Though unfortunately there isn’t a lot of color contrast in the finished dish for you to ooo and awe over, and I forgot to take a picture of the head of kale before chopping it up. Sorry, next time I promise. So here’s to starting the New Year off right! Do you have any resolutions or goals for 2013?


Sauteed White Kale with Hot Chili Oil, and Pickled Ginger 

1 Head White Ornamental Flowering Kale Torn into bite sized pieces
1 Large Leek Sliced
4 Garlic Cloves Minced
2 tsp Hot Chili Oil ***
2 tsp Vegetable Broth
2 tsp Tamari
A few Drops Ume Vinegar to taste
Minced Picked Ginger to taste

- Add the leek, garlic and chili oil to a large frying pan and saute over medium-high heat until leeks are just becoming tender. Roughly 5-6 minutes.

- Add in the Tamari, Vegetable Broth and Kale. Saute for 5-6 more minutes covered, until Kale is tender.

- Add in the ume vinegar and give the mixture a good stir.

- Serve with minced pickled ginger on top.


*** Note - Depending on how hot your Hot Chili Oil is you may want to use more or less. 2 tsp made my dish quite spicy, so you may want to start with 1 tsp and go from there. Or if you would like to make this oil free, saute in water and add 1 tsp of Red pepper Flakes instead.

Monday, November 12, 2012

Umeboshi Noodles with Black Soybeans and Collard Green Ribbons in Soy Broth...

I know with all the toppings it's kind of hard to see all
the awesomeness in this bowl


If you know me, or If you’ve been following this blog for any length of time you probably know that Asian Cuisine is one of my favorites. I love the duality between the simple fresh ingredients and the bold complex flavors that are so characteristic of Asian cooking. I also love bowls and one pot meals, especially on cold days. Well, today was a cold day, and I was feeling particularly inspired thanks in part to the reading I’ve been required to do for my Chinese Medicine class, as well as my most recent trip to Mitsuwa, the Japanese Market in Arlington Heights.


My last trip to Mitsuwa was a couple of weeks ago, and I was on a mission for Miso and a variety of Japanese noodles. These are things I can find easily in the health food stores in my area, however they’re roughly half the price at Mitsuwa, which is way more economical considering how much miso I go through. As for the noodles I found exactly what I wanted, a ton of Udon, Soba and Somen, and then I found some packages of Green Tea flavored noodles, and Ume flavored noodles. Ume of course referring to Umeboshi, the tart, sour, slightly sweet plum typically used as a paste or made into vinegar in Japanese cooking. I’d never seen Ume noodles anywhere else before, nor had I even heard of them, but they were bright pink and beautiful, and contained no weird or nefarious ingredients and so I bought a package.


I really had no idea what I was going to do with them once I got them home, and so they’ve just been sitting in my pantry for the past couple of weeks. Until today. Today, for whatever reason was the day I decided to give them a try. Initially I was a bit stumped as to what to pair them with, or what kind of dish to put them into because I wasn’t sure what their flavor would really be like. Eventually I decided to go with traditional Asian seasonings such as garlic, ginger, sesame, and tamari, and picked my vegetables according to what I had on hand and what I thought might make the most startling contrast. Green, orange and black I thought would all look fantastic against the bright pink noodles, and I had really been trying to find a use for the solitary can of Black Soybeans left over in my pantry from a squash stew I made a couple of months ago.


Now, I’ll be honest, at first I wasn’t sure how this would turn out. I was kind of just flying by the seat of my pants so to speak. Whenever you just start tossing things together there is always the risk that you’ll under season or over season whatever your making, or just make a bad call on an ingredient. So when we sat down to eat I was a little hesitant and a bit skeptical, particularly of the noodles since I had no idea what to expect from them. Turns out there was no real need to worry because this delicious hearty bowl really blew me away. The flavors were exactly what I was looking for, rich - complex - and warming, and the entire thing came together in the most delicious way. The Ume noodles in particular were fantastic, and now I can’t wait for my next trip to Mitsuwa so I can buy myself some more packages. If you see Ume Noodles in your area pick some up, and make this dish!


Umeboshi Noodles with Black Soybeans and Collard Green Ribbons in Soy Broth.

8oz Umeboshi Noodles
1-2 Tbsp Toasted Sesame Oil
6 Garlic Cloves Minced
1 Thumb Sized Piece of Ginger grated
1 Medium Sized Leek sliced
1 Bunch Collards - ribs removed cut in ribbons
4 oz Enoki Mushrooms
1 15oz can Black Soybeans
A Few Dashes of Ume Vinegar
1 tsp Japanese 7 Spice

For Broth 

1 1/3 C Low-Sodium Vegetable Broth
2 Tbsp Low-Sodium Tamari
½ Tbsp Agave nectar

For Garnish 

1 Large Grated Carrot
½ Tbsp Brown Rice Vinegar per bowl
2 tsp Sesame Seeds per bowl


- Cook Ume Noodles according to package directions. Then drain in a colander and rinse with cold water to stop cooking and set aside, until ready to serve.

- While Noodles are cooking heat 1 Tbsp of sesame oil in a large skillet. Add the minced garlic, grated ginger and sliced leek. Saute over medium-high heat until the leek has softened, and garlic is fragrant. About 5-7 minutes.

- Add in the collard green ribbons, then cover and cook for three minutes. Then add in the enoki mushrooms and cook another 3-5 minutes until the mushrooms are soft and the collard greens are bright green and tender. If the pan starts looking dry during this time you can add an additional 1 tbsp of toasted sesame oil.

- Lower the heat and stir in the black soybeans, ume vinegar, and 7 spice seasoning. Replace the lid and let sit over low heat until the soy beans are warmed through then turn the heat off. And set the pan aside until ready to serve.

- To make the broth whisk the vegetable broth, soy sauce, and ume vinegar in small sauce pan. Then bring to a boil and reduce to simmer. Let simmer one minute then turn off the heat.

- To serve divide the noodles into two bowls. Then divide the broth and the collard green mixture evenly among them. Top each bowl with grated carrot, sesame seeds and the rice vinegar.


PS: Black Soybeans by the way are pretty interesting. They look like a black bean but a bit lighter, and taste a regular soybean or maybe a blander edamame. Outside of health food or specialty stores I don’t know how easy it is to find them, the brand I used was Eden Organic’s but if you can’t find them you could always sub in regular soybeans, edamame or black beans if you want to keep the contrast. Shiitake mushrooms would also be good if you don't have Enoki.


Once I mixed it all up you could better see those lovely
Pink Ume Noodles!

Wednesday, October 17, 2012

Vegan Mofo #17 - Celine & Tamasin's Tofu Pomegranate Pockets...


Vegan Mofo #17 - Celine & Tamasin's Tofu Pomegranate Pockets 
The Book - Vegan Sandwiches Save the Day!
The Author - Celine Steen & Tamasin Noyes
The Recipe - Tofu Pomegranate Pockets
Page # 67
Difficulty - Easy
Duration - 20-30 minutes not including the time it takes to press and drain tofu, or if you want to marinate your tofu as I did before baking. Once tofu is done it comes together in under 10 minutes.


I chose to make this recipe for one reason and one reason only, Pomegranate! Growing up Pomegranate was one of my favorite fruits, it was one of my favorite parts about the autumn and winter season. As a kid I remember my mom would come home from grocery shopping and she’d have 1 pomegranate for each of us, sometimes there would be extras, but pomegranates were/are expensive and so they were usually a treat. I would cut my Pom open, grab a bowl then hunker down in front of the t.v. watching some show while pulling all the little pom kernels free of their membrane. Snapping and crunching them between my teeth, enjoying their sweet and sometimes sour, occasionally bitter flavor. I tend to eat pomegranates a lot less these days, pomegranate juice sure, pomegranate flavored stuff definitely but actual pomegranate fruit? It’s rare. I’ve got so many fillings, plus a crown and all that fibrous pulp gets stuck between my teeth. When I saw this recipe however I knew I couldn’t pass it up. First of all pomegranate on a sandwich? Who would have thought! I love the originality of that. Plus it’s combined with smoky baked tofu, bitter greens, and a creamy dressing, what’s not to love?


So first, the tofu. Now you all know how picky I am about my tofu I’m sure, so this bare-bones approach to tofu had me a bit skeptical to say the least. All it is, is Tamari, Liquid Smoke, onion powder, sea salt, black pepper and Maple Syrup. The recipe says to coat the tofu in this mixture and then cut it into cubes and bake it for twenty minutes. Instead I decided to let my tofu marinate in the mixture to really give it a chance to soak up the flavor. I probably let it marinate about an hour before slicing it into cubes. Then I made a little extra marinade - because by then all of the original had been soaked up - to brush the cubes with before popping them into the oven. I probably let them back for about 25-30 minutes until they were really nice and brown because I wanted my cubes really crispy and I have to say - these were freaking amazing! No lie, the tofu cubes were so delicious I was eating them plain, right out of the oven. This is definitely a method I’ll be coming back to again and again.


Second there is the sauce which is super easy-peasy. All it is, is Cashews, Apple Juice and Ume vinegar. That’s it! You blend it all together and somehow you get this super creamy, all flavorful sauce that reminded me a bit of a Ranch or a Cesar. I truly appreciate that the ingredients for the sauce were simple and wholesome and it just goes to show that you don’t need a laundry list of items or any fancy vegan this or that to make a good sauce.


Lastly the recipe says to combine the sauce with sliced red onion, and spinach or arugula. Unfortunately I didn’t have either of those greens but I had a box of mixed salad greens in the fridge that needed to get used. Arugula was one of the greens in the mix so I thought it was a good choice. Once the salad is mixed you stuff it into the pockets along with sliced cucumber, the tofu bits and the pomegranate kernels and bam! The most amazing, delicious combination ever! I really, really urge you to give it a try. It’s so simple, yet so impressive, I know I’ll be making it for years to come.


Sunday, October 14, 2012

Vegan Mofo #14 - Lauren’s Breakfast Sandwiches...


Vegan Mofo #14 - Lauren’s Breakfast Sandwiches 
The Book - Vegan Yum Yum
The Author - Lauren Ulm
The Recipe - Breakfast Sandwiches
Page # 5
Difficulty - Easy
Duration - Roughly 40 Minutes, less if you use English Muffins instead of baking your own biscuits.


I have actually been wanting to make this sandwich since I got Vegan Yum Yum, but Yum Yum was one of my very first vegan cook books (Along with Appetite for Reduction) and so I was a bit intimidated by this recipe. Also add to that the fact that I used to be a total tofu hater and generally skipped over any recipes containing it. The picture has always intrigued me though - it really looks like the real thing! - and so when I chose sandwiches for my Mofo theme I thought what better time to make it then now? I have the skills, I like tofu, it’s the perfect opportunity.


This recipe is actually so much easier then it appears, and the ingredients are pretty simple. The biscuits are pretty typical and cook up quick about 12 minutes or so. The tofu eggs consist of tofu, soy milk, nutritional yeast, olive oil, tahini, baking powder, corn starch and salt - I used black salt for that extra eggy flavor. You whip it all together in a food processor or blender then use a measuring cup to drop some of the batter into a hot pan spread it thin like a pancake and fry. Simple or what?


The Maple Soy Tofu is pretty simple too. Just tofu pressed and drained to get out as much moisture as possible. Then you slice it into strips cook it till brown and then add maple syrup and soy sauce - I added a few drops of liquid smoke too! -  to the hot pan and let it bubble up and form a glaze over the strips. When all the component are done slice open a biscuit layer in some tofu egg, and some maple tofu and BAM!  It’s like a healthy delicious version of a ‘Mcmuffin”


I think out of all the breakfast sandwiches I’ve made so far the Hawaiian Benedict was my favorite but this one is pretty damn good. My husband said he liked this one the best out of all the ones I’d made so far. Smeared with a little bit of ketchup and a little extra maple syrups I can think of worse ways to start the day.


Thursday, June 7, 2012

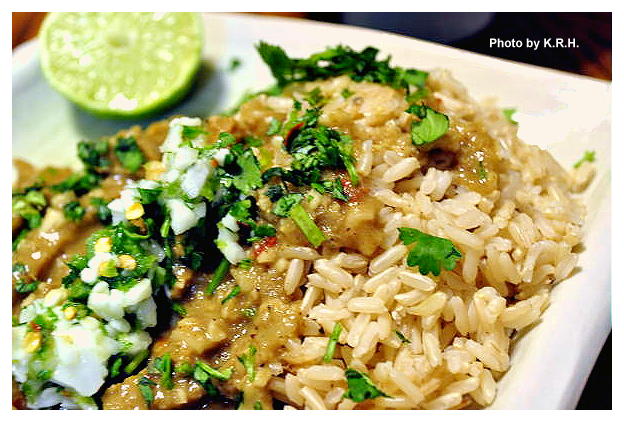
Curry Kapitan with Coconut and Chili Relish...


My latest foray into Malaysian Cooking. Curry Kapitan is traditionally made with chicken, and it’s said that the dish recalls the traditional role of the Chinese Kapitan, who was a man of considerable social standing amongst the Malay and Chinese people in old Melaka. Possibly invented by the Peranakans - the Malay-Chinese - to present to the Kapitan or to celebrate his role. It owes it’s flavor to the cultural melting pot of Old Melaka, and to the traditions of Chinese, Malay, Portugese, and Indian cuisine. Of course for my version I used homemade seitan instead of chicken, and decided to use soy sauce for a salty taste instead of dried shrimp paste.


This dish is nothing if not flavorful. The aroma alone is mouth-watering, but the taste... incredible! Though the ingredient list may seem long, this dish actually comes together rather quickly and it is worth every ounce of effort. When I first set out to make this dish I had no idea what to expect, and there were a few moments at least where I thought the whole thing would end in disaster. However when it came time to eat, and I took my first bite of curry Kapitan I was in love. The flavor is so complex that it’s hard to describe, but it has every flavor note you could possibly want in a dish. You can adjust the seasonings to make it as hot or mild as you like, but a little bit of kick is part of what makes this dish so fantastic. Use the chilies as a garnish, with a squeeze of lime and you won’t be disappointed. It tastes even better the next day!


Curry Kapitan with Coconut and Chili Relish 

For the Rempah 

½-1 tsp red pepper flakes
1 large red onion
10 cloves garlic
thumb sized piece of ginger
1 tbsp soy sauce
½ tsp ground turmeric
2 tsp Chinese five spice powder
1/4-1/2 tsp ground cinnamon

For the Curry 

2 Tbsp tamarind paste
Flesh from half of 1 Fresh Thai Coconut (roasted)
2 tbsp peanut oil
1 15oz can coconut milk + 1/3 c water
1-2 Pack Stevia
1 ½ lb Seitan (Homemade or Store bought)

For the Chili Relish 

½ - 1 Jalapeno Minced (Depending on how spicy you want it)
½-1 Red Chili Minced or ½-1 tsp red pepper flakes
½ Bunch Cilantro Minced
Flesh from half of 1 Fresh Thai Coconut
Juice of 1 Lime


To Serve

1 Lime
Extra Cilantro minced
Cooked Brown Rice

- First you must open your coconut. To do this the easiest way is to get a cleaver. It doesn’t have to be a good cleaver, it doesn’t have to be a $500 one, a $50 one will work just as good. Use the cleaver to whack your coconut a couple of times to break through. Drain the liquid out into a bowl or measuring cup and refrigerate to dink later, it’s not needed for the recipe.

- Once the liquid has been drained from the coconut you can split it in half. Use your cleaver and give the coconut a great whack in the middle. If like me you’re not strong enough to get the cleaver all the way through the coconut in one whack, and not skilled enough to keep hitting it in the exact same spot, use a rubber mallet to hammer the cleaver down through the coconut. This works really great, and fast.

- Once your coconut is in half use a spoon to scoop out the delicious white flesh. Once all the flesh has been removed rinse it under cold water and rub any filament away. Pat the coconut dry, and then slice it thin. Reserve half the amount of coconut in a bowl, to use as part of the relish and dry roast the other half in a pan over medium heat until it’s golden brown. Be careful not to burn it. The coconut should emit a slight nutty aroma.

- Once the coconut is a nice golden brown remove it and grind it either in a food processor or mortar and pestle until it resembles corse sugar grinds. Place in a bowl and set aside.

- Now to make the Rempah. In a food processor blend together the garlic, ginger and onion. Add in the soy sauce and pulse to combine. Stir in the turmeric, cinnamon and five spice powder.

- Heat the oil in a large pan over medium-high heat and stir in the rempah. Fry for five to eight minutes until the mixture becomes fragrant.

- Add the seitan to the pan and fry another 3-5 minutes, to let the seitan brown a little.

- Add in the coconut milk, water, Tamarind, stevia and season with sea salt and black pepper. Bring the mixture to a boil, then reduce heat and let simmer for 10-20 minutes. Add in the reserved roasted coconut.

- In the meantime combine all the relish ingredients in a bowl.

- Serve the Curry Kapitan over a bed of brown rice, garnished with extra cilantro, some squeezed lime, and the chili relish.


*** Note - To make this dish Gluten-Free use Wheat Free Tamari and a soy-based ‘meat’ or tofu. To make this dish Soy-Free use Coconut Amino’s instead of soy sauce.***