Showing posts with label Shallots. Show all posts

Wednesday, February 10, 2016

Toast From Pajottenland....


This has seriously become my favorite lunch. It is super simple and super satisfying. I Love the combination of flavors and I think this is a great way to utilize radishes. Radishes are a vegetable I really love but hardly have occasion to use in anything other then a salad, I imagine other people find this to be true, and while in a salad is not a bad way to eat radishes, I do enjoy new creative ways to eat them.


This simple open-faced sandwich originated as a Belgian snack food. Coming from the Pajottenland area West of Brussels.  Pajottenland is famous for unfiltered, fermented Lambic beers, and stinky cheese. The traditional recipe calls for either Quark (A stinky cheese from the area) or sour cream, so it was easy enough to veganize using Vegan Sour Cream. You can make this with or without Daiya, I've done both, and love it both ways.  However you choose to make it, enjoy!


Toast from Pajottenland

1 loaf Dark Rye or Pumpernickel Bread Sliced.
1 Bunch Radishes Sliced thin
12oz Vegan Sour Cream
1-2 Shallots finely diced
1 tsp Garlic Powder
1 tsp Sea Salt
1/4 tsp Black Pepper
3Tbsp chopped fresh Chives or Green Onions
Daiya Cheddar Cheese (Optional)
Minced Parsley to Garnish (Optional)

- Toast the Bread.

- In a bowl mix the sour cream, garlic powder, salt, pepper, shallot, and chives/onion.

- Spread a layer of the sour cream mixture over each slice of toasted bread.

- If using Daiya sprinkle a layer of the cheese over the sour cream.

- Place the sliced radishes on top.

- Sprinkle with parsley and season with additional salt and pepper if needed.


Thursday, September 17, 2015

Vegan Mofo #20: Entrecote a la Bordelaise...

Add caption


Entrecote a la Bordelaise is a classic French dish, simple yet elegant as so many classic French dishes.  Apparently there is a bit of a distinction between Entrecote a la Bordelaise and Entrecote Bordelaise. The first being a dish of seared steak served in a red wine and shallot sauce, the second being a seared steak dish served with raw chopped shallot, and no wine.  I liked the idea of the wine sauce and so that’s why I decided upon veganizing this version. The original recipe uses bone marrow as an ingredient, since there is no real way to veganize that I didn’t bother trying and I don’t think the dish suffers from the lack of it. I suppose if you want a ‘richer’ sauce you could simply add more fat in the form of oil or butter to make up for the lost marrow, but really, it isn’t necessary. In French Entrecote basically means rib steak, or more generally it’s known as a prime cut of meat, so I recommend using good quality seitan, or really good home-made seitan cutlets. Again for this recipe I made The Gentle Chef’s Filet Mignon seitan, and it turned out so good!


Entrecote a la Bordelaise 

2 Tbsp Nondairy Butter
3 Shallots Diced
2 Cups Red Wine (Preferably Bordeaux)
1 Cup Vegan Beef Stock or 1 Cup Water with 1 Vegan Bouillon Cube
1 Tbsp Parsley Minced
4 Beef Style Seitan Cutlets
Olive Oil as needed.
Sea Salt and Black Pepper to taste

- Splash a bit of olive oil in a large saute pan and heat over medium high heat. Add the Seitan Cutlets and cook for 5-8 minutes per side until nicely browned. Remove the steaks from the pan and put on a plate.

- Melt the butter in the pan and add the shallots.  Saute for 7 minutes or until they are soft.

- Pour in the wine and simmer until reduced by two-thirds.

- Add the stock and continue to simmer until reduced by half.

- Season the sauce with salt and pepper, and parsley.

- Pour the Sauce over the Cooked Steaks and serve. I served our steaks with Boulangere Potatoes but you could serve then with any roasted, boiled or mashed potatoes too.


Tuesday, March 12, 2013

Irish Seitan and Guinness Stew With Champ...


The Irish have a long standing tradition of cooking meat in beer. Soups, stews, casseroles you name it, there are a whole slew of Irish recipes that use stout - typically Guinness - as a flavor enhancer. They’re certainly not the only culture to use beer as an ingredients in their dinner, however I think they make better use of it and get more creative with it then some. This particular recipe appealed to me because it was cold and rainy all day yesterday, which made me want something hearty, chewy, heavy and comforting. While this dish may not be one of those extremely clever uses of stout that I just mentioned it is super satisfying. Flavor wise it’s reminiscent of a more traditional beef stew but with a subtly sweet edge a slight acidic tang, and robust undertones of roasted barley and hops. There’s something really pleasing to my palate about this combination, and the smell of simmering beer made me feel ‘home-sick’ for Dublin. Don’t be surprised if as you’re cooking this stew you begin having daydreams of cobble stone streets, and rowdy overflowing pubs.


Now my version of this recipe differs a little from those that you might find in Ireland because rather then strain out the leeks, onion, carrot and celery after a long cooking time I leave the vegetables in. Traditional recipes also use bacon as a flavoring agent. I originally considered using  a vegan bacon substitute in this recipe to achieve the same effect, however I opted to use liquid smoke instead. It's cheap, fast, effective and imparts the perfect smoky-bacon flavor. Of course if you prefer you could use whatever vegan bacon you like, 4oz is the typical amount called for.


Lastly, Guinness - of course - is the recommended kind of stout to use for this dish, however since Guinness - like so many other types of beer and wine - is filtered through the bladders of fish it’s avoided by those who are vegan for animal-rights reasons. In that case any Irish stout will do, but if you’re a little less strict about it then Guinness works perfectly. The Irish say that Stout Beer and Beef are natural partners - which I suppose is why they’re paired so frequently in Irish cooking - but really, you don’t know the magic of stout until you’ve paired it with a good, chewy, home-made Seitan! Forget about beef, Seitan and Stout were meant to be together and I mean that.


Irish Seitan and Guinness Stew

1 Tbsp Olive Oil
1 lb Irish Style Seitan Chopped into cubes
1 Small Yellow Onion Roughly Chopped
1 Large Leek Sliced
3 Carrots Roughly Chopped
3 Stalks Celery Roughly chopped
6 Garlic Cloves Minced
1 1/4 C Water + 1 Vegan Beef Bouillon Cube
1 Bottle of Irish Stout Beer
1/4 C Earth Balance
8oz Cremini or Baby Bella Mushrooms Quartered
3 Large Shallots cut into quarters or sixths
1/4 C Whole Wheat Pastry Flour
Celtic Sea Salt and Black Pepper to taste
2 tsp Liquid Smoke
Sliced Green Onions to serve (Optional)
Minced Fresh Parsley to Serve (Optional)

- Heat the oil in a pot over medium-high and add the carrot, celery, onion, and leek. Saute for five minutes until the vegetables are bright and just beginning to become tender.

- Add the minced garlic, the stock, the stout, and season with salt and pepper. Cover and simmer gently over low heat for 20 minutes.

- Meanwhile melt the Earth Balance in a frying pan. Add the cubed seitan, quartered mushrooms, and chopped shallots. Saute over medium-high heat for 5-8 minutes until seitan is nice and brown and shallots and mushrooms are tender.

- After 20 minutes add the browned seitan, mushrooms, and shallots to the pot. Simmer for another 10 minutes.

- After 10 minutes add the flour and stir to combine. Simmer for five minutes to let thicken and then add the liquid smoke and simmer an additional five minutes.

- Remove from the heat and let rest for 10-15 minutes to let flavors mingle. Then serve in large bowls with a heaping scoop of Champ and garnish with Fresh parsley and green onions.


Typically and Irish Seitan and Guinness Stew would be paired with a hearty scoop of Mashed potatoes smothered in butter. However I decided to jazz things up a little and so rather then serve my stew with plain old mash, I decided to make Champ. Champ is a traditional dish that’s basically a glorified form of mashed potatoes. It’s a common side-dish in Ireland and is typically paired with stews, sausages or other grilled meats. It’s most associated with Northern Ireland but you can find it all over the country. What makes it different then a traditional dish of mashed potatoes is that the potatoes are mixed with fresh spring onions that have been simmered in milk, and often other fresh herbs are thrown into the mix for good measure. Chives, Parsley, and Basil are all common addition, and even green peas can be thrown into the mix. For my version of Champ I decided to keep it basic and traditional, after all it was going to be soaked and smothered in Seitan and Guinness stew anyway. Make sure each serving of champ is accompanied by a good dollop of non-dairy butter, as the traditional way of eating champ is to make a well in the center, fill it with butter, then dip your champ as you eat. Yum!


Champ

6 Medium Sized Russet Potatoes peeled and cubed
4 Baby Yukon Gold Potatoes peel left on and cubed
1 Bunch Green Onions
1 1/4 C Unsweetened Almond Milk
1 tsp Garlic Powder
½ Tsp Celtic Sea Salt
1/4-1/2 tsp Black Pepper
Earth Balance to serve
Fresh Minced Parsley to serve

- Fill medium sized pot with water and bring to a boil over high heat.

- Once boiling add the potatoes and cook until fork tender and soft. Once desired doneness has been reached drain the potatoes and return them to the pot.

- While potatoes are cooking simmer the green onions and the milk in a small saucepan over medium heat. Simmer for 5 minutes until onions are bright green and tender.

- Add the simmered milk and green onions to the potatoes, season with garlic, salt and pepper and then mash, or use an electric hand mixer to whip the potatoes into a creamy consistency.

- Serve alongside Seitan and Guinness Stew, and garnish each serving with a generous dollop of Earth Balance and a sprinkling of fresh minced Parsley.


Wednesday, October 31, 2012

Vegan Mofo #26 - Celine & Tamasin’s Radish and Creamy Cheese Bagel Sandwiches...


Vegan Mofo #26 - Celine & Tamasin’s Radish and Creamy Cheese Bagel Sandwiches

The Book - Vegan Sandwiches Save the Day!
The Author - Celine Steen & Tamasin Noyes
The Recipe - Radish and Creamy Cheese Bagel Sandwiches
Page # 62
Difficulty - Easy
Duration - Roughly 15 minutes


I like Radishes, I like bagels and I like vegan cream cheese. So when I came across this recipe while flipping through “Vegan Sandwiches Save the Day” I found myself intrigued. I hadn’t really planned to make it for Mofo, but one afternoon before going to work I needed something quick and easy to make for lunch, and since I had all the ingredients this seemed perfect.


The recipe is super easy and you can really whip it up in no time. Toast a bagel, slice some radishes and grab a handful of baby arugula or spinach. I used spinach because I was out of arugula. Then you dice some shallots, raisins, and chives, mix them with cream cheese, ume vinegar, salt and pepper and smear the mixture onto your toasted bagel halves.


The savory slightly sweet cream cheese tastes really good along with the crisp, crunchy radish, and the smooth spinach. It would be equally as good with peppery arugula, and it would be especially good eaten - as the authors suggest - on a sweltering hot mid-summer day. This might not be the most impressive sandwich I’ve made during Mofo, but it is refreshing and satisfying.


Saturday, May 19, 2012

5 Spice Fiddleheads and Bunapi Mushrooms...


Fiddleheads are the unfurled fronds of a young fern. They are harvested seasonally, in early spring before the fronds have opened and reached their full height. I knew what fiddleheads were, and I’ve come across recipes for them before, but until a few days ago I’d never tasted them, nor even seen them in person. Apparently they are the new ‘in’ thing but I didn’t really know what all the fuss was about. So of course, when they made their appearance in my local market last weakened I knew I’d have to try them. If only to see if they lived up to the hype, and because it’s become something of a rule for me that whenever I’m faced with a vegetable I don’t know or have never tried, I must eat it.


My first thought upon eating one raw was “Wow, this tastes exactly like a fern.” A reaction that my husband found greatly amusing, and if like him, you too, are wondering how do I know what ferns taste like, it’s simple. I did grow up in Vancouver after all, amongst a rich natural landscape, and I was a Tom Boy as a child. Meaning I spent all of my childhood playing out doors, especially in the woods, - of which there was no shortage in my neighborhood - and when you’re the sort of child that spends her days climbing trees, and building forts and, tree houses, you inevitably find yourself doing a bit of foraging. So yes, I’ve eaten wild ferns, and wild berries, and tons of other random, wild vegetarian. - Which by the way I don’t recommend unless you absolutely know what you’re doing! - So when I first bit into that raw Fiddlehead it brought back a flood of memories of days spent in trees, playing at being a ‘wild thing.’ I can’t say the flavor of ferns is a particularly delicate one, and it is something of an acquired taste to be sure. Cooked fiddleheads on the other hand are an entirely different vegetable. When you cook them they become far milder, almost bland, with a hint of sweetness and a wonderful chewy texture. My second thought upon eating a blanched fiddlehead was “Interesting.” my third thought was “Amazing.” Like tofu, they really soak up the flavor of whatever you cook them with, they absorb so much which I love, but the thing I love most about them is their texture. I can’t really explain it, but something about it really appeals to me.


Though I wouldn’t go so far as to say they are my new favorite vegetable, nor do they even make it onto my top ten, but they are definitely a treat. A wonderful spring surprise to brighten up and liven up your palate. So if you see them, do give them a try, their season is very short so you have to snap them up when the opportunity presents itself.


So, about this recipe, since I’d never cooked with fiddleheads before I wasn’t really sure what to do. I did a google search and pretty much every recipe I found came back using fiddleheads as a garnish to meat. A few other recipes had them thrown into pasta, and many more still had them cooked in butter with morel mushrooms. None of these things appealed to me, and none of them seemed particularly creative or interesting. However I did like the idea of cooking the fiddleheads with mushrooms. Not morels though. As it happened I still had a package of Bunapi mushrooms that I’d bought at the Japanese market, and so I decided why not try them, and do an Asian inspired sort of dish? - By the way Bunapi mushrooms also known as White Beech are a unique sort of Japanese mushroom with a crisp texture and slightly nutty flavor. If you can’t find them you could always substitute shiitake or oyster mushrooms. - I’ve also been kind of addicted to Chinese 5 Spice Powder lately, and so I thought I’d try and work that into the recipe too. In the end the whole thing came together perfectly, far exceeding my expectations. The flavors of this dish are a complex mixture of sweet, salty, and spicy, and it’s just so delicious you’ll definitely be craving more.


5 Spice Fiddleheads and Bunapi Mushrooms

5oz Bunapi Mushrooms stem base removed and separated
7oz Fiddleheads
8 Garlic Cloves Minced
1 Thumb sized piece Ginger grated
2 Shallots minced
2 tsp Sesame Oil
2 Tbsp Soy Sauce or coconut aminos
½-1 Tbsp Brown Rice Syrup
½-3/4 tsp Chinese 5 Spice Powder
1/4-1/2 tsp Crushed Red Pepper Flakes

- First bring a medium sized pot of water to a boil, add the fiddleheads to the pot and boil for 2 minutes. Quickly drain and then plunge into a bowl of ice cold water to stop the cooking process. Once cooled drain the fiddleheads and pat dry, set aside on a plate.

- Heat the 2 tsp of sesame oil in a large pan over medium-high heat. Add the garlic, ginger and shallot and saute for 5 minutes until fragrant. Add in the crushed red pepper flakes and saute another 2-3 minutes until the shallots are soft.

- Whisk soy sauce, brown rice syrup and five spice powder together in a small bowl and set aside.

- Add in the Bunapi mushrooms and the Fiddleheads saute for 5 minutes. Add in the reserved sauce and saute another 3-5 minutes until the sauce has absorbed a bit and the mushrooms and fiddleheads are softened.

- Serve and enjoy!


*** Note - gluten-free if using GF Tamari, soy-free if using coconut aminos.***


FYI - Fiddleheads are reported to be a good source of Omega-3 and Omega-6 fatty acids. They’re also high in Iron, fiber and potassium. They also have a good deal of antioxidant activity as does the bunapi mushroom.

Thursday, April 26, 2012

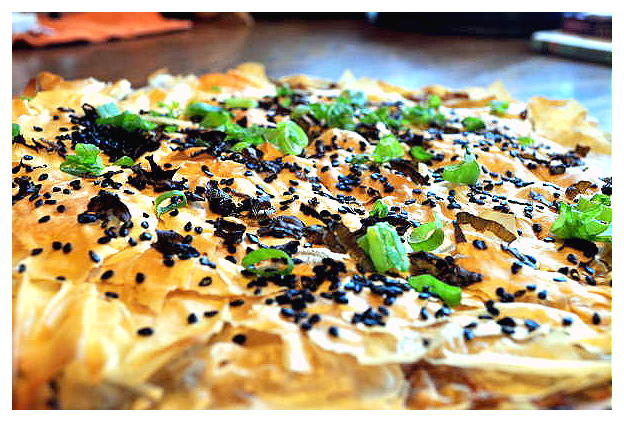
The Ultimate Spring Onion Phyllo Tart


When I first thought about what I wanted to make and then eat for Earth Day, onions were the first thing to come to mind. I had just discovered - and fallen in love with - ramps, I had leeks and green onions handy, and I’ve always been an onion fanatic. A tart using spring onions would be the perfect main course. The only problem was that I’d never cooked a tart before. I made a French Onion Pie once but that’s not exactly the same. So I searched the internet looking for a good onion tart recipe, and you know what I found? A whole lot of nothing, or at least nothing good. None of the onion tart recipes I found were vegan for one thing, the only vegan recipes I could find that came even close were for vegan French onion pie which I absolutely did not want to make. The vegetarian recipes were all very heavy on egg and cheese, and the non-vegetarian recipes were heavy on eggs, cream, cheese and meat. All of those things I might have been able to remedy however, but the problem was that almost none of the recipes used more then 1 kind of onion! Only one kind of onion? What kind of tart was that? Where was the creativity? Where was the onion love?


No, no, no... they wouldn’t do at all. I wanted to showcase a variety of onions in my tart, particularly fresh spring type onions. I wanted a ton of onion flavor, pure and simple. I didn’t want my tart stuffed with mushrooms and veggie meats, and heaping cupfuls of non-dairy cheeses. I didn’t want it full of breadcrumbs and other such nonsense. I just wanted onions. I didn’t think that was asking too much, but by the looks of the recipes I found it was. Sometimes despite all the cook books I own, and the wealth or recipes available I just feel like there’s a lack of creativity out there. Like everyone gets stuck in the same culinary vacuum. Not that there aren’t creative people out there, because there are, I read lots of awesome vegan blogs written by the most inspirational and talented people, but it’s like that old saying. Sometimes if you want something to get done and get done right you just have to do it yourself.


So I had to put on my thinking cap and figure out how to work out this tart. It didn’t take a lot of time to come up with a recipe and I’m so, so happy I was able to put this together because this Onion tart is simply incredible! I’m telling you, it’s a plate of absolutely mouth-watering, mind-blowing awesomeness. Really, I am going to be making this again and again! Really, It's got five kinds of onions, plus garlic!  If that isn't Ultimate I don't know what is. It was also rich, creamy, buttery and full of good old onion flavor. However, despite the massive amount of onions in this dish the onion flavor wasn’t overpowering at all. It was perfect, and just a tad sweet thanks to caramelized onions.  However if you prefer a little more sweetness you can add in the optional sugar I’ve listed, I don’t think it’s necessary but decide for yourself.


This turned out to be the perfect main course for my Earth Day dinner. Everything about it was amazing. For me the dish really embodied spring, so I hope you make it and enjoy it too. Oh, and FYI - It tastes even better reheated the next day!


The Ultimate Spring Onion Phyllo Tart 

2 Large Shallots
10 Garlic Cloves minced
3 Knob Onions sliced (White and Green parts)
1 Large Leek sliced (White and Green parts)
12 Ramps (Bulbs and Leaves)
1/3 C Sliced Green Onions
2 Tbsp Earth Balance or other non-dairy butter
3/4 tsp ground Thyme
3/4 tsp dried Sage
3/3 tsp dried Summer Savory
½ tsp Smoked Paprika
1/4-1/2 tsp White Pepper
Sea Salt to taste
½-1 Tbsp Sugar (Optional)

1/4 C Non-dairy Sour Cream
8oz non-dairy Cream Cheese
3 tsp White Miso

1/4-1/2 C Melted Earth Balance or other non-dairy butter
Sliced Green Onions to Garnish
Black Sesame Seeds to Garnish
10oz Phyllo Dough

- Preheat oven to 375'F

- Heat 1 Tbsp of non-dairy butter in a pan over medium heat. Saute garlic, shallots, and white parts of knob onions until caramelized. About10-15 minutes. Remove from pan and set aside in a bowl.

- Heat remaining 1 Tbsp of non-dairy butter in pan, and add the leeks, ramps and green parts of knob onions. Saute over medium heat until fragrant and soft. 8-12 minutes. Remove from heat and add to the bowl with the other onions.

- Add Thyme, Summer Savory, Sage, Smoked Paprika, White pepper, salt, Green Onions, Sour Cream, Cream Cheese and Miso, and sugar if using to the bowl with the onions. Stir until well combined. Taste and adjust flavor as needed, then set aside.

- Lightly spray a 11 inch quiche or tart pan with non-stick spray. Melt a quarter cup of Earth Balance or other non-dairy butter and keep handy. Carefully layer sheets of the phyllo dough into your quiche pan, covering the bottom and sides. It’s okay if some over hangs. Lightly brush every sheet of phyllo with melted non-dairy butter before adding another sheet.

*** Note - Ultimately how many sheets you decide to use is up to you. You want enough to form a nice crust on the bottom, but not so much that there isn’t room for the filling. Also a sheet of phyllo dough isn’t going to fit your quiche pan perfectly, so it’s okay to cut the sheets into workable pieces that you can layer in 8-10 sheets (depending on the size of your sheets) should be more then sufficient. Also don’t worry about it looking perfect, a little looseness around the edges will give it a nice rustic look. ***


- Once you’ve layered your phyllo sheets into the bottom and over the sides of the pan, add in your filling. Spread the filling evenly inside the pan.

- Carefully layer more sheets of phyllo over top of the filling. Use roughly the same amount that you used to form your crust and make sure to brush each sheet with melted non-dairy butter before applying it.

- When you’ve finished layering your top crust, carefully break or cut away any excess dough hanging over the edges. A little hang is okay, but you don’t want excessive dough hanging over or it’ll just burn. Brush the top crust with a little melted non-dairy butter then sprinkle with black sesame seeds and sliced green onions.

- Place in the preheated oven and bake for 45 minutes to 1 hour, or until your tart is a nice golden color.

- Let cool 15 minutes before cutting and serving.


PS: Don't let all the steps worry you, this is actually really simple and pretty easy to make. Phyllo is a pain in the ass to work with, but once you get over that, this tart's a snap! and it's SO worth it!


Thursday, April 19, 2012

Seared Tempeh with Blackberry Shallot Reduction...


Something amazing happened in my kitchen last night, and I’ve been dying to tell you about it!  
                   
But first, it all started with a trip to the grocery store. While I was doing my weekly shopping I saw that blackberries were on sale. Being a big lover of the blackberry and not having had them all winter I decided to pick up a couple of cartons. However once I got them home I realized I didn’t quite know what to do with them. I could have eaten them by themselves of course but as much as I love blackberries I have to admit their seeds are more then just mildly annoying. Especially for me, with my mouthful of fillings. I thought about putting them in a smoothie but considering the price of fresh blackberries - on sale or not - it seemed like a waste when I could have easily made a blackberry smoothie with frozen berries for cheaper. Unable to think much beyond that I decided to enlist the help of my numerous cook books, surely somewhere in those pages I could find a recipe.


Unfortunately virtually every recipe I came across that utilized blackberries had them in dessert. I definitely wasn’t interested in making a dessert. The few recipes I found that didn’t make a pie, crumble, cake, or bar out of them used them in sweet breakfast dishes like pancakes, or oatmeal - another thing I didn’t want to do. - While a few more had them tossed into salads or made into salad dressings. I briefly thought about making the blackberries into a salad dressing and then decided against it, that’s not at all what I wanted.


What I wanted was a savory blackberry dish. A dish that could be simple and light, or hearty depending on my mood. Something that would scream spring and yet feel comforting, so I thought long and hard about it. I thought about everything I know about cooking, and food pairing, and somewhere along the line I was reminded of some recipes I’d come across in my pre-vegetarian days. Recipes I’d never got around to making myself, but had piqued my interest for their oddness. There seems to be no shortage of roasted meat recipes dredged in blackberry sauce amongst omnivore gourmands, and minus the meat - of course - that seemed like exactly what I was after.


Now all I needed was to figure out what to use as the vehicle for the sauce I planned on making. As luck would have it my fridge is currently stocked both with tofu and tempeh as I bought several packages of each when they were on sale. After weighing the merits of both, I decided to use tempeh because of it’s firmness and robust flavor. Once I had my vehicle picked out all I needed was to figure out what sort of sauce I wanted to make, and how to go about it. This turned out to be a lot easier then I initially expected, and the result was out of this world.


Seriously, this is probably the most delicious, amazing, mind-blowing meal I’ve eaten in a while. Everything about it delights the senses, and the flavors mingle so well that they truly dance across the tongue. Who would have thought that tempeh and blackberry would pair so beautifully! I know this is a meal I will be making over, and over and over again, and I hope you do as well.


Seared Tempeh with Blackberry Shallot Reduction

1 8 oz pack of garden vegetable Tempeh cut into strips***

2 Tbsp Olive Oil
6 Cloves Garlic Minced
1-2 tsp Fresh Grated Ginger
2 Shallots finely diced
1 C Red Wine
1/4 C Balsamic Vinegar
2 ½ Tbsp Granulated Sugar
6-8oz Fresh Blackberries halved or quartered if large
1/4 tsp Dried Crushed Rosemary
½ tsp Ground Thyme
Fresh Cracked Black Pepper and Sea Salt to taste

- Fill a medium sized pot with enough water to cover the bottom. Place a steamer basket inside and add the tempeh. Cover and steam for 10 minutes until Tempeh is tender.

- Heat 1 tbsp of the olive oil in a pan over medium-high heat. Once tempeh has done steaming add it to the pan. Cook for 5 minutes then flip and cook for another 5 minutes or until both sides of each piece of tempeh is a nice dark golden brown. Remove seared tempeh to a plate lined with paper towel to remove excess oil.

- In small to medium sized saucepan saute garlic, ginger, and shallot in remaining 1 tbsp of olive oil. About 10 minutes until fragrant and shallot becomes translucent.

- Add red wine, balsamic vinegar, and blackberries. Cover and bring to a boil. Let boil 5 minutes then uncover and let boil another 10 minutes.

- By this time blackberries should be beginning to break down. Reduce heat to medium-low and simmer for another 15-25 minutes or until liquid has thickened and reduced by roughly a third.

- Arrange your seared tempeh over a bed of Micro Greens (or Wild Field Greens) then top with the blackberry sauce.


I think this tasted amazing over Micro Greens and the extra sauce doesn’t get wasted because it serves as a salad dressing. Perfect for a light spring or summer meal. However if it’s heartier fare your after I think this would go quite well with a scoop of mashed potatoes or perhaps some roasted potatoes. Although I haven’t tried it out yet myself, I’m quite eager to! However way you serve it, I hope you enjoy!

*** Note - You can use regular tempeh or any other flavor tempeh you like if you don’t have or can’t find the garden vegetable variety. If you can find it though I highly recommend it because it gives the tempeh a really nice additional flavor. My husband and I think the garden vegetable variety when seared or fried has a flavor mildly reminiscent of fried chicken, without all the grease or the animal-cruelty. It really did pair beautifully with the sauce.***