Showing posts with label Bell Pepper. Show all posts

Tuesday, February 9, 2016

Classic Ratatouille...

It had been way to long since my last blog entry, I realize that. I had hoped to get back to regular blogging after we returned from our Washington/Oregon Road Trip, but things were just hectic, and I didn't have the time nor the energy, nor the inclination to do much cooking, or blogging. I don't know if today will mark my return to blogging or not, but I did want to post this recipe that I made last week because I thought it turned out rather good, and who couldn't use more vegetables?


Classic Ratatouille

2 Tbsp Olive Oil
4 Garlic Cloves Minced
4 Large Tomatoes
1 Large Onion Diced
1 Red Pepper Diced
1 Yellow Pepper Diced
1 Medium Eggplant Diced
2 Large Zucchini Diced
2 Tbsp Tomato Paste Mixed with 1 Tbsp Water
1 tsp Sugar
1 Bay Leaf
3 Springs Thyme
1 Tbsp Minced Basil
1 Tbsp Minced Parsley
1-2 Additional Garlic Cloves to taste
1 tsp Sea Salt
1/2 tsp Black or White Pepper to taste


- Score a cross into the bottom of each tomato.  Plunge into boiling water and boil for 20 seconds. remove from the water and blanch in ice water. peel the skins away from the tomato, and chop the tomato. Reserve.

- Heat 1Tbsp Oil in a pot. Add the onion and cook for 10 minutes. Add the 4 garlic cloves, the red and yellow peppers. Cook for about 4 minutes and then remove the vegetables from the pan.

- Heat the second Tbsp of Oil in the same pan. When it's hot add the eggplant and cook for 4 minutes until beginning to brown. Add the zucchini and cook for another 5 to 10 minutes or until the veggies are a nice deep brown.

- Add the Onion and Pepper mix back to the pot.  Add in the tomato paste mixture and stir well to combine. Cook for 2 minutes and then add in the tomatoes, sugar, salt, pepper, bay leaf, thyme and basil. Stir well and cover to cook for 20 minutes. Check the vegetables after 10 minutes and if they look too dry add in about 1/4 cup water.

- Mix the remaining 1 or 2 garlic cloves with the minced parsley. When your Ratatouille has finished cooking add the garlic/parsley mix and stir lightly just to combine.

- Serve your Ratatouille hot with crusty French Bread or Garlic Bread. Enjoy with a glass of red wine for good measure.

Tuesday, February 17, 2015

9 Days of Valentine's: Part 8...


And on the eighth day we broke from our French/Italian inspired menu and went Spanish with Paella. I can’t say I ever ate paella before. As I’ve mentioned I wasn’t a big fan of seafood growing up, and my exposure to Spanish food was limited to mostly Tex-Mex creations. Even when I grew up and started cooking for myself I never found the idea of Paella all that exciting. But a vegan paella? Well, why the heck not?


I used the recipe from Annie and Dan Shannon’s book “Betty Goes Vegan” It was simple and thought there were a few separate steps the recipe actually came together relatively quickly and without much fuss. I liked that. I’ve seen other vegan paella recipes that are either ultra simple - to the point of not needing a recipe - or way too complicated. The Shannon’s recipe seemed to have just the right level of down-home comfort, mixed with fancy-complication.


Now, in case you didn’t know outside of Spain paella is considered the national dish of Spain, though most Spaniards consider paella to be a regional Valencia dish. Paella has a long history in the country with ancient roots, and many variations and stories or origin - considered by food historians to be a union of two important cultures Roman, and Arab. There are three common types of paella - and variations on each. One is the traditional Valencia Paella, containing meat, greens, and beans. Seafood Paella which contains seafood, and vegetables. Then Mixed Paella which is more of a ‘free-style’ dish that can include anything from meat and seafood to greens other vegetables and beans.


I would classify the Shannon’s recipe as Paella Mixto, since it used Vegan Shrimp, Vegan Italian Sausage, Rice, Artichoke, Faux Chicken and Wine Broth, Red Bell Pepper, Garlic, Green Beans, tomatoes and spices. One of the classic features of paella is also that when cooked over an open flame the rice on the bottom of the pan gets crispy and this is the most prized part of any good paella. Of course when you bake a paella - as the Shannon’s recipe does’ a crispy rice crust is harder to come by, but the paella was still delicious, and I’m a bit grateful for the non-crispy rice. I have too many old fillings I’d be afraid of cracking on rock-hard kernels of rice.

So, this was my first experience both cooking and eating a paella. I fond the experience of cooking it really enjoyable. I loved every minute in my kitchen preparing the vegetables and vegan meats, layering everything together and smelling it as it baked. There was something really satisfying about creating and eating this ancient dish for the first time, like I was inspiring some Roman-Moorish alchemy in my kitchen. However despite the fun I had cooking, I did not find the dish to be as delicious as I’d hoped. I don’t think this is the fault of paella in particular or the Shannon’s recipe specifically, I think this has more to do with the fact that I don’t think I’m really all that fond of Vegan Shrimp. They’re too realistic for me, they’re too much like actual shrimp that it kind of creeps me out. Since I was never big on seafood to begin with, the fact that they’re so real isn’t really a selling point for me.


That being said I would most definitely make paella again, and I would even use the Shannon’s recipe again but next time I’ll leave out the vegan shrimp and replace it with more sausage or some vegan chicken instead.

Check back tomorrow to see what we had on Day 9 our final day of celebration. I’ll give you a hint, it’s Italian!

Thursday, March 28, 2013

Tempeh, Sweet Potato Stir-Fry with Assorted Vegetables and Plum Sauce...


Last nights dinner was super simple, and super quick and easy to throw together, but it was so delicious I thought I’d share it. You know, when I was an omnivore I loved stir-fry. I used to make stir-fry’s at least 2-3 nights a week, but since going vegan I hardly ever make stir-fry. I think in the 3 years I’ve been vegan I’ve only made a handful of stir-fry’s. When I stop to wonder why this is I think it’s probably because as an omnivore I lacked creativity, not to mention that stir-fry is one of the quickest and easiest ways to cook meat. Where as, as a Vegan there are so many extraordinary things one can do with vegetables that using them in a stir-fry seems a bit - well - meh. Of course, every now and then quick and easy is what you’re after - especially on a busy weeknight - and sometimes you just really want a big ‘ole heaping plate of veggies.


This stir-fry in particular is unique only in that it includes sweet potatoes and edamame - two things I’ve never seen in a ‘traditional’ stir-fry and two things I’ve rarely if ever seen in any other kind of stir-fry. It also includes a plum sauce rather then the standard ginger sauce or teriyaki sauce. I really wanted a different flavor component and I thought plum sauce would work really well with sweet potatoes - spoiler, it does! How much sauce you use is up to you, and how saucy you like your fry’s, since I was in the mood for a plate of mostly veg, I was happy with 1/4 cup of sauce though my husband added a bit more to his own plate. Experiment and see what works best for you, there’s no right or wrong amount. Lastly you can serve this fry over rice for a hearty meal - as I did for my husband - or eat it like me, just plain and on its own a big ‘ole plate of veggies. Or you can find a happy compromise and serve it over a bed of sauteed or wilted spinach, arugula, or kale. Anyway you decide to serve it I hope you enjoy!


Tempeh, Sweet Potato Stir-Fry with Assorted Vegetables and Plum Sauce 

1 Tbsp Sesame Oil
2 Small Sweet Potatoes or Yams cubed
8oz Tempeh
1 Large Yellow Onion
8 Garlic Cloves Minced 
2 tsp Fresh Grated Ginger
1 Red Bell Pepper Chopped
2 Large Carrots Sliced on the diagonal
½ tsp Red Pepper Flakes
2 Heads Broccoli Chopped
1 C Frozen Edamame
1/4-1/3C Asian Plum Sauce (Homemade or store bought)
1 Tbsp Bragg’s Liquid Amino’s (or Tamari)

- Heat the Sesame Oil in a large pan. Add peeled cubed sweet potatoes and cook on high for 10-15 minutes, until the potatoes are al dente, and even a little browned. Stir a few times to make sure they don’t stick or burn.

- Meanwhile cube the tempeh and fill a pot with enough water to cover the bottom. Place a steamer basket inside and steam the tempeh for 10 minutes until fragrant. Remove from the steamer basket and set aside.

- Add in the Garlic, Onion, grated ginger, red pepper flakes,  bell pepper, and carrots. Stir to combine and cook an additional 5 minutes.

- Lower the heat to medium. Add in the frozen Edamame, steamed tempeh and broccoli. Cook for 3-5 minutes until broccoli is bright green and tender crisp.

- Add in the Plum Sauce and Bragg’s Liquid Amino’s. Stir until well combines and then cook for 1-2 minutes until heated through, and vegetables have reached your desired level of doneness.

- Serve spooned over rice or wilted greens and enjoy!


Wednesday, March 20, 2013

Broccoli Stem and Kohlrabi Salad with Chickpeas and Smoky Pepper Tahini Dressing...


I love a big ‘ole salad, by now this should be perfectly obvious. For me, any day of the year - but particularly on sunny Spring and summer days - there are few things better then a gigantic bowl filled to the brim with a luscious array of rainbow colored vegetables, fruits, nuts, seeds and legumes.  There are days where I just crave salad, and nothing had me craving salad more then my week long foray into Irish cooking. As much as I loved the Irish cuisine I cooked up leading up to St. Patrick’s Day, the Irish aren’t exactly known for ‘light’ meals, nor are they particularly known for their salads. So after a long week of heavy seitan and potatoes fair I was desperate for a good old fashion salad.


Unfortunately the usual salad fixings were pretty scarce in my house yesterday. There wasn’t a scrap of any sort of lettuce, no avocado, no fresh herbs, and only one tomato. What’s a girl who needs a salad to do? Well, she’s got to get creative. I took a quick inventory of my crisper drawers and then began to formulate a plan. I might not have had lettuce, but I had two kohlrabi that had been in my fridge since who knows when, and two broccoli stalks leftover from the night before. Since I got my juicer I’ve been a big fan of re-proposing vegetables. I save all of my stalks and stems now instead of junking them, and feed them through my juicer. That was the original plan for these broccoli stalks but then I thought, why juice them when I can eat them? Washed and steamed and combined with a bit of red cabbage that I had, some red bell pepper, green onions, sesame seeds and tomato I was well on my way to lunch!


This is a really great way to use up your broccoli stalks, if you’re saving them or don’t want to throw them away, and if you’ve never had Kohlrabi before you’re really in for a treat. Kohlrabi is such a strange vegetable, it’s round like a beet but green, and it tastes like something between a potato, a cabbage and a sunchoke. They’re really unique and they can be eaten either raw or cooked. So a light steam is a really nice way to have them. They also pair really nice with a creamy-smoky dressing. It makes the perfect lunch salad.


Broccoli Stem and Kohlrabi Salad with Chickpeas

2 Broccoli Stems Chopped
2 Medium Sized Kohlrabi Peeled and Chopped
1 Tomato Chopped
½ Red Bell Pepper Chopped
1/4-1/2C Shredded Red Cabbage
1/4C Green Onions Sliced
½ Can of Chickpeas rinsed and drained
2 Tbsp Sesame Seeds (to taste)
3 Garlic Cloves Minced (or to taste)

Smoky Pepper Tahini Dressing 

3 Tbsp Lime Juice
3 Tbsp Tahini
2 Tbsp Bragg’s Liquid Amino’s
2 Tbsp Water (to thin and dilute as needed)
1 Tbsp Agave Nectar
1/4-1/2tsp Smoked Paprika
White Pepper to taste
Black Pepper to taste

- Steam the Broccoli and Kohlrabi together in a steamer basket fitted into a medium sized pot. Steam for about 5-6 minutes until tender, but still a bit firm.

- Combine all other salad ingredients in a large bowl. Add the steamed vegetables and mix together.

- Whisk together all dressing ingredients in a bowl until smooth and creamy. Then pour desired amount over your salad, mix well and enjoy!


Wednesday, February 20, 2013

Thai Inspired Cabbage Salad with Creamy Tahini Lime Dressing...


This is one of my favorite salads. Seriously. I’ve been making it frequently over the past couple of years and though it’s super simple and easy it never fails to amaze me just how satisfied I am after eating it. This is one of those recipes that came about because a growling hunger was gnawing at my stomach at a time when my refrigerator was looking pretty sparse, so I had to make due with what I had. Sometimes that’s the best way to cook. Though it can be restrictive to cook with an empty fridge and an empty pantry, it can simultaneously be inspiring. It can provide you with the kind of freedom to be creative that you might not have otherwise. There’s always something a little magical in that.


Over the years this recipe has changed and transformed. The basic heart of it however has stayed the same. It was initially inspired by Thai flavors, - Thai cuisine being one of my favorites - and those hot lazy days of mid-summer when you don't want to do a lot of cooking anyway. Though no matter how I choose to make it these days, it always has the same six basic ingredients. Cabbage, cilantro, green onions, tahini, lime juice and soy sauce. Some days I use a little more of this, or a lot more of that. Some days I throw certain ingredients in, and leave others out, it all depends on my mood and what I have on hand, and that’s the beauty of this. It’s versatile! There are no hard and fast rules to making it, as long as you have those six basic ingredients it’s a winner every time.


I really do love the cool crisp cabbage slathered in thick rich, creamy, and nutty tahini. The sourness of the lime, the saltiness of the soy sauce, the bite of the onion, and the earthiness of the cilantro. It’s such a satisfying combination, made even better by various additions. A little sweetness from agave, or bell pepper, extra crunch from bean sprouts, a little spice from the radish. Cool and creamy avocado, or sweet mango, a hint of ginger or a hint of garlic. This version that I present to you is definitely a more jazzed up version of that original salad that I first made years ago, but it is extremely delicious. Of course it’s meant to be simple, so if you don’t have everything on the list don’t fret. In keeping with the spirit of the original work with what you have, and enjoy!


Thai Inspired Cabbage Salad with Creamy Tahini Lime Dressing 

1 Small Nappa Cabbage sliced thin
½ Head Red Cabbage sliced thin
1 Large handful bean sprouts
2 Large Carrots shredded
1 bunch green onions Sliced
1 bunch cilantro Minced
6 Red Radishes Sliced Thin
1 Cucumber Sliced thin
1 Red Bell Pepper Sliced thin
Handful of Raw or Roasted Unsalted Peanuts

Half a Mango sliced thin (Optional)
Half an Avocado sliced thin (Optional)

Creamy Tahini Lime Dressing

4 TBSP Tahini
4 Tbsp Lime Juice
2 Tbsp Tamari
2 Tbsp Water (as needed)
1 Tbsp Agave
1 small piece Ginger Grated finely
1 Clove Garlic Minced
1/8 tsp Cayenne


- To make the salad slice, chop or mince all ingredients as directed and place into a large mixing bowl.

- Whisk together all the dressing ingredients in a small bowl and taste for flavor. Adjust seasonings as needed if you want more lime, more tamari, more garlic etc.. or if you need to thin it more with a little water.

- When the dressing is to your taste pour it over the salad in the mixing bowl. Mix the salad thoroughly to combine and serve!

- Enjoy garnished with extra cilantro and peanuts if desired. Or with sliced avocado and/or sliced mango.


PS: I chose to use Tahini here in the dressing because I love it, and it's what I had on hand. However if you were interested in a more traditional Thai taste, you could easily substitute almond butter or peanut butter for the Tahini. Though it's not something I do myself i'm sure it would be just as lovely.

Wednesday, October 10, 2012

Vegan Mofo #10 Celine and Joni’s Tempeh, Pepper and Spinach Pesto Sandwich...


Vegan Mofo #10 Celine and Joni’s Tempeh, Pepper and Spinach Pesto Sandwich 

The Book - Hearty Vegan Meals for Monster Appetites
The Author - Celine Steen and Joni Marie Newman
The Recipe - Tempeh, Pepper and Spinach Pesto Sandwich
Page #84 Pesto on Page #210
Difficulty - Easy
Duration - Roughly 30 minutes.


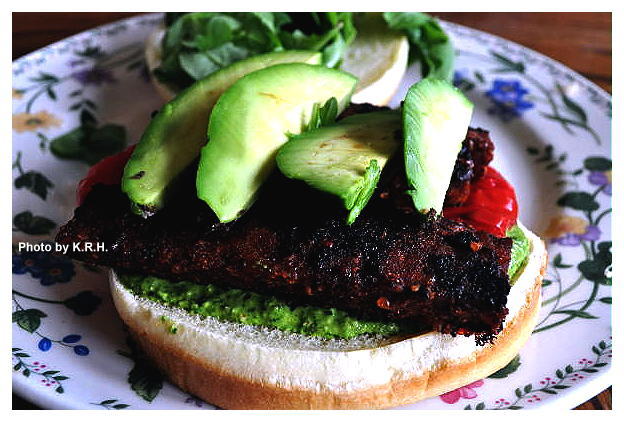
This is a super simple and delicious sandwich that you can throw together in no time for a quick lunch or light dinner. The whole reason I chose to make it was for it’s simplicity and for it’s emphasis on whole ingredients. Besides how can anyone pass up a combination like bacon flavored tempeh, roasted red peppers and pesto? Yum!


I think one of my favorite things about this recipe is the method of how the tempeh is made. The tempeh is sliced thin, slathered in a mixture of soy sauce, liquid smoke, Dijon mustard, sesame oil, granulated onion, paprika, chipotle chile powder, garlic and brown sugar. Then it’s baked for 20 minutes until brown and crispy. The only alteration I made to this method was that I steamed my tempeh first, and then let it marinate for an hour as opposed to just baking it right away. I think this worked out really well and gave it a nice full bodied flavor.


Second I love the pesto in this recipe. I’ve made a lot of pesto’s in my time, vegan and non-vegan and this is one of the best. I love my walnut based pesto but using almonds as this recipe does gives the pesto a really unique flavor and a creaminess that you don’t quite get with a walnut pesto. I also love the addition of spinach because it boosts the pesto’s nutrition, adds to the creaminess and lends a subtle and delicate flavor to the final product. Absolutely perfect paired with the smoky tempeh, and amazing with those roasted red peppers. Which by the way I roasted myself but you could easily buy jarred roasted peppers to save yourself some time. In the recipe it’s suggested to add spinach or arugula to the sandwich - I chose to add arugula - and to serve it on a toasted bun. I didn’t toast the buns because I’m not a huge fan of toasted bread but I’m sure that would have brought this sandwich even further into the realm of awesome flavor. I did however add some sliced avocado, because I had some that needed using, and I love avocado on practically anything! This actually worked really well with the tempeh, pesto and peppers and I highly recommend it!


Monday, July 30, 2012

Baked Sunchoke Sandwiches with Five Spice Slaw...


I’ve been rather neglectful of the blog of late I know, and for that I’m sorry. It’s just that a multitude of other things have accumulated and I’m finding it very difficult at the moment to divide my time. I know I last left off with updating about my vacation to Germany but I thought since it’s been such an awful long time since I posted a recipe I should take a few moments to do that instead.


In truth I haven’t been cooking much, or rather I have been but I’ve been making very simple food, nothing worthy of blogging about. This dish however I made just before going on vacation and it was simply superb! Really it’s perfect for a hearty lunch or a light dinner, because really, who doesn’t love a big ‘ole sloppy sandwich every once and a while? And, how often do you get to use sunchokes? Not often enough in my opinion, so I hope you enjoy, and I promise to get back to posting regularly again.


What I like best about this sandwich is the subtle hint of anise from the five spice powder. You get this great punch of Asian flavor combined with the unique taste of sunchokes, fantastic combination, trust me!


Baked Sunchoke Sandwiches with Five Spice Slaw 

1 lb Sunchokes,
Sea salt and Black Pepper to taste
1 French Baguette
Sliced Tomato to serve
Thai chili sauce to serve (optional)

Five Spice Slaw 

2 Carrots Grated
2 Celery Ribs diced
1 Red Bell Pepper diced
4 Garlic Cloves minced
Green Onions to taste
1 ½ C Red Cabbage finely shredded
½ C Non-dairy Mayo (I like Earth Balance)
1 ½ tsp Sesame Oil
1 tsp Coconut Amino’s or Soy Sauce
1 ½ tsp Chinese 5 Spice Powder or to taste
Sea salt Black pepper
1 Packet Stevia or to taste (Optional)
2 tsp Apple Cider Vinegar
½ Bunch Cilantro Minced

- Pre-heat oven to 400'F

- To make the Sunchokes make sure you rinse and clean them very well. They tend to be quite gritty. What I like to do is soak them in a big bowl of warm water for a few minutes. Then I scrub them good and give them a rinse.

- After they’ve been washed you want to slice them relatively thin. You can do it with a mandolin or a knife, whichever you prefer. No need to peel the chokes as long as you wash them well.

- Next spray a baking sheet with non-stick spray. Then spread the sunchoke slices out in a single layer. Depending on the size of your pan you might need to do this on two pans. Sprinkle with sea salt and black pepper to taste then place in the oven.

- Bake at 400'F for 10 minutes a side, or until the sunchokes have turned a nice golden color. Be careful not to burn or crisp them. You still want them a bit soft.

- Once done remove from the oven and set aside to cool.

- To make the Five Spice Slaw mix together carrots, red pepper, red cabbage, celery, cilantro, garlic and green onions in a big mixing bowl.

- In a small bowl whisk together the Mayo, sesame oil, coconut amino’s or soy sauce, Chinese 5 spice powder, apple cider vinegar, salt, pepper, and stevia to taste. Taste for flavor and adjust seasonings as needed.

- Pour the dressing over the Slaw and mix to thoroughly combine. Taste and adjust flavor as needed.

- To assemble your sandwich slice the Baguette in half crosswise, then make a slit lengthwise down each half.  Layer in the baked sunchokes, top with a few slices of tomato, and a heaping amount of slaw. Then drizzle a little Thai Chili Sauce over top if desired, and enjoy!


PS: Gluten-Free if using Coconut Amino's or GF Tamari. Soy-Free if using Soy-Free non-dairy Mayo


Wednesday, April 11, 2012

Mediterranean Scramble...


My husband and I are suckers for a good tofu scramble. I think in the beginning we were both a little bit skeptical but we quickly came to the realization that tofu scrambles are the way to go. They look like scrambled eggs and taste a million times better, plus they’re so versatile. You can literally add anything in that you like.


I generally only make scrambles for special occasions, - I don’t know why since they’re so darn good! - and typically I only make one of two versions that have become my go too scramble recipes. One is just a basic garden scramble that I came up with. The other is a slightly sweeter tad spicier scramble that includes vegan chorizo, sort of meant to be like a Mexican Eggs and Chorizo sort of thing. Both are wonderful - I’ll have to post the recipes some time. - However when my husband requested a scramble for Easter breakfast, rather then the quiche I’d originally planned I decided to stick with the Mediterranean theme we’d set for dinner.


When I started out I just had a vague idea of what I wanted. Sausage and peppers to start, seasoned with Greek spices, but beyond that I didn’t really have a clue as to what I was going to do. So I picked through my cabinets, sorted through my fridge and pilfered my brain of every tiny bit of it’s culinary knowledge and Greek inspiration. What I ended up with was so utterly mind blowing that neither my husband nor I could resist the urge to utterly gorge ourselves silly. Everything about this scramble is perfect! The flavors are subtle and play off each other beautifully, the aroma is heavenly, and the entire dish transports you to a new level of culinary bliss. It must also be said that long ago my husband happened upon the realization that if you add a bit of ketchup to a tofu scramble it makes it taste all the more like eggs. Both of us know people who actually eat ketchup on real chicken’s eggs and both of us have always found this utterly sickening. However, ketchup on a scramble makes total sense and over time I’ve picked up this habit as well. Although, this is one scramble that definitely doesn’t need it. I gobbled my plate up as was, without making any alterations. If you like Mediterranean flair, and both Greek and Italian spices I strongly suggest you give this scramble a try, you won’t be sorry!


Mediterranean Scramble

2 Tbsp Olive Oil
1 lb Firm Tofu (Pressed and Drained)
1 lb Vegan Italian Style Sausage (I used Field Roast)
1 C chopped Mixed Peppers (I Used Red and Orange)
1 Small Yellow Onion Diced
10 Cloves Garlic Minced
10 Sun-dried tomatoes chopped
2 Large handfuls Baby Spinach
10-15 Kalamata Olives Halved
½-3/4 tsp ground Fenugreek ***
½ tsp ground Fennel ***
1 tsp ground Cumin
1 ½ tsp ground Thyme
1-2 tsp Dried Oregano
1/4-1/2 tsp Dried Crushed Rosemary
1/8 Ground Turmeric
Dash of Dried Dill
Dash of Smoked Paprika
Sea Salt and Black Pepper to taste
1/8-1/4 C Nutritional Yeast
Water as needed

- Put tofu in a tofu press - or wrap in a towel and place between two heavy objects - and press for about 2 hours.

- Heat 1 tbsp of oil in a pan over medium-high heat. Slice Italian sausages into thin rounds and fry in the oil until nicely browned on both sides. Roughly 5-10 minutes. You can add a bit more oil or water if needed. Once browned, remove to a plate and set aside.

- Heat remaining tbsp of oil in the same pan. - No need to clean it out. - Add garlic, onion, and peppers and saute over medium heat for 5-8 minutes until flagrant, and onions are translucent and peppers are soft.

- Drain tofu and crumble into the pan. Alternately if you want large pieces you can cube it using a knife rather then just crumble it.

- Add in all your spices. The fenugreek, fennel, cumin, thyme, oregano, rosemary, turmeric, dill, smoked paprika, sea salt, pepper, and nutritional yeast. Adjust for personal taste preferences and color and stir until everything is well combines and tofu has taken on a yellow color. If the pan seems dry you can add in a bit more oil or water to de-glaze and moisten it, as needed.

- Add in the cooked Italian Sausage, Spinach and sun-dried tomatoes. Stir to combine and saute over medium for 2-4 minutes until tofu and sausage are well heated through and spinach has wilted. Add in the kalamata olives, saute another minute then taste for flavor, adjust as needed and serve.


*** Note - Both Fenugreek and Fennel may only be sold in seed form. If this Is the case no worries, just grind the seeds yourself in a spice or coffee grinder. It works perfectly. I actually have a coffee grinder for just this purpose. Also fenugreek may not be in everyone’s average grocery store depending on where you live. However grocery retailers such as Whole Foods, as well as specialty and spice shops, typically carry it. You could also check out your nearest Mediterranean, Indian, Turkish, Middle Eastern, or even Chinese Grocery as Fenugreek is used in all of these cuisines. Trust me when I say it’s worth your looking for!***


*** Note - Can be made Gluten-Free by using a GF Vegan Sausage*** 

Thursday, March 1, 2012

Classic Greek Salad with Fantastic Tofu Feta...


I have a real passion for Greek Cuisine. I’ve mentioned my love of it before, and being part Greek myself this should come as no surprise. However despite my undying love for the aromas and flavors of Greek culinary tradition Greek food isn’t something I often prepare myself. Nor would it seem is it a culinary delight I seek out at restaurants these days. When I lived in Vancouver I frequented several different Greek restaurants on a regular basis. There were tons to choose from but I had my favorites, they made my favorite dishes like tzatziki, pita, rice pilaf, souvlaki, moussaka (though no one can compare to my grandma’s moussaka) dolmathes and so on just right. When I moved to Chicago the number of palatable - In my opinion - Greek restaurants severely diminished and the few that I enjoyed never could quite compare to my favorites from back home. I don’t know why but for a city that has a decent sized Greek community I find the food to be rather lackluster at most of the Greek restaurants I’ve been to here. There seems to be a fundamental difference between how Greek food is prepared in Chicago and how it’s prepared in Vancouver which I assume comes down to differing culinary and regional trends and traditions that develop as a result of diaspora. Traditions after all, often change when people leave their homeland and are forced to adapt to new ways of life in another country.


So this is one of the main reasons I stopped eating Greek food out, the other main reason is that I became vegan and as much as I love Greek cuisine it is by no means vegan friendly. Vegetarian friendly yes, most certainly, but not vegan friendly. Why I don’t cook Greek food at home more often is something of a mystery. It’s not as though I haven’t got the skill or the resources to do so. I guess it’s just one of those things, but I digress...


All last week I was having a wicked hankering for Greek food. It happens like that sometimes, all of a sudden I’ll get a taste for a certain ethnic cuisine and that’s all I’ll want to eat for days. One of the dishes in particular that I was craving, is a long standing favorite of mine. Just a super simple but delicious Greek Salad. I stopped eating Greek salad when I moved to Chicago because the restaurants here don’t make it right everyone’s got their twist on this classic salad and it drives me nuts. People are always throwing romaine lettuce into it, which I absolutely do not understand. The dressings are never right, there’s never enough garlic, and different places like to throw in other random additions that in my opinion just don’t belong. Kalamata olives, squid, sun-dried tomatoes, radishes - you name it and I’ve seen it stuck in amongst the lettuce leaves. I’ve made it at home several times in the past of course but when I went vegan that option went out the window too. A Greek salad just isn’t a Greek salad without the feta, in my opinion anyway, and since my husband doesn’t like olives there hardly seemed a point in making a salad in which the two most important ingredients were absent.


What about tofu feta? You might ask. Of course I was aware of tofu feta. I’d heard about it, I’d heard about people making it. I’d seen recipes in books on how to make it, but honestly none of the recipes I ever saw sounded like they’d be anywhere close to real feta, and while that may be fine in some instances it is certainly not fine within the context of a Greek salad. Tofu, or tofu tasting things do not belong. I just never saw how it would work or how it would be edible, particularly for me since I’m not a big fan of tofu to begin with.
That craving just wouldn’t let up though, and so I spent a day debating, deliberating, pondering and contemplating just how I could make tofu into feta cheese and have it not only be adequate but damn near amazing. The only other time I’ve tried to replicate the taste of feta was last summer when I veganized my mom’s recipe for spinach and feta stuffed peppers. I thought back to that recipe and came to the conclusion that the same basic principals should work again, if given the right amount of time and with the right technique. So I began, and what I ended up with turned out to be so mind-blowingly fantastic I can’t even begin to put it into words.

This recipe is super simple, all it takes is patience and time, and the result is phenomenal. Never again will I long for the days of cow’s milk feta. Never again will I even consider it for a second. Not only did the end result of this not taste anything even slightly resembling tofu, but it tasted exactly like what I remember feta to taste like. It was so damn good that when I went to go taste test it I ate a handful of it straight out of the container, by itself! For a tofu evader like me that’s freaking huge! It really made the salad, which of course was fantastic and totally satisfying!

So without further adieu here are my recipes for tofu feta, and a traditional Greek Salad - traditional at least where I’m from - I hope you enjoy them, and as far as the tofu is concerned I highly recommend using a tofu-press if you have one. See the note for more details. The press really is amazing, I’m just saying!


Fantastic Tofu Feta

1 lb Extra Firm Tofu drained and pressed for 2-4 hours
½ tsp Garlic Powder
½ tsp Dried Oregano
½ tsp Dried Dill
1 ½ tbsp Dried Basil
3 tbsp Olive Oil
2 tbsp Lemon Juice
4-6 tbsp Caper Liquid
Black Pepper to taste
Sea Salt - start with ½ tsp and go up until you reach the desired saltiness

- When you press your tofu, try to make sure as much water comes out as possible. Your block of tofu should become extremely condensed, to the point of being almost half of it’s original thickness. It should not be really wet, slippery or slimy. This is how you know it’s been pressed long enough, and trust me when I say this level of pressing is what goes along way in helping the tofu actually taste like real deal feta. Take the time to do it right if you can otherwise the end result will not be as wonderful.

- Once tofu has been pressed crumble it into a bowl. Add all the other ingredients and stir until well combined. Taste for salt and seasoning and adjust as needed. Place in an air-tight container and let marinate overnight. 12-24 hours is good, keep in mind the longer you allow it to marinate the stronger the flavor will be, thus the more feta-like it’ll be. I highly suggest at least a 12 hour marinade. Make the feta a day in advance, and actually the longer you leave it in the fridge the bolder the flavor becomes. It should last you up to a week in the fridge, and I think it tastes best at 2-3 days but a 1 day marinade is totally sufficient for this purpose.


Greek Salad

5 Medium Tomatoes cut into chunks
½-1 Small Red Onion sliced paper thin (to taste)
1 15 oz can Black Olives drained
1 large Cucumber Peeled and cut into chunks
1 large Green Bell Pepper cut into chunks
1 recipe Tofu Feta

Classic Greek Dressing

1/3-1/2 C Olive Oil
1/3-1/2 White Vinegar
2 tsp Dried Oregano
½ tsp Dried Basil
Sea Salt and Black Pepper to taste
1 Packet Stevia (optional)
3-6 Cloves Garlic finely minced (or to taste)

- Combine Chopped Tomato, red onion, pepper, olives, and cucumber in a bowl. Sprinkle tofu feta over top. You may not need or want to use the entire batch, that’s up to you. I used about 3/4 of a batch.

- Whisk all dressing ingredients in a bowl until well combined. Then pour over salad. Again depending on how much salad all your veggies yield you may not need to use the entire dressing. I used roughly two-thirds of it.

- Let the whole thing marinate 1-3 hours in the fridge. As with the tofu the longer you let it marinate the stronger the flavor will be. The raw onion and garlic also mellow out a little the longer they sit marinate in the dressing which is nice.

- When ready serve as an appetizer or side dish to a wonderfully home-cooked Greek feast! And enjoy!

PS: Stay tuned for more Greek inspired recipes!


*** Note - You don’t need a tofu press to press the water out of tofu, however I strongly recommend it. A lot of people argue that using a kitchen towel and a heavy object works just fine, I can’t attest to that personally because I’ve never had any success with that method. Try as I might a heavy bottomed frying pan on top of my block of tofu didn’t press out all that much, and because of the differing in size between the pan and the tofu it never sat level. If I tried to force more water out by pressing the pan down on the tofu all I succeeded in doing was squishing or crushing my tofu but it still contained water. The great thing about the press is that there’s a plate in place held down by a spring that’s forcing constant pressure onto the tofu so that water seeps out. The tofu retains it’s rectangular shape because of the box surrounding it and you don’t have to fuss or fight with it to get the water out. Put it in, set it up and leave it along for 2 hours. It’s a thing of beauty, and it works fantastic. Now that I have one I don’t know how I ever survived without one. It makes eating tofu a lot tastier, and I tend to avoid it less now. A press costs about $35 and in the grand scheme of things it really isn’t all that much money, certainly not if you’re going to get your money’s worth.***

Friday, February 24, 2012

Roasted Vegetable Mango Salsa...


Now I am of the opinion that you can’t have a good taco without good salsa. I am a big fan of salsa’s and Pico de gallo, any kinds and all kinds, the more unusual the better. Though I am particularly fond of salsa’s or pico’s that include fruits such as mango, pineapple, peach etc.. There’s just something so divine about that combination of tart tomatoes and spicy chili blended with the sweetness of fruit and the pungency of garlic. A winner in my book every time.

Since I was feeling in a very tropical mood the other night, and since the tacos I was making included coconut, avocado, and plantains I thought it only fitting that I make a fruity salsa to accompany them. As luck would have it I had mangoes on hand and pineapple juice in the fridge, so I set to work. Since I’ve always been rather fond of roasted and fire roasted salsa’s I decided to use that method and in the end It worked out brilliantly.


Fair warning this recipe does make quite a bit of salsa, but it’s so delicious you’re going to be glad that it does. Even when all your taco’s are eaten and you have no more leftovers to compile into a tortilla you can use this salsa on chips or wherever else you might typically use salsa. It’s really fantastic, especially for all the mango lovers - like me - out there.


Roasted Vegetable Mango Salsa

2 Large Tomatoes
1 Red Onion
1 Red Pepper
5 Cloves Garlic
1 Bunch Cilantro minced
2 Ripe Mangos
Sea Salt and Black Pepper to taste
Crushed Red Chili or Cayenne Pepper to taste (Start with 1/4 tsp and work your way up)
3-5 tbsp Pineapple Juice
3-5 tbsp Lime Juice
Garlic Powder to taste if needed

- Preheat your oven to 400'F (200"C) and lightly spray a baking sheet with non-stick spray.

- Slice each tomato into 6-8 pieces, quarter your onion and pepper. Separate onion layers. Lay all the veggies and garlic cloves out onto the baking sheet and place in the oven. Roast for 15-20 minutes until
veggies begin to get soft and fragrant.

- Peel and chop mangoes, place into a food processor. When veggies are done remove them from the oven and let cool for 5-10 minutes. Place them into the food processor with the mango and pulse until everything is finely diced but not pureed.

- Remove contents of food processor to a bowl. Mince cilantro with a chef knife then add it to the bowl, along with the pineapple juice, lime juice, sea salt, pepper and chili or cayenne. Stir until thoroughly combined. Taste and adjust seasoning as needed. If you don’t feel that the 5 cloves give enough garlic flavor to your salsa once they’ve been roasted you can add in some garlic powder to taste or 1-2 cloves raw minced garlic if you like.

- Enjoy served with my Coconut ‘Shrimp’ Tacos or any of your favorite taco, burrito, fajita’s or just with chips.


*** Note - How much pineapple and lime juice you’ll need are going to be dependant on how much your fruit and vegetables yield. Your tomatoes, mangoes etc... may be larger or smaller then mine, so adjust the liquid as needed. You don’t want it soupy. ***

Monday, January 30, 2012

Broiled Vegetable Pizza Sauce...


Everyone it seems love pizza, and I am certainly no exception. There’s just something so overwhelmingly satisfying and comforting about it. It’s become something of an ingrained cultural ritual for most people. We eat it at parties, and family gatherings. We pick it up when we get off work late, or grab a slice to eat on the go at lunch. It was a favorite childhood food for most of us enjoyed at all the best occasions and celebrations. We eat it when we have late night cravings and enjoy it cold the next day for breakfast - or at least I do - Then there are some days where you just want some of that greasy oozy-gooey goodness.

These days I don’t eat as much pizza as I used to. Partly because I don’t consider it to be a particularly healthful food, - not the way most restaurants make it anyway - but also because I’m just the type of person that enjoys constantly engaging in new culinary experiences. As much as I love it I couldn’t eat pizza all the time, and I’ve never been the kind of person who only ate one kind of pizza and that was it. I find that very boring. Not to mention limiting. I prefer to constantly change things up. I despise limitations. I relish freedom and choice, and am always looking for ways to fully take advantage of both, especially in the kitchen. So these days when I do eat pizza I take great pleasure in making my own. I love coming up with new combinations of ingredients and seeing how they work together.


My favorite kinds of pizza are the kind absolutely loaded up with veggies, I also appreciate creative sauces. Classic marinara is fine, and certainly has it’s place, but I like my pizza sauce to have a little more pizzaz. I love pesto on pizza, I also love a good garlic cream sauce on pizza, roasted tomato sauces are good too, as is a good sweet and smokey barbeque sauce. So the last time I decided to whip up a few of my own pizza creations I thought why not try my hand at making a nice delicious pizza sauce?

The following recipe is what I came up with after a little bit of thought. I love broiled veggies so much, and thought they'd be wonderful blended into a sauce, lending it a sweet yet robust flavor. I was very happy with the finished product, and the great thing about it is that while there are several steps involved it is very easy. This sauce recipe makes enough for at least 3 14 inch pizzas with still a bit leftover. A great idea for the remaining sauce If you don’t want to freeze it is to heat a bit in the microwave and then drizzle it over the finished pizza. Or heat some to use as a dipping sauce. Super tasty! Another nice thing about this sauce is that it’s very versatile. You can literally pile any kind of veggies you like on top of it and it’ll go remarkably well. I used sweet potatoes and beets sliced thin on one pizza. Tomatoes, zucchini and asparagus on one, and spinach, onions, and peppers on another. Experiment and see what you like best.


Broiled Vegetable Pizza Sauce

3 Medium Sized Tomatoes on the Vine (it’s okay if they’re a bit overripe)
½ a large Vedalia Onion (or other sweet onion)
1 Large Red Pepper
6-8 cloves garlic
1 tsp Agave nectar (or to taste)
1 tsp lime juice
Fresh parsley, oregano, and basil to taste
Sea salt and Black Pepper to taste

- Set Broiler to high.

- Slice tomatoes, and red pepper in half and lay on a lightly greased broiler pan. Slice your onion half in half again and place it on the broiler pan along with the other vegetables.

- Broil vegetables until skins are blackened. You don’t want them to be entirely black and burnt, just charred a bit. Remove from oven, place onto plate or into bowl and stick in the freezer for a quick cold shock, about five minutes.

- While vegetables are in the broiler, brown garlic cloves in a dry skillet over medium heat. about five or so minutes. Remove from heat and set aside.

- Remove vegetables from freezer, skins should easily peel away from the tomatoes and pepper. Discard, along with the outermost layer of onion. Place vegetables into a highspeed blender. If there is juice remaining on the plate or in the bowl you used to hold the vegetables when putting them in the freezer pour that into the blender as well..

- Add garlic and herbs, agave, and lime juice. Blend on high until everything is combined and smooth. Add a little sea salt and black pepper.
- Next spread a generous amount of sauce onto your prepared pizza dough. Everyone likes a different amount of sauce so that is up to you. I personally like very saucy pizza, since I don’t eat cheese on my pizza the extra sauce gives it that extra oomph. Make sure to spread the sauce evenly then assemble your pizza toppings as you like and bake according to recipe directions.

So there you have it, a quick and easy pizza sauce that’s delicious and gives you the added satisfaction of knowing you made it yourself from scratch. Nothing better then that.


And incase you are curious about the pizza I have pictured here, it’s a very simple concoction that was absolutely heavenly. I used Colleen Patrick-Goudreau’s pizza crust recipe from "The Vegan Table" topped it with my Broiled Vegetable sauce, then arranged thinly sliced tomato, and zucchini on top. Added sauteed red peppers, and red onions then finished it off with some shaved asparagus, some chopped green onion and some freshly cracked black pepper. Delicious!

Also my apologies for not actually taking a picture of the sauce on it’s own, that was very neglectful on my part.

*** Note - While my sauce is gluten-free, soy-free and oil-free. My pizza was not gluten-free or oil-free. I always brush my crust with a bit of olive oil before baking to get it a bit crispy, you don't have to. Also it is very easy to make gluten-free pizza and you can even buy pre-made gluten-free crusts or pre-made gluten-free pizza dough mix at many grocery and health food store chains. ***