Showing posts with label Sun Dried Tomatoes. Show all posts

Friday, March 8, 2013

Franco-Moroccan Inspired Eggplant, Squash and Tempeh Crumble...


Who doesn’t love a good crumble? On a crisp fall evening there are few better ways to end the night then with a warm homemade apple or plum crumble. Am I right? But, have you ever had a savory crumble before? Have you ever eaten crumble for dinner? Yeah neither had I, until I came across a savory crumble recipe in Beatrice Peltre’s ‘La Tartine Gourmande’ that caught my interest. I was so intrigued by the idea that I did a little internet research and as it turns out crumbles in general are thought to be of British or Irish origin, and have always been made in both sweet and savory varieties, although the sweet versions are far more common. Interestingly crumbles didn’t become a popular or widespread menu item until the second world war, when strict rationing of flour, sugar and butter made it nearly impossible for people to make pies since pie crusts require so much of the three rationed ingredients. Instead some ingenious people decided to make the pie filling and throw a crust-like mixture on top, and since it was so easy, and cheap to make it really caught fire. Cool right?


Anyway, crumble for dinner? I’d never considered such a thing before, but all this information really got me interested in trying one out for myself, the only thing I had to figure out was what kind of crumble to make. Peltre’s recipe used eggplant and squash and had a gluten-free crust and I liked the idea of those things. Eggplant and squash I both had on hand and they fueled my daydreams of warmer more hospitable climates such as those in the Mediterranean, the South of France, Africa and The Middle East. So I took that inspiration and ran with it, combining a mixture of Middle Eastern and French elements to form this super savory, slightly tangy, a tad sweet, flavor packed and decadent crumble. I kept the idea fo a gluten-free crumble topping because, well why the hell not? But I added cooked amaranth and nutritional yeast to make it a bit more substantial and to give it that creamy cheesy flavor that savory crumbles are suppose to boast.


I had no idea how this experiment was going to work out, but in the end I was more then surprised. This was definitely one of the most surprisingly delicious meals I’d made in some time. No matter how odd you might think the idea of a savory crumble is, the bottom line is that this worked. Plain and simple, it was so delicious that there’s no doubt you’ll go back for seconds! I know this recipe has a few steps, and it requires you to dirty a few different dishes but trust me when I say every ounce of effort is so worth it! So expand your horizons and give it a try.


Franco-Moroccan Inspired Eggplant, Squash and Tempeh Crumble 

For the Tempeh 

1lb Tempeh
1 Tbsp Fennel Seed
1 tsp Dried Basil
1 tsp Dried Oregano
1 tsp Onion Powder
1 tsp Garlic Powder
1 tsp Red Pepper Flakes
1/4 tsp Ground Mace
1 ½ C Water + 1 Beef Bouillon Cube
3/4 C Red Wine

For The Crumble Topping 

2/3 C Finely Chopped Walnuts
1/3 C Millet Flour
1/4 C Brown Rice Flour
4 Tbsp Nutritional Yeast
1/4 C Amaranth Cooked in 3/4 C Water
1 tsp Ground Cumin
Sea Salt and Black Pepper to taste
4 Tbsp Earth Balance
½ Bunch Parsley Minced

For The Crumble Filling 

1 Medium Butternut Squash, peeled, seeded and chopped. Roughly 4 C
1 Medium Eggplant chopped. Roughly 4 C
4 Tomatoes Blanched, peeled and chopped
1 Large Yellow Onion Chopped
2 Stalks Celery Chopped
2 Tbsp Olive Oil
8 Garlic Cloves Minced
1 tsp Ground Cumin
1 tsp Ground Coriander
8oz Tomato Sauce
1 tsp Dried Rubbed Sage
½ tsp Ground Cinnamon
Sea Salt and Black Pepper to taste
1/3 C Chopped Sun-dried tomatoes
6 Tbsp Capers with liquid


To Make the Tempeh -

- Mix 1 Beef Bouillon cube with 1 C of water.

- Crumble the Tempeh into a large pan, and add all the spices. Cover with the water/Bouillon mixture and the red wine. There should be enough liquid to cover the tempeh but it depends on the size of your pan. If it doesn’t quite cover add up to ½ C more.

- Bring the mixture to a boil, then reduce the heat and simmer on medium or medium-low until all or most of the liquid has been absorbed by the tempeh. Roughly 20-25 minutes. Remove from the pan and set aside.

To Make the Filling - 

- Heat the olive oil in the same pan you used to make your tempeh mixture. Add the onion, celery and garlic and saute for roughly five minutes. Add the cumin, coriander, cinnamon, black pepper and salt and cook for another two minutes.

- Add the blanched chopped tomatoes, the tomato paste, the chopped eggplant and the cubed squash. Stir to thoroughly combine, then cover. Over medium-high heat let the mixture come to a roaring simmer, let simmer for 5 minutes then stir, and reduce heat to medium-low. Simmer the mixture for another 25 minutes. Make sure to check frequently to make sure the liquid doesn’t evaporate and the filling doesn’t burn. If it is looking too dry add a quarter cup of water.

- After 25 minutes add the tempeh mixture into the pan, along with the sage, capers, and sun-dried tomatoes. Stir well to combine and simmer an additional 10 minutes until squash is nice and tender.

- Remove from heat, and spoon the mixture into a large greased casserole dish.

- To Make the Crumble Topping.

- While your mixture is simmering combine all dry ingredients in a medium sized bowl.

- Melt the Earth Balance in the microwave, and add it into the dry mixture along with the cooked amaranth. Mix until nice and crumbly.

To Assemble and Bake.

- Preheat the oven to 400'F

- Spread the crumble mixture evenly over top of the filling in the greased casserole dish. Then place the casserole dish uncovered into the oven and bake for 25-30 minutes until filling is bubbly and topping is lightly browned.

- Remove from oven and let rest for 10 minutes. Then enjoy with a nice salad and a glass of sangria!


*** Note - If you need this to be soy-free you can replace the tempeh with Seitan. However if you need this to be soy and gluten-free you can try replacing the tempeh with a bean of your choosing. Either chickpeas or something hearty would be my suggestion.***

Thursday, December 20, 2012

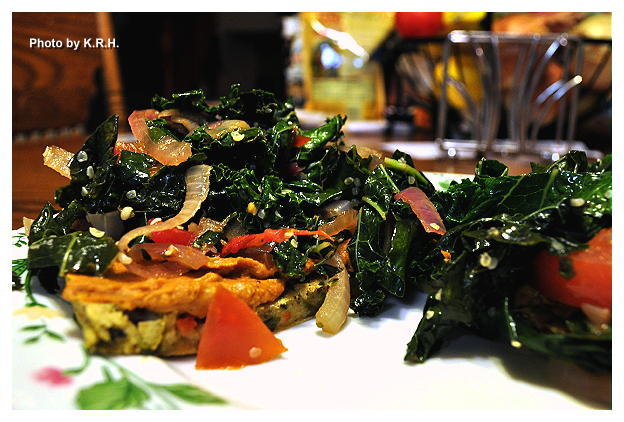
Simple Socca with Fava Bean Spread and Sauteed Kale...


I know I haven’t been keeping up with this as well as I should have been, but with the holiday season I’ve been a little pressed for time. School has been brutal the past couple of weeks as I struggled to finish all of my assignments in time to take my final - which I did today, and aced! - And any time I’ve had not devoted to school has been divided between work, holiday planning/Christmas shopping and watching documentaries on Netflix until my one month free-trial runs out on the 24th. Suffice to say I haven’t been doing a lot of cooking, or rather I have been, but I haven’t really been ‘creating. ‘ Mostly I’ve been relying on my good and trusty cook books to see me through, particularly those cook books devoted to healthful recipes that can be made in under 30 minutes. As unlike everyone else - or so it seems - I’m actually trying to keep with my routine this holiday season rather then use the holiday as an excuse to excessively binge on high fat junk foods. So I’ve been eating a lot of salad - which I’ve been craving lately anyway - and a lot of soup because the days are growing colder, a lot of things you probably wouldn’t find to enticing except for maybe the Socca.


Socca you see is my new favorite thing. - That and firtatta but more on that another time! Now Socca is a specialty in Southeastern French cuisine particularly in and around Nice. However it apparently originates in Genoa, Italy, and over time spread to Nice where it became popular throughout the region of the Ligurian Sea.  There are apparently similar dishes in countries such as Algeria, Argentina and Uruguay but I digress. The Socca I’m talking about is of the French variety. For those of you still unsure of what a Socca is, it’s a crispy thin pancake cooked in a cast iron skillet and eaten as a finger food while piping hot. It’s seasoned with fresh herbs, and generous amounts of black pepper and is typically eaten on it’s own. However I’m quite fond of turning my socca into a kind of pizza topped with a bean dip instead of a marinara sauce, and a lightly dressed salad. Making your meal an all in one sure makes cleanup a breeze! Over the past few weeks I’ve made quite a few socca’s, I’m typically making it twice a week now, and so I’ve tried a lot of different things, but this was one of my favorite combinations, and my husbands too. It’s sort of a cross between Provincial and Italian with a little red hot jalapeno thrown in for good measure, but what it really is, is delicious so I hope you try it out.


Simple Socca with Fava Bean Spread and Sauteed Kale

Socca 

1 ½ C Chickpea Flour
½ tsp Sea Salt
1/4 - ½ tsp Freshly Ground Black Pepper
3-4 Nice Sprigs Fresh Rosemary minced
1 tsp Dried Basil
1 tsp Dried Oregano
½ tsp Garlic Powder
1 ½ C Water
2 Tbsp Olive Oil
1/4 C Minced Kalamata Olives
1/4 C Minced Sun-dried Tomatoes
1/4 C Minced Green Onion
Minced Pickled Jalapeno to taste - try between 2-4 Tbsp.

Fava Bean and Sun-dried Tomato Spread

1 15oz Can Fava Beans drained and rinsed
2 Garlic Cloves - or to taste
6 Oil-Packed Sun-Dried Tomatoes
1 tsp Dried Basil
Sea Salt and Black Pepper to Taste
2 Tbsp Olive Oil - optional
1 Tbsp Lemon Juice
2 Tbsp Water to thin as needed

Topping 

1-2 Tbsp Olive Oil
1 Large Red Onion sliced thin
1 Large Bunch Kale cut into bite sized pieces.
10 Cherry Tomatoes halved
2 Tbsp Hemp or Sesame Seeds
Sea Salt and Pepper to taste
Ume Vinegar to taste


- Preheat oven to 425'F

- To make Socca whisk flour, salt, pepper, rosemary, basil, oregano, garlic powder, water and olive oil together in a bowl and set aside for 30 minutes.  - While Socca is resting you can make the Fava Spread and the topping.

- After thirty minutes whisk in all remaining ingridients.

- Heat a cast iron skillet over high heat on top of the stove. Spray with a little non-stick cooking spray. Once hot enough that water sizzles pour the Socca batter into the pan. Let the socca cook on high in the pan for 1 minute until the edges turn golden brown.

- Turn off the burner, and remove the cast iron pan, placing it into the heated oven. Bake for 15-20 minutes until light golden brown.

- To make the Fava Bean Spread combine all ingredients in a food processor and process until completely smooth and spreadable. Adding more water or oil to thin as needed. Taste for seasonings and adjust as necessary.

- To make topping. Heat olive oil in a pan over medium heat. Add onion and saute until translucent about 5-7 minutes.

- Add Kale and saute for another 5-8 minutes until kale is wilted and tender. Add in cherry tomatoes and saute for 2-3 minutes. Season with salt, pepper, ume vinegar and hemp seeds. When the mixture has reached it’s desired tenderness and flavor remove from heat.

- To assemble, cut the socca into four equal pieces and divide amongst 2-4 people. Spread each wedge of socca with a generous amount of the fava spread and top with a generous helping of the sauteed kale mixture.

- Enjoy! Seriously i'm so in love with socca you may see more recipes for it and variations of it from me in the future!


PS: Socca’s seem to be becoming a little more popular in North America. Over the past few weeks I’ve been making them I’ve seen them mentioned a few times in magazines, blog posts, and even in newly released cook books! Also another great fact about Socca is that they’re naturally gluten-free, and vegan! 

Wednesday, June 6, 2012

Garlic Scape and Collard Green Pizza...


There are few things better then a truly good pizza, and I’ve made plenty of tasty pizza’s in my life, but this one beats them all by a thousand miles. The flavors in this pizza are out of this world amazing! It’s truly amazing what you can create when you’re making every effort to use every last bit of fresh produce in your fridge. Collard greens, tomatoes, and non-dairy cheese were all staring at me yesterday afternoon threatening to spoil unless I used them before vacation. A quarter of a jar of garlic and green onion olive oil had been sitting on my counter for the better part of a month. A jar of sun-dried tomatoes sat nearly empty in my fridge, and I had just purchased 4 bunches of garlic scapes from my local grocery.


I was not suppose to buy groceries this week, but when I saw that scapes were back in season I knew I’d have to have them before I left, because by the time I get back they’ll surely be gone. It was a total impulse by, and my stomach not my brain was responsible. When I got them home, I thought “What am I going to do?” I have hardly anything left in my fridge. I stared down the contents of my fridge for a good long while and then the above mentioned ingredients started calling to me. They started saying “pizza, pizza, piiiizzzzaaaa!” Until I just had to listen.


Though this was my own idea, I was skeptical at first. Collard greens on a pizza? I’d never hear of such a thing, and collards - love them though I do - are just one of those things that one immediately identifies with ‘health food’ not pizza. Still, I decided it was better to try and fail and have to through the collards out because dinner was terrible, vs throwing the collards out because they went bad. I can not tell you how amazed I was by the end result. This is literally the best pizza I have ever made, perhaps even the best pizza I have ever eaten and I do not say that lightly. We’re talking mind-blowing, mouth-watering, tastebud-tickling good, so good that you’ll crave it! Even my husband, a pizza eating fanatic said it was one of the best pizza’s he’d ever eaten, and last night he simply couldn’t get enough of it!


Instead of sauce I decided to coat the crust in home-made garlic and green onion infused olive oil. I wanted a lighter, cleaner tasting pizza, and wasn’t in the mood for a heavy acidic tomato based sauce. Of course if you’re anti-oil this may not be the pizza for you, but you can control how much oil you brush onto the crust. You don’t have to go overboard and if you’re only eating a slice or two it’s really not all that bad. You can of course try it with a tomato based sauce though I can’t grantee that it’ll taste at all the same. The infused oil is highly recommend. Also though I list the non-dairy cheese as optional I highly recommend that too. I used Daiya’s Garlic Jalapeno Havarti which was amazing and really kicked the pizza up to a new level, but you could use vegan mozzarella if that’s all you can find. Remember though to use just a little bit, you want it more as a garnish than anything else, the pizza shouldn’t be dripping with it. Just sprinkle on enough that you get a few good bites of it per slice. On it’s own the pizza is hearty and filling, but to make it even more of a meal you could serve it with a nice side salad and perhaps even a glass of red wine if wine is your thing. However you serve it, just be sure to enjoy it! And trust me when I say this comes together a lot quicker then the length of the recipe may imply. Also the topping can be made ahead and saved till needed, which makes it that much easier!


Garlic Scape and Collard Green Pizza 

Topping 

2 Leeks white and light green parts only sliced thin
2 bunches collard greens chopped into bite size pieces
3 Roma tomatoes sliced thin
1-2 Bunches garlic scapes sliced into 1 inch lengths
Garlic and Green Onion infused Olive Oil for brushing ***
1/8 C Shredded non-dariy cheese (optional)
10-15 sun-dried tomatoes sliced into strips
Rosemary sea salt ***
Fresh Black pepper to taste (Optional)
1 ½ Tbsp Balsamic Vinegar to drizzle over top

Dough

2 1/4 C All Purpose Flour
1 ½ Whole Wheat Flour
1 pack active dry yeast
1 C warm water
3/4 tsp salt
2 Tbsp Olive Oil

Preheat Oven to 400'F

- Water Saute leeks, collard greens, and garlic scapes in large pan over medium-high heat. Saute about 10 minutes until veggies are tender and all the water has been absorbed. You want the mixture to be a bit dry. Transfer to a bowl when finished and set aside, or if making ahead refrigerate until ready to use.

- To make the dough, combine all purpose and whole wheat flour, and salt in a food processor and pulse to incorporate.

- Combine Active Dry Yeast with Warm water and set aside for five minutes

- Drizzle the olive oil into the food processor and add the yeast/water mixture. Process until mixture forms a cohesive dough. If the dough is too moist or sticky add in more flour until you’ve reached your desired consistency.

- Remove the dough from the food processor, shape into a ball and set aside to rest for 10 minutes.

- After the dough has sat, you can either divide it to make two smaller thin crust pizzas or leave it as is to make one large regular crust pizza.

- Flour a clean work surface and flour a rolling pin. Gently roll dough out into a large circle. Start with the edge closest to you and roll the dough outwards in a circular motion. Flip the dough over and continue rolling outwards in a circle. Flip the dough one more time and continue to roll outwards until the circle is large enough to fit your pizza pan.

- Lightly grease your pizza pan with some non-stick cooking spray. Then gently transfer your pizza dough to the pan. There should be excess dough flowing over the edge of the pan. Roll it up to form a crust around the edge of the pan. Trim some off as needed if the excess is too much.

- Poke your pizza dough with the tings of a fork a few times. Then brush the dough with a generous amount of garlic and green onion olive oil (or regular olive oil) make sure to brush both the base of the dough as well as the crust.

- Place pan in preheated oven and cook for 10-15 minutes until dough is firm. Remove from the oven.

- Brush with a little more garlic and green onion oil, then layer sliced Roma tomatoes around the crust. Evenly distribute the collard green, leek and garlic scape mixture over top of the tomatoes. There will be a lot but that’s okay, pile it all one and spread it as evenly as possible.

- Next scatter the sun-dried tomato strips over top of the pizza, and the shredded non-dairy cheese if using.

- Finish the pizza by drizzling the balsamic vinegar over top, sprinkling with Rosemary sea salt and a few twists of a black pepper mill.

- Return the pizza to the oven and bake for 15 or so minutes until the cheese has melted, and the edges of the crust begin to golden.

- Slice and serve hot with a bowl of garlic and green onion olive oil dotted with balsamic vinegar for dipping your pizza crusts! Enjoy!


*** Note - The Garlic and Green Onion Olive Oil is super easy to make and tastes amazing on this pizza. If you prefer you can use regular olive oil, but this oil really does kick the pizza up a notch and infuses it with such great flavor. I highly recommend it, especially since it’s so easy. All you do is pour 2 cups of olive oil in a mason jar. Add 1 cup of sliced green onions (just the green parts) ½ cup of finely minced parsley or basil (or a mixture of both) a pinch of sea salt, and 10-12 garlic cloves finely minced. Screw a lid on tight, give it a good shake then leave it on your kitchen counter for 24 hours to let the flavors develop. So delicious! ***


*** Note - Rosemary Sea Salt is easy to make. All you need is fresh Rosemary springs and sea salt. Remove the Rosemary leaves from the stems and grind in a food processor. Then add to a shaker with an equal (or slightly less) amount of sea salt. Use on everything because it tastes delicious! ***


*** Note - This pizza is only soy-free if you use a soy-free non-dairy cheese.*** 

Friday, April 20, 2012

The Beauty of Ramps - and Terry Walters ‘Cannellini Beans with Sun-dried Tomatoes and Ramps’


Yesterday I ate ramps for the first time, and my tastebuds totally exploded! Now if you’re unfamiliar with ramps let me enlighten you, because they are a whole world of awesome.


Ramps belong to the onion family, and go by the alternate names of ramson, spring onion, wild leek, wood leek, and wild garlic. They’re native to North America where they grow from South Carolina all the way up to Quebec. They are particularly popular in the cuisines of the rural upland South and Quebec, and have been gaining in popularity amongst upscale restaurants throughout North America. Throughout Appalachia they are considered particularly special, and many festivals are often held each spring either in their honor or with ramps as a culinary focus.


Ramps are characterized by smooth, flat, broad green leaves and stems that are somewhere between red and purple. Their stock/bulb is very similar to that of a scallion. Taste wise their flavor falls somewhere between that of garlic and onions with their leaves having a milder flavor then their bulbs.

Now that you know what they are, let me tell you about how I happened to come across them.


Until I purchased the cook book “Clean Start” I didn't even know what a Ramp was, but once I knew it didn’t matter because I couldn’t find them for sale anywhere. As a lover of all things garlic and onion the one recipe that calls for ramps in “Clean Start” had caught my eye and piqued my interest, but as badly as I wanted to try it, I could not. Ramps you see have a very short season, and are usually available for only a short time between end of March and Early May. Not being able to find them, I forgot about them entirely, until ast weekend.


I was doing my grocery shopping, and I was in the mood for Garlic Scapes. Another delicious spring vegetable only available for a short time in spring. I asked my friend SC who works in the produce section of my local grocery if he had any scapes in or if it was still too early for them. He said that they’d just gotten scapes in the day before. Excited I followed behind him as he directed me to a produce shelf. However once we got there I saw immediately that they were not scapes but ramps. “Aren’t they the same thing?” he asked, and I informed them that they were not. I was all set to leave disheartened by not having found any scapes when I suddenly remembered that recipe from “Clean Start” and how rare it is to find ramps. Finding them right then, on that particular day seemed like a miracle and so I bought two bunches to bring home.


Yesterday was my first chance to try them out, and of course I decided to use Terry Walters recipe for Cannellini Beans with Sun-dried tomatoes and ramps. Generally speaking I’m not a fan of Cannellini beans, not canned at least but that’s all I had, and I figured why not at least try it? I am so, so glad I did. I made this dish for lunch and it was the most amazing, mind-blowing thing. The flavor of the ramps was incredible, kind of like a strong chive mixed with a bit of garlic, and it paired beautifully with the sun-dried tomatoes and the creaminess of the beans.


Honestly, I couldn’t stop Mm-Mmming the entire way through the meal and I don’t typically do that. I fell instantly in love with the dish and the ramps and have made the decision that buy oodles and oodles of ramps when I go grocery shopping today. I can not wait to find out what other delicious configurations I can come up with for these delicate wild onions.


Please do yourself a favor, next time you’re out look for ramps, and if you find them buy them! You won’t be sorry, really!

Wednesday, April 11, 2012

Mediterranean Scramble...


My husband and I are suckers for a good tofu scramble. I think in the beginning we were both a little bit skeptical but we quickly came to the realization that tofu scrambles are the way to go. They look like scrambled eggs and taste a million times better, plus they’re so versatile. You can literally add anything in that you like.


I generally only make scrambles for special occasions, - I don’t know why since they’re so darn good! - and typically I only make one of two versions that have become my go too scramble recipes. One is just a basic garden scramble that I came up with. The other is a slightly sweeter tad spicier scramble that includes vegan chorizo, sort of meant to be like a Mexican Eggs and Chorizo sort of thing. Both are wonderful - I’ll have to post the recipes some time. - However when my husband requested a scramble for Easter breakfast, rather then the quiche I’d originally planned I decided to stick with the Mediterranean theme we’d set for dinner.


When I started out I just had a vague idea of what I wanted. Sausage and peppers to start, seasoned with Greek spices, but beyond that I didn’t really have a clue as to what I was going to do. So I picked through my cabinets, sorted through my fridge and pilfered my brain of every tiny bit of it’s culinary knowledge and Greek inspiration. What I ended up with was so utterly mind blowing that neither my husband nor I could resist the urge to utterly gorge ourselves silly. Everything about this scramble is perfect! The flavors are subtle and play off each other beautifully, the aroma is heavenly, and the entire dish transports you to a new level of culinary bliss. It must also be said that long ago my husband happened upon the realization that if you add a bit of ketchup to a tofu scramble it makes it taste all the more like eggs. Both of us know people who actually eat ketchup on real chicken’s eggs and both of us have always found this utterly sickening. However, ketchup on a scramble makes total sense and over time I’ve picked up this habit as well. Although, this is one scramble that definitely doesn’t need it. I gobbled my plate up as was, without making any alterations. If you like Mediterranean flair, and both Greek and Italian spices I strongly suggest you give this scramble a try, you won’t be sorry!


Mediterranean Scramble

2 Tbsp Olive Oil
1 lb Firm Tofu (Pressed and Drained)
1 lb Vegan Italian Style Sausage (I used Field Roast)
1 C chopped Mixed Peppers (I Used Red and Orange)
1 Small Yellow Onion Diced
10 Cloves Garlic Minced
10 Sun-dried tomatoes chopped
2 Large handfuls Baby Spinach
10-15 Kalamata Olives Halved
½-3/4 tsp ground Fenugreek ***
½ tsp ground Fennel ***
1 tsp ground Cumin
1 ½ tsp ground Thyme
1-2 tsp Dried Oregano
1/4-1/2 tsp Dried Crushed Rosemary
1/8 Ground Turmeric
Dash of Dried Dill
Dash of Smoked Paprika
Sea Salt and Black Pepper to taste
1/8-1/4 C Nutritional Yeast
Water as needed

- Put tofu in a tofu press - or wrap in a towel and place between two heavy objects - and press for about 2 hours.

- Heat 1 tbsp of oil in a pan over medium-high heat. Slice Italian sausages into thin rounds and fry in the oil until nicely browned on both sides. Roughly 5-10 minutes. You can add a bit more oil or water if needed. Once browned, remove to a plate and set aside.

- Heat remaining tbsp of oil in the same pan. - No need to clean it out. - Add garlic, onion, and peppers and saute over medium heat for 5-8 minutes until flagrant, and onions are translucent and peppers are soft.

- Drain tofu and crumble into the pan. Alternately if you want large pieces you can cube it using a knife rather then just crumble it.

- Add in all your spices. The fenugreek, fennel, cumin, thyme, oregano, rosemary, turmeric, dill, smoked paprika, sea salt, pepper, and nutritional yeast. Adjust for personal taste preferences and color and stir until everything is well combines and tofu has taken on a yellow color. If the pan seems dry you can add in a bit more oil or water to de-glaze and moisten it, as needed.

- Add in the cooked Italian Sausage, Spinach and sun-dried tomatoes. Stir to combine and saute over medium for 2-4 minutes until tofu and sausage are well heated through and spinach has wilted. Add in the kalamata olives, saute another minute then taste for flavor, adjust as needed and serve.


*** Note - Both Fenugreek and Fennel may only be sold in seed form. If this Is the case no worries, just grind the seeds yourself in a spice or coffee grinder. It works perfectly. I actually have a coffee grinder for just this purpose. Also fenugreek may not be in everyone’s average grocery store depending on where you live. However grocery retailers such as Whole Foods, as well as specialty and spice shops, typically carry it. You could also check out your nearest Mediterranean, Indian, Turkish, Middle Eastern, or even Chinese Grocery as Fenugreek is used in all of these cuisines. Trust me when I say it’s worth your looking for!***


*** Note - Can be made Gluten-Free by using a GF Vegan Sausage*** 

Thursday, February 16, 2012

Valentine’s Day Rotini with Roasted Beets, Spinach, Red Onion and Sun-Dried Tomatoes...


As promised my Valentine’s Day Rotini recipe. As I mentioned yesterday this came about after a lot of stress, searching and frustration. I wanted to make a dish that was both simple yet elegant. I wanted to make a dish that embodied the spirit of love and romance associated with Valentine’s Day, and I wanted to utilize the beets I had sitting in my crisper drawer. Unfortunately despite all my frantic searching I couldn’t find any creative or inspiring beet recipes, or V-day recipes in general - well not ones that fit my criteria anyway.


Everything was strawberry dessert this, chocolate raspberry dessert that. Pages upon pages of recipes for roasted beets and borscht served as a side dish or afterthought rather then a show stopping main, assaulted me as I scanned the internet. Not to mention virtually every "Valentine’s Day" recipe I came across seemed utterly lacking in romance. I’m sorry but Seitan Parmesan doesn’t scream love to me, it just doesn’t. Spaghetti and marinara isn’t romantic it’s economical! Not to bash these dishes, which are delicious if it’s what you’re in the mood for, but come on! Valentine’s only comes once a year, and even though it’s a stilly, bull-shit, Hallmark holiday, that doesn’t mean you and your loved ones can’t make it your own and make it something special. That’s what I do. In honesty there isn’t a single holiday - Thanksgiving, Christmas, Easter, St. Patrick’s Day, Victoria Day, Canada Day, Hanukkah, Halloween, Labor Day etc.... - that hold any real deep sentimental or significant meaning for me. Not culturally, not religiously. I love holidays, but not because society tells me I should, and not because someone somewhere hundreds or thousands of years ago supposedly did something significant. I love them because they give you an excuse to really go all out and do something extra special. Sometimes I do this anyway, but it’s always nice to have a ‘special occasion’ to back it up with. Holidays whether big or small are a great time to spend with the ones you love, and to shower them with a little extra love. You don’t have to buy the hype, but you don’t have to be a miserable old cynic either. So it’s that desire that was driving me to want to do something lovely for my beloved.


Though pasta doesn’t normally scream romance to me, I figured since I finally settled on an Italian appetizer I may as well make an Italian inspired main dish to go along with it. After all it would be pretty silly if I made caponata to start and say a red coconut curry to follow, or a red lentil dahl. It made the most sense to stay within one culinary tradition, so pasta it was. The beauty of pasta - besides the economical factor - is that it really is versatile. It’s like a good pair of jeans you can dress them down with a t-shirt or dress them up with a blouse. With pasta you can ‘dress it down’ with marinara or olive oil, or make it fancy with just a little thought and effort. With this dish I tried to stay within the color tradition of Valentine’s day by trying to use pink, purple and red foods but I threw a little spinach in, both for a colorful pop and a bit of added nutrition. This dish worked out so well, and it far exceeded my expectations. My guests were just as impressed as myself, and everyone went back for seconds which I consider to be the highest compliment.

However the thing I love most about this dish, - which was entirely unintentional - the thing that really tickles me about it and puts a little smile on my face is that the beets turned the pasta a lovely shade of pink! How perfect is that for Valentine’s Day? Perhaps Aphrodite the dear goddess of love was smiling down on my kitchen on Tuesday.


Valentine’s Day Rotini with Roasted Beets, Spinach, Red Onion and Sun-Dried Tomatoes

Roast Beets

3 Beets peeled and cubed
2 Tbsp Olive Oil
2 Tbsp Balsamic Vinegar
½ tsp Crushed Rosemary
½ tsp Dried Dill
1 tsp Dried Basil
Sea Salt and Black Pepper to Taste
1 Packet Stevia (Optional)

Pasta

2 lb Whole Wheat Rotini (or Gluten-Free)
2 Bunches Spinach, trimmed, washed and patted dry
1 Large Red Onion sliced in half moons
10-12 Garlic Cloves minced
10 Oil-Packed Sun-dried Tomatoes chopped or sliced
1/4 C Olive Oil
1/4 C Vegetable Broth
2 Tbsp Tomato Paste
3-4 Tbsp Balsamic Vinegar
1-2 Packets Stevia (Optional)
Sea Salt and Black Pepper to taste
Garlic Powder to taste (Optional if you want an extra garlicky kick)

- Preheat oven to 400'F (200'C) To make the beets peel and cube them into roughly ½ inch cubes. Place in a baking dish. Combine oil, vinegar, stevia and spices in a bowl and stir until well combined. Pour over beets and toss to coat. Cover with aluminum foil and place in the oven and roast for 45-60 minutes until beets are nice and tender and most of the liquid has absorbed.

- Cook pasta according to package directions. Drain when finished and then return to pot and cover until ready to use.

- Heat a tsp of olive oil in a large pan over medium heat and add the sliced onion and minced garlic. Saute for 5-7 minutes until fragrant and onion becomes translucent. Add sun-dried tomatoes and stir to combine. Saute another 3-4 minutes.

- Add the spinach to the pan, cover and let steam a couple of minutes. Remove the lid then gently stir to combine the spinach. Careful so that nothing topples over the rim of the pan continue to stir the spinach into the onion-garlic-tomato mixture until the spinach has wilted and cooked down. Be careful not to overcook it though. You don’t want spinach mush! Add the roasted beets which should be down at this point, with any pan juices and stir until just incorporated.

- Next, in a bowl combine the 1/4 C Olive oil with the 1/4 Vegetable broth, tomato paste, vinegar, salt and pepper and garlic powder and stevia if using. Whisk together until well blended.

- Carefully add the sauteed vegetables into the pot with your reserved pasta, and pour in half of the sauce mixture. Stir until thoroughly combined. If the pasta looks a little dry add the remainder of the sauce and stir until well combined. Taste and adjust seasoning as needed.


*** Note - You can make the beets hours in advance if you like then just cover and refrigerate them until ready to use. This makes throwing dinner together later a lot quicker. Also as far as the sauce goes I only ended up using maybe ½-3/4 of it because I didn’t want the pasta to be overly saucy. However everyone’s tastes are different so feel free to use as much or as little as you like. Also it must be said that this dish was developed to feed about 5 people. If you don’t need to feed that many people feel free to decrease the ingredients by half or however best suits your family.***

*** Note - Gluten-Free if using GF Rotini***

Monday, February 13, 2012

Wine Roasted Portobello Mushrooms with Mesquite Wild Rice and Kale Stuffing...


Never judge a book by it’s cover, or a meal by it’s subsequent picture, looks can very often be deceiving. As is the case with my latest recipe creation. The picture is a bit horrendous I know, apologies! But it wasn’t the most photogenic dish to begin with, and my camera was very uncooperative yesterday. Though I took over a dozen pictures all but these two came out utterly blurry and totally useless. I’ve never before had such a bad shoot, but the shitty little cam I use most often for food photography really has been through the ringer. It’s been dropped countless times, bashed, smashed, fallen into sand and had beer spilled inside the battery slot. Some of the buttons have ceased to function and I’m beginning to think the focus is on the fritz now too. I think from now on I just might have to use my good high-tech cam for food photography, but since it’s so bulky I usually forget to bring it to the kitchen with me. I’ll have to start making a greater effort to remember it, I suppose.

Anyway, now that I’ve explained myself lets move onto the food shall we? Yesterday I was hit by a bundle of food cravings all at once. Generally when I get a craving for something it’s one dish in particular or one food in particular, not so yesterday. All of a sudden I was craving mushrooms, red wine sauce, Italian herbs, kale, sun-dried tomatoes and the smokey goodness of mesquite. I was practically salivating at the thought of sauteed kale, and mushrooms roasted in red wine, but how I wondered could I combine all these very specific ingredients into one tasty dish?

Stuffed mushrooms was the answer that came sounding back to me and from there all I had to do was figure out the cooking methods and the proportions. I had no idea whether or not this crazy culinary adventure would yield an edible result but I was determined to embark on it nonetheless. What finally emerged from my oven about an hour later stunned both my husband and I. The flavor of these mushrooms exceeded even my wildest expectations. A truly phenomenal blend of flavors from earthy mushrooms and robust wine, to tart vinegar and capers to sweet sun-dried toms and stevia. Enhanced with Italian herbs and smokey mesquite rice. A beautiful partnership, and absolutely mouth-wateringly delicious. We could barely stop ourselves eating long enough to actually look up at one another and engage in conversation. We cleaned our plates in a frenzy, then sat back satiated and smiling.

So disregard the picture that leaves a lot to be desired, and take my word for it when I tell you these mushrooms are to die for! Really, it’s one of the best things I’ve made - scratch that - eaten in a long time! So what are you waiting for? Get thee to thee kitchen, and enjoy!


Wine Roasted Portobello Mushrooms with Mesquite Wild Rice and Kale Stuffing

Rice -

1 1/4 C Wild Rice
2 1/4 C Vegetable Broth
1 1/4 - 2 tsp Sweet Mesquite Seasoning

Mushrooms -

4 Large Portobello Mushroom Caps
2/3 C Red Wine
1-2 Tbsp Brown Sugar
½ tsp Crushed Rosemary,
½ tsp Garlic Powder
1 tsp Dried Basil

Kale Stuffing -

2 tsp Olive Oil
10-12 Garlic Cloves finely minced
The mushroom stems diced fine
8-10 Oil-packed sun-dried tomatoes diced fine
2-3 Tbsp Capers with a bit of juice
1 Large Bunch Dinosaur Kale chopped into bite sized pieces
1-2 Tbsp Balsamic Vinegar
1 Packet Stevia (optional)
Sea Salt and Black Pepper to taste

- First get your rice going. Wild Rice takes a bit longer then Brown so you want to start it first. If you have a rice cooker just combine all the ingredients together in it and turn it on. Otherwise combine all ingredients in a pot and bring to a boil then reduce to simmer for about 45-60 minutes until rice is tender and all liquid is absorbed. If making the rice in a pot be sure to check on it now and again so it doesn’t burn and stick to the bottom.

- Set your oven to 350'F (175'C) Remove stems from your mushrooms and clean. Combine Wine, sugar and herbs in a bowl or measuring cup. Place mushrooms in a baking dish, then pour the wine mixture over top. Make sure some of the wine stays inside the caps while the rest covers the bottom of the dish.

- Place mushrooms in the oven and roast for 20-30 minutes until tender, and slightly smaller.

- Take the mushrooms out of the oven and using a slotted spoon remove the mushrooms from the dish and place into a colander over the sink to drain. Pour wine mixture into a bowl and reserve.

- Meanwhile, as your mushrooms are roasting and your rice is cooking put the olive oil into a large pan. Heat over medium then add the garlic. Saute for 2-3 minutes until fragrant and slightly golden. Add the mushroom and cook another 4-5 minutes until mushrooms begin to brown and become tender. Add sun-dried tomatoes and capers and cook another 2 minutes. Add kale, and the vinegar. If the mix is looking a little too dry you can also add in another tsp of olive oil if you like. Stir to combine then cover and let cook 2-3 minutes. Stir again and cook another 2-4 minutes until kale has wilted. Season to taste with salt and pepper, and add stevia if you like to balance out the tartness of the capers and vinegar.

- Your rice should be done by now. Remove it from the pot and pour it into the pan with the kale mixture. Stir until well combined.

- Place mushroom caps back into the baking dish, and carefully fill them with stuffing. Depending on the size of your caps you may have a little extra filling. That’s okay, it tastes amazing on it’s own so you can save it and eat it the next day or you can serve it alongside the mushrooms (as we did). Once the caps are stuffed as full as they can be, return the baking dish to the oven and bake about 5-10 minutes, just until everything is heated through.

- Plate the mushrooms and if you like drizzle a little bit of the reserved sauce over them. These mushrooms are so delicious and flavorful that you don’t need the extra sauce if you don’t want it, but a little drizzle is nice.

*** Note - If you don’t have wild rice you can use black or brown rice instead, though I really like the texture of wild rice and I think it’s crunchy/chewy consistency and nutty flavor work really well here. If you don’t have dinosaur kale also known as Lacinato kale you can use regular.***

Wednesday, December 28, 2011

Mediterranean Flair Humus...


Humus. Who doesn’t like Humus? It makes a great appetizer especially at pot lucks or parties, it’s a perfect late afternoon snack when you need that little something but want to keep it healthy, it’s a great spread for sandwiches, and I’ve even been known to thin it a little and mix it into my salad for a healthier kind of dressing. It’s great on the go too, but the absolute best thing about Humus is that it’s quick, easy, nutritious and vegan! That’s right, humus is and has always been vegan. So next time an anti-vegan tells you he or she doesn’t like that weird vegan stuff you always eat, ask them if they like humus.

Interestingly many cuisines try and claim humus as a regional dish that’s been a staple since ancient times. However while chickpeas, lemon, sesame and garlic have all been consumed in the Middle East for Millennia there is no specific evidence to point us to the actual birthplace of what we consider to be a ‘traditional’ humus, also known by the name hummus bi tahini. Pureed chickpeas eaten cold with tahini does not seem to appear before the Abbasid period in Egypt and Levant. (751-1258) While the earliest known recipe for a dish similar to hummus bi tahini dates back to the 13th century Egypt, it is described as a cold chickpea puree with vinegar, pickled lemons, oil and herbs but no tahini or garlic.

Though regardless of where humus may or may not have originated, it is and has been a beloved staple throughout the Middle East and parts of the Mediterranean for a very long time, and it’s popularity in the west is growing.


Maybe it’s because I’m part Greek, and grew up with humus, but to me it seems so strange to think that amongst average white Americans humus wasn’t part of the culinary fabric until the end of the twentieth century. That makes it a relatively new idea for a lot of people and the enthusiasm shows. Personally I love watching culinary trends, I find them so interesting and often humorous, particularly when something I’ve eaten for a long time suddenly because ‘popular’ in the culinary world. Humus is definitely one of those things, in fact I can’t think of a single cook book that I own that doesn’t include at least one - and sometimes multiple - recipes for humus. Humus seems to be at every party these days, and it appears to be one of those universally loved non-threatening foods that can be equally enjoyed by both the very young and the very old alike.

I find it so interesting that according to market research conducted in 2010, humus consumption in the United States increased by 35% in a period of 21 months. That’s a lot of humus! And as much as I love the stuff, with that much humus floating around it can get a bit tired. Which is why I like to jazz up the dish by adding in different seasonings and flavors. Sure it’s not ‘traditional’ to included roasted red peppers or olives in humus but it’s fun, not to mention delicious, and sometimes even the best loved things - be they food, or your own
personal style - can benefit from a make-over every once and a while.

This afternoon I found myself hungry and craving humus, so I decided to take some traditional components of Mediterranean cuisine and mix them in with my chickpea puree for a heightened flavor profile. Now the color of the end result may not win any awards for beauty, but flavor wise this dish kills it! Seriously, if you like olives and sun-dried tomatoes as much as I do you need to give this dip a try pronto!

Never be afraid to try new things even if they seem out of the ordinary.


Mediterranean Flair Humus

1 15oz Can Chickpeas drained and rinsed
1 Tbsp Olive Oil
2 Tbsp Lemon Juice
1-2 Tbsp Tahini
1/3 C Pitted Kalamata Olives
1/3 C Sun-dried Tomatoes (not oil-packed)
1-2 tsp dried Basil (or fresh if you have it, I didn’t)
2-3 Garlic Cloves
1 tsp Paprika
½ tsp smoked paprika
Sea Salt to taste

- Reconstitute sun-dried tomatoes in a bowl of warm water for about five or so minutes. Reserve a little soaking liquid before draining.

- Combine chickpeas, olive oil, tahini, lemon juice, garlic, paprika’s, and basil in a food processor. Process until smooth. You may need to scrape down the sides of the bowl with a spatula. If your humus is too thick and you need help getting things moving add in a little of the liquid from your reconstituted sun-dried tomatoes. It adds a great flavor!

- Give sun-dried tomatoes a few good squeezes over the sink to remove excess liquid, then add them to the food processor along with the kalamata olives and a dash or two of salt. Puree until mostly incorporated, but not entirely smooth. It’s nice to leave the olives and sun-dried tomatoes a little chunky for texture. Taste for flavor and adjust seasoning as needed.

- Serve on a platter alongside pita, or other flatbread, carrot sticks, celery and other raw vegetables. Enjoy!


PS: And tomorrow I’ll be back hopefully with my recipe for tonight’s dinner. You see it’s my husband’s birthday week, and one of the dishes he requested I prepare for him is a vegan ‘beef’ stroganoff. A childhood favorite of his that he hasn’t eaten since going vegan. I told him I’ll try my hand at it, using my mother-in-law’s recipe, as well as my own research as a guide, and we’ll see what I come up with. Hopefully it’ll be out of this world fantastic, as I wouldn’t want to disappoint my birthday boy.

Tuesday, December 13, 2011

Fusilli In Cream Sauce With Caramelized Onions, Sun-dried Tomatoes, and Crushed Pink Peppercorns...


A few nights ago I was in the mood for pasta, but not just any kind of pasta. I wanted a rich and creamy white sauce, rather then olive oil, pesto, or marinara and I wanted it to be kind of cheesy. Whenever I think of cream sauce I think of Alfredo, but that’s not really what I wanted. I wanted something ‘cleaner’ if that makes sense, that was just a tad sweet, with just a touch of delicious cheesy goodness.

White Miso, Nutritional Yeast and Coconut Milk immediately sprung to mind. Now you may have done a double take on the words coconut milk, but trust me on this. The best, richest, and creamiest sauces I’ve made yet for pasta whether they be for mac and cheese, Alfredo or other have all been made with coconut milk. I don’t know what it is about coconut milk but it works so much better then any other non-dairy milk or cream that I’ve tried for that rich flavor and thick texture. I know you might be skeptical but it’s true, and you may be asking yourself ‘doesn’t it make what you’re cooking taste like coconut’ and the answer is no. I find that if you don’t add sugar into your coconut milk, and use savory seasonings there isn’t any coconut flavor at all. I know it sounds crazy right? And I get your reluctance, because I was a total skeptic too when I first happened upon this amazing culinary discovery, but then I tried my first coconut milk mac and cheese and nearly lost my mind! I really is that good, so phenomenal in fact that coconut milk has since become my ‘go-to’ for cream sauce as well as a few other things.


As for the White miso and the Nutritional Yeast, it’s only natural they sprung to mind for this recipe considering the cheesy taste they impart to dishes. People think I’m a little crazy for thinking that White Miso has a cheese like flavor, but I don’t know, that’s what I taste. Something about the fermentation I think gives it a quality similar to aged cheeses. It has that sharp, salty full-bodied flavor you -or at least I - associate with a rich aged cheddar. So whenever I want to make something cheesy White Miso is my ‘go-to.’ Darker Miso, such as red or brown doesn’t really have the same flavor or quality. It’s more salty and bitter to me rather then cheese like so I wouldn’t recommend using them for this. Stick to white miso, or perhaps yellow. As for the Nooch. Since I’m not a big fan of nutritional yeast I played it kind of conservative here, but if you like the taste of nooch then by all means feel free to add in more. I went with the 1/4 cup but think a 1/3 cup would be just as good too, but if you really want to heighten the flavor you could go up to a ½ cup.


Of course once I had the sauce all figured out there was still the matter of what else to put in the pasta. After some careful consideration I decided to go with red onion, garlic, sun-dried tomatoes, fresh parsley and pink peppercorns. Since the pasta is a tan color, and the sauce is so white I wanted to include ingredients that would really stand out and pop with brightness when they came together in my bowl. Red onion, sun-dried tomatoes and parsley are perfect for that, and the pink peppercorns give the dish a cute pink dusting and interesting flavor.


However Pink Peppercorns definitely have a distinct and unique flavor, they’re not hot, but rather have a delicate almost fruity flavor. For some they may be an acquired taste, so if they’re not your cup of tea so to speak, or you’re unable to find them then by all means leave them out and add in white pepper or even black pepper instead. I don’t think the dish will suffer any from their absence, and in fact I think white pepper might give it another distinctive component. The pink peppercorns do lend a hint of sophistication though, and I do really enjoy them.

Now, before we get started I do want to say that there are a couple of steps to this recipe, but if you plan it well it can all come together rather quickly, so don’t feel intimidated!


Fusilli In Cream Sauce With Caramelized Onions, Sun-dried Tomatoes, and Crushed Pink Peppercorns

1 lb Whole Wheat or Gluten-Free Fusilli

1 Tbsp Olive Oil
1 Red Onion
8 Cloves Garlic minced
½-1 C Sun-dried tomatoes (not oil packed)

3/4 C Raw Cashews
½ C water
1 Tbsp Lemon Juice
3-5 Tbsp Mellow White Miso

1 15oz Can Coconut Milk (not light)
½ tsp Smoked Paprika (or to taste)
½ tsp rubbed Sage (or to taste)
1/4 tsp ground Nutmeg (or to taste)
1/4-1/3 Cup Nutritional Yeast
½ Bunch Fresh Parsley Finely Minced
*** ½-1 Tbsp Pink Peppercorns (crushed or ground with a mortar and pestle) (Optional)

- Bring a pot of water to boil and cook Fusilli as directed by the package. When cooked drain, and return to pot.

- Meanwhile, place oil in pan or pot, over medium-high heat. Add onions and saute over medium-high heat for five minutes. Lower to medium and saute another five minutes. Add in garlic and reduce heat to medium-low. Add in the sun-dried tomatoes. Cover and let saute until onions become very soft and light golden brown. Roughly another ten minutes. Make sure to stir every once in a while so the onions and garlic don’t stick. Add a little water If they do.

- When onions are caramelized to your liking transfer them to a plate or bowl and set aside.

- While onions are caramelizing you can blend the cashews, water, lemon juice, and miso in a highspeed blender on high for 30-60 seconds until super smooth and creamy. Taste for flavor and adjust miso as needed.

- Next begin your sauce. Poor coconut milk into medium pot. Add the cashew-miso mixture from your blender making sure to scrape out as much as possible, and whisk until combined. Whisk in Nutritional Yeast, smoked paprika, sage and nutmeg and taste for flavor. Adjust as needed. Let simmer on the stove for roughly ten minutes. Add in crushed pink peppercorns and minced parsley.

- Add your caramelized onion mixture into the pot with your fusilli, then pour in your cream sauce. Mix until everything is thoroughly combined and then serve garnished with a little extra parsley and crushed pink peppercorn if desired.

*** Note - Soy-Free if using Chickpea Miso***