Yesterday was Litha, or Summer Solstice. I made lots of delicious food and sweets, but one of the dishes I want to share most with you is a French Inspired Casserole. The Original Recipe calls for Venison but I used Gardien Beef Tips, though you could easily use homemade seitan (I would have, if I'd had any prepared.) The dish is super rich, and flavorful and tastes wonderful alongside roasted tomatoes with thyme, charred asparagus and soft bread for sopping up excess sauce. It's a fairly simple recipe though does require some advanced prep.
French Inspired "Venison" Seitan Casserole.
1 Yellow Onion
4 Cloves
8 Juniper Berries Crushed
8 Black Peppercorns Crushed
1 1/2 Cup Red Wine
2 Celery Stalks
2 Carrots
2 Bay Leaves
6 Whole Garlic Cloves sliced
Zest of half a lemon
5 Sprigs Rosemary
2 Packages Gardien Beefless Tips (or Equivalent amount of homemade Seitan)
All Purpose Flour
1 Tbsp Olive Oil
1 Tbsp Earth Balance
4 Shallots Sliced
2 Cups Brown Stock
2 Tbsp Raspberry Jam
1 Heaping Tbsp Marmite
1 Vegan Beef Bouillon Cube (Optional but recommended)
- First defrost Tips or Seitan (if frozen) Place seitan in a large bowl.
- Quarter the Onion and stick a clove in each quarter. Place the Onion Quarters into the bowl with the seitan.
- Add Juniper Berries, Crushed Pepper, Chopped celery Stalks, Chopped Carrots, Sliced Garlic, Bay Leaves, Lemon Zest, and Minced Rosemary from the five sprigs to the bowl. Stir with a large wooden spoon to combine.
- Place a medium sized sauce pan on the stove. Bring 2 cups of water to a boil, and add in the Marmite and Bullion Cube. Whisk until the marmite and cube dissolve and you have a nice brown liquid. Add in 1 cup of the red wine, and raspberry jam, whisk to combine and lower the heat. Simmer for five minutes.
- Pour the stock/wine mixture over the beef and veg in the bowl. Stir to combine and make sure everything gets nice and covered. Place the bowl in the fridge and let marinate overnight.
- After the stew has marinated. Melt the Butter and oil in a large fry pan on the stove. remove the Onions from the bowl discard cloves and slice onions thin. Slice the shallots as well. Add both onions and shallots to the butter in the pan, fry until brown.
- Place the Tips or Seitan in a zip-lock bag and dump in enough all purpose flour to cover all the pieces. Shake the bag around to make sure evenly coated.
- Once onions are cooked place them in a well oiled cast iron casserole dish.
- Use the same pan to fry the floured seitan. Fry until brown, and add it to the Casserole.
- Add the remaining veg to the casserole. Then strain the marinade into the casserole through a fine mesh sieve. Discard bay leaves, peppercorns and juniper berries. You can season to taste with additional pepper and salt if you like but it should be salty enough.
- Bake in the oven at 350'F for 1 1/2 hours until tender and marinade has reduced by half. Serve with roast tomatoes, asparagus, a salad and soft bread like pita.
PS: Sorry for the poor picture quality I was more interested in eating, drinking and being marry to care much about photography.
Showing posts with label Raspberry. Show all posts
Wednesday, June 21, 2017
Tuesday, September 8, 2015
Vegan Mofo #9: Seitan with Raspberries...
Today’s recipe I found in a French cook book and couldn’t help but be intrigued. Unfortunately the book didn’t provide any information on history or origin of the dish, and so I have no idea where it comes from. Though it is a pretty common practice throughout Europe to cook rich meats with sweet fruits, and the French sure like to make food look fancy so regardless of origin this dish at least fits with my theme.
I’ll admit I was pretty skeptical about this dish when I first attempted to make it. I just didn’t know how seitan would taste when mixed with fruits, guess I needn’t have really worried because the dish turned out amazing! Seriously, it far exceeded my expectations. I myself have only ever eaten duck once, a long time ago, in a Chinese restaurant and I hated it. I thought it was greasy, and fatty and disgusting, I never ate it again. When eating poultry I never liked dark meat anyway and duck is all dark meat. So I was a bit flummoxed as how to make this seitan taste ‘duck-like’ and Google raveled nothing further then what I already knew “Tastes like greasy chicken” thanks, so helpful! In the end I decided to make a basic chicken-style seitan but included in the met ingridients I added a spoonful of marmite and I used sesame oil instead of regular oil. Before I boiled the cutlets I also coated them in oil, then when they came out of the broth I oiled them again and let them sit in the fridge in a bit of their cooking liquid until I used them the next day. I can’t say that the seitan tasted like ‘duck’ but it didn’t have a ‘chicken’ taste either, it was richer, and slightly more greasy then your average seitan. So, while it might not be an ‘authentic’ duck taste, it was certainly different, and enjoyable, and why do you need your seitan to taste exactly like duck anyway?
The true star of this show however is the raspberry sauce. Oh... my.... god.... the sauce alone is amazing and I wish I’d made more cutlets just so I could eat more sauce! If it sounds weird to you to cook raspberries in a somewhat savory dish, I hear you, but trust me when I tell you this will literally blow your mind! Try it, and see! Enjoy with a nice glass of wine, a side of mashed potatoes, a side salad, or as we did, simply with a side of Vichy Carrots.
Seitan with Raspberries
(AKA Canard aux Framboises aka ‘Duck’ with Raspberries)
A Splash of Olive Oil
2-4 Homemade or Store Bought Chicken Style Seitan Cutlets
1 tsp Sea Salt
1 tsp Ground Cinnamon
2 tsp Sugar
½ Cup Red Wine
1/3 Cup Creme de Cassis (A Red Current Liquor)
1 Tbsp Cornstarch
9oz Fresh Raspberries
- Heat the olive oil in a large frying pan over medium high heat. Add in your cutlets and brown 4-5 minutes per side.
- In a small bowl mix together the salt, sugar and cinnamon. Set aside.
- In another bowl whisk together the red wine and creme de cassis, set aside.
- When the seitan is done cooking carefully remove it from the pan and put on a plate. Leave the pan, you are going to uses it again.
- After the seitan has cooled for a minute or two carefully rub the salt sugar, cinnamon mixture into the seitan on both sides. Then return the seitan to the pan and cook on medium heat for another 2-3 minutes per side.
- Add most of the red wine, creme de cassis mixture to the pan with the seitan, reserving a couple of Tablespoons. Mix this reserved wine mix with the cornstarch and then add that into the pan as well. Stir to combine and let simmer 2 minutes until thickened.
- Add raspberries, stir to coat with the sauce, and then simmer for an additional 2-3 minutes stirring occasionally until the sauce is thick and the berries are cooked.
- Remove seitan cutlets from the pan, place on individual plates and spoon the sauce and berries over top. Enjoy!
Friday, March 7, 2014
Sensational Spring Citrus Smoothie...
If you’re living just about anywhere in North America right now, and you’re anything like me you’re probably wondering when this dreaded winter is going to come to it’s end. I mean I like winter alright - in moderation, but all these crazy snowstorms and the bone-chilling cold has got me longing for Spring like never before. Today it’s in the mid-40's which to some is still pretty cold, but to me it’s like paradise, the sun is shining, there’s no wind, it’s actually warm enough to walk outside without a parka - light jacket may be required however - and I’m beginning to feel like Spring is finally on it’s way. I know I’m ready for it, and my body is ready for it, and so are my tastebuds.
Something a lot of people don’t know about me is that I absolutely love grapefruit, and the reason why people don’t know this, is because despite my great love of this beautiful citrus I don’t really talk about it very much. Over the past couple of months I’ve been buying huge bags of ruby red grapefruits and normally I juice them along with oranges, lemons and ginger. Well, this morning I was definitely craving a mix of that sort but was too lazy to get out the juicer. So instead I whipped up this super simple, and deliciously citrusy smoothie to keep the smile on my face and remind myself that spring is only a few more weeks away. So buck up, and enjoy some citrus until it gets here.
Sensational Spring Citrus Smoothie
1 Large Red Grapefruit, peeled, pith and seeds removed.
Small handful of Fresh or Frozen Raspberries
6 Fresh or Frozen Strawberries
½ Large or 1 Small banana
5 Frozen Peach Slices
3/4 C Orange Juice
½ C Water
1 Tbsp Lemon Juice
- Place all ingredients in a high speed blender and blend for 60-90 seconds until completely smooth. For a thinner consistency add a little more water if desired.
Thursday, September 29, 2011
Nutritional Powerhouse Smoothie...
For the past few days I’ve been making a huge morning breakfast smoothie using Vega: Complete Whole Food Health Optimizer. For those of you not familiar with Vega it’s a nutritionally complete powder made from natural plant-based whole-foods. It’s alkaline, easily digestible, gluten-free, soy-free, and GMO-free. It contains no animal products, including eggs and dairy. No wheat, no yeast, no added sugar, no artificial colors, artificial flavors, artificial sweeteners or artificial preservatives, and no herbicides or pesticides. It comes in four different flavors - Chocolate, Vanilla Chai, Nuteral, and Berry - three different sizes - 36oz containers, 17oz containers and small single serving packages - and was formulated by Brendan Brazier. A vegan professional Ironman triathlete and best-selling author on performance nutrition.
It is a complete meal with only 240 calories per serving. However I personally think the 2 scoop serving is a bit much for one person, and so if I’m making the smoothie for just me I use only 1 scoop, which is 120 calories. The product is sweetened with stevia and contains 100% of your RDA - in the full 2 scoop serving - for Vitamin A, C, D, E, K, B2, B3, B6, B12, Thiamin, Folate, Biotin, Calcium, Iron, Phosphorus, Iodine, Magnesium, Zinc, Selenium, Copper, Manganese, and Chromium. It also contains 60% dietary fiber, 52% protein, and 43% Potassium. There is no sodium, only 6g of fat, and only 7% Carbohydrates. It also contains 2,500mg of Omega-3 Fatty acids, 1,500mg Omega-6 fatty acids, 2,500mg Chlorella, 2,500mg Maca root, 300mg Digestive enzyme blend, 83mg dairy-free probiotic blend, and 43,000mg of plant based protein from hemp yellow pea, brown rice, and whole flax seed.
I’ve never really been into protein powders, or things of that nature. Not as a omnivore nor as a vegan. I know/knew plenty of people who drank boost, and whey protein and what not and never really understood it. However a couple of friends of mine have recently been raving about Vega, and since I’m always interested in making sure my husband and I receive optimal nutrition I thought I’d give it a try. As healthy as we eat day to day, lets face it there are those crazy days where we just don’t have the time to consume as many fruits and veggies as we need to or would like to. On those days we’re subjected to eating fast, carby, usually fatty foods, which always leave us feeling so gross and drained. This is the perfect solution to that. All you need to do is add Vega to water and shake, but if you’ve got a bit more time or want to give yourself an extra kick you can blend it with some water or non-dairy milk, and some fruit of your choice. It really does keep you feeling full so you can power through those busy mornings without having to munch down a cliff bar, or stop off at starbucks for a bagel.
As far as taste goes it’s a nutritional supplement, so it kind of tastes like one. A little chalky like most of them are, but the berry flavor is pretty good and made even better by blending it with a banana or some blueberries. I actually quite like the chocolate one as well, I didn’t think I would, but it’s pretty great. I thought it was less chalky and less powdery then the berry flavor, and it’s totally brilliant blended with 1 C almond milk 1 C water and 1 banana. Tastes just like a chocolate banana smoothie and who doesn’t love that?
Anyway all week I’ve been playing around with different combinations of ingredients. I used all kinds of different fruits, I used kale and some other greens, and all of my concoctions were okay, but this morning I really hit the jackpot. This smoothie was so good that I think it’ll be the only one I make when I use berry flavored Vega. So if you have Vega give it a try, and if you don’t have Vega but are curious about it I really suggest trying it out. Especially if you’re concerned about getting the proper nutrition through your diet, or just if you have a busy life and need something more substantial then a cup of coffee and a power bar in the morning.
*** Note - This recipe makes enough for 2 medium sized eaters. So I suggest halving it if it’s just for you. Unless your particularly hungry, or a big eater. Or you can always drink half of it, then refrigerate the other half to enjoy later in the day. ***
Nutritional Powerhouse Smoothie
4 C purified water
2 Medium sized Bananas
1 C Frozen Blueberries
½ C Frozen Mixed Berries (I used a blend of Raspberries, Blackberries, and Mulberries)
2 Scoops Vega
- Add ingredients into a highspeed blender in order listed above. Blend on high for 30 to 60 seconds until smoothie is well blended and smooth.
- Pour into two large glasses and enjoy!
***Note - If you’re not used to getting much fiber in your diet I recommend not going anywhere that won’t have a bathroom available. Also be sure to drink lots of water throughout the day to help the fiber move through your system.***
Vega’s Website - http://myvega.com/
Monday, May 30, 2011
Raw Chocolate Chia Pudding Tarts With Fresh Fruit...
As promised it is Monday, and I have returned. I hope everyone had a wonderful long weekend.
Now, one thing that’ll become very obvious about me the more you read my blog is that I Love to bake, and I Love deserts. I usually make two deserts a week, or I at least bake cookies or muffins or what not. I get a lot of pleasure out of any kind of cooking, but particularly out of making deserts. There’s just something about measuring and mixing that I just find so de-stressing. I love how a house smells when there’s fresh baking in the oven, or on the wire cooling rack. I used to love waking up to the scent of my mother’s whole grain breads baking, filling not only the kitchen but the whole house with their earthy goodness. My mother is an excellent cook, but she’s always in my opinion been a master baker. Growing up our house was always full of fresh home made cookies, cakes, brownies, bars, pies, and breads. You name it and she would bake it, and I can’t recall ever not liking something she’d baked. She always starts her baking in the morning, six or seven am, and when I lived at home I would always wake up to those sweet, heavenly scents. Maybe that’s why I love to make deserts more then anything else, and maybe that’s why I without a doubt prefer to always do my baking at the start of my day rather then in the middle or the end. Baking in the morning, no matter where I am always reminds me of home.
Now despite my long standing love affair with baking it might astonish you to learn that I’ve never actually made a tart before. Before a week ago I wouldn’t have been able to make a tart to save my life, vegan, non-vegan, raw or baked, never had I embarked on such an endeavor. Yet somehow several weeks ago I suddenly got it in mind to do just that. Make tarts. Where this idea came from I have no idea. Maybe because Spring has finally come to the Mid-West, maybe because fresh fruit, particularly fresh berries are available in such abundance, maybe I was just craving chocolate. Regardless of the reason it’s a good thing to remember that once an idea firmly grabs hold of me I’m stuck with it until I carry it out. So three weeks ago or so when I was in Bed Bath and Beyond to buy a cake pan, I picked up a six pack of tart pans too, without a recipe or a clue, I stuffed them into my basket and went about my day.
Spring forward to last Wednesday when the desire to make tarts really over took me. By now I had read many tart recipes in preparation for my sudden onset of tart lust. I had flipped through every cook book I own, I pillaged my local library, and surfed the net for every kind of tart recipe imaginable and yet I could not find a single one that appealed to me. What then may I ask is a tart loving girl to do? The simple answer? Throw caution to the wind, and just ‘go with it’ by which I mean throw some stuff together and hope it works out alright. Personally I think this recipe worked out better then alright, way better. Both my husband M and I were wildly amazed by how creamy, rich and down-right delicious these tarts were. Not a one survived, always a good sign in my house.
Now, before you even get finished reading this recipe I know it looks like a lot of work, but it’s not, not really. Yes it is a lot of steps, but the actual labor is pretty minimal. I think it’s just a matter of being prepared, and though there are many steps that must be followed they are all super easy, I promise!
Raw Chocolate Chia Pudding Tarts With Fresh Fruit...
Start by making the crust....
Almond Cashew Crust - Yields enough for roughly 4 4x1 inch tart pans.
1C Cashews
3/4C Almonds (soaked in warm water for 10 minutes)
2 Medjool Dates (pitted and soaked in warm water for 10 minutes)
Roughly ½-3/4 of a medium sized banana.
½-1 tsp Vanilla extract
dash sea salt and cinnamon
1/4 cup water as needed
Now if you are like me and only own the tiniest, lamest food processor the world has to offer you’ll have to make this crust in stages. However if you’re fortunate enough to have one of those large fancy food processors I don’t see why you couldn’t just grind all the nuts together, and then add everything else into the processor once the nuts have formed a meal.
- Pulse Cashews until they from a meal. Then remove Cashews to mixing bowl.
- Pulse Almonds until they form a meal. Then remove to the same mixing bowl as cashews.
- Add a dash of sea salt, and a hefty dash of cinnamon to the nut meal combination then stir to combine.
- Using a half cup measure fill your food processor with the nut meal until roughly half full, add in ½ tsp vanilla extract, 1 date, and 1/4 of your banana. Pulse until well combined. If mixture is to dry and not pulsing gently pour in 1/4 cup of water until the blades begin moving. (Don’t worry if it becomes to pasty as it’ll dry out a bit more with the addition of the rest of the nut meal.) At this point, if your food processor is as lame as mine you still may need to use a spatula to scrape down the sides of the bowl to get things moving again.
- Once everything is combined and running smoothly, add another cup of the nut meal and process. If mixture isn’t moving, add in another ½ tsp vanilla extract, 1 date, and another 1/4 of banana. Continue to process until smooth, scraping down sides of bowl as needed, and gradually adding in the remaining nut meal. (You can add another 1/4 of banana if necessary, if mixture is too dry and crumbly)
- By now you should have a somewhat sticky, paste like mixture. Using a regular spoon scoop out 2 spoonfuls worth of batter and place into a plastic wrap lined tart pan. This part can be a bit tricky as the mixture can be quite sticky. What I found very helpful is folding the excess plastic wrap under the tart pan, which held the plastic in place better and made spreading the batter easier. You can use the back of the spoon to spread the batter as evenly as possible around the pan, then use your fingers to gently press the batter up the sides of the pan. Once batter has been evenly shaped into the pan cover with another piece of plastic wrap, then place in the freezer for 2-3 hours to firm up.
- Repeat with all four pans, or until no batter remains.
Chocolate Chia Pudding - Yields enough for about 5 or 6 tarts.
1-2 C Fresh Coconut Meat from 1-2 Thai Coconuts
3/4 C (Or more if desired) Coconut water from 1 Thai Coconut
½ C (or less) pure Maple Syrup
1/3 C (or less) Agave Nectar
½ C (or to taste) Cacao Powder
2 Tbsp (or to taste) Vanilla Extract
1/4 tsp Sea Salt
1/4-1/2 C Chia Seeds
- A couple of notes about this recipe, It’s one I originally got from Sarma Melngailis’s cookbook Raw Food Real World, and have altered a bit to suit my own taste preferences. I’ve made the recipe both with one cup of coconut meat and with 2 cups of coconut meat, and honestly I think I prefer the 1 cup of coconut meat variation. If you use less coconut meat you’ll want to use more chia seeds, if you use more coconut meat you’ll want to use less chia seeds. I don’t particularly like all the excess sweetener in this recipe, so I cut back on it, though I don’t really measure it. Generally speaking for the Agave I fill my third cup up about half or a little over half full, and sometimes I cut down a bit on the maple syrup as well, but that’s just me, I also like to add additional cocoa powder, as much as 3/4 cups, or as little as just an extra tbsp or two. Depending on how chocolatey I want it. Also if you’re not on a strict raw diet, by all means use regular dark coco powder, it works out just fine as well. Lastly, you really do need a high-speed blender for this one, I’m sorry, but otherwise it just won’t blend the coconut or the chia seeds properly. I tried to make this once last year with just my regular blender and it turned out simply awful! Also you do need Thai coconuts, those are the tan square ones with the triangular tip. Not the round brown hairy ones, those are mature coconuts and their flesh is very firm and not good for this kind of recipe. I made that mistake last year too.
Step 1 - Extracting the water and the flesh from a coconut.
- The easiest way to do this is to chop off the triangular tip of the coconut with a cleaver, and then quickly scoop the coconut up so that as little water spills out as possible. Then you can easily scrape out the flesh with a spoon.
- Now if you’re like me, you might not own a cleaver. That’s not a problem, but opening a coconut without a clever is going to take a little elbow grease. Generally what I do is take a (clean) screw driver and mallet and hammer the screw driver into the coconut. Make two or three puncture marks in the side then tip it upside down over a large measuring cup, and let the water leak out. However depending on the size of your punctures this might take some time. I’m usually to impatient to wait very long and so I begin shaking the coconut vigorously to get all the water out. Once all or most of the water is out you can use the point of a chef knife (I recommend a cheap one, don’t use a good expensive chef knife for this in case it gets ruined) To dig into the puncture that you’ve made, then you can start sawing off the top of the coconut. This is where the elbow grease is going to come in. Depending on how firm the coconut is it might take a bit of work, though ideally it should be less then 10-15 minutes. Once I get a good crack into it, I generally cover the sharp end of the knife with a towel then press down on both the covered sharp end and the handle with each hand, and use the force of all my weight to slice through the coconut shell. Of course, if you have a partner who’s a bit stronger then you, you could always bribe him or her to do it for you. I have resorted to this in the past when I found my ‘elbow grease’ to be a bit lacking in the face of one very, strong and determined Thai coconut. Once the coconut is opened scrape out the flesh with a spoon and Ta-Da! Finished.
Step 2 - Blending your pudding
- Once you have your coconut flesh, measure out all of your ingredients into your high speed blender and then blend on high for 1-2 minutes until everything is smooth. As stated above you might want to go a bit conservative on some of the ingredients and then taste for sweetness and flavor and then adjust according to your personal preferences. This is what I tend to do most of the time. If you find you need to re-adjust just blend for another 30 seconds to 1 minute until everything is well combined. If you find your pudding is too thin then add more chia seeds, if you find that it’s too thick for your liking then add a bit more coconut water or liquid sweetener.
Step 3 - Constructing Your Tart
- Once you have your pudding at your desired consistency and taste, remove your tart pans from the freezer.
- Grab a rubber spatula or wooden spoon and evenly distribute the pudding between your tart pans. I found that after adjusting the pudding ingredients that I had more pudding then tart shells. You could either make enough extra crust for two more shells or do what I did and scoop the excess pudding into a air tight container and place it in the fridge to eat by itself some other time.
- After you’ve filled your tart pans with your pudding place them into the fridge to cool and firm up a bit more. About 1-2 hours.
Step 4 - Decorating Your Tart
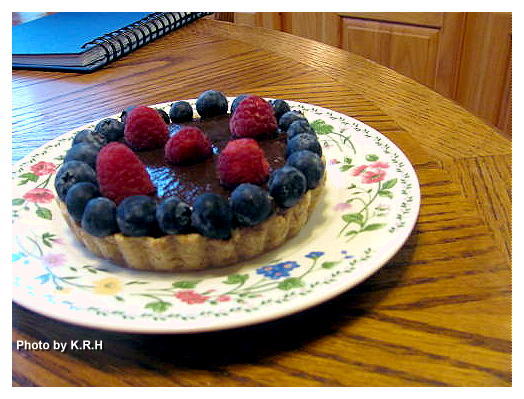
You can use any berries or any fruit really that you want to decorate your tarts, but I chose to decorate mine with fresh blueberries and raspberries, because that’s what I was in the mood for. You can also decorate your tart with any pattern or design you want, but I chose to do something simple.
I used about 16oz of blueberries to place a ring of berries around each of the four tart pans. I used about 15 raspberries to decorate the middle of each tart.
Once you decorate your tart you can serve them right away, or place them back in the fridge for later. They should keep a couple of days in the fridge. Though they’re so good you’ll probably devour them in one sitting!
I know it must seem like a lot of trouble to go to for some tarts, but I assure you it was worth every minute and really the steps look a lot more complicated then they actually are. The toughest part is cracking open the coconuts, everything else is gravy. Of course as I mentioned before if you’re not on a raw diet, you can really use any pudding recipe you like, that’s what I love about this recipe, it’s so flexible. You could essentially use any nuts for the crust, any pudding as a filling and any berries for a topping, though I sincerely recommend you make it my way at least once, before you decide to play around with it. If you make it I hope you enjoy it, and stay tuned, as tomorrow will being even more goodies!
Labels:
Blueberries,
Chia Seeds,
Chocolate,
Dessert,
Gluten-Free,
Oil-Free,
Pudding,
Raspberry,
Raw,
Soy-Free,
Sugar-Free,
Tarts
Wednesday, May 25, 2011
Pink Raspberry Passion Smoothie...
Monday was a wonderful day, beautiful, sunny and warm with a nice breeze. Exactly the kind of spring day where you feel the overwhelming desire to kick back with a good book and a delicious fruit smoothie after an afternoon of running around. So that’s exactly what I did. I wanted something sweet, and delicious with berries being the focal point, and so I came up with this super simple smoothie that totally satisfies the tastebuds. Enjoy it garnished with fresh raspberries, near an open window where you can hear the sounds of birds singing, and smell that fresh sweet spring air - or better yet enjoy it lounging outside on the grass, with a book in one hand, and your drink in the other.
Pink Raspberry Passion Smoothie
½ C Raspberries (roughly 23-25)
1 ½ C chopped fresh Pineapple
3/4 C water (or enough to cover blades of a Vitamix)
1 packet Stevia (optional)
- Place everything except Stevia in a high speed blender and process for 30 seconds to 1 minute until everything is smooth. Taste for sweetness and add Stevia if desired.
- Serve in a fancy chilled glass, and garnish with 4-5 raspberries, of if you’re feeling especially creative garnish with raspberries and a thin slice of pineapple.
You won’t be sorry you did, I promise!
Subscribe to:
Posts (Atom)