Showing posts with label Apple Cider Vinegar. Show all posts

Monday, September 14, 2015

Vegan Mofo #16: Seitan a l’Orange...


I’ve never had Duck a l’Orange before, because I never liked duck, but there was something really intriguing to me about trying to veganize this recipe. I thought it might work out well with seitan in place of duck and since I had some ‘duck’ style seitan left over from making the Duck with Raspberries I thought I’d give it a try. I have to admit I was really skeptical about it, because I had to really play around with the cooking method and times, and I wasn’t at all sure it was going to be any good, but much to my surprise it turned out really, really well. The sauce is so flavorful and on a nice juicy piece of seitan it works so well. Though I imagine the sauce would also be a nice accompaniment to tofu or tempeh as well.
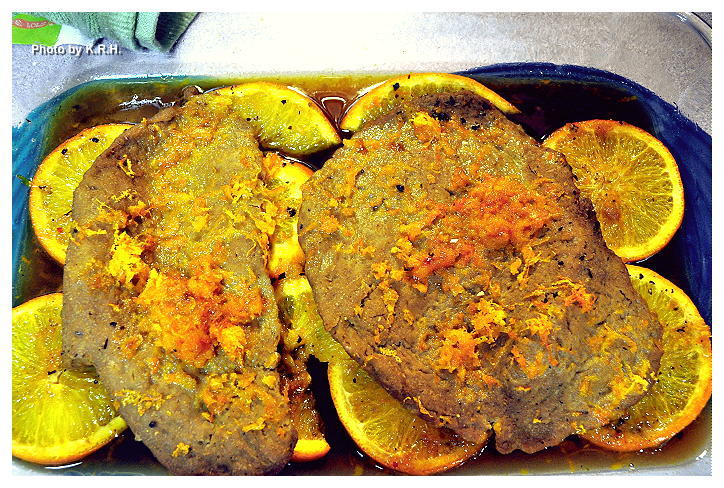


Certainly there is a bit of work involved in a recipe like this, but that’s French cooking for you right? The end result is worth it, so I hope you give it a try. Enjoy your seitan a l’Orange with some simple sides like rice and broccoli as we did, or potatoes and asparagus.


Seitan a l’Orange 
(AKA Canard a l’Orange, AKA ‘Duck’ a l’Orange, ) 

2-4 Homemade or store bought Chicken Style Seitan Cutlets
5 Large Oranges
2 Cinnamon Sticks
1-2 Tbsp Minced Fresh Mint Leaves
½ Cup Brown Sugar
½ Cup Apple Cider Vinegar
1/3 Cup Grand Marnier
4 Tbsp of Nondairy Butter + 1 Tbsp
1 Tbsp Cornstarch


- Preheat the oven to 300'F

- Grease a glass baking dish that’s large enough to hold your seitan. Slice two of the oranges into thin slices. Line the bottom of the glass dish with the slices from one orange. Place the cinnamon sticks over top of the oranges and sprinkle with mint. Layer your seitan cutlets over top, and then top those with the remaining orange slices.

- Roast in the Oven for roughly 30 minutes.

- Meanwhile zest and juice the remaining 3 oranges.  Heat a small pot of water over high heat. When it’s boiling blanch the orange zest Refresh under cold water, drain, and set aside.

- Heat the sugar in a saucepan over low heat until it melts and caramelizes, use a whisk to whisk the sugar a bit so that it caramelizes evenly. When the sugar is a rich brown add in the vinegar, but be carefully as it might splatter.  Boil for three minutes then add the reserved orange juice and grand Marnier. Simmer the mixture for 2 minutes.

- Remove the seitan from the oven, and pour a third of the sauce over the cutlets. If using 2 cutlets place 2 Tbsp of Butter on each Cutlet, if using 4 Cutlets place 1 Tbsp on each cutlet. Then Sprinkle the cutlets with about a quarter of the orange zest. Place back into the oven and roast for another 30 minutes.

- Mix the Tablespoon of cornstarch with a bit of water and whisk to combine. Slowly add it into the pot with the sugar, vinegar, juice mixture. Increase heat and simmer, whisking constantly until the sauce has thickened. Add in the remaining tbsp of butter and the orange zest stir to combine and turn off the heat. Set aside.

- When the seitan is ready, remove it from the oven. Place one cutlet on each plate, and top with as much sauce as you like. FYI the sauce also tastes great over broccoli and rice!


Thursday, December 6, 2012

Swiss Chard Salad with Sauteed Stems in A Dijon Vinaigrette...


Last night I felt like making a salad to go with our dinner, but I didn’t have any lettuce and I didn’t have any kale. I had cabbage but we’d just eaten a cabbage salad with dinner the night before and so I wanted something different. The only other green I had available was a huge bunch of Rainbow Swiss Chard that I bought on Sunday simply because it looked beautiful and because it was on sale. I took a good look at those big beautiful leaves and thought ‘why not? You can make a salad out of this can’t you?’ In fact I knew it was possible to make a salad out of Chard because I’d made a Romaine and Chard salad more then a year ago, but chard is just one of those greens that while I love it, I never really use it. Plus I was worried that without the subtle sweetness of romaine the chard would be too bitter. Of course since I didn’t have anything else to offset the flavor I had to do my best and make it work somehow.


In the end this salad exceeded all expectations, and for whatever reason it really felt like a winter salad. Maybe because of the dark leafy leaves, or maybe because Chard is more associated with winter, I don’t know but it felt appropriate and it tasted fantastic. Since I didn’t want to waste the stems and because I didn’t want to eat the stems raw I decided to saute them, I like sauteed chard stems, they taste vaguely of beets and I think it was a perfect topper for this salad. They were tasty, tender-crisp, made a beautiful presentation and throwing them into the salad is a great way to utilize the whole plant.


Though it may sound strange to you at first trust me when I say this salad is fan-freaking-tastic. My husband and I loved it so much we gobbled up massive bowls of it, and barely had room left for the soup I’d made as our main course. It’s got a great combination of flavors and textures, and each one really lingers on the tongue. Try it!


Swiss Chard Salad with Sauteed Stems in A Dijon Vinaigrette

1 Large bunch Rainbow Swiss Chard
1 Red Onion sliced thin
2 carrots grated
½ C dried Blueberries
1/4 C Toasted Pecans (optional)
2 Tbsp Hemp Seeds or more to taste
1 tsp olive oil

Dijon Vinaigrette 

3 Tbsp Hemp Seed Oil
2 Tbsp Apple Cider Vinegar
1 ½ Tbsp Dijon Mustard
4 Medjool Dates
1/4-1/3 C Walnuts
1-2 Garlic Cloves to taste
½-1 Tsp Onion Powder
Sea Salt and Black Pepper to taste
Dash of White Pepper
1/4 C Purified Water to thin or more/less as needed.

- Remove Chard leaves from stems. Set stems aside and cut leaves into bite sized pieces. Toss the Chard leaves into a big bowl and add grated carrots, dried blueberries, pecans, and hemp seeds. Set aside.

- Mince the reserved Swiss Chard stems then add them to a medium sized pan with the tsp of olive oil and sliced red onions. Saute over medium-high heat for 5-8 minutes until stems are tender-crisp and onions are translucent. Remove from heat and add them to the salad.

Note - It’s okay if the pan that you’re cooking the stems and onions in gets a bit dry, you don’t want the mixture to be liquidly so you may even want to use less then 1 tsp of oil. Just enough really so that they cook nicely, get a bit of flavor and don’t stick to the pan. 

- To make vinaigrette place all ingredients in a food processor or high speed blender and blend until completely smooth. Taste for flavor, and consistency and thin the dressing as needed and adjust flavor to taste.

- Poor the vinaigrette over the salad and using two wooden spoons gently massage the dressing into the salad making sure all chard leaves get covered. Massage the salad for roughly 5 minutes until the chard leaves wilt slightly and soften.

- Divide amongst bowls and enjoy!


PS: In summer when fresh blueberries are in season you can make this salad with those instead of dry. You could also probably substitute the nuts for a nut that's a little more summery, like a Macadamia. Yum! 

Friday, October 19, 2012

Vegan Mofo #19 - Celine & Tamasin’s Protein Happy Quinoa Wraps...


Vegan Mofo #19 - Celine & Tamasin’s Protein Happy Quinoa Wraps 
The Book - Vegan Sandwiches Save the Day!
The Author - Celine Steen & Tamasin Noyes
The Recipe - Protein Happy Quinoa Wraps
Page # 74
Difficulty - Easy
Duration - Roughly 20 minutes.


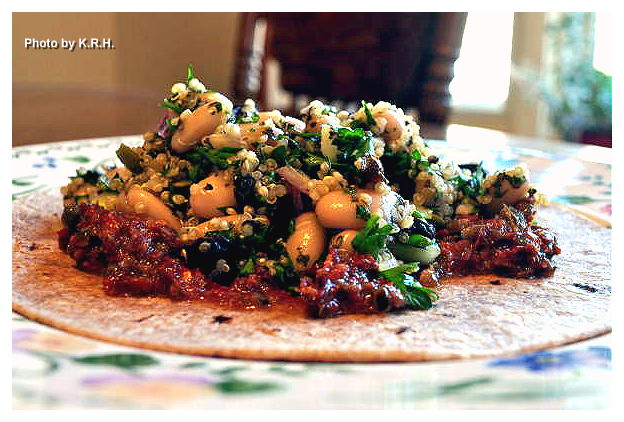
I absolutely love these wraps! They’re incredible, seriously. They’re super simple and so full of flavor, I could probably eat one of these every day and be very, very happy. Again my favorite thing about them is their emphasis on wholesome ingredients, all of which are pantry-staples for me. I also like that it’s a super quick meal. The most time consuming thing about it is cooking the quinoa but even that doesn’t take long. To make it even simpler you can always cook up a big batch of quinoa in advance along with preparing the spread in advance and then you have quick and simple lunches to throw together all week.


I also really liked the combination of flavors here. The spread is made from sun-dried tomatoes, olive oil, kalamata olives, capers and red pepper flakes. While the filling is made from combining cooked quinoa with white beans, golden raisins - I used regular - apple cider vinegar, lemon juice, olive oil, red pepper flakes, red onion, garlic, sea salt and black pepper, parsley, basil and roasted pepitas though I just used raw pumpkin seeds because that’s all I had. To serve you slice up some red bell pepper and cucumber really thin and layer it along with the filling into a whole wheat tortilla. Wrap it up and enjoy!


These are super filling too but not in a way that makes you feel weighed down. You can eat two of these and still not feel ‘stuffed.’ It’s the perfect late afternoon lunch. You could also opt out of using a tortilla and instead serve the quinoa and spread over a bed of mixed greens, it would be equally as tasty as a salad. Or you could eat the quinoa filling as is, it’s that good just on it’s own. Trust me! You need to make these, I know I’ll be making this a definite go-to lunch for work days.


Friday, April 27, 2012

Blackberry Vanilla Buttercream Cake with Blackberry Vanilla Buttercream Frosting...


And now for the grand finale... We ended our Earth Day dinner with a delicious Blackberry Vanilla Buttercream Cake!

I absolutely adore blackberries, have since I was a kid. To me they’ve always meant spring, and summer, because when I was growing up my Opa used to pick ice cram buckets full of wild blackberries that grew in brambly areas along the roadsides. He would pick enough buckets of blackberries all summer for each of his six children to have a couple of buckets, plus a few buckets for him and my Oma too. My mom would always turn those buckets of blackberries into blackberry pie which was then and still remains my all time favorite pie. To me there is absolutely nothing better then a juicy ripe blackberry eaten fresh of the vine or cooked down with a bit of sugar.


Unfortunately I think blackberries - despite their awesome array of phytonutrients and antioxidants - are a relatively underappreciated and underused berry. They never get the appreciation of blueberries, nor the love of raspberries most people just complain that their seeds are annoying. While I can’t deny that simple little fact, I do own floss, and never leave home without it. Blackberries are just too good to ignore, especially when they’re fresh, ripe and in their prime.

So I wanted to use them on Earth Day, but I wasn’t interested in going through all the hassle of making a pie crust. I sort of loath pre-made store crusts, and so almost always opt to make my own, but they’re work. More work then I felt like investing on Saturday night when I got home late from work, so I had to come up with something else. It thought about other sweet decadent ways to use blackberries and suddenly recalled the Gluten-Free Raspberry Cake from ‘Sweet Vegan’ that I’d made for Easter. It has been such a hit, and tasted so good when mixed with vanilla buttercream I thought “why not try something similar with blackberries?” From there it was a no-brainer, blackberry vanilla cake it would be, topped with a blackberry buttercream frosting to match.


Like the Raspberry cake this blackberry version was a huge hit, even amongst people who’d previously said they were not blackberry lovers. So I hope you try it, enjoy it, and forever become a blackberry lover!

*** Note - Normally I’d use whole wheat pastry, or at least a combination of whole wheat and all-purpose flour. However, because I wanted the blackberries to stand out against the cake I chose to use all purpose flour, for aesthetic and contrast reasons. If that doesn’t matter to you buy all means sub in some whole wheat pastry or whole wheat flour. ***


Blackberry Vanilla Buttercream Cake

3 C Unbleached All Purpose Flour
3 tsp Baking Powder
1 C Earth Balance or other non dairy butter at room temp
1 1/4 C Granulated Sugar
3 tsp Vanilla Extract
6 tsp Ener-G Egg Replacer Mixed with 8 Tbsp warm water till frothy (or other egg replacer)
1 1/4-1/2 C Almond Milk (Unsweetened, Plain, or Vanilla flavor)
1 Tbsp Apple Cider Vinegar
1 ½ C Fresh Blackberries quartered

Blackberry Vanilla Buttercream Frosting 

1 C Earth Balance or other non-dairy butter at room temperature
4C Powdered Sugar
2tsp Vanilla Extract
3-4 Tbsp Blackberry Jam (Seedless if possible)
1-3 Tbsp Vanilla or Plain Almond Milk to thin if needed

To make the cake

- Preheat the oven to 350'F

- Combine the flour and baking powder in a large sized bowl and set aside.

- Using a handheld or stand mixer beat the Earth Balance with the Sugar and the Vanilla extract on medium speed until combined. Scrape down the sides of the bowl as needed. Set aside.

- In a third bowl, combine almond milk, vinegar, and Ener-G egg replacer mixture.

- Alternate adding both the dry and the wet ingredients to the earth balance sugar mixture. Staring and ending with the dry ingredients. Mixing on low-speed until each addition is just incorporated. Once all wet and dry ingredients have been incorporated scrape down the sides of the bowl as needed.

- With a wooden spoon gently fold in the blackberries until just incorporated.

- Grease two 9 inch cake pans - I like to use springform - with cooking-spray, and spread the cake better evenly between the two. Bake for 35-45 minutes until a toothpick inserted inside the middle of each cake comes out clean.

- Remove cakes from the oven and let cool for 10 minutes. Then remove the cakes from the pans transferring to a wire cooling rack. Let cool for 1 hour, or until completely cool.


To Make the Frosting

- With handheld or stand mixer beat non-dairy butter and vanilla extract until smooth and creamy

- Add in Sugar 1 cup at a time beating to incorporate.

- Add in 1 Tbsp of almond milk, plus the blackberry jam and beat until thoroughly mixed.

- If the frosting Is too thick add in additional almond milk or jam. If it’s a little thinner then you’d like add in some more powdered sugar 1/4 at a time.


Assembly.

- Place 1 cake upside down on a plate. So that bottom is facing up. Using a flat frosting spatula - or regular spatula - spread a thick layer of frosting over it.

- Carefully place the other cake - right side up - on top of the first cake.

- With the remainder of the frosting frost the top and sides of the cake as desired. Garnish with fresh blackberries however you like, and serve!


*** Note - Soy-Free if using a soy-free non-dairy butter, Can also be made Gluten-Free by subbing in GF Flour(s)***

Tuesday, April 24, 2012

Kickin’ Kale Coleslaw...


This salad recipe is partly inspired by the one my friend J brought to Easter this year, and partly inspired by the delicious kale salads I ate at Choice Health Bar in Lahaina, when I was in Maui in October. It’s the perfect blend of sweet, tangy and spice. The sweet coming from the dried fruit, the tang coming from the mayo, and the two vinegars, and the spice coming from smoked paprika, pepper, allspice, clove and curry powder. It may sound like a strange combination but trust me when I say they work in perfect harmony together. Paired with earthy hemp and sesame seeds this salad is a powerhouse of awesome flavor, and it got gobbled up faster then anything else when I made it for Earth Day.


One important thing to note about this salad is that, par usual I didn’t really measure the spices as well as I should have. You see I started off with a certain measurement, either 1/4 or ½ tsp and then kept adjusting from there. Unfortunately I neglected to write down what the final mastermind became for some of the spices. With the ingredients I’ve noted as (to taste) I suggest erring on the side of caution and going with the conservative measurement first, then tasting and adjusting to suit your preference. With the garlic and curry powder it’s also important to keep in mind that you want enough of each of those flavors to taste them, but not so much that either one of them is overpowering. You want to shoot for a mild garlic flavor and a mild curry flavor. In fact as you prepare the salad keep in mind that the flavors should be working together not fighting one another, meaning no one flavor should really overshadow the others. Instead they should be layered together to enhance the dish as a whole. With that in mind, you can’t go wrong. I know I at least will be making this salad - or some variation of it - for years and years to come!


Kickin’ Kale Coleslaw

4 ½ C Shredded Kale
3 Carrots Grated
1/4 C Raisins
1/4 C Dried Cranberries
3 Tbsp Hemp Seeds
2 Tbsp Sesame Seeds
½ C Chopped Green Onions

½ C Non-dairy Mayo
1-2 Tbsp Apple Cider Vinegar (to taste)
1 tsp Toasted Sesame Oil
1 tsp Umeboshi Plum vinegar
 2-3 Packets Stevia (to taste)
½ tsp Ground Allspice
3/4 tsp Smoked Paprika
3/4 tsp Dried Oregano
½-3/4 tsp Ground Thyme (to taste)
½ tsp Garlic Powder (to taste)
½-3/4 tsp Curry Powder (to taste)
Dash of Cinnamon and Cloves (slightly less then 1/8 tsp each)
Black Pepper to taste

- The easiest way to shred kale is in a food processor. Just pop it in and pulse a few times until you have fine shreds. Don’t puree it! If you don’t have a food processor just slice it thin with a knife.

- Once the kale has been shredded place it in a bowl with the grated carrot, cranberries, raisins, seeds, and onions.

- Combine all dressing ingredient in a small bowl and whisk until thoroughly combined. Taste for flavor and adjust seasoning as needed. For an additional kick you can always add a pinch or two of Cayenne pepper! Enjoy!


Wednesday, March 14, 2012

The Joy of Pickling...


Pickling. It’s a process that’s always intrigued me, which I suppose is ironic considering I never much cared for pickled food aside from sushi ginger, pickles and pickled beets. When I first began my culinary adventures in earnest five years ago the fact that I didn’t like pickled food seemed inconsequential, I wanted to learn how to pickle. Of course back then I wanted to learn how to do everything! Everything in the culinary world was new, and amazing to me, and I wanted to achieve it all. I’ve mentioned before that I essentially taught myself how to cook by borrowing stacks upon stacks of cook books from my local library. Well amongst those stacks were several books on canning and pickling. Both practices that fascinated me.

It seemed such a quaint and old fashioned thing to do, but at the same time I thought of it as being a very economical idea. I’ve always been partial to the thought of having a pantry stocked with good, nutritious food that I’d grown, preserved and canned myself. I remember reading the Barbara Kingslover book "Animal, Vegetable, Mineral" and thinking "I want to do that!" Minus the raising and slaughtering of livestock of course. Being a passionate environmentalist I want to live as sustainable and self-sufficiently as possible, growing and preserving my own food is definitely a step in the right direction. However, five years ago when I read my first book on preserving, pickling and canning I felt a bit overwhelmed. Well overwhelmed may be an understatement. Not only was everything I was reading entirely new to me, but I didn’t understand half of it, and what I did understand sounded complicated. How could I be sure I wouldn’t die from botulism? I was neither confident nor skilled enough in the kitchen to embark on such a journey.


Fast forward to now. This week as I mentioned yesterday I’m eating simple, light, mostly raw foods in an attempt to re-balance my body. Flipping through my various cook books, - some raw some not - I came across several recipes I felt I absolutely must try. One of them is Chad Sarno’s recipe for Beet Ravioli that appears in Tal Ronnen’s book "The Conscious Cook." One of the components to the recipe is Pickled Balsamic Figs. Another component is Green Garlic Oil, which is essentially olive oil infused with garlic, and green herbs. I’ve been curious to try this recipe for forever but the raw aspect, combined with the pickling the infused oil and the cultured cashew cheese had me feeling a little intimidated. Until now. I made the figs and oil Monday, and not only was it super easy but I’ve already tried one of the figs and they’re delicious. I’m actually making the full dish tonight for dinner - and I’ll let you know how it turns out - but the simplicity of that one experience eased my fears about pickling.

It’s easy! So easy. All you need are some clean mason jars - or old pasta sauce jars - some vinegar, a bit of salt/sugar and whatever you want to pickle. It really is as simple as that, and I don’t know why I was always so concerned about it. I had so much fun Monday, that today I decided to pickle my own sushi ginger. I love sushi ginger so much and use it in abundance when eating sushi but to buy pickled ginger at the store is ridiculous. Almost $4 for 4oz, when I can buy 2 pounds of ginger root for less then $1 and make my own? No brainer right? So very excitedly this morning I decided to use Ani Phyo’s recipe for pickled ginger from her book "Ani’s Raw Food Asia" and it should be ready in about a week.


I’ve been feeling so good over the past few days that I’ve decided I definitely want to eat more raw over the summer, and I think pickling is going to be a great thing to do. Next up I’m going to try pickled daikon, and after that maybe kimchi. I’ve really gotten a great sense of satisfaction and joy out of the two things I’ve pickled so far, plus the infused oil. It’s given me a real positive lift, and it’s nice to finally be able to upcycle all those pasta sauce jars that have been floating around the house. So stay tuned for more pickling stories and seriously, give it a try yourself. You won’t believe just how easy and fun it is!