Showing posts with label Coconut. Show all posts

Friday, September 4, 2015

Vegan Mofo #4: Salade aux Noix....


Today we’re moving on from Ireland and onto France with this tasty yet simple salad.  Honestly I don’t know much about the origins of this salad, but it’s a pretty typical and traditional French Salad, I saw it on a lot of menus when I was there this past Spring but unfortunately because the traditional version contains bacon I was never able to eat it. Traditionally the dressing also uses the leftover bacon drippings as an ingredients, which I think is kind of gross, but to mimic the flavor I used the leftover liquid from cooking my coconut bacon. If you want it a bit more ‘greasy’ you could add some additional oil - perhaps coconut oil - and a dash more of liquid smoke for extra bacon flavor.

Originally I hadn’t intended to make this salad but I’m happy I decided to put a vegan spin on it after all, because it turned out great. It’s the kind of salad that’s perfect for a light lunch, or as the first course to a larger meal.


Salade aux Noix

1 Head Green Leaf Lettuce
Handful of Arugula.
½ Cup Walnuts
½ Cup Coconut Bacon (recipe follows)
5 Thin Slices Baguette
1 Garlic Clove
1 Tbsp Walnut Oil
1 Tbsp Red Wine Vinegar
1 tsp Dijon Mustard
Olive Oil as needed
Coarse Black Pepper to taste.

Coconut Bacon 

½ Cup Dried Unsweetened Coconut Flakes
1 Tbsp Soy Sauce
1 Tbsp Olive Oil
1 Tbsp Maple Syrup
½ Tbsp Liquid Smoke
Dash of Smoked Paprika
Dash of Garlic Powder
Dash of Smoked Sea Salt


Instructions - Coconut Bacon 

- Combine all liquid ingredients in a bowl, and pre-heat a small pan over medium heat. Once heated add the coconut flakes and pour the sauce over, mix with a spatula to combine. Fry for 3-5 minutes turning occasionally so the flakes don’t burn. Once browned and most of the liquid has been absorbed turn off the heat and remove the coconut to a plate to cool. Let cool 5 minutes. Leave any remaining liquid in the pan.


Instructions - Salad 

- Tear the lettuce into bite sized pieces and place in a large salad bowl along with the arugula.

- Re-heat the pan in which you cooked the coconut bacon, and add the walnuts. Toast them until browned then remove them to a plate.

- To the pan add the walnut oil, red wine vinegar, and Dijon Mustard. Whisk to combine, and simmer for a minute until warmed though. Turn off the heat and set aside.

- Preheat your Broiler. Slice the garlic clove in half. Drizzle the baguette slices in a bit of olive oil and rub the garlic halves over the bread.

- Place the bread on a broiler sheet and broil on high for 1-2 minutes a side until brown. Remove from the broiler and let cool.

- Finally, add the cooled coconut bacon and walnuts to the salad. Breaking the pieces a part as necessary. Crumble the sliced baguette pieces over top, and then drizzle the dressing over. Toss the entire thing together, and sprinkle with black pepper if desired. Enjoy!


Saturday, December 20, 2014

Product Review - So Delicious: CocoWhip Whipped Topping...

Full-Fat CocoWhip


Oh my goddess, have you heard about So Delicious's new product? CocoWhip - Coconut Whipped Topping? This stuff is amazing, AH-MAZING! Seriously, Vegan Cool Whip, that's all you really need to know.

No, but seriously, when it comes to making amazing vegan dairy products So Delicious has always been in the lead. Their Creamers, their Holiday Beverages, and their Cultured yogurts are all unmatched, and their ice cream is out of this world, but their new CocoWhip may just be the best thing they've ever made.


Vegans everywhere have been waiting a long time for vegan whip cream, and yes, we do have vegan whip in cans, a Rice Whip - which I particularly like, - and a Soy Whip, but the truth is these two whips are kind of a pain in the ass. You need to leave them at room temp for 15-20 minutes to soften so that they can be applied to desserts, and very often I find that the lever that releases the whip breaks, causing the whip to become stuck inside and therefore useless. Both of these products also contain ingredients which I consider to be questionable, but they work in a pinch. Of course, you can make your own coconut whip at home too, and I've done so many times but I'll be honest, when you're planning a big dinner and you have countless dishes to prepare sometimes making your own whip is the last thing on your mind. In times like these convenience is essential for piece of mind.

Full Fat CocoWhip
An Inside Shot, see, look how fluffy! 


So, what makes So Delicious's CocoWhip so great? First of all it's delicious! Really it is. I mean it's been years since I had Cool Whip but this tastes exactly like I remember Cool Whip to be like. Or maybe 'exactly' is doing a disservice to So Delicious, because their CocoWhip is actually better then Cool Whip. It's fluffy, creamy, and decadent and doesn't melt when you scoop it atop a dessert and let it sit for a few. Other Whips tend to go runny if refrigerated for even short periods. So, flavor wise this stuff is dead on, there is NO comparison. I love that CocoWhip comes in a tub so you can easily scoop it out and plop it on desserts. No more fiddling with frustrating cans.

Lite CocoWhip


The other thing I really like about this product is the ingredient list. As I said the other whips on the market have some questionable ingredients but Coco Whip keeps things simple. Both the Full-Fat and the Lite Versions of CocoWhip contain Coconut Oil, water, Tapioca Syrup, Cane Syrup, Pea Protein, Guar Gum, Xanthan Gum and Sunflower Lecithin. Most of these are organic, and the product itself Non-GMO verified. Another cool thing about CocoWhip is that it's pretty allergen friendly. It's soy-free, gluten-free, dairy-free, grain-free, and nut-free. It's also Kosher.

I really can't say enough good things about this product. The first tub I bought we went through in less then a few days. I am officially addicted to this stuff! Although it must be said that while the full-fat version has a higher calorie count it also has the better texture. The Lite Whip is really rather runny, it doesn't firm up or fluff the way that the full fat version does. Taste wise it's still great, but if you're looking for fluffy whip go with full-fat. If you're looking to make a presentation, go with full-fat. If you don't care about any of that and are only concerned with calories then buy the lite, as I said it also tastes great, it just doesn't look as pretty.

You can learn more about So Delicious products here, but I don't think they have CocoWhip listed on their website yet as it just came out in November.

Thursday, June 6, 2013

Chocolate Berry Superfood Smoothie...


I love all kinds of smoothies but there are three kinds that I enjoy more frequently then others. One is the obligatory green smoothie, the second is a berry combo smoothie, and the third is the chocolate protein nut butter smoothie. I tend to drink green smoothies more often in the summer, a lot of berry smoothies in the winter and the chocolate nut butter combo is a wild card. I’ll take it whenever, wherever. Lately however I’ve been enjoying this third variety more often. It seems to be my new ‘go-to’ smoothie on working days, the added protein from the protein powder and nut butter, plus the cacao and the maca keep me energized long into the day.


The only problem is that I get board pretty quickly when forced to eat the same thing all the time. So Monday I was craving a smoothie, something chocolate and creamy like my typical pre-work smoothie but the idea of the same old same old just had me feeling blah. I thought about making a berry smoothie as I have a lot of delicious berries newly on hand but that just sounded so plain. After a few moments spent pondering my dilemma in my kitchen something dawned on me. “Who ever said you can’t combine a berry smoothie with a chocolate nut butter smoothie?” No one that I know of anyway and so that’s exactly what I did.

It may sound weird to you to combine berries with chocolate and peanut butter but I assure you it’s quite delicious - mind blowing really - and while the color leaves a little something to be desired the taste is phenomenal. And really, that’s all that matters isn’t it?


Chocolate Berry Superfood Smoothie 

1 Scoop Sun Warrior Chocolate Protein Powder
1 3.5oz pack frozen acai berry puree
6-8 frozen strawberries
1 Banana
1 tsp Lucuma Powder
1 tsp Maca Powder
1 Tbsp Hemp Seeds
1 Tbsp Earth Balance Coconut Peanut Butter
3/4 C Unsweetened Almond Milk
4 Ice Cubes

- Place all ingredients into a high speed blender and blend on high for 60-90 seconds until smooth and all the ice is crushed.

Enjoy before or after an energizing workout, or on days you have to go to work!

*** Note - You can use any kind of peanut butter or protein powder you like, but I find the Sun Warrior Protein Powder has a superior taste. As for Earth Balance's Coconut Peanut Butter, I highly recommend this. Not only is it freaking delicious but adds another flavor note to the overall smoothie. More about this peanut butter in a review post to come.***

Thursday, December 13, 2012

Coconut Curry Miso Soup...


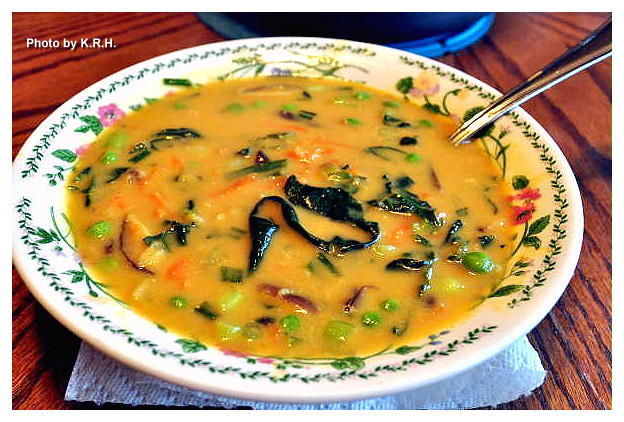
I can’t believe I forgot to post about this recipe, or maybe I can believe it. Things have been so busy around here lately that it’s easy to loose track. Well, the day I received my first CSA box I was so excited to use that Tat Soi that I decided to make it for lunch. It was a Friday afternoon and I needed something filling, hearty and warming before heading to work for the night shift. Originally I thought about making Miso soup, that seems to be my most common go to meal when I need something delicious and filling on short notice, but as much as I love Miso soup I was looking for something more. The more I thought about it the more I realized I was also in the mood for curry, and coconut. Now I know from past experiments that miso and curry actually go pretty well together but I wasn’t sure on the coconut. I envisioned like a Thai coconut curry of sorts but with the addition of Miso to give it that bold, well rounded, and savory flavor I love so much from miso soup.


I didn’t know if it would workout but in the end I thought I couldn’t do that much harm. I guess I needn’t have worried too much, because the soup turned out so good that my husband and I gobbled up the whole pot. That’s two huge heaping bowls a piece. Now as much as you may want to eat this whole pot yourself once you make it, I highly suggest you share it with a loved one instead and serve a salad alongside it to complete the meal.


Coconut Curry Miso Soup

2 ½ C Water
2/3 C Coconut Cream***
1/4 C Red Miso
4 Garlic Cloves Minced
Thumb Sized piece of Ginger minced
2 tsp Red Curry Paste
1/4 C Frozen Green Peas
1/4 C Green Onion sliced
½ Head of Tat Soi Sliced
1 Carrot Grated
1/3 C Black Soybeans
½ C Sliced Shiitake Mushrooms
1/4 tsp Ground Turmeric
2 ½ tsp Sliced Lemon Grass
Black Pepper to taste

- Combine Water, coconut cream, and red miso in a medium sized pot. Place over medium heat and stir until all the miso and coconut cream is dissolved and the mixture is smooth.

- Add in the garlic, ginger, lemon grass, curry paste, and turmeric. Mix to incorporate, until curry paste is dissolved.

- Add mushrooms, tat soi, and simmer for 10-15 minutes over medium or medium low heat until vegetables are soft.

- Add all other ingredients and simmer for 5-8 more minutes until warmed through.

-Serve hot and enjoy!


*** Note - Coconut Cream is the thick cream that normally rises to the top of a can of coconut milk. Scrape the cream out of the can and use, do not use the liquid for this recipe. Reserve it for another use. Also in some Asian groceries and markets canned coconut cream is available.

PS: If you don't have Tat Soi you can use another Asian Green, though I highly recommend searching for the tat soi.

Thursday, June 7, 2012

Curry Kapitan with Coconut and Chili Relish...


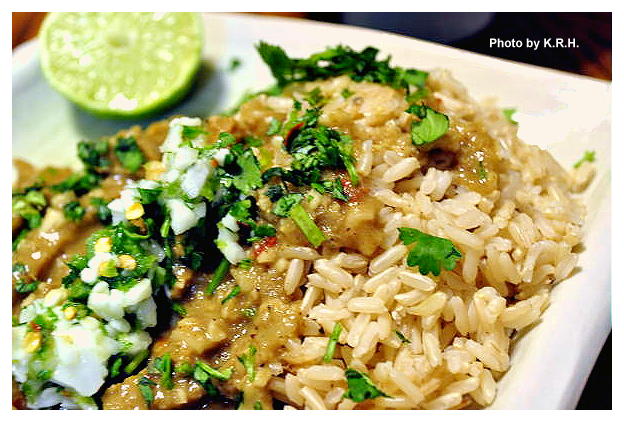
My latest foray into Malaysian Cooking. Curry Kapitan is traditionally made with chicken, and it’s said that the dish recalls the traditional role of the Chinese Kapitan, who was a man of considerable social standing amongst the Malay and Chinese people in old Melaka. Possibly invented by the Peranakans - the Malay-Chinese - to present to the Kapitan or to celebrate his role. It owes it’s flavor to the cultural melting pot of Old Melaka, and to the traditions of Chinese, Malay, Portugese, and Indian cuisine. Of course for my version I used homemade seitan instead of chicken, and decided to use soy sauce for a salty taste instead of dried shrimp paste.


This dish is nothing if not flavorful. The aroma alone is mouth-watering, but the taste... incredible! Though the ingredient list may seem long, this dish actually comes together rather quickly and it is worth every ounce of effort. When I first set out to make this dish I had no idea what to expect, and there were a few moments at least where I thought the whole thing would end in disaster. However when it came time to eat, and I took my first bite of curry Kapitan I was in love. The flavor is so complex that it’s hard to describe, but it has every flavor note you could possibly want in a dish. You can adjust the seasonings to make it as hot or mild as you like, but a little bit of kick is part of what makes this dish so fantastic. Use the chilies as a garnish, with a squeeze of lime and you won’t be disappointed. It tastes even better the next day!


Curry Kapitan with Coconut and Chili Relish 

For the Rempah 

½-1 tsp red pepper flakes
1 large red onion
10 cloves garlic
thumb sized piece of ginger
1 tbsp soy sauce
½ tsp ground turmeric
2 tsp Chinese five spice powder
1/4-1/2 tsp ground cinnamon

For the Curry 

2 Tbsp tamarind paste
Flesh from half of 1 Fresh Thai Coconut (roasted)
2 tbsp peanut oil
1 15oz can coconut milk + 1/3 c water
1-2 Pack Stevia
1 ½ lb Seitan (Homemade or Store bought)

For the Chili Relish 

½ - 1 Jalapeno Minced (Depending on how spicy you want it)
½-1 Red Chili Minced or ½-1 tsp red pepper flakes
½ Bunch Cilantro Minced
Flesh from half of 1 Fresh Thai Coconut
Juice of 1 Lime


To Serve

1 Lime
Extra Cilantro minced
Cooked Brown Rice

- First you must open your coconut. To do this the easiest way is to get a cleaver. It doesn’t have to be a good cleaver, it doesn’t have to be a $500 one, a $50 one will work just as good. Use the cleaver to whack your coconut a couple of times to break through. Drain the liquid out into a bowl or measuring cup and refrigerate to dink later, it’s not needed for the recipe.

- Once the liquid has been drained from the coconut you can split it in half. Use your cleaver and give the coconut a great whack in the middle. If like me you’re not strong enough to get the cleaver all the way through the coconut in one whack, and not skilled enough to keep hitting it in the exact same spot, use a rubber mallet to hammer the cleaver down through the coconut. This works really great, and fast.

- Once your coconut is in half use a spoon to scoop out the delicious white flesh. Once all the flesh has been removed rinse it under cold water and rub any filament away. Pat the coconut dry, and then slice it thin. Reserve half the amount of coconut in a bowl, to use as part of the relish and dry roast the other half in a pan over medium heat until it’s golden brown. Be careful not to burn it. The coconut should emit a slight nutty aroma.

- Once the coconut is a nice golden brown remove it and grind it either in a food processor or mortar and pestle until it resembles corse sugar grinds. Place in a bowl and set aside.

- Now to make the Rempah. In a food processor blend together the garlic, ginger and onion. Add in the soy sauce and pulse to combine. Stir in the turmeric, cinnamon and five spice powder.

- Heat the oil in a large pan over medium-high heat and stir in the rempah. Fry for five to eight minutes until the mixture becomes fragrant.

- Add the seitan to the pan and fry another 3-5 minutes, to let the seitan brown a little.

- Add in the coconut milk, water, Tamarind, stevia and season with sea salt and black pepper. Bring the mixture to a boil, then reduce heat and let simmer for 10-20 minutes. Add in the reserved roasted coconut.

- In the meantime combine all the relish ingredients in a bowl.

- Serve the Curry Kapitan over a bed of brown rice, garnished with extra cilantro, some squeezed lime, and the chili relish.


*** Note - To make this dish Gluten-Free use Wheat Free Tamari and a soy-based ‘meat’ or tofu. To make this dish Soy-Free use Coconut Amino’s instead of soy sauce.***

Thursday, February 23, 2012

Coconut ‘Shrimp’ Tacos with Fried Plantains and Collard Greens...


Ah - I’ve been trying to post for the past two days and was unable to due to some sort of technical difficulty that appears to now be sorted out. This is the recipe I’d planned to post Tuesday, and since I haven’t been able to post in a couple I’ve got a nice backlog of posts waiting to be published. So stay tuned for all the delicious treats I have in store!


As winter is slowly coming to it’s end for another year I find I too am gradually moving away from the cozy, comforting meals associated with the colder months. It seems to always happen this way, about a month or so before the true end to a season my body is already geared up to enter the next phase. While I’m still enjoying soups, and other wintery treats, for the most part my heart and tastebuds are set on spring and summer.


Now before I was a vegetarian, shrimp was always a food I associated with spring, and especially summer. Coconut shrimp in particular, and over the course of the weekend I found myself longing for that sweet, crisp, coconut flavor. Of course I had no desire to eat actual shrimp, and no intention of doing so, but I wanted to find a way to recreate that flavor and texture, and I wanted to enjoy it wrapped in a summery Caribbean inspired kind of taco.


I have to say that despite some of my reservations while cooking, this dish turned out phenomenally and totally satisfied that tropical flair I was craving. Of course these little tempeh bites taste nothing like what I remember of shrimp but that’s not the point, the point is the fried coconut! Combined with the plantains, the collards, the coconut milk drizzle and the mango salsa this dish was heaven on a plate!


Now to put this whole thing together it does require a bit of work. There are several steps you have to go through to make the different taco components but it is so worth it, and if you prepare ahead of time it actually doesn’t take that long. So give it a go, really in the grand scheme of things it’s not a lot to ask for some good homemade coconut ‘shrimp’ tacos! Enjoy, and stay tuned for the salsa recipe which I plan on posting tomorrow.


Coconut ‘Shrimp’ Tacos with Fried Plantains and Collard Greens

Coconut ‘Shrimp’

1 lb Tempeh cut in cubes
1 15 oz can coconut milk
½ tsp garlic powder
½ tsp dried dill
1 tsp hot sauce
1 tsp kelp granules
½ C Panko Breadcrumbs (or gluten-free breadcrumbs if you're GF)
3/4 C Coconut Flakes (I used unsweetened)
1 tsp Cajun Seasoning Blend (or to taste)

Taco Fixin’s

1 Bunch Collard Greens chopped in bite sized pieces.
Whole Wheat or Corn Tortillas
1 Recipe Sweet Shredded Fried Plantains (Recipe Follows)
Roasted Vegetable Mango Salsa (Recipe to come)
Diced Avocado
Diced Green Onion
Coconut Milk Drizzle (Optional)

Sweet Shredded Fried Plantains

3 Plantains
2 Tbsp Coconut Oil
½ tsp Cinnamon
½ tsp Cajun spice blend
1 tbsp Brown Sugar
Water if needed

- First prepare your tempeh. If you’re working with two 8oz blocks of tempeh as I was cut each block horizontally into 6-8 slices. Then slice vertically in half or in thirds depending on how big you want your cubes. Place tempeh into an airtight container when cubed.

- Mix together the coconut milk, garlic powder, dill, kelp, and hot sauce. Pour over the tempeh. Close the container give it a good shake until all the tempeh is covered and then place in the fridge and let marinate for 1-2 hours.

- After the tempeh has marinated mix breadcrumbs, coconut flakes and Cajun seasoning in a shallow bowl. Grab a tempeh cube from the marinating dish give it a shake to remove any excess coconut milk then roll it in the breadcrumb mixture until it’s breaded on all sides. Set aside and repeat until all cubes have been breaded. Reserve the marinade mixture if you want to make a coconut drizzle.

- Once all of your tempeh has been breaded you can cook it 1 of 2 ways. The first way being to fry them. If you have a deep fryer just pop them in there for a few minutes until they’re golden brown. Then remove them and drain on a plate lined with paper towels. If you don’t have a deep fryer you can fry them in about a ½ cup of coconut oil or nuteral vegetable oil in a large frying pan, until golden brown. If however you’re like me and like to try and keep on the healthier side of things you can bake your coconut tempeh in the oven.

- Preheat your oven to 400'F (200'C) lightly grease a baking sheet then place your tempeh cubes on it. Spray the top of each cube with a tiny bit of non-stick spray then place in the oven and bake for 15 minutes. Remove from the oven turn each cube over and return to the oven to cook for another 10-15 minutes. Make sure to keep an eye on them so they don’t burn. Smaller cubes will cook faster and larger cubes will take longer so times may vary.

- While your tempeh is cooking you can work on your plantains. Grab 3 large, green plantains. Cut off the ends and peel. I find the easiest way to be running the tip of a knife down two sides then just dig in with my nail and roll the peel off.

- Once the peel has been removed take a vegetable peeler and run it along the plantains like you would to peel a carrot. You’ll get nice long thin strips of plantain, continue until all plantains have been turned into strips. You’ll probably be left with a core of plantain that your peeler can’t turn into strips, and that’s okay just cut it into thin rounds and toss it in with the strips. Waste not want not right?

- Heat the coconut oil in a large frying pan over high heat. Once melted add the plantains and stir until all strips are coated. Add in the cinnamon, sugar and Cajun Seasoning. Stir again until thoroughly coated and then cook on medium heat until plantains are golden brown and soft. About 8-10 minutes. Make sure to stir frequently so no plantains stick to the bottom, and you may need to add more oil, or water. I added in about a 1/4 of water because I didn’t want to use more oil, and it worked brilliantly. When plantains are finished remove them from the heat and if you like you can drain them on a paper towel. I personally didn’t bother draining them.

- To make your collards just add an inch of water into a pot fitted with a steamer basket. Add your chopped up collards and steam for 3-5 minutes until they’re bright green and wilted. They shouldn’t be mushy but soft, with still a bit of texture. Remove them immediately from the steamer basket and place onto a plate or in a bowl.

- To make the coconut drizzle all you have to do is stir 1-2 packets of stevia into the reserved coconut marinade along with 1-2 tbsp flaked coconut. Set aside, until ready to use.

- To assemble your taco place one tortilla on a plate. Layer on some collard greens and then a generous spoonful of shredded plantains. Top with 4-5 cubes of coconut tempeh, and a bit of coconut milk drizzle. Top with diced green onion, avocado, and a generous spoonful or two of roasted vegetable mango salsa. Wrap up tight and enjoy!


*** Note - This dish can be made Gluten-Free if using Corn Tortilla's and GF Breadcrumbs***

Tuesday, May 17, 2011

Coconut Lemon Bundt Cake...


I am a coconut loving fiend! I know coconut is one of those foods that people often have rather strong feelings about - whether for or against, generally everyone has an opinion. My opinion is that coconuts are amazing, and I will consume virtually anything that even hints of coconut. Where this love of coconut comes from I have no idea, but I assure you I most definitely wasn’t born with it. I didn’t start to go coconut crazy until a few years ago, and honestly I can’t think of more than a handful of people I know who actually like this tropical sensation. Me though - man - coconut water, coconut milk, coconut pudding, non-dairy coconut ice cream, coconut curry, coconut soup, coconut sauce, coconut... well you get the picture, coconut anything and I’ll eat it. Coconut water I find particularly refreshing, and usually drink a few bottles a week. If I could drink vats of coconut milk without gaining 800 pounds I’d do it in a heart beat. I even enjoy cracking open baby Thai coconuts scooping out their delicate white flesh and eating it right off the spoon.

So is it any surprise that a recipe for coconut lemon bundt cake has been taunting me all weekend? I think not. I mean how can you really go wrong there? if the coconut itself isn’t enough to convince you, there’s the lemon to finish the job! So Monday afternoon I set to work, pulling all my ingredients from their various locations in the kitchen, measuring, pouring, whisking, and mixing. I grabbed the old bundt pan that never seems to want to cooperate with me - always sticking like glue to my finished product and refusing to let go until I jiggle and shake so hard that I end up with more of a steaming mess then a cake - and thoroughly greased it. Maybe excessive is a better word, the pan was excessively greased, but hey as long as it didn’t grab hold of the cake and hang on for dear life, am I right? What’s a little extra oil? I set it in a 350 oven and after 45 minutes pulled it out and pierced it with a green plastic chopstick - because I have no toothpicks - the cake was suppose to bake an hour, but after 45 minutes I felt it was sufficiently done. So I took it out and left it to cool for thirty minutes before very cautiously, and very nervously placing a plate over top of the pan and gently flipping it over. Slowly I raised the pan, and much to my surprise - Voila! My very first ever perfect bundt cake! I breathed a sigh of relief and left it to cool uncovered for a while longer.

Now I wish I could take credit for this magnificent creation, but I simply can’t. The credit belongs to Isa Chandra Moskowitz and Terry Hope Romero in who’s book "Veganomicon" I found the recipe. (Great book by the way I highly recommend it) I can however take credit for a nice decorating job. Just a well placed sprinkling of powdered sugar, and some julienne lemon zest curls. I can also take credit for enjoying two large slices of this incredible desert promptly upon finishing my dinner, and no I don’t feel the least bit guilty about it either. The cake was so moist and scrumptious! Whoever claims vegan deserts don’t taste like the most heavenly thing on earth hasn’t been to my house recently, or ever in their life picked up a vegan baking book and given it a try. You get all the flavor with a hell of a lot less fat! I fail to see the downside of that.

My only suggestions here are to check the cake after 45 minutes as I did, and make the cake the recipe way first, then upon your second attempt remove the lemon and sub it with lime. Coconut and Lime work magic together and I can already taste how great they would pair in this cake.

*Bon Appetite Mes Amis!*