Showing posts with label Sauce. Show all posts

Thursday, September 19, 2013

Vegan Mofo #15 - Taymer’s Bajan Seasoning...


Vegan Mofo #15 - Taymer’s Bajan Seasoning 

The Region - Barbados
The Book - Caribbean Vegan
The Author - Taymer Mason
The Recipe - Bajan Seasoning
Page # 19
Difficulty - Easy
Duration - About 15 minutes

Ordinally I only made this seasoning because it was called for in another recipe in Taymer’s wonderful book “Caribbean Vegan” but since it turned out so wonderful, and tastes so great I thought this little seasoning deserved a Mofo post all it’s own.

Bajan is a word that means ‘from Barbados’ and according to Taymer this seasoning - or some variation of it - is found in every kitchen on the Island.  From what Taymer says in her book, and from what I’ve read online there is no real set recipe, no ‘authentic’ ‘traditional’ recipe, as each family and each chef has their own blend, and puts their own creative touches or twists on it. I kind of like the fact that there’s no set recipe, that’s the ‘real’ Bajan recipe. I like that you can play around with it as long as you follow a few basic principals.

At least as far as my experience with Caribbean food goes Taymer’s version of Bajan tastes, smells and looks pretty authentic to me, as well it should since she’s a Caribbean woman. Her version uses a ton of green onions, a whole yellow onion, garlic cloves, Scotch Bonnet Peppers - though you can sub habanero which I did because I’ve never seen Bonnet’s in my area. - Lime juice, thyme, marjoram, parsley, curry powder, salt, black pepper, paprika, clove and white vinegar. None of these ingredients are cooked, they’re thrown right into a food processor and processed until you get a course sauce. After that your Bajan seasoning is ready to use in whatever creation you like from soups and stews, to tofu, tempeh or seitan. I originally made this seasoning to go into the Caribbean Split Pea Soup I was planning to make, but I can’t wait to try marinating some tofu in it and then firing up the grill.

Now, be cautious, anyone with a low tolerance for spice might find this to have too much kick, and if you’re not real sure about how much you can handle I would recommend using 1 small habanero or even a half habanero. I used 1 pepper, rather then two, and my sauce packs a punch, but the flavor is just so good, and really adds a new level of depth to meals. The other great thing about this recipe is that it makes quite a bit - about a medium sized pickle jar’s worth - a little goes a long way, and it can keep in the fridge for up to a year. How awesome is that?


Saturday, May 12, 2012

Wild Ramp Pesto...


So, the other day I mentioned that one of the things I did with my bounty of ramps was make a pesto. It may not have been the most original idea out there, but since I’d never used ramps in that way before and since I’m a big lover of pesto I thought why not? Sounded like the perfect dish to me.


Initially I wasn’t sure if I should leave the ramps raw or cook them first. Amongst ramp pesto lovers there seems to be quite the divide. Some prefer raw, some prefer cooked. After tasting one ramp raw, I decided to go the ‘mostly’ cooked route. Ramps are very pungent, and while a few raw ones here and there probably taste great, I thought it would be a bit too over powering to have them all raw. So I decided to blanch 18 and leave 2 raw and honestly I think it worked out great. 2 raw ramps were enough to give the pesto that oomph without giving it any ugh factor. At least in my opinion, but if you like a little more pungency feel free to use more then 2 raw ramps. Use them however best suits your taste, but definitely use them, and definitely use them to make pesto, because this is without a doubt one of the best pesto’s I’ve ever eaten! And I’ve eaten a lot of pesto in my time.


Wild Ramp Pesto 

20 Ramps - 18 Blanched, 2 Raw
2 Garlic Cloves
2/3 C Walnuts
2/3-3/4 C Olive Oil
Dash of ground Thyme
Sea salt and Black Pepper to taste
½ Tbsp Dried Oregano
2-4 Tbsp Lemon Juice
½ bunch Parsley

- Fill a medium sized pot with water and bring it to a boil over high heat. Trim the roots off the ramps and when the water is boiling add the 18 whole ramps into the water. Boil for 1-2 minutes until ramps are soft. Immediately drain, and then plunge into a bowl if ice water to stop them from cooking.

- Place the walnuts in a food processor and pulse until it resembles fine crumbs.

- Add olive oil, lemon juice, garlic and raw ramps to the processor, pulse until combined.

- Add the blanched ramps to the food processor along with the thyme, sea salt, black pepper, oregano and parsley. Pulse until creamy and smooth. Taste for flavor and adjust seasoning as needed.

- Enjoy over your favorite pasta. I used Gluten-Free Rice Spaghetti, and it tasted fabulous. It’s also great garnished with a handful of halved cherry or grape tomatoes!


Friday, March 2, 2012

Avgolemono Sauce...


Avgolemono Sauce is a thick, rich, creamy and tangy sauce made primarily of lemon juice and eggs. In Greek cuisine it’s typically served with dolmathes, but can also be served with steamed artichokes or sometimes as a soup. It has always been my favorite Greek sauce after tzatziki.

Dolmathes are a favorite Greek dish of mine, I love them to death but for me one of the best parts about them is the avgolemono! Since going vegan I’ve made dolmathes several times and served them with several different sauces. The cranberry tahini from "Vegan Yum Yum" which was excellent, vegan tzatziki which is good, and a handful of other concoctions, but none of them was ever the same. Dolmathes just aren’t dolmathes without the Avgolemono.


There was a period where I spent a great deal of time searching high and low for vegan versions of avgolemono, without much success. Most of the recipes I came across were for the soup variation and the ones I found that were for the sauce seemed to miss the point drastically. I did not want tofu in my avgolemono, nor did I want chickpeas or cornstarch in it. I wanted a pure and simple avgolemono, one that mimicked the taste and texture I remembered and didn’t require a bunch of ingredients that would have been entirely foreign in the kitchens of my ancestors. It took time, and thought and quite a bit of fiddling before I realized that simple really was the way to go. Essentially all I needed to do was figure out how to substitute the eggs and everything else could be changed easily. In the end I opted to use cashews for three reasons, they cream really nicely, they firm up a bit if given the chance and I wanted to make this sauce soy-free. Initially I had no idea how or if it was going to work but by the time I was finished I couldn’t believe what I’d done.

Now truthfully I can’t recall exactly what a dairy based avgolemono sauce tastes like, aside from it tasting rich and tangy with lemon, but this sauce certainly delivers on both of those fronts. In fact it’s so rich It’s hard to believe there isn’t any egg in it! You can adjust the lemon and caper content to fit your own tangy desire but I think this is really perfect as is, and it tastes incredible alongside dolmathes which is the ultimate test in my opinion. Never again will I have to eat my dolmathes plain or with a sauce that just can’t compare to the culinary traditions I grew up with. This sauce is so good in fact you’re almost tempted to eat it by itself right off a spoon!


Avgolemono Sauce

3 Tbsp Earth Balance
3 Tbsp Whole Wheat Flour
2/3 C Cashews
1/3-1/2 C water, vegetable broth or faux ‘chicken’ broth
1/4-1/3 C Almond milk
3 Tbsp capers
2-3 Tbsp lemon juice
1/8-1/2 tsp Turmeric ***
sea salt and pepper
Additional vegetable or faux ‘chicken’ broth as needed (Optional)

- Blend Cashews, water/stock capers, lemon juice, turmeric, sea salt and black pepper in a high speed blender until completely smooth. Taste for seasonings and adjust as needed. Set aside.
- Melt the Earth Balance in a small pan over medium heat. Add the flour and stir until combined and a roux forms.

- Pour blended cashew mixture into the pot and stir to combine. Slowly stir in the almond milk starting with 1/4 C if too thick proceed to stir in the rest. Let sauce simmer over medium-low heat for 5-10 minutes until thickened.

- If sauce has thickened too much or you prefer a more liquid sauce stir in 1/4-1/3 C vegetable or faux ‘chicken’ broth.

- Taste for flavor and texture, adjust any seasonings as needed and enjoy with a big plate of dolmathes! Yum!

PS: If you don’t know how to make dolmathes of your own stay tuned for my dolmathes recipe which I hope to post this weekend or Monday at the latest.

*** Note - Because you don’t want any of the turmeric flavor to come through I recommend you start off small. Use 1/8 of a tsp of turmeric powder to color your sauce, taste and increase from there until you get the desired yellow shade. ***

*** Note - Soy-Free if using a soy-free non-dairy butter. This dish can also be made Gluten-Free if you use GF flour instead***

Tuesday, January 31, 2012

Pomegranate Pancake Syrup...


I suppose technically this is more of a sauce then a syrup, but I think syrup sounds better, and I generally think of sauces as being savory and syrups as being sweet, and this sauce definitely falls into the later category.

Simmering on the Stove


I first made this sauce over a year ago, when we had an abundance of pomegranates in the house, and my waffle iron was still a novelty item. I was making waffles for breakfast once or twice a week, and when you eat that many waffles you soon grow tired of the traditional toppings. Or at least I did. Since I love pomegranate in all of it’s incarnations - whole, juice, as a flavoring for anything, etc.. - I thought why not as a syrup? There are all kinds of other fruity syrups out there but I hadn’t ever seen pomegranate syrup, and pomegranates are so delicious!

Finished Product


So after a bit of thought, some playing around and tweaking I came up with this recipe. It’s very simple, without too many ingredients, but it is very satisfying and tastes wonderful on either waffles or pancakes. It’s definitely made it onto my husbands list of favorite breakfast toppings, and I’ve made it several more times since that initial time. I hope you enjoy it too!


Pomegranate Pancake Syrup

3/4 C Pomegranate Arils (roughly 1 ½ pomegranates)
3/4 - 1C Water.
1tbsp lemon juice
1-2 Tbsp Organic Cornstarch
1/3 C Brown Sugar (or to taste)

- Blend Pomegranate Arils and water on high in highspeed blender for 30-90 seconds until very smooth. Start out with lesser amount and increase to get the desired consistency, you want the mixture to be soupy not thick.

- Strain the contents of the blender through a cheesecloth or very fine metal sieve. To remove the juice from the pulp. If using a vitamix there might not be that much pulp left that needs to be discarded.

- Next pour the liquid into a small saucepan over medium heat. Stir in the lemon juice and brown sugar. Bring to a boil, then reduce heat and let simmer. Add in Cornstarch whisking frequently until dissolved, and the sauce has thickened. Let simmer and continue to whisk periodically for about 15-20 minutes until the syrup has thickened and begins to smell heavenly.

- Once thickened test for consistency and flavor. If not sweet enough for you then add a bit more sugar to taste. Keep in mind that this sauce doesn’t get as thick as commercial syrup, if you want you can add a bit more cornstarch to thicken further, but it’s delicious as is.


- Serve warm over your choice of pancakes or waffles. Almost any traditional or fruit/nut combination would work, but my personal favorite to accompany this syrup is blueberry pancakes or blueberry waffles, and that’s what I have pictured here. Blueberry and pomegranate are a match made in heaven and if you really want to amp up the flavor add a sprinkling of fresh blueberries to your plate, and lightly dust with powdered sugar. Delicious! Cherries are another great choice, particularly sauteed or baked cherries, yum!

Monday, January 30, 2012

Broiled Vegetable Pizza Sauce...


Everyone it seems love pizza, and I am certainly no exception. There’s just something so overwhelmingly satisfying and comforting about it. It’s become something of an ingrained cultural ritual for most people. We eat it at parties, and family gatherings. We pick it up when we get off work late, or grab a slice to eat on the go at lunch. It was a favorite childhood food for most of us enjoyed at all the best occasions and celebrations. We eat it when we have late night cravings and enjoy it cold the next day for breakfast - or at least I do - Then there are some days where you just want some of that greasy oozy-gooey goodness.

These days I don’t eat as much pizza as I used to. Partly because I don’t consider it to be a particularly healthful food, - not the way most restaurants make it anyway - but also because I’m just the type of person that enjoys constantly engaging in new culinary experiences. As much as I love it I couldn’t eat pizza all the time, and I’ve never been the kind of person who only ate one kind of pizza and that was it. I find that very boring. Not to mention limiting. I prefer to constantly change things up. I despise limitations. I relish freedom and choice, and am always looking for ways to fully take advantage of both, especially in the kitchen. So these days when I do eat pizza I take great pleasure in making my own. I love coming up with new combinations of ingredients and seeing how they work together.


My favorite kinds of pizza are the kind absolutely loaded up with veggies, I also appreciate creative sauces. Classic marinara is fine, and certainly has it’s place, but I like my pizza sauce to have a little more pizzaz. I love pesto on pizza, I also love a good garlic cream sauce on pizza, roasted tomato sauces are good too, as is a good sweet and smokey barbeque sauce. So the last time I decided to whip up a few of my own pizza creations I thought why not try my hand at making a nice delicious pizza sauce?

The following recipe is what I came up with after a little bit of thought. I love broiled veggies so much, and thought they'd be wonderful blended into a sauce, lending it a sweet yet robust flavor. I was very happy with the finished product, and the great thing about it is that while there are several steps involved it is very easy. This sauce recipe makes enough for at least 3 14 inch pizzas with still a bit leftover. A great idea for the remaining sauce If you don’t want to freeze it is to heat a bit in the microwave and then drizzle it over the finished pizza. Or heat some to use as a dipping sauce. Super tasty! Another nice thing about this sauce is that it’s very versatile. You can literally pile any kind of veggies you like on top of it and it’ll go remarkably well. I used sweet potatoes and beets sliced thin on one pizza. Tomatoes, zucchini and asparagus on one, and spinach, onions, and peppers on another. Experiment and see what you like best.


Broiled Vegetable Pizza Sauce

3 Medium Sized Tomatoes on the Vine (it’s okay if they’re a bit overripe)
½ a large Vedalia Onion (or other sweet onion)
1 Large Red Pepper
6-8 cloves garlic
1 tsp Agave nectar (or to taste)
1 tsp lime juice
Fresh parsley, oregano, and basil to taste
Sea salt and Black Pepper to taste

- Set Broiler to high.

- Slice tomatoes, and red pepper in half and lay on a lightly greased broiler pan. Slice your onion half in half again and place it on the broiler pan along with the other vegetables.

- Broil vegetables until skins are blackened. You don’t want them to be entirely black and burnt, just charred a bit. Remove from oven, place onto plate or into bowl and stick in the freezer for a quick cold shock, about five minutes.

- While vegetables are in the broiler, brown garlic cloves in a dry skillet over medium heat. about five or so minutes. Remove from heat and set aside.

- Remove vegetables from freezer, skins should easily peel away from the tomatoes and pepper. Discard, along with the outermost layer of onion. Place vegetables into a highspeed blender. If there is juice remaining on the plate or in the bowl you used to hold the vegetables when putting them in the freezer pour that into the blender as well..

- Add garlic and herbs, agave, and lime juice. Blend on high until everything is combined and smooth. Add a little sea salt and black pepper.
- Next spread a generous amount of sauce onto your prepared pizza dough. Everyone likes a different amount of sauce so that is up to you. I personally like very saucy pizza, since I don’t eat cheese on my pizza the extra sauce gives it that extra oomph. Make sure to spread the sauce evenly then assemble your pizza toppings as you like and bake according to recipe directions.

So there you have it, a quick and easy pizza sauce that’s delicious and gives you the added satisfaction of knowing you made it yourself from scratch. Nothing better then that.


And incase you are curious about the pizza I have pictured here, it’s a very simple concoction that was absolutely heavenly. I used Colleen Patrick-Goudreau’s pizza crust recipe from "The Vegan Table" topped it with my Broiled Vegetable sauce, then arranged thinly sliced tomato, and zucchini on top. Added sauteed red peppers, and red onions then finished it off with some shaved asparagus, some chopped green onion and some freshly cracked black pepper. Delicious!

Also my apologies for not actually taking a picture of the sauce on it’s own, that was very neglectful on my part.

*** Note - While my sauce is gluten-free, soy-free and oil-free. My pizza was not gluten-free or oil-free. I always brush my crust with a bit of olive oil before baking to get it a bit crispy, you don't have to. Also it is very easy to make gluten-free pizza and you can even buy pre-made gluten-free crusts or pre-made gluten-free pizza dough mix at many grocery and health food store chains. ***

Tuesday, May 31, 2011

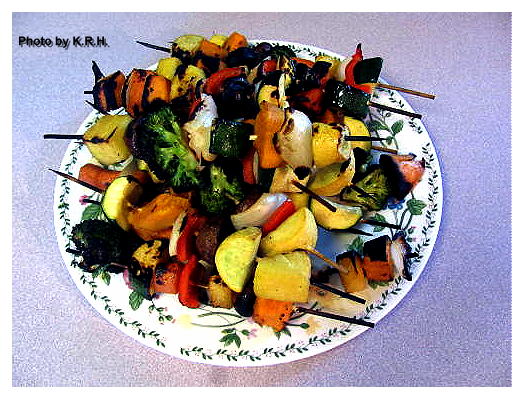
Asian Style Veggie Skewers with Thai Almond Dipping Sauce & Red Coconut Curry Sauce....


Last Thursday I invited two of my good friends J & L over for dinner. Normally when I throw together these little dinners I have some idea of what to make, but for one reason or another last week I was at a complete loss as to what to make. I wanted something simple, yet elegant, but it had to be light. The weather outside was good, and I didn’t want to stand around a hot stove, and then eat a heavy meal that would just sit in the pit of my stomach all night. I’d been thinking of grilling, and I’d been craving sweet potatoes, pineapple, Pad Thai, and curry, all very strange things to crave at once I’ll admit, and with all those things in mind I came up with this. Considering I did it all on the fly without anything except my own imagination I was pretty impressed with myself, and my guests left happily sated. Along side the veggie skewers I served a Black Radish and Pea Tendril Salad with Asian Pears, and Red Bhutanese Fried Rice, both recipes will be coming soon. Trust me when I say this is a really great meal to throw together quickly on a summer evening.

Asian Style Veggie Skewers - Makes about 16 skewers depending of course on how full you pack them.

Skewers

2 medium sized sweet potatoes diced
4 medium sized carrots chopped into roughly inch and a half length pieces
1 medium or large yellow onion quartered layers separated
1 zucchini cut into medium thickness rounds or half moons
1 yellow crookneck squash cut into medium thickness rounds or half moons
1-2 cups pineapple cut into chunks
1 red bell pepper cut into chunks
1-2 Broccoli crown cut into medium-large sized florets
14 baby bella mushrooms

Marinade

1/8 cup vegetable broth
4 tbsp organic peanut oil
1-2 tbsp sesame oil
1-2 tbsp soy sauce
1 tbsp lime juice
1 tbsp agave nectar
dash of black pepper, ground ginger, and garlic powder

- Steam sweet potatoes and carrots in steamer basket until able to pierce easily with fork, but not mushy or too soft. 10-12 minutes.

- Place all vegetables in large sealable container. Or zip-lock bag (I used a snap-lock container) pour marinated over vegetables, lock container and shake till well mixed. Place in refrigerators and let sit 2-4 hours. Turning over once every 30 minutes to evenly distribute marinade.

- When finished marinating slide vegetables onto wooden skewers in alternating patterns.

- Turn grill to medium heat, and grill vegetable skewers for roughly 3-4 minutes a side. Remove from heat to a plate and serve with Red Coconut Curry dipping sauce, and Thai Almond Sauce.

- Note: If a few veggies get a bit crisp or blacken don’t fret, it adds a really nice smoky grill flavor to the vegetables.


Thai Almond Sauce

1/3 heaping cup Almond butter(or to taste)
1/3 cup lime juice (or to taste)
1/4 cup soy sauce (or to taste)
2 tbsp agave nectar (or to taste)
A few cracks of a black pepper mill
dash of ground ginger, and garlic powder
Cayenne pepper to taste

- Whisk everything together until smooth, then place in bowl and serve right away. You can also make this sauce in advance and keep it in the fridge until ready to serve

Red Coconut Curry Sauce

1/4 cup coconut milk (full fat) (or slightly more to thin)
4 dates pitted
1 tbsp lime juice (or to taste)
1-1/2 tsp Red Curry Paste (or more to taste)
dash of black pepper, ground ginger and garlic powder

- Blend everything in a high speed blender for roughly 1 minute or until everything is smooth and creamy. Serve right away, or it can be placed in fridge until ready to serve.


Honestly these vegetables skewers are so flavorful on their own that the dipping sauces aren’t really necessary, but the sauces do make great companions, and if you have the time plus the ingredients I highly recommend making them. You and your guests will not be sorry. I promise.

*** P.S.: I’m sorry there are no pictures of the sauces, it had kind of slipped my mind and by the time I remembered to grab my camera there wasn’t mush sauce left to photograph. ***

*** Note - Gluten-Free if using Wheat-Free Tamari Soy Sauce ***