Showing posts with label Lunch. Show all posts

Tuesday, January 14, 2014

January Cleanse Part Two...


And so the cleansing continues - I had meant to post a couple of days ago but time gets away from me, and then I caught a cold middle of last week and didn’t feel all that inspired to write. That doesn’t mean I haven’t been keeping track though, and interestingly being sick has helped me stick pretty rigorously to the cleanse. Since fresh fruit and veggies - lots of garlic, onions and greens - are the best things to eat when you’re under the weather.

Each days starts the same with a 20oz glass of water - there’s nothing particularly special about this number it’s just that all my drinking glasses hold about 20oz of liquid. - Sometimes with lemon and sometimes not it depends on how I feel. I normally drink immediately upon waking, but I don’t always drink a full glass before decided to eat. I’ve found that waiting to eat until I’ve drunk a full glass of water better helps me to determine whether or not I’m actually hungry. You’d be amazed, sometimes those ‘hunger pains’ you feel in the morning is just a need for water.

Grapefruit/Orange/Lemon Juice &
Immune Me Juice 


When I begin to feel hungry again I grab a 12oz bottle of fresh juice. Either it’s the grapefruit, orange, lemon concoction I mentioned before or a green juice. The Green Juice pictured here is the Immune Me Juice from Kris Carr’s “Crazy Sexy Kitchen” it contains cucumbers, green apples, lemon, ginger, and romaine lettuce. Though it’s not my favorite juice from the book - nor my favorite green juice - it’s still pretty good, less sweet then some green juices I’ve had before, with a real cucumber taste. Great ginger zing though.

Everyday Wednesday, Thursday, Saturday, Sunday and today I followed my 12oz juice 2-3 hours later with either a smoothie or a bowl of oatmeal. My bowl of oatmeal is always pretty well the same. Quick cooking oats, sliced almonds, dried cherries or cranberries, fresh or frozen blueberries, flaxseed, pumpkin seeds or sunflower seeds, unsweetened almond milk and a few drops of liquid vanilla stevia. Super hearty and filling.

Oatmeal 


In the case of the smoothie - which I neglected to photograph each day, my apologies - I either had a Green smoothie - usually a combination of spinach or kale, wheatgrass, banana, pineapple, mango or blueberry and water - or I made the AJ’s Power Smoothie from Kris Carr’s “Crazy Sexy Kitchen” this is a smoothie combo of Almond Milk, Blueberries, Mango, Almond Butter, Cinnamon, Kale, and Spinach. Overall this smoothie is pretty good, though not as sweet as I initially thought it might be.

Masala Tofu Scramble 


On both Friday and Yesterday I was feeling inspired and decided to treat my husband and myself to a breakfast of solid food that wasn’t oatmeal. On Friday I was really feeling like a hearty tofu scramble and so I decided to make the Masala Tofu Scramble from Anupy Singla’s book “Vegan Indian Cooking” It’s a very simple recipe - Tofu, cumin seeds, onion, ginger, Serrano chilies, turmeric, chili powder, sea salt, black salt and cilantro.


Now on this cleanse I’m not doing ‘oil-free’ ‘salt-free’ or ‘gluten-free’ but I am trying to limit all three of these items in my diet to minimal amounts or in the case of wheat - a few times per week. So instead of using the 1 Tbsp of oil called for in this recipe I used 1 tsp. I also used only 3/4 tsp of black salt as opposed to ½ of black salt, and a ½ tsp of sea salt. I also decided we needed a little more green in our life and so I added 1 cup of frozen peas and a generous handful of baby spinach to the scramble. It might sound crazy, but this was one of the best scrambles I’ve ever had. It was moist, and flavorful with great combination of tastes and textures. To make it a bit heartier I served it over dry toasted wheat bread and sliced tomatoes. - The toast in this meal was the first wheat I’d had in 5 days.

Chickpea Flour Crepes 


Due to our tremendous sucsess with Anupy’s Scramble I decided yesterday that I wanted to give another one of her breakfast options a try. This time I wanted something gluten-free and so I picked the Chickpea Flour Crepes - or Besan Poora - from “Vegan Indian Cooking” Making them was a bit like making a socca except instead of cooking the entire batter in a cast iron skillet all at once you make smaller thinner crepes with it. I was kind of skeptical at first about how it might turn out but I have to say these were incredible and so filling! This kept me full pretty much all day. At around 5pm yesterday I had a 12oz juice, and was still only moderately hungry when dinner was ready at about 9pm.


So what’s in these delicious magical crepes you ask? Chickpea flour obviously, and water, onion, ginger, serrano chili, cilantro, sea salt, coriander, turmeric and chili powder. There were also suppose to be fenugreek leave in the batter but I don’t know where you might find those for sale around here - possibly the Indian market but I wasn’t about to run out to look, and so I just left that out. Anupy says that the recipe is pretty adaptable and she encourages you to experiment with different batter ingredients and also suggests filing the crepes. I liked the idea of filling the crepes and so I sauteed the half an onion that didn’t go into the batter, along with some garlic, spinach, and tomato. I happened to have fenugreek seeds in my pantry and so I used 3 tsp of those rather to replace the flavor the leaves might have imparted.  She also suggests serving the crepes along with mint or peach chutney but I didn’t have either nor did I have the proper ingredients to make chutney. Instead I mixed some tamarind concentrate with water and made a quick tamarind chutney to drizzle over the pancakes. Tamarind chutney is my favorite anyway and so I didn’t feel like I was missing out.


The flavor of these crepes was really spectacular, and they kind of reminded me of an egg, even though there were no eggy ingredients in them. Typically I prefer a sweet breakfast if I’m going to have breakfast, but this just might have made me a savory breakfast convert.

Now what I’m sure you’ve all been waiting eagerly to hear about. What have I been eating for dinner? Well Wednesday night was simple I was really just craving greens you know? So I made one of my ‘go-to’ quick and easy rice bowls. This particular one contained brown rice, steamed kale, minced raw garlic, minced pickled ginger, diced tomato, red cabbage, and sesame seeds. Over top I drizzled some of that spectacular Tahini dressing that I’ve been using on my Woodstock Peace Salads. - Which I talked about in January Cleanse Part One

Rice Bowl with Kale 


Thursday night I really needed some immune support you know? All Wednesday night into mid-day Thursday I had a fever of over 100. By Thursday evening I was feeling a little better because the fever had finally broken and gone, but I was tired and needed some food that would support me. I decided to make the Garlic and Greens Soup from Colleen Patrick-Goudreau’s book “The Vegan Table. This is a super simple soup that uses a whole head of garlic! Plus an onion, potatoes, vegetable broth, kale, salt, pepper, and rice vinegar. It’s actually a really tasty soup despite how simple it sounds although I thought it could use more garlic. Maybe it’s just because I naturally put ½ to 1 full head of garlic into almost all of my meals anyway that I didn’t notice the garlickyness of this, but I ended up adding some extra garlic powder.

Garlic and Greens Soup


Along with the soup I made a salad. The Chopped Salad from Kris Carr’s “Crazy Sexy Kitchen” this is a super simple but delicous and satisfying salad of romaine, chickpeas, parsley, sunflower seeds, flax oil, white balsamic vinegar, sea salt and black pepper. I also added avocado because, well why not? I’ve made this salad on a few occasions before and really like it. Even my husband enjoyed it and he’s neither a big fan of sunflower seeds or chickpeas.

Chopped Salad 


Friday, Saturday, and Sunday we ended up having the exact same thing for dinner. The Crazy Sexy Bean Chili from “Crazy Sexy Kitchen” I had really been craving chili for a while and it seemed like the perfect time to make one. Typically my husband is not a fan of chili - he hates beans! I know a vegan that hates beans, absurd! - so he wasn’t too thrilled about it but I decided I didn’t care. I wanted chili he could eat leftovers. This particular chili is made with cumin seeds, olive oil - I used half the amount listed - onion, garlic, jalapeno, chili powder, seitan or tempeh - I used seitan because I had some homemade seitan patties in the freezer - zucchini, potato, black beans, kidney beans - I was a bit concerned about this because Kidney beans are the only variety of bean I don’t like! - crushed tomatoes - I didn’t have any so I used 14 oz diced tomatoes and 6 oz tomato sauce - water, maple syrup, sea salt, cilantro and kale.

Crazy Sexy Bean Chili 


This is a super veggie packed chili, but I was a bit skeptical. Most chili recipes I make call for vegetable broth not water, and they typically have more spices so I was worried this chili might be bland. Crazy thing is, it was the most flavorful chili I’ve ever made. Seriously I’ve had some good chili in my time and this really tops the list, it’s probably going to be my ‘go-to’ chili from now on. I didn’t even notice the kidney beans and the mixture of veggies, seitan and beans provided a perfect balance. The chili was so good in fact that my husband tasted a little and then devoured an entire 2 bowls! I’ve never seen him go crazy for chili like that, I’ve never seen him eat beans with such relish! Since he loved it so much and It was so easy to make I decided that after our leftovers ran out Saturday night that I’d make another batch for Sunday. Seriously, this is a totally heavenly chili, and so good it doesn’t need extras like vegan sour cream or vegan cheese - though we did add some diced avocado to the top, because, like, why not?


Last nights dinner was another winning meal from “Crazy Sexy Kitchen” I made the Coconut and Red Lentil Soup and it’s probably one of my favorite red lentil soups now. It’ll probably be another ‘go-to’ recipe for me. Again it’s a super simple recipe, cumin seeds, coriander seeds, olive oil - I used less then half the amount called for - Serrano chili, onion, red lentils, vegetable broth, coconut milk, ginger, lemon zest, lemon juice, salt - the recipe calls for ½ Tbsp but I couldn’t in good conscious put that much salt into anything! So I used 1 tsp. Black pepper - a ½ Tbsp is also called for but I used a little under 1 tsp instead,- fresh cilantro and diced avocado. This soup was really flavorful, really creamy, and just plain delicious.

Coconut and Red Lentil Soup 


So, how have I been feeling? Overall I’d say that despite being sick I’ve felt a lot better then I had been feeling previously. Most noticeable is an increase in energy. I feel more alert, more awake and I’m better able to make it through the day without yawning or laying down for a nap. My brain doesn’t feel foggy, my body doesn’t feel so leaden and heavy. I don’t think I’ve lost weight but I feel lighter and leaner despite that. Probably because I’m not bloated and my bodily functions are normalizing. I have less trouble waking up in the morning and can stay up later - like I used to be able to.


As far as temptations are concerned, yes there have been some hard moments. At least a few times I’ve found myself craving something sweet - particularly chocolate - but I’ve been able to find ways to overcome this. I find these cravings often come in the evening and so if I make a hearty satisfying dinner they typically don’t persist. However if they do I’ve been able to stave them off with fresh juice, or in Thursday’s case a healthy dessert. Thursday I really wanted something sweet and it was driving me bonkers so I decided to make the Banana Chia Pudding from Matthew Kenney’s book “Everyday Raw Express” it’s a super simple Vitamix recipe. You blend together cashews, water, cinnamon, vanilla, nutmeg, ginger, bananas, and agave - I used 1/3 cup instead of the ½ cup called for. Then you pour it over a ½ cup of chia seeds stir and refrigerate until it’s congealed. Bam, practically instant pudding, and while this might not sound all that phenomenal let me tell you. This stuff is like crack! I’m serious, if I could mainline this stuff I would. It’s amazing! What’s great is you don’t even have to feel guilty about eating it! It’s absolutely perfect on it’s own or you can jazz it up with some fresh fruit or chopped nuts.

Banana Chia Pudding 


I also had some caffeine cravings and there was nothing I could do to find a suitable replacement and so I just had to ‘be strong’ and exert my willpower. I try and drink a significant amount of water, and I have been drinking quite a bit of tea - due to the cold - so that does help The occasional Kombucha or coconut water doesn’t hurt either and I remind myself that I feel great after drinking these things as opposed to how I feel after drinking coffee which is an immediate buzz, and then a total crash and ‘blah’ feeling.

So far I’m most proud of myself when it comes to eating at work. I have a bad habit of snacking on junk at work, and work is really my biggest downfall when it comes to sweets. That’s when I crave chocolate the most. Since I’ve been sick I’ve been arming myself with travel mugs of hot tea, and 2 12oz bottles of green smoothie. I sip these things slowly over the course of the day, or save a bottle of smoothie for my lunch break and I’ve found that my hunger was completely satisfied and I felt no need whatsoever for sweets or snacks. Packing a smoothie is also quicker then packing a ‘traditional lunch’ and so I think I’ll continue this trend even after my cleanse is technically over.

The only thing I haven’t been able to do is exercise. I was hoping to get into a real good exercise routine as I started my cleanse but having this cold has kind of thrown that out the window. Low pressure activities like walking would have been acceptable if the weather wasn’t so bad, but with -20 degree temperatures I hardly think it wise to venture outdoors for a walk. I could do some easy yoga inside but the headache and sinus pressure I’ve felt over the past few days made that impossible. Just bending down to tie my shoes had my head feeling like it was going to explode. So exercise will have to wait, but at least the eating portion of the cleanse is going as planned. Stay tuned for the next installment.

Friday, January 4, 2013

Green Salad with Crumbled Chèvre, and Walnuts in a Sweet Dijon Vinaigrette


One thing I really wanted to do for Christmas was utilize some of the delicious sounding recipes from Miyoko Schinner’s book “Artisan Vegan Cheese.” For me, holiday celebrations are the best and most practical time for me to make recipes like this. Since these recipes always tend to make a lot, and since my husband was never a fan of dairy cheese - and thus not a fan of vegan cheese either - it’s far to much for me to make these recipes just for myself. I’d never be able to eat it all, and truth be told I wouldn’t want to eat an entire pound of cheese anyway, even if it is vegan cheese.


There are so many great sounding recipes in this book that I really wanted to try that it was really difficult to try and decide what ones I wanted to make first. I thought long and hard about what would make a great party cheese plate, and then thought about what kind of cheese I’d like to eat. Eventually I settled on three cheeses in particular but for now I’m only going to talk about the Chèvre. Back when I was still a dairy eater, I loved goat cheese, and so this recipe really intrigued me. Overall I think it turned out really well, although next time I think I’ll use a bit less lemon juice and age it a tad less as well because it came out tasting very tart, and overall it was very strong. At the party I served it on a platter with crackers along with the Aged Cheddar - also from the book - and a Raw Christmas Cheese Ball - More on this later - that I made and It went over really well, even with the omnivores who thought it was delicious, and couldn’t believe that I’d actually made it from scratch.


The problem came after Christmas was over and I realized I still had half a brick of Chèvre left in my fridge. I’m not the cheese and crackers type really, so I’m not about to sit around and eat it all up in that way, and it’s been so long since I’ve had any use for cheese of any kind that I wasn’t quite sure what else to do with it. Eventually I decided on giving half of what I had left to my dear twin brother E, because I knew he would enjoy it. As it turns out he did enjoy it, and he gave me a great idea for how to use up the rest of what I had left. Crumbled on top of salad with walnuts, and a Dijon Vinaigrette. Of course! And how simple, I can’t believe it hadn’t occurred to me.

So a couple of days ago I got thee to my kitchen and threw together this super tasty and ridiculously simple salad.


Green Salad with Crumbled Chèvre, and Walnuts in a Sweet Dijon Vinaigrette

1 C Baby Spinach
1 C Chopped Romaine Lettice
1 Ripe Anjou Pear sliced thin
½ C Dried Cranberries
1 Large Ripe Tomato Diced
½ C Raw Walnuts
1/4 C Sliced Green Onions
1/3 C Crumbled Vegan Chèvre (Preferably homemade using the Artisan Vegan Cheese Recipe!)

Dressing 

1 Tbsp Agave Nectar
1 ½  Tbsp Dijon Mustard
1 Tbsp Hemp Seed Oil
1-2 Garlic Cloves
2 Tbsp Water
Sea salt and Black Pepper to taste

- Combine all salad ingredients - except Chèvre -  in a bowl and mix thoroughly to combine. Top with crumbled Chèvre.

- Combine all dressing ingredients in a food processor and process until smooth and creamy. Roughly 1 minute. Taste and adjust flavor as needed.

- Drizzle dressing over salad and enjoy!

Thursday, December 6, 2012

Swiss Chard Salad with Sauteed Stems in A Dijon Vinaigrette...


Last night I felt like making a salad to go with our dinner, but I didn’t have any lettuce and I didn’t have any kale. I had cabbage but we’d just eaten a cabbage salad with dinner the night before and so I wanted something different. The only other green I had available was a huge bunch of Rainbow Swiss Chard that I bought on Sunday simply because it looked beautiful and because it was on sale. I took a good look at those big beautiful leaves and thought ‘why not? You can make a salad out of this can’t you?’ In fact I knew it was possible to make a salad out of Chard because I’d made a Romaine and Chard salad more then a year ago, but chard is just one of those greens that while I love it, I never really use it. Plus I was worried that without the subtle sweetness of romaine the chard would be too bitter. Of course since I didn’t have anything else to offset the flavor I had to do my best and make it work somehow.


In the end this salad exceeded all expectations, and for whatever reason it really felt like a winter salad. Maybe because of the dark leafy leaves, or maybe because Chard is more associated with winter, I don’t know but it felt appropriate and it tasted fantastic. Since I didn’t want to waste the stems and because I didn’t want to eat the stems raw I decided to saute them, I like sauteed chard stems, they taste vaguely of beets and I think it was a perfect topper for this salad. They were tasty, tender-crisp, made a beautiful presentation and throwing them into the salad is a great way to utilize the whole plant.


Though it may sound strange to you at first trust me when I say this salad is fan-freaking-tastic. My husband and I loved it so much we gobbled up massive bowls of it, and barely had room left for the soup I’d made as our main course. It’s got a great combination of flavors and textures, and each one really lingers on the tongue. Try it!


Swiss Chard Salad with Sauteed Stems in A Dijon Vinaigrette

1 Large bunch Rainbow Swiss Chard
1 Red Onion sliced thin
2 carrots grated
½ C dried Blueberries
1/4 C Toasted Pecans (optional)
2 Tbsp Hemp Seeds or more to taste
1 tsp olive oil

Dijon Vinaigrette 

3 Tbsp Hemp Seed Oil
2 Tbsp Apple Cider Vinegar
1 ½ Tbsp Dijon Mustard
4 Medjool Dates
1/4-1/3 C Walnuts
1-2 Garlic Cloves to taste
½-1 Tsp Onion Powder
Sea Salt and Black Pepper to taste
Dash of White Pepper
1/4 C Purified Water to thin or more/less as needed.

- Remove Chard leaves from stems. Set stems aside and cut leaves into bite sized pieces. Toss the Chard leaves into a big bowl and add grated carrots, dried blueberries, pecans, and hemp seeds. Set aside.

- Mince the reserved Swiss Chard stems then add them to a medium sized pan with the tsp of olive oil and sliced red onions. Saute over medium-high heat for 5-8 minutes until stems are tender-crisp and onions are translucent. Remove from heat and add them to the salad.

Note - It’s okay if the pan that you’re cooking the stems and onions in gets a bit dry, you don’t want the mixture to be liquidly so you may even want to use less then 1 tsp of oil. Just enough really so that they cook nicely, get a bit of flavor and don’t stick to the pan. 

- To make vinaigrette place all ingredients in a food processor or high speed blender and blend until completely smooth. Taste for flavor, and consistency and thin the dressing as needed and adjust flavor to taste.

- Poor the vinaigrette over the salad and using two wooden spoons gently massage the dressing into the salad making sure all chard leaves get covered. Massage the salad for roughly 5 minutes until the chard leaves wilt slightly and soften.

- Divide amongst bowls and enjoy!


PS: In summer when fresh blueberries are in season you can make this salad with those instead of dry. You could also probably substitute the nuts for a nut that's a little more summery, like a Macadamia. Yum! 

Monday, October 1, 2012

Vegan Mofo #2 - Chloe’s Thai Chickpea Burgers with Sweet ‘n’ Spicy Sauce...


Vegan Mofo #2 - Chloe’s Thai Chickpea Burgers with Sweet ‘n’ Spicy Sauce
The Book - Chloe’s Kitchen
The Author - Chloe Coscarelli
The Recipe - Thai Chickpea Burgers with Sweet ‘n’ Spicy Sauce
Page #121
Difficulty - Easy
Duration - 30-40 minutes depending on how fast you’re able to whip everything together. Longer if you’d prefer to bake the patties as opposed to frying them.


I am a big fan of anything chickpeas, they are without a doubt my favorite bean, and I could eat them cold straight out of the can. I’m also a huge fan of falafel and falafel type things, so I was eager to test this recipe out. The fact that it’s pretty simple to prepare and comes together rather fast was a bonus since I had to make it all yesterday morning before heading off to work.


I haven’t made a lot of recipes in Chloe’s Kitchen, but of the one’s I’ve made I haven’t been steered wrong yet, and these burgers are no exception. I love the robust combination of flavor as well as the density of the patties. They’re hearty, they’re filling, they feel like they should be really bad for you but really they’re not. I also love the simplicity. No wheat-gluten, no seitan, no tempeh not even tofu. Just good down-home ingredients that most people already have handy in their fridges and pantries. It’s perfect for a busy weeknight meal, a quick weekend throw-together or an afternoon lunch.


The patties are a blended mixture of chickpeas, onion, garlic, ginger, cilantro, lime juice, jalapeno and a couple of other things. They have a slightly spicy subtly tangy twist, and a vague Thai or Asian fusion feel. They’re especially good paired with the super simple and easy sweet ‘n’ spicy sauce which is just a combination of tomato paste, olive oil, water, agave, vinegar, red pepper flakes and salt though for some extra kick I also added Siracha. Of course no spicy burger would be complete without the addition of cooling avocado.


In the end I served these burgers pretty plain. On simple wheat burger buns, with sweet orange tomatoes from our garden and a smear of Earth Balance Mindful Mayo. I know it sounds so simple, but sometimes simple is all you’re looking for, sometimes simple is what you need.

I’m looking forward to trying more recipes out of Chloe’s Kitchen in the future.

PS: Please excuse the bad lighting I took these pictures close to Midnight and you know how my kitchen lighting is. Also excuse the poor presentation, I wasn’t about to make a side dish just for aesthetics.


Monday, July 30, 2012

Baked Sunchoke Sandwiches with Five Spice Slaw...


I’ve been rather neglectful of the blog of late I know, and for that I’m sorry. It’s just that a multitude of other things have accumulated and I’m finding it very difficult at the moment to divide my time. I know I last left off with updating about my vacation to Germany but I thought since it’s been such an awful long time since I posted a recipe I should take a few moments to do that instead.


In truth I haven’t been cooking much, or rather I have been but I’ve been making very simple food, nothing worthy of blogging about. This dish however I made just before going on vacation and it was simply superb! Really it’s perfect for a hearty lunch or a light dinner, because really, who doesn’t love a big ‘ole sloppy sandwich every once and a while? And, how often do you get to use sunchokes? Not often enough in my opinion, so I hope you enjoy, and I promise to get back to posting regularly again.


What I like best about this sandwich is the subtle hint of anise from the five spice powder. You get this great punch of Asian flavor combined with the unique taste of sunchokes, fantastic combination, trust me!


Baked Sunchoke Sandwiches with Five Spice Slaw 

1 lb Sunchokes,
Sea salt and Black Pepper to taste
1 French Baguette
Sliced Tomato to serve
Thai chili sauce to serve (optional)

Five Spice Slaw 

2 Carrots Grated
2 Celery Ribs diced
1 Red Bell Pepper diced
4 Garlic Cloves minced
Green Onions to taste
1 ½ C Red Cabbage finely shredded
½ C Non-dairy Mayo (I like Earth Balance)
1 ½ tsp Sesame Oil
1 tsp Coconut Amino’s or Soy Sauce
1 ½ tsp Chinese 5 Spice Powder or to taste
Sea salt Black pepper
1 Packet Stevia or to taste (Optional)
2 tsp Apple Cider Vinegar
½ Bunch Cilantro Minced

- Pre-heat oven to 400'F

- To make the Sunchokes make sure you rinse and clean them very well. They tend to be quite gritty. What I like to do is soak them in a big bowl of warm water for a few minutes. Then I scrub them good and give them a rinse.

- After they’ve been washed you want to slice them relatively thin. You can do it with a mandolin or a knife, whichever you prefer. No need to peel the chokes as long as you wash them well.

- Next spray a baking sheet with non-stick spray. Then spread the sunchoke slices out in a single layer. Depending on the size of your pan you might need to do this on two pans. Sprinkle with sea salt and black pepper to taste then place in the oven.

- Bake at 400'F for 10 minutes a side, or until the sunchokes have turned a nice golden color. Be careful not to burn or crisp them. You still want them a bit soft.

- Once done remove from the oven and set aside to cool.

- To make the Five Spice Slaw mix together carrots, red pepper, red cabbage, celery, cilantro, garlic and green onions in a big mixing bowl.

- In a small bowl whisk together the Mayo, sesame oil, coconut amino’s or soy sauce, Chinese 5 spice powder, apple cider vinegar, salt, pepper, and stevia to taste. Taste for flavor and adjust seasonings as needed.

- Pour the dressing over the Slaw and mix to thoroughly combine. Taste and adjust flavor as needed.

- To assemble your sandwich slice the Baguette in half crosswise, then make a slit lengthwise down each half.  Layer in the baked sunchokes, top with a few slices of tomato, and a heaping amount of slaw. Then drizzle a little Thai Chili Sauce over top if desired, and enjoy!


PS: Gluten-Free if using Coconut Amino's or GF Tamari. Soy-Free if using Soy-Free non-dairy Mayo


Monday, November 21, 2011

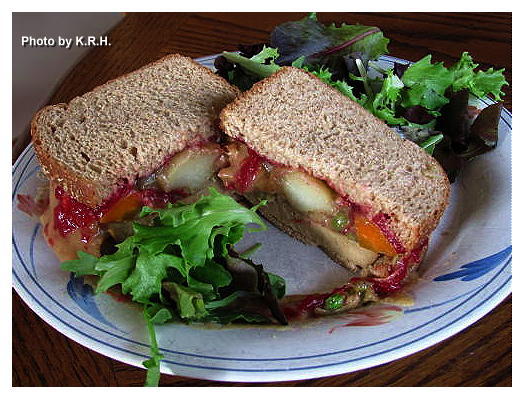
The Obligatory Post-Holiday Leftover Tofurky Sandwich...


Before I get to the matter at hand I believe this post requires a bit of back story.

On Friday afternoon while doing a little grocery shopping, my husband and I walked past a frozen display case showcasing items that were on sale for the holiday’s. Among them were Tofurky’s 1 pound vegetarian roast, and a carton of their mushroom gravy. I have never before eaten a Tofurky roast, nor had I any interest in doing so. In fact I tend to steer clear of Tofurky products - with the exception of their marinated tempeh bacon which is delicious - because of negative reviews from people I know. However as we stood there staring into the display case I couldn’t help but feel a little curious about the roast. My husband - exuding much more enthusiasm then me - declared "Let’s try it!" and promptly plopped the thing into our cart. At first I was tempted to put it back, but then after a few moments consideration I decided it would make a quick and effortless meal one day this week. Since it is a holiday week which will see me busy with all manner of things but also working more then usual the convenience of this appealed to me. As much as I love to cook, there are just some days where even I want to say "Screw it!" so I grabbed a carton of mushroom gravy too. I figured as long as I was already going down that road why not get both feet wet, you know?

The Sandwich Open Faced


Yesterday after a long and tedious day that began at 4:15am I decided to prepare the roast. I was skeptical about it for sure, not only because of my negative associations with Tofurky but also because I generally do not like meat substitutes. Yet as I began reading the preparation instructions along with their listed suggestions I felt some excitement brewing. Originally I planned only to serve the roast with some mashed potatoes, but the package suggested I roast the Tofurky in a casserole surrounded by chopped carrots, onion, and potatoes. Not only did this sound delicious - I love roasted vegetables - but it was also convenient. I mean who doesn’t love a one pot meal? I took the suggestion to heart added the recommended vegetables along with some minced garlic and their ‘turkey baste’ which was a mixture of olive oil, soy sauce and sage. After later uncovering the roast to let it cook uncovered for the remaining fifteen minutes I also threw in a cup of frozen peas because for some reason I just can’t imagine eating gravy without peas. I love the combination of sweet peas and savory gravy so much I could literally just eat that as a meal!

As the Tofurky roasted the smell that emanated from my oven was surprisingly heavenly and very Thanksgiving like. It got my mouth watering and my creative juices flowing. How could I just roast a simple tofurky without any proper ‘traditional’ sides - I use the word traditional very loosely considering my last post on the matter. - Suddenly I felt in the mood for cranberry sauce, strange since never in my life have I ever liked or desired cranberry sauce. I never ate it growing up, and always adamantly avoided it when it appeared on the holiday table, but I’ve come to the conclusion that it’s not cranberry sauce I dislike but canned cranberry sauce. There is indeed a massive difference, and as a child I’d simply never eaten homemade before. Cranberry sauce is easy enough to make from scratch and doesn’t require a recipe but considering my goal of late I decided to use Alicia Silverstone’s Cranberry Sauce recipe from "The Kind Diet" and it was delicious! To round out the meal - and because I’ve been desperately craving greens lately - I made Isa Chandra Moskowitz’s Stewed and Sauteed Collards from "Appetite for Reduction." Which too were fantastic.


As for the Tofurky? Fantastic! I literally could not believe my tastebuds. The flavor was wonderful, and didn’t have that strange aftertaste I find most meat alternatives have. The texture was also chewy yet soft, very comparable to turkey or rather what I remember turkey to be like. Both my husband and I quite enjoyed it, and came to the mutual conclusion that it might be nice to indulge in a tofurky once a year or so from now on.

Now, to bring this post back to ir’s original intention. The Obligatory Post Holiday Leftover Turkey Sandwich. As I was enjoying my tofurky smothered in mushroom gravy with a generous dollop of cranberry sauce I started to have these memory flashbacks of my childhood.

Look at all that oozy delicious gravy!


I started to recall quite vividly that when I was growing up my Oma, post holiday - would always make for my uncles - and anyone else who wanted one - a special sandwich made up of holiday leftovers. I don’t think this is at all unique to my family but I don’t know many other people who do this. What my Oma would do was take slices of leftover turkey and place it on a piece of bread. Top it with a scoop of leftover stuffing, a dollop of leftover mashed potatoes. Pour onto it some gravy and then slather a second slice of bread with cranberry sauce and press that on top. This would happen after every holiday that featured a turkey dinner. - In Canada, at least for my family that meant Thanksgiving, Christmas and Easter. As unlike most Americans we never ate ham or beef roast during the holidays - Now as a child I found this utterly disgusting and I can say with total honesty that I never, ever ate one of these monstrous and grotesque sandwiches. Never had any desire to, the very idea of it made me want to be sick. That is until last night. I mean for whatever reason as I enjoyed my tofurky all I could think about was using the leftovers to make one of those post holiday sandwiches. I don’t know what suddenly prompted this idea, or what fueled my desire for it, but there it is. Isn’t it funny how veganism can change so many things in your life?

So this afternoon when lunchtime rolled around I very excitedly bounced into my kitchen eager to try for the first time ever a post holiday sandwich. I heated the tofurky, a few spoonfuls of mushroom gravy and a scoop of leftover vegetables. Left the cranberry sauce cold though I suppose you could heat that also and then grabbed the wheat bread to assemble. When I finally sat down to take a bite out of my creation it was as if all the goodness of Thanksgiving exploded into my mouth. This sandwich has all the things you love about Thanksgiving rolled up into one big, delicious, decadent treat. My only complaint is that there should have been more stuffing. I suggest if you’re a stuffing lover you make an extra dish of stuffing to serve alongside your tofurky roast, and be sure to leave some extra for your sandwich the following day!


The Obligatory Post-Holiday Leftover Tofurky Sandwich.

2 thin slices roast tofurky
2-3 generous spoonfuls of mushroom gravy
1 scoop of mashed assorted roast vegetables or mashed potatoes
1 generous spoonful of cranberry sauce
2 slices whole what bread
1-2 generous spoonfuls of stuffing of choice (optional if you have any leftover available)

- On a plate heat your tofurky, vegetables and stuffing in the microwave until warmed through but not piping hot. About 1 minute and 30 seconds.

- In separate dish heat your mushroom gravy, until warmed through. About 1 minute.

- Place sliced tofurky on 1 slice of wheat bread. Top with optional stuffing, roasted vegetables or mashed potatoes and then pour gravy over top. Slather the cranberry sauce over the second slice of bread and press on top of the sandwich.

- Slice sandwich in half to make it easier to eat. Caution sandwich will be messy but it’s oh so worth it! Serve with a side salad of mixed greens and enjoy!

PS: This is definitely comfort food not health food, but then what are the holidays about if not comfort? Thanksgiving only comes once a year right, allow yourself to indulge a bit!
PPS: Regrettably I neglected to take pictures of the full Tofurky meal from last night. This has a lot to do with the fact that we ate rather late, and both of us were too hungry to wait for my photo shoot to be over. Appologies for that as I now wish I’d taken photos of every dish to accompany this post, and so you could see what a roasted tofurky looks like - the picture on the box is a little less then appetizing in my opinion - as well as see Alicia’s cranberry sauce and Isa’s Stewed and Sauteed Collards. C’est la Vie! Next time I promise.

Monday, July 18, 2011

Toasted Tomato Cucumber Sandwich with Dill Mayo and Sweet Cajun Plantains


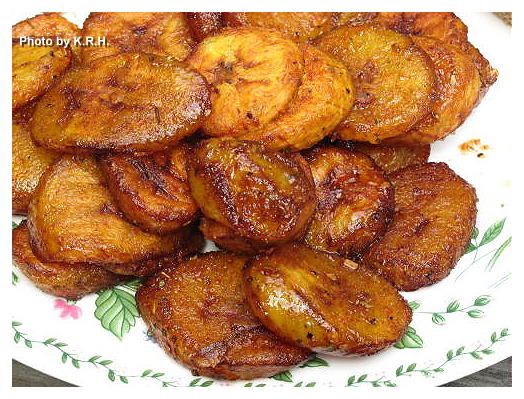
Today’s recipe(s) is super simple but also super delicious. It’s the perfect thing to whip up for a quick filling lunch or a light dinner. The best part is that it doesn’t have you slaving over a hot stove or grill in this agonizing heat. The sandwich is simple I know, using few ingredients, but it packs a flavorful punch. It’s very reminiscent of the toasted tomato mayo sandwiches I ate and loved during the summers of my childhood. Though grown this is still a meal I find myself craving at least a few times each summer season. Something about the texture, the toasted bread, the creamy mayo, and the cool refreshing tomato.... the sweet juicy taste of fresh vine-ripened tomato paired with black pepper... mmm... This version of course is slightly different then the Toasted tomato sandwich of my childhood, but no less delicious, more so in fact. Also back then my sandwich was usually paired with chips, fresh fruit or raw veggies. I highly recommend the fresh fruit and raw veggies but on this particular day I was feeling something slightly more decadent... sweet, fried plantains!

Revamped Toasted Tomato Cucumber Sandwich

2 Slices Whole Wheat Bread (lightly toasted)
4 Slices tomato
8 Thin slices cucumber
Fresh ground Black Pepper to taste (3-4 grinds of a pepper mill usually does the trick)
Pinch of White Pepper (Optional)
Dijon Mustard (Optional)
1 Batch Dill Mayo (Recipe Follows)

- Toast your bread till lightly golden. You don’t want it to be soft but you don’t want it to be super crunch either.

- Spread a thin layer of Dijon mustard over one slice if desired. Spread the Dill Mayo on the other slice of bread. Add cucumbers in an even layer over Dijon side of bread. Evenly layer over tomatoes, add your ground pepper and then place mayo slice of bread on top and cut in half if desired. Serve with fresh fruit, raw vegetables or Sweet Cajun Plantains (recipe Follows) like I did.

Dill Mayo

1 ½ Tbsp Vegan Mayo (My new Favorite is Earth Balance’s ‘Mindful Mayo’ original, SO GOOD!)
1-2 Tbsp fresh chopped Dill (or to taste) (I used 2 heaping tbsp)

- Place mayo and dill in a small bowl and whisk until well combined. May be a bit chunky depending on how much dill you use but that’s okay.


Fried Sweet Cajun Plantains

*** Note - Now normally I don’t eat fried foods, but every once and a while I don’t think it hurts to indulge a little, and in all honestly frying plantains is my all-time favorite way to eat them. If you prefer you can bake the plantains in the oven as you would any type of potato fries, but it will take a lot longer then the frying method, making this dish slightly less ‘quick’ so keep that in mind.***

2 Ripe Plantains (The yellow kind with black spots)
½ - 1 Tsp your favorite Cajun Seasoning (or to taste)
1 Tbsp Brown Sugar (or less if desired)

- To Peel plantains cut the a tiny bit off each end and use your knife to score down the side of the skin. Deep enough to get through the peel but not deep enough to cut into the flesh of the plantaine. Remove the peel carefully like you would a banana peel.

- Pre-heat your deep fryer. (If you don’t have a deep fryer you can fry your plantains in a pan on the stove using any kind of vegetable oil. Enough to cover the pan and the plantains. Set burner to medium-high heat) Slice each plantains into rounds on the diagonal. When deep fryer is ready, (or oil in pan is hot enough) add your plantains to the oil and fry for about 5 minutes, or until plantains are a light to medium golden brown.

- Remove plantains from oil and place in a paper towel. You want to remove some but not all of the oil otherwise the seasoning mix won’t stick as good.

- Place plantains in a container that has a fitted or locking lid. Add to the plantains the sugar and Cajun seasoning. Then close the lid and shake well for roughly a minute until all plantains are well coated with seasoning.

- Dump out onto a plate alongside your sandwich and enjoy!


PS: I thought since I was absent on both Saturday and Sunday it was only fair to give you more then one recipe today