As promised it is Monday, and I have returned. I hope everyone had a wonderful long weekend.
Now, one thing that’ll become very obvious about me the more you read my blog is that I
Love to bake, and I
Love deserts. I usually make two deserts a week, or I at least bake cookies or muffins or what not. I get a lot of pleasure out of any kind of cooking, but particularly out of making deserts. There’s just something about measuring and mixing that I just find so de-stressing. I love how a house smells when there’s fresh baking in the oven, or on the wire cooling rack. I used to love waking up to the scent of my mother’s whole grain breads baking, filling not only the kitchen but the whole house with their earthy goodness. My mother is an excellent cook, but she’s always in my opinion been a master baker. Growing up our house was always full of fresh home made cookies, cakes, brownies, bars, pies, and breads. You name it and she would bake it, and I can’t recall ever not liking something she’d baked. She always starts her baking in the morning, six or seven am, and when I lived at home I would always wake up to those sweet, heavenly scents. Maybe that’s why I love to make deserts more then anything else, and maybe that’s why I without a doubt prefer to always do my baking at the start of my day rather then in the middle or the end. Baking in the morning, no matter where I am always reminds me of home.
Now despite my long standing love affair with baking it might astonish you to learn that I’ve never actually made a tart before. Before a week ago I wouldn’t have been able to make a tart to save my life, vegan, non-vegan, raw or baked, never had I embarked on such an endeavor. Yet somehow several weeks ago I suddenly got it in mind to do just that. Make tarts. Where this idea came from I have no idea. Maybe because Spring has finally come to the Mid-West, maybe because fresh fruit, particularly fresh berries are available in such abundance, maybe I was just craving chocolate. Regardless of the reason it’s a good thing to remember that once an idea firmly grabs hold of me I’m stuck with it until I carry it out. So three weeks ago or so when I was in Bed Bath and Beyond to buy a cake pan, I picked up a six pack of tart pans too, without a recipe or a clue, I stuffed them into my basket and went about my day.
Spring forward to last Wednesday when the desire to make tarts really over took me. By now I had read many tart recipes in preparation for my sudden onset of tart lust. I had flipped through every cook book I own, I pillaged my local library, and surfed the net for every kind of tart recipe imaginable and yet I could not find a single one that appealed to me. What then may I ask is a tart loving girl to do? The simple answer? Throw caution to the wind, and just ‘go with it’ by which I mean throw some stuff together and hope it works out alright. Personally I think this recipe worked out better then alright, way better. Both my husband M and I were wildly amazed by how creamy, rich and down-right delicious these tarts were. Not a one survived, always a good sign in my house.
Now, before you even get finished reading this recipe I know it looks like a lot of work, but it’s not, not really. Yes it is a lot of steps, but the actual labor is pretty minimal. I think it’s just a matter of being prepared, and though there are many steps that must be followed they are all super easy, I promise!
Raw Chocolate Chia Pudding Tarts With Fresh Fruit...
Start by making the crust....
Almond Cashew Crust -
Yields enough for roughly 4 4x1 inch tart pans.
1C Cashews
3/4C Almonds (soaked in warm water for 10 minutes)
2 Medjool Dates (pitted and soaked in warm water for 10 minutes)
Roughly ½-3/4 of a medium sized banana.
½-1 tsp Vanilla extract
dash sea salt and cinnamon
1/4 cup water as needed
Now if you are like me and only own the tiniest, lamest food processor the world has to offer you’ll have to make this crust in stages. However if you’re fortunate enough to have one of those large fancy food processors I don’t see why you couldn’t just grind all the nuts together, and then add everything else into the processor once the nuts have formed a meal.
- Pulse Cashews until they from a meal. Then remove Cashews to mixing bowl.
- Pulse Almonds until they form a meal. Then remove to the same mixing bowl as cashews.
- Add a dash of sea salt, and a hefty dash of cinnamon to the nut meal combination then stir to combine.
- Using a half cup measure fill your food processor with the nut meal until roughly half full, add in ½ tsp vanilla extract, 1 date, and 1/4 of your banana. Pulse until well combined. If mixture is to dry and not pulsing gently pour in 1/4 cup of water until the blades begin moving. (Don’t worry if it becomes to pasty as it’ll dry out a bit more with the addition of the rest of the nut meal.) At this point, if your food processor is as lame as mine you still may need to use a spatula to scrape down the sides of the bowl to get things moving again.
- Once everything is combined and running smoothly, add another cup of the nut meal and process. If mixture isn’t moving, add in another ½ tsp vanilla extract, 1 date, and another 1/4 of banana. Continue to process until smooth, scraping down sides of bowl as needed, and gradually adding in the remaining nut meal. (You can add another 1/4 of banana if necessary, if mixture is too dry and crumbly)
- By now you should have a somewhat sticky, paste like mixture. Using a regular spoon scoop out 2 spoonfuls worth of batter and place into a plastic wrap lined tart pan. This part can be a bit tricky as the mixture can be quite sticky. What I found very helpful is folding the excess plastic wrap under the tart pan, which held the plastic in place better and made spreading the batter easier. You can use the back of the spoon to spread the batter as evenly as possible around the pan, then use your fingers to gently press the batter up the sides of the pan. Once batter has been evenly shaped into the pan cover with another piece of plastic wrap, then place in the freezer for 2-3 hours to firm up.
- Repeat with all four pans, or until no batter remains.
Chocolate Chia Pudding -
Yields enough for about 5 or 6 tarts.
1-2 C Fresh Coconut Meat from 1-2 Thai Coconuts
3/4 C (Or more if desired) Coconut water from 1 Thai Coconut
½ C (or less) pure Maple Syrup
1/3 C (or less) Agave Nectar
½ C (or to taste) Cacao Powder
2 Tbsp (or to taste) Vanilla Extract
1/4 tsp Sea Salt
1/4-1/2 C Chia Seeds
- A couple of notes about this recipe, It’s one I originally got from
Sarma Melngailis’s cookbook
Raw Food Real World, and have altered a bit to suit my own taste preferences. I’ve made the recipe both with one cup of coconut meat and with 2 cups of coconut meat, and honestly I think I prefer the 1 cup of coconut meat variation. If you use less coconut meat you’ll want to use more chia seeds, if you use more coconut meat you’ll want to use less chia seeds. I don’t particularly like all the excess sweetener in this recipe, so I cut back on it, though I don’t really measure it. Generally speaking for the Agave I fill my third cup up about half or a little over half full, and sometimes I cut down a bit on the maple syrup as well, but that’s just me, I also like to add additional cocoa powder, as much as 3/4 cups, or as little as just an extra tbsp or two. Depending on how chocolatey I want it. Also if you’re not on a strict raw diet, by all means use regular dark coco powder, it works out just fine as well. Lastly, you really do need a high-speed blender for this one, I’m sorry, but otherwise it just won’t blend the coconut or the chia seeds properly. I tried to make this once last year with just my regular blender and it turned out simply awful! Also you do need Thai coconuts, those are the tan square ones with the triangular tip. Not the round brown hairy ones, those are mature coconuts and their flesh is very firm and not good for this kind of recipe. I made that mistake last year too.
Step 1 -
Extracting the water and the flesh from a coconut.
- The easiest way to do this is to chop off the triangular tip of the coconut with a cleaver, and then quickly scoop the coconut up so that as little water spills out as possible. Then you can easily scrape out the flesh with a spoon.
- Now if you’re like me, you might not own a cleaver. That’s not a problem, but opening a coconut without a clever is going to take a little elbow grease. Generally what I do is take a (clean) screw driver and mallet and hammer the screw driver into the coconut. Make two or three puncture marks in the side then tip it upside down over a large measuring cup, and let the water leak out. However depending on the size of your punctures this might take some time. I’m usually to impatient to wait very long and so I begin shaking the coconut vigorously to get all the water out. Once all or most of the water is out you can use the point of a chef knife (I recommend a cheap one, don’t use a good expensive chef knife for this in case it gets ruined) To dig into the puncture that you’ve made, then you can start sawing off the top of the coconut. This is where the elbow grease is going to come in. Depending on how firm the coconut is it might take a bit of work, though ideally it should be less then 10-15 minutes. Once I get a good crack into it, I generally cover the sharp end of the knife with a towel then press down on both the covered sharp end and the handle with each hand, and use the force of all my weight to slice through the coconut shell. Of course, if you have a partner who’s a bit stronger then you, you could always bribe him or her to do it for you. I have resorted to this in the past when I found my ‘elbow grease’ to be a bit lacking in the face of one very, strong and determined Thai coconut. Once the coconut is opened scrape out the flesh with a spoon and Ta-Da! Finished.
Step 2 -
Blending your pudding
- Once you have your coconut flesh, measure out all of your ingredients into your high speed blender and then blend on high for 1-2 minutes until everything is smooth. As stated above you might want to go a bit conservative on some of the ingredients and then taste for sweetness and flavor and then adjust according to your personal preferences. This is what I tend to do most of the time. If you find you need to re-adjust just blend for another 30 seconds to 1 minute until everything is well combined. If you find your pudding is too thin then add more chia seeds, if you find that it’s too thick for your liking then add a bit more coconut water or liquid sweetener.
Step 3 -
Constructing Your Tart
- Once you have your pudding at your desired consistency and taste, remove your tart pans from the freezer.
- Grab a rubber spatula or wooden spoon and evenly distribute the pudding between your tart pans. I found that after adjusting the pudding ingredients that I had more pudding then tart shells. You could either make enough extra crust for two more shells or do what I did and scoop the excess pudding into a air tight container and place it in the fridge to eat by itself some other time.
- After you’ve filled your tart pans with your pudding place them into the fridge to cool and firm up a bit more. About 1-2 hours.
Step 4 -
Decorating Your Tart
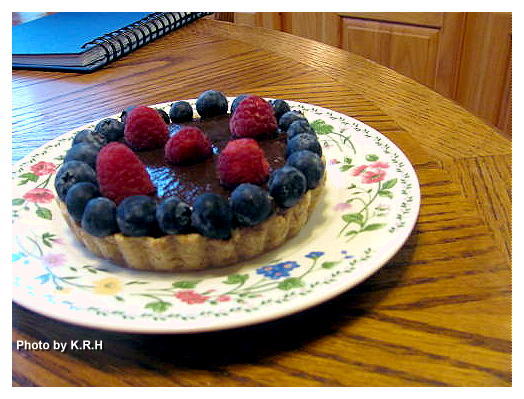
You can use any berries or any fruit really that you want to decorate your tarts, but I chose to decorate mine with fresh blueberries and raspberries, because that’s what I was in the mood for. You can also decorate your tart with any pattern or design you want, but I chose to do something simple.
I used about 16oz of blueberries to place a ring of berries around each of the four tart pans. I used about 15 raspberries to decorate the middle of each tart.
Once you decorate your tart you can serve them right away, or place them back in the fridge for later. They should keep a couple of days in the fridge. Though they’re so good you’ll probably devour them in one sitting!
I know it must seem like a lot of trouble to go to for some tarts, but I assure you it was worth every minute and really the steps look a lot more complicated then they actually are. The toughest part is cracking open the coconuts, everything else is gravy. Of course as I mentioned before if you’re not on a raw diet, you can really use any pudding recipe you like, that’s what I love about this recipe, it’s so flexible. You could essentially use any nuts for the crust, any pudding as a filling and any berries for a topping, though I sincerely recommend you make it my way at least once, before you decide to play around with it. If you make it I hope you enjoy it, and stay tuned, as tomorrow will being even more goodies!

.jpg)

.jpg)

.jpg)
.jpg)