Showing posts with label ‘Mayo’. Show all posts

Tuesday, February 9, 2016

The Ultimate Stoner Breakfast....


It's not called The Ultimate Stoner Breakfast for nothing. This meal is pure 'meat' and potatoes, it's 'carbs, carbs, and more carbs.' it is exactly the kind of food you want to eat and should indulge in when you're grooving in your happy place, and everything is beautiful. One of the best things about it is how low effort it is, yet the flavor is not sacrificed. It's also super hearty, it'll tame even the wildest munchies, of course, don't limit yourself to just eating it at breakfast time!

Now, there are two ways you can eat this. The 'traditional' way with each food having it's own separate space on the plate. Or you can eat it like a taco. Yeah, you heard me, a pancake breakfast taco. How awesome is that? I know it sounds strange but trust me when I say it's amazing. My husband was really skeptical at first too, but after he watched me down 3 of these bad boys he was convinced enough to try it. If you enjoy it in Taco form then you can essentially add anything you like as a topping which is awesome, it makes it versatile. So trust me on this one, and give it a try.

(PS: You can use any pancake recipe you like, but I've included my go-to just incase you don't have one. I have also made these with gluten-free flour before and they have turned out well.)


Cheese Tots

Olive Oil
1lb Frozen Tater Tots
1 Small Yellow Onion Diced
Garlic powder
Sea Salt
4 Sliced Green Onions
1/2-1 Cup Daiya Cheddar or Mozzarella Cheese.

- Preheat Oven to 400'F

- Dump the tater tots into a baking dish with the diced onions. Drizzle a little olive oil over them then sprinkle them with salt, and garlic powder. Stir to combine everything.

- Pop it in the oven and bake for 15-20 minutes until tots are cooked to your taste.

- Remove from the oven, Sprinkle cheese, and green onions over top. Return to the oven and cook for 2-3 minutes or until the cheese has just melted and the onions are soft.

- Enjoy on their own as part of your breakfast, smothered in ketchup, sour cream, or mayo. Or enjoy in a taco!


Classic Go-To Pancakes

2 Cups White Flour
2 Tbsp Baking Powder
1 tsp Sea Salt
1 1/2 Cups water
3 Tbsp Olive Oil
3 Tbsp Maple Syrup

- Mix all dry ingredients in a bowl.

- Combine the water, maple syrup and olive oil.

- Pour the wet into the dry and stir until just combined.

- Heat a pan, spread a 1/4 C of batter out into the pan, spread it thin, but not too thin, similar to the thickness of a flatbread.

- Cook for a few minutes until bubbles appear on the surface of the pancake. flip and cook another couple of minutes until golden brown. Repeat.


The Ultimate Stoner Breakfast.

Add-Ons and Extras

Avocado
Sour Cream
Mayo
Ketchup
Maple Syrup
Your Favorite Tofu Scramble
Jalapeno Slices or Hot Sauce if you like it spicy

To Serve the "Traditional Way" Heap a mound of Cheese Tots onto your plate, Slap down 3-4 Pancakes next to it, then add on a portion of your favorite Breakfast Sausage, a portion of your favorite bacon, with half an avocado on the side. Serve with ketchup and mayo for the tots, and Maple Syrup for the pancakes and sausage.


To Serve it the "Taco Way" Spread a thin layer of Syrup over one pancake. Place 1/2 a slice of bacon (or a full slice if you prefer) on top of the pancake, then a breakfast link.  Pick the pancake up, and hold it in your palm like you would a taco shell. Take a spoon and scoop a small portion of the cheese tots inside your pancake shell. If you're using tofu scramble as well, scoop a small portion of that into the pancake taco along with the tots. Drizzle a bit of ketchup over top, and then serve with dollops of sour cream and/or mayo and whatever other add-on's you wish. It's great with or without avocado, and I personally like the mix of sour cream and mayo. So delicious!


Saturday, September 12, 2015

Vegan Mofo #13: Avocados Stuffed with Peruvian Chicken Mayonnaise 2 Ways...


When we were in Peru last September we ate a lot of really good vegan food. Vegan food is not as easy to come by in Peru as it was for us in other places in Central/South America but when you can find it, it’s very good. We enjoyed a lot of simple stews, lima beans, butter beans, corn, and definitely avocados. We took full advantage of the popular ‘plate of the day’ set up that most Peruvian restaurants have around lunchtime. Usually for a few bucks you get a nicely portioned meal with all the staples.


We didn’t have a Vegetarian version of Chicken Mayonnaise while we were in Peru, but I found a recipe for it in a Peruvian cook book that I found intriguing. There is certainly no shortage of Avocados in Peru, and they’re a lot bigger then the ones you buy around here. Anyway, since avocados are one of my favorite foods, and everyone loves a good ‘chicken’ salad, I thought I’d try my hand at making a more compassionate, chicken friendly version of this dish.

I think this would make a great starter to a dinner party, but it’s just as easily enjoyed as a main course along with a side salad. You’ll be surprised at how filling these little avocado boats are!


Avocados Stuffed with Peruvian Chicken Mayonnaise 2 Ways


Beyond Meat Version 

2 tsp Olive Oil
2 Ripe Avocados Peeled, Sliced in Half, Pits removed
1 Box Beyond Meat Chicken Strips Diced
1 Small Carrot Minced
1 Celery Stalk Diced
4 Green Onions Sliced
4 Kalamata Olives Minced
½-1 tsp Smoked Sea Salt
1/3 Cup Vegan Mayo
Black Pepper to taste
Strips of Red Bell Pepper to Garnish (Optional)


Chickpea Version 

2 tsp Olive Oil
2 Ripe Avocados Peeled, Sliced in half, pits removed
1 15oz Can Chickpeas rinsed and Drained
1 Small Carrot Minced
1 Celery Stalk Diced
4 Green Onions Sliced
4 Kalamata Olives Minced
½-1 tsp Smoked Sea Salt
1/3 Cup Vegan Mayo
Black Pepper to taste
Strips of Red Bell Pepper to Garnish (Optional)


Instructions - Beyond Meat Version 

- Heat the Olive Oil in a pan over medium heat. Add the diced beyond meat and cook for 6-8 minutes until nicely browned on all sides. Remove from the pan and place into a large mixing bowl.

- Add the carrot, celery, and half the onion. Saute for 4-5 minutes until the carrot is soft. Add a dash more oil if needed. When the veggies are soft remove from the pan and place into the bowl with the beyond meat.

- Add the remaining raw onion, olives, smoked salt, pepper, and vegan mayo to the bowl, stir thoroughly to combine.

- Taste and adjust seasonings as needed.

- Spoon the beyond meat mixture into the center of each avocado half. Place the halves on a serving plate, and garnish with red pepper strips. Add a dash of sriracha if you like things spicy!

Instructions - Chickpea Version.

- Place the drained, rinsed chickpeas into a serving bowl and mash with a potato masher. You do not need to mash every pea, just get a somewhat mashed consistency.

- Heat the oil in a pan over medium heat. Add the carrot, celery, and half the onion. Saute for 4-5 minutes until the carrot is soft. When the veggies are soft remove from the pan and place into the bowl with the mashed chickpeas.

- - Add the remaining raw onion, olives, smoked salt, pepper, and vegan mayo to the bowl, stir thoroughly to combine.

- Taste and adjust seasonings as needed.

- Spoon the chickpea mixture into the center of each avocado half. Place the halves on a serving plate, and garnish with red pepper strips. Add a dash of sriracha if you like things spicy!


Sunday, October 28, 2012

Vegan Mofo #23 - Celine & Tamasin’s Bean and Nut Burgers...


Vegan Mofo #23 - Celine & Tamasin’s Bean and Nut Burgers 

The Book - Vegan Sandwiches Save the Day!
The Author - Celine Steen & Tamasin Noyes
The Recipe - Bean and Nut Burgers
Page # 108
Difficulty - Easy
Duration - Roughly 30 minutes


These are super simple burgers that are quick and easy to whip together making them perfect for a midweek or busy weekend meal. They also utilize simple pantry-staple ingredients and emphasize whole foods which I like. The majority of the burger is made from either black or cannellini beans and walnuts. Then you add in your onion powder, garlic, cayenne, sea salt and black pepper. Some breadcrumbs - I used home made - and Barbeque Sauce - I used a store bought BBQ sauce as I didn’t have time to make it from scratch. Also I wanted to use cannellini beans rather then black beans but didn’t have any so I used navy beans - another white bean - instead and they were delicious. White beans are a little more subtle in flavor then black beans and that’s what I was looking for. I wanted a bean and nut burger that didn’t taste like ground up beans and nuts. Not that there’s anything wrong with that, it’s just I wasn’t in the mood for that sort of flavor. These burgers with their addition of BBQ sauce really fit the bill, and even my husband who’s a bean and nut hater loved them.


I served my bean and nut burgers on a pretzel roll, with a smear of Dijon Mustard, Vegan Mayo, and extra BBQ, then topped them off with tomatoes, bibb lettuce, red onion slices, and pickle. So delicious! I highly recommend making them if you have this cook book, and if you don’t own a copy of “Vegan Sandwiches Save the Day” yet then you need to pick one up! So far every sandwich I’ve made from this book has been spectacular, as well as fairly quick and pretty easy. It’s the perfect go-to book when you’re in a rush but want some home cooked food rather then take-out.


Monday, October 15, 2012

Vegan Mofo #15 - Celine & Joni’s Monte Cristo...


Vegan Mofo #15 - Celine & Joni’s Monte Cristo 
The Book - Hearty Vegan Meals for Monster Appetites
The Author - Celine Steen and Joni Marie Newman
The Recipe - The Monte Cristo
Page # 83
Difficulty - Easy
Duration - Roughly thirty, maybe forty minutes.


I’ll be honest, when I first opened this cook book and saw this recipe I thought the Monte Cristo sounded disgusting. I had never heard of, nor eaten such a sandwich before, but apparently in America it’s a ‘thing.’ Over the past year or so I’ve seen a lot of different variation on this recipe, in cook books, online etc.. and each time I see this sort of sandwich featured I feel a little bit baffled and disgusted. Baffled because I don’t understand what the ‘big deal’ is, and disgusted because I can’t imagine eating such a strange concoction. Subsequently every time I see a recipe for this sandwich I feel slightly more curious. If you’ve been reading this blog for a while then you know how I feel about strange and bizarre foods, you also know that I typically end up making things that I initially find ‘off-putting.’  So of course it would happen that one day after a particularly long day of work, when I wasn’t feeling much like cooking anything at all I decided against my better judgement to give this sandwich a try. I just so happened to have all of the ingredients handy - except the vegan deli meat, though that was easy enough to acquire after work, and I thought why not?

The Monte Cristo is apparently inspired by the French Sandwich known as the croque-monsieur and became popular in the United States in the 1930's, gaining popularity through to the 1960's.  It is classic ‘diner food’ and tastes like fast food. Though I’d never eaten a Monte Cristo before making this one it reminded me so much of the diners I’d eat at growing up, and many of the sandwiches they offered. After having eaten it I said to my friend E “It tasted like it should give you a heart attack.” to which he replied “That’s what a real Monte Cristo is, it’s the heart-attack special.”


So what exactly is it? And what’s on it? Well basically it’s French Toast, and stuffed in-between is vegan deli meat and vegan cheese slathered in a special sauce made of vegan mayo, ketchup, pickle relish, Dijon Mustard and garlic. The French toast batter is super simple, just soy milk, flour, paprika, salt, pepper and dried dill. Once the French Toast is done, and the sandwiches are assembled you stick them in a broiler for a few minutes until they’re toasty and the cheese has melted. Then Celine and Joni suggest serving them with a side of Maple Syrup for dipping. Sounds crazy right? Especially the part about the maple syrup yeah?

Well, did I like it? Actually - much to my surprise - I did. It’s a strange amalgamation of flavor and it just tastes so wrong and bad for you. In every bite you’re reminded of the most delicious terrible for you fast food you’ve ever eaten and there’s something a little satisfying about that. The decadence of it is appealing yet you can feel satisfied knowing that the sandwich is cruelty-free and while it may not be vegan ‘health-food’ at least it’s not loaded with cholesterol. I even liked the Maple Syrup for dipping, the sweetness really brought the sandwich to a new level. Though I have to say this recipe makes four and if you’re not actually cooking for four half the recipe. Eating two of these in one sitting is way, way to much.


Unfortunately these sandwiches don’t have much color so trying to make them look pretty for the photograph wasn’t easy. You’ll just have to trust me when I say that they’re better then they look. Oh, and incase you’re interested I used Daiya Mozzarella for the cheese, and Tofurkey’s Hickory Smoked Slices for the Deli Meat. The Smoked Slices were actually really tasty and reminded me a lot of what I remember actual smoked lunch-meat turkey to taste like. Definite thumbs up on that one.


Wednesday, October 3, 2012

Vegan Mofo #4 - Isa’s Tempeh Reuben...


Vegan Mofo #4 - Isa’s Tempeh Reuben 

The Book - Vegan with a Vengeance
The Author - Isa Chandra Moskowitz
The Recipe - Tempeh Reuben
Page # 102
Difficulty - Easy
Duration - The tempeh needs to marinate for 1 hour, after that you can whip this sandwich together in ten minutes.


Now I’ll be honest I’ve never eaten a real Reuben, I have always found corned beef to be one of the most disgusting meats on the planet. There is nothing about it that I find in the least bit appetizing. I’ve also never liked thousand Island dressing which I think is one of the most disgusting salad dressings on the planet, and I never liked sauerkraut. I know, I’m weird, I’m sure everyone reading likes or liked at least one of those three things, but that is my reason for never actually having a real Reuben. In the past year or so I’ve actually really grown to like Sauerkraut, in fact I like it so much now that I can’t believe I never liked it before. Just further proof that tastebuds change with time and that veganism opens your tastebuds to new worlds you never imagined possible. So because of this new love of sauerkraut I have in the past year tried several vegan Reuben’s. One at last years Vegan Mania, and a ‘California’ style Reuben at The Chicago Diner back in August - both delicious.


So while I was thinking about what sandwiches to make for Mofo, and I cam across this recipe I thought why not give it a try? Of course the problem then was my husband who does not like sauerkraut, nor thousand island dressing either, and he’s not exactly the biggest fan of rye bread. I really wanted to try this sandwich but making a recipe that serves four just for myself seemed a bit much. My solution then became to invite my dear friend E over for lunch to help me devour some sandwiches. In the end my husband ate one too - minus the kraut - and actually really liked it, even the bread, go figure.


So Isa’s Reuben is fairly simple. You slice the tempeh thin and marinate it in a mixture of wine, oil, vinegar, soy sauce, lemon juice, and garlic, then grill or fry it. You make a thousand island like dressing by mixing vegan mayo with ketchup, lemon, onion, capers, sweet pickle relish, and cayenne. Then when everything is ready you assemble your sandwich by spreading hot toasted pumpernickel bread with the dressing, piling on the tempeh, kraut, dill pickles and avocado, then drizzle over a little more dressing and enjoy!


I didn’t know what to expect. I thought the tempeh might be bitter because the marinade ingredients didn’t sound that promising, but I was wrong. The whole sandwich was bursting with unique and delicious flavor. All the components worked so well together and I particularly liked the mixture of sweet and tangy. The sauce is both sweet and tangy, the pickle is tangy, the kraut is tangy and then the bread is a bit sweet and the avocado brings it all together by adding a soft creamy texture. Amazing! I know that traditional Reuben’s use rye bread, but Isa’s calls for pumpernickel. Personally I prefer pumpernickel over rye but then when I was at the store I saw they had a pumpernickel-rye bread that looked so beautiful and delicious that I decided to get that instead. The best of both worlds you could say, and it really was a fantastic bread. E in particular really liked it.

This is definitely a sandwich I could make over and over again. There isn’t a bad thing I can say about it, it was simply divine. The Reuben may be a new favorite of mine!


Monday, July 30, 2012

Baked Sunchoke Sandwiches with Five Spice Slaw...


I’ve been rather neglectful of the blog of late I know, and for that I’m sorry. It’s just that a multitude of other things have accumulated and I’m finding it very difficult at the moment to divide my time. I know I last left off with updating about my vacation to Germany but I thought since it’s been such an awful long time since I posted a recipe I should take a few moments to do that instead.


In truth I haven’t been cooking much, or rather I have been but I’ve been making very simple food, nothing worthy of blogging about. This dish however I made just before going on vacation and it was simply superb! Really it’s perfect for a hearty lunch or a light dinner, because really, who doesn’t love a big ‘ole sloppy sandwich every once and a while? And, how often do you get to use sunchokes? Not often enough in my opinion, so I hope you enjoy, and I promise to get back to posting regularly again.


What I like best about this sandwich is the subtle hint of anise from the five spice powder. You get this great punch of Asian flavor combined with the unique taste of sunchokes, fantastic combination, trust me!


Baked Sunchoke Sandwiches with Five Spice Slaw 

1 lb Sunchokes,
Sea salt and Black Pepper to taste
1 French Baguette
Sliced Tomato to serve
Thai chili sauce to serve (optional)

Five Spice Slaw 

2 Carrots Grated
2 Celery Ribs diced
1 Red Bell Pepper diced
4 Garlic Cloves minced
Green Onions to taste
1 ½ C Red Cabbage finely shredded
½ C Non-dairy Mayo (I like Earth Balance)
1 ½ tsp Sesame Oil
1 tsp Coconut Amino’s or Soy Sauce
1 ½ tsp Chinese 5 Spice Powder or to taste
Sea salt Black pepper
1 Packet Stevia or to taste (Optional)
2 tsp Apple Cider Vinegar
½ Bunch Cilantro Minced

- Pre-heat oven to 400'F

- To make the Sunchokes make sure you rinse and clean them very well. They tend to be quite gritty. What I like to do is soak them in a big bowl of warm water for a few minutes. Then I scrub them good and give them a rinse.

- After they’ve been washed you want to slice them relatively thin. You can do it with a mandolin or a knife, whichever you prefer. No need to peel the chokes as long as you wash them well.

- Next spray a baking sheet with non-stick spray. Then spread the sunchoke slices out in a single layer. Depending on the size of your pan you might need to do this on two pans. Sprinkle with sea salt and black pepper to taste then place in the oven.

- Bake at 400'F for 10 minutes a side, or until the sunchokes have turned a nice golden color. Be careful not to burn or crisp them. You still want them a bit soft.

- Once done remove from the oven and set aside to cool.

- To make the Five Spice Slaw mix together carrots, red pepper, red cabbage, celery, cilantro, garlic and green onions in a big mixing bowl.

- In a small bowl whisk together the Mayo, sesame oil, coconut amino’s or soy sauce, Chinese 5 spice powder, apple cider vinegar, salt, pepper, and stevia to taste. Taste for flavor and adjust seasonings as needed.

- Pour the dressing over the Slaw and mix to thoroughly combine. Taste and adjust flavor as needed.

- To assemble your sandwich slice the Baguette in half crosswise, then make a slit lengthwise down each half.  Layer in the baked sunchokes, top with a few slices of tomato, and a heaping amount of slaw. Then drizzle a little Thai Chili Sauce over top if desired, and enjoy!


PS: Gluten-Free if using Coconut Amino's or GF Tamari. Soy-Free if using Soy-Free non-dairy Mayo


Tuesday, April 24, 2012

Kickin’ Kale Coleslaw...


This salad recipe is partly inspired by the one my friend J brought to Easter this year, and partly inspired by the delicious kale salads I ate at Choice Health Bar in Lahaina, when I was in Maui in October. It’s the perfect blend of sweet, tangy and spice. The sweet coming from the dried fruit, the tang coming from the mayo, and the two vinegars, and the spice coming from smoked paprika, pepper, allspice, clove and curry powder. It may sound like a strange combination but trust me when I say they work in perfect harmony together. Paired with earthy hemp and sesame seeds this salad is a powerhouse of awesome flavor, and it got gobbled up faster then anything else when I made it for Earth Day.


One important thing to note about this salad is that, par usual I didn’t really measure the spices as well as I should have. You see I started off with a certain measurement, either 1/4 or ½ tsp and then kept adjusting from there. Unfortunately I neglected to write down what the final mastermind became for some of the spices. With the ingredients I’ve noted as (to taste) I suggest erring on the side of caution and going with the conservative measurement first, then tasting and adjusting to suit your preference. With the garlic and curry powder it’s also important to keep in mind that you want enough of each of those flavors to taste them, but not so much that either one of them is overpowering. You want to shoot for a mild garlic flavor and a mild curry flavor. In fact as you prepare the salad keep in mind that the flavors should be working together not fighting one another, meaning no one flavor should really overshadow the others. Instead they should be layered together to enhance the dish as a whole. With that in mind, you can’t go wrong. I know I at least will be making this salad - or some variation of it - for years and years to come!


Kickin’ Kale Coleslaw

4 ½ C Shredded Kale
3 Carrots Grated
1/4 C Raisins
1/4 C Dried Cranberries
3 Tbsp Hemp Seeds
2 Tbsp Sesame Seeds
½ C Chopped Green Onions

½ C Non-dairy Mayo
1-2 Tbsp Apple Cider Vinegar (to taste)
1 tsp Toasted Sesame Oil
1 tsp Umeboshi Plum vinegar
 2-3 Packets Stevia (to taste)
½ tsp Ground Allspice
3/4 tsp Smoked Paprika
3/4 tsp Dried Oregano
½-3/4 tsp Ground Thyme (to taste)
½ tsp Garlic Powder (to taste)
½-3/4 tsp Curry Powder (to taste)
Dash of Cinnamon and Cloves (slightly less then 1/8 tsp each)
Black Pepper to taste

- The easiest way to shred kale is in a food processor. Just pop it in and pulse a few times until you have fine shreds. Don’t puree it! If you don’t have a food processor just slice it thin with a knife.

- Once the kale has been shredded place it in a bowl with the grated carrot, cranberries, raisins, seeds, and onions.

- Combine all dressing ingredient in a small bowl and whisk until thoroughly combined. Taste for flavor and adjust seasoning as needed. For an additional kick you can always add a pinch or two of Cayenne pepper! Enjoy!


Friday, February 17, 2012

Japanese 7 Spice Rice Bowl with Greens...


Yesterday I was really craving greens, all kinds of greens! Anything from broccoli to kale to collards to cabbage. Originally I had planed to make some sauteed Swiss Chard with Baked Tempeh but as the day drew nearer it’s close I started longing for something a little less involved. I started thinking about rice, which got me thinking about Japanese food, which in turn got me thinking about sushi. Sushi, now there was an idea! Except it was eight o’clock at night and after a couple hours of hard study I wasn’t really in the mood to break out the bamboo mat and start rolling Maki.


Instead I decided to make a Japanese inspired rice bowl. One that would combine the flavors I love about sushi, with simplicity and my desire for a plate loaded up with greens. Though you can really use any green veggie you like I strongly suggest the broccoli asparagus combination. Not only do they taste good together but they always taste great with rice. Initially I chose them out of convenience, as I always have bags of frozen broccoli on hand and I had just bought a pound of asparagus the day before yesterday. Convenience or not though it turned out to be a stellar choice.


This bowl is so full of flavor, and I particularly like the application of Japanese 7 Spice here - also known as Shichimi Togarashi - for the subtle heat and refreshing citrus flavor it lends to the dish. This meal is both satisfying and filling yet light. Which is exactly what you want if you’re forced to have a late dinner. You don’t want to be bogged down with digestive distress and gastric upset right before you slip into bed right?


Japanese 7 Spice Rice Bowl with Greens

Rice

2 C Brown Rice
2 1/4 C Water
2 tsp Kelp Granules
2 Tbsp Brown Rice Vinegar
1 Tbsp Sugar
½-1 Tbsp Grated Ginger
6 Garlic Cloves Minced
1 tsp Sesame Oil

Sauce

2 Tbsp non-dairy Mayo
2 tsp Liquid Smoke
1 tsp Umeboshi Plum Pate
½ tsp Agave Nectar
1 1/4 tsp Japanese 7 Spice Seasoning (or to taste)

1lb Asparagus trimmed
½-1 lb Broccoli Florets
1 tsp Sesame Oil (or to taste. Optional)
2-4 tsp Sesame Seeds (to taste)

- To make the rice combine rice, water, vinegar, kelp, and sugar in a rice cooker and cook as directed by manufacturer. Or combine in a pot and cook the old fashioned way. (Bring to a boil, then reduce heat to simmer and let cook for 30-45 minutes making sure to check and stir occasionally so the rice doesn’t burn.)

- While rice is cooking heat the tsp of sesame oil in a small pan over medium heat. Add the grated ginger and minced garlic. Saute for a few minutes until fragrant and golden. About five minutes. Remove from heat and set aside.

- Trim asparagus of tough ends and place into a steamer basket along with the broccoli. Or if your steamer basket is small work in batches. Asparagus first then broccoli. Steam the vegetables until they are tender but still a bit crisp, about 5-8 minutes. They should be bright green and vibrant!

- To make sauce combine Mayo, liquid smoke, umeboshi paste, agave and 7 spice seasoning. Taste for flavor and adjust as needed. A word of caution though, both umeboshi and 7 spice seasoning are strong, so a little goes along way. It’s important that you taste the sauce before deciding to add more and If you do add more add it in small increments. Once sauce is combined set aside.

- Once the rice has finished cooking add the sauteed ginger and garlic mixture to the pot. Stir until combined.

- Divide the rice mixture amongst two bowls. Into each bowl place 1-2 Tbsp of the sauce and mix it into the rice until well combined. Top each bowl with an equal amount of asparagus and broccoli.

- Drizzle any remaining sauce over top of the veggies. Divide the remaining 1 tsp of sesame oil and drizzle a half tsp over each bowl. (Optional but recommended) Then sprinkle 1-2 tsp of sesame seeds over top of each bowl. I used black sesame seeds because it was all that I had but feel free to use brown.

- Serve and enjoy!

Thursday, January 12, 2012

Sesame Asparagus Maki...


Ah... see, yesterday I promised sushi and today I shall deliver it. I’ve been in a real sushi kind of mood lately, there’s something about that combination of brown rice and seaweed that’s got me jonesing bad - Sounds strange I know - but seriously it’s all I could think about last week. I made sushi twice, and this is one of the Maki’s I came up with. As I mentioned yesterday Asparagus sushi was always one of my favorites, and it’s been so long since I’ve had asparagus that I broke down and bought a bundle even though it’s not technically in season. - Very bad of me I know. - Though this Maki is kind of on the simpler side, it is super delicious either on it’s own or dipped lightly in soy sauce. It has a flavor and texture slightly reminiscent of a ‘traditional’ California Roll, which used to be me husband’s favorite. I’m proud to say that out of all the Maki I’ve ever made, in fact out of all the Maki he’s eaten, after eating this one he generously claimed that it was his new hands down favorite.


So, go ahead, and don’t be afraid to roll your own. It isn’t really that hard, and it’s not overly time consuming. You just need a little patience, and delicacy. If you can manage that, you can roll your own Maki and impress your family and friends by making them think you’re a super awesome sushi chef!


Sesame Asparagus Maki

1 ½ C Brown Rice
3 C water
1 Tbsp Granulated Cane Sugar
2 Tbsp Brown Rice Vinegar
1 lb Asparagus
4 Tbsp Sesame Seeds
4 Sheets Nori Seaweed
4 Tbsp Vegan Mayo
Wasabi paste to taste
Liquid Smoke to taste

- The quickest and easiest way to make sushi is to have everything prepared and ready to go. Meaning clean off a good sized work space. Have all your pots, pans, steamers, and bowls set up and ready to go. Have your ingredients laid out on the counter with your knives and measuring tools, and don’t forget your sushi mat!

- First, start your rice. Now if you’re like me you own a rice cooker for ease and convenience sake. I use it so often that it really is the most used appliance in my house after the Vitamix. If you have a rice cooker, dump your rice, water, vinegar and sugar into it. Mix to combine and then cook according to manufacture directions. However if you are not so fortunate to own a rice cooker you’re going to have to make your rice the old fashioned way, but you should be used to that I’d think. Pour rice, water, vinegar and sugar into a pot, stir to combine cover and bring to a boil. Reduce heat and let simmer until all water is absorbed and rice is cooked. Cooking time varies but for brown rice I’d say it’s usually done within 35-45 minutes so just check on it every now and again and make sure to stir so the bottom doesn’t burn. Add more water if necessary.

- When rice is done cooking fluff it with a fork and set aside to cool. About 10-15 minutes. Or you could put it in the fridge for a quick cool.

- While rice is cooking, trim the corse ends from the Asparagus and discard. Also trim off the leafy tips of the Asparagus, though save those to toss into salads, stir-fries or soups etc... Place asparagus in steamer basket and steam for 5 or so minutes until Asparagus is bright green and tender crisp.

- Remove asparagus from steamer and set aside till cool enough to handle.

- While your rice and asparagus are cooling combine the mayo, wasabi and liquid smoke in a bowl. Taste for flavor and adjust as needed. The sauce should not be overly spicy in fact it should only have a hint of wasabi heat, and a bit of sweet smokiness. However if you prefer more heat by all means feel free to add it. 3-4 small drops of wasabi paste should be sufficient for achieving the flavor I intended.

- Now comes the trickiest part, but trust me you’ll be okay. On your clean work surface. - I use a clean bamboo cutting board - lay down your bamboo sushi rolling mat. On top lay down 1 sheet of Nori with the shiny side facing up. Have a bowl of cold water at your work station and with wet - but not profusely dripping - hands grab handfuls of rice and spread evenly over the sheet of nori. Spread the rice as close to the edges as possible but leave about a half to a quarter inch of space on the horizontal side of the Nori furthest from you. This little boarder will help your rolled Maki stick together. Rinse your hands before moving onto the next step.

- Spoon 1 Tbsp worth of the mayo sauce horizontally along the edge of rice closest to you. Then sprinkle 1 Tbsp of the sesame seeds - by the way you can use toasted or not it doesn’t matter. Mine weren’t toasted - over the rice.

- Next layer in 3 spears of asparagus on the left parallel with the horizontal edge of the nori closest to you. Laying them down over the mayo layer you just created. If they’re not long enough to reach from left to right then layer in 3 more spears on the right so that the edge closest to you is completely filled with asparagus. If some poke out past the nori you can trim them off, and use them on the next roll or eat them.

- Now, using your mat, and working slowly pull the mat up slightly and roll it over. Moving slowly and using both hands slowly roll your Maki, using the bamboo mat to press down and make the roll tight. You may have to stop at some point to push the filling back under the Nori or to help guide the roll. Stop just before you get to the opposite edge that you’ve left empty. Dip your fingers into the water, run them along the empty edge then roll your nori closed. Press down tightly to seel.

- It’s okay if it’s not perfect, rolling Maki takes practice and even though I’ve done it a ton of times I still don’t make a perfect roll each time. Sometimes my rolls are to fat, sometimes they don’t seel properly, sometimes I don’t cut them well. It happens, don’t beat yourself up about it. Remember that you’re doing it for the fun of it, and it’s - maybe - your first time, you’ll get better the more you practice.

- Next, and this step is very important. Before cutting your Nori into one inch sections run your chef knife under cold water. By the way you should always use a chef knife or other similar smooth edged knife to cut sushi. If you use a steak knife, or a bread knife or some other kind of knife with a jagged edge your Maki is going to get shredded and will likely fall apart. Once seaweed is wet it is very, very durable, your roll will fall apart before the seaweed cuts properly. I know from experience. So run your Chef knife under cold water. Give it a shake and then starting from one edge and working towards the other cut your roll into rounds.

- The best way to cut your roll is to do it in one smooth motion. Do not use your knife as a saw. Press down firmly it’s okay if the roll doesn’t cut right away, it’s okay if it looks like it’s getting squished a bit this is normal. Use one fluid motion, press down on the knife with your knife hand and hold the long end of the roll steadily in place with the opposite hand. Press the knife firmly down until it has cut all the way through. To separate the round from the rest of the roll you may have to give one quick saw motion depending on the sharpness of your knife, but otherwise that is it. Run your knife under cold water before EACH cut! This is important. Before each cut your knife must be wet. The drier your knife Is the more difficult this will be and the more likely your roll will fall apart.


- Congratulations! Now that one roll is finished - You should have gotten 6-8 rounds out of it by the way - give yourself a pat on the back, and then begin again from step one. Repeat all steps until ingredients are used up. At the end you may have some leftover rice. If this is the case no worries, stick it in the fridge and toss it into a salad tomorrow!

- To serve arrange on plates and serve with dipping bowls of soy sauce, and my favorite Sweet Thai Chili Sauce. Serve with addition dollops of wasabi if desired and pickled ginger, yum!


PS: As you can see in the pictures two of my rolls were coming apart at the seam, so don’t fret if yours do too. Also end pieces are always kind of ugly so don’t worry about them either. If you’re making this for a friend you’d like to impress you can always stuff the ends with extra filling once they’ve been cut. This way you have greater control and the filling won’t fall out on you.


*** Note - Can be made Sugar-Free by Omitting the Cane Sugar***

Sunday, July 24, 2011

Watercress, Tomato and Avocado Sandwich with Smokey Garlic Mayo


Since my unexpected success with my super simple dill mao I’ve been rather interested in concocting other interesting mayo flavors to pair with interesting yet easy sandwiches that can be thrown together for a quick bite to eat. This particular sandwich came about out of sheer necessity. I had an avocado and a bunch of watercress sitting in my fridge begging to be used. Even though I’m not too familiar with watercress (I actually only tried it for the first time this month! Wow, that’s a little embarrassing to admit actually.) I thought it’s peppery, parsley reminiscent bite would pair well with smooth and creamy avocado. Of course tomato and avocado are a match made by Hera, so that was a no-brainer. Developing the mayo however took a little brainpower but eventually I came to the realization that you can never go wrong with garlic and a bit of smokiness, especially where tomatoes and avocados are concerned, and I was right.

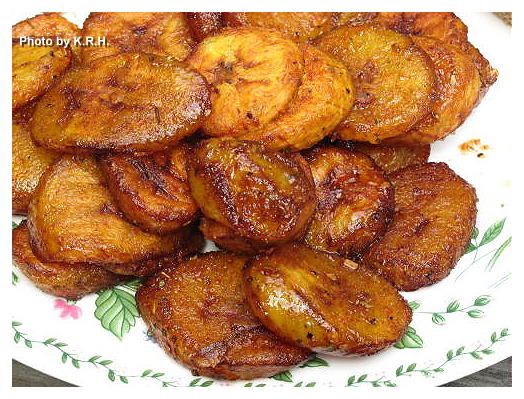
This sandwich was the perfect lunch, filling, cooling and refreshing in the face of this ridiculous heat wave we’ve been having. All the components paired beautifully together. The best part of course is that it’s super quick and easy to throw together, and you can pair it with some veggie chips, fresh fruit, fresh raw veggie sticks or my Sweet Cajun Plantains as I did here.


Watercress, Tomato and Avocado Sandwich with Smokey Garlic Mayo

1 handful watercress
4-5 slices tomato about 1 small-medium
4-6 slices avocado (or to taste, about half to one avocado)
2 slices whole wheat bread
pinch of white pepper
Smokey Garlic Mayo
1 ½ tbsp mayo (I used Earth Balance Mindful Mayo)
1 heaping 1/4 tsp smoked paprika
dash of black pepper
½ tsp garlic powder

- Toast your bread till lightly golden.

- While bread is toasting you can slice your vegetables and make your mayo. To make mayo all you have to do is combine your favorite non-dairy may with the your spices in a bowl, and mix until smooth and everything has been incorporated.

- The best way that I’ve found to slice and peel an avocado. Is to just take a knife and cut down lengthwise all the way around the circumference of the avocado. Then twist and the two halves will come apart, then you can easily remove the peel and the pit, then slice the avocado into nice strips.

- When your bread, your veggies and your mayo are all ready, slather mayo onto one slice of bread, pile with tomatoes, a sprinkle of white pepper, watercress and then avocado. If you like you can slather your second slice of bread with the remaining mayo (I did, I also used the whole avocado, because I’m not the type to worry about such things) and press on top.

- Slice your sandwich in half, and enjoy with your favorite light summer side dish, and a glass of Iced Ginger Lime Green Tea, or Cranberry Lemonade.

Monday, July 18, 2011

Toasted Tomato Cucumber Sandwich with Dill Mayo and Sweet Cajun Plantains


Today’s recipe(s) is super simple but also super delicious. It’s the perfect thing to whip up for a quick filling lunch or a light dinner. The best part is that it doesn’t have you slaving over a hot stove or grill in this agonizing heat. The sandwich is simple I know, using few ingredients, but it packs a flavorful punch. It’s very reminiscent of the toasted tomato mayo sandwiches I ate and loved during the summers of my childhood. Though grown this is still a meal I find myself craving at least a few times each summer season. Something about the texture, the toasted bread, the creamy mayo, and the cool refreshing tomato.... the sweet juicy taste of fresh vine-ripened tomato paired with black pepper... mmm... This version of course is slightly different then the Toasted tomato sandwich of my childhood, but no less delicious, more so in fact. Also back then my sandwich was usually paired with chips, fresh fruit or raw veggies. I highly recommend the fresh fruit and raw veggies but on this particular day I was feeling something slightly more decadent... sweet, fried plantains!

Revamped Toasted Tomato Cucumber Sandwich

2 Slices Whole Wheat Bread (lightly toasted)
4 Slices tomato
8 Thin slices cucumber
Fresh ground Black Pepper to taste (3-4 grinds of a pepper mill usually does the trick)
Pinch of White Pepper (Optional)
Dijon Mustard (Optional)
1 Batch Dill Mayo (Recipe Follows)

- Toast your bread till lightly golden. You don’t want it to be soft but you don’t want it to be super crunch either.

- Spread a thin layer of Dijon mustard over one slice if desired. Spread the Dill Mayo on the other slice of bread. Add cucumbers in an even layer over Dijon side of bread. Evenly layer over tomatoes, add your ground pepper and then place mayo slice of bread on top and cut in half if desired. Serve with fresh fruit, raw vegetables or Sweet Cajun Plantains (recipe Follows) like I did.

Dill Mayo

1 ½ Tbsp Vegan Mayo (My new Favorite is Earth Balance’s ‘Mindful Mayo’ original, SO GOOD!)
1-2 Tbsp fresh chopped Dill (or to taste) (I used 2 heaping tbsp)

- Place mayo and dill in a small bowl and whisk until well combined. May be a bit chunky depending on how much dill you use but that’s okay.


Fried Sweet Cajun Plantains

*** Note - Now normally I don’t eat fried foods, but every once and a while I don’t think it hurts to indulge a little, and in all honestly frying plantains is my all-time favorite way to eat them. If you prefer you can bake the plantains in the oven as you would any type of potato fries, but it will take a lot longer then the frying method, making this dish slightly less ‘quick’ so keep that in mind.***

2 Ripe Plantains (The yellow kind with black spots)
½ - 1 Tsp your favorite Cajun Seasoning (or to taste)
1 Tbsp Brown Sugar (or less if desired)

- To Peel plantains cut the a tiny bit off each end and use your knife to score down the side of the skin. Deep enough to get through the peel but not deep enough to cut into the flesh of the plantaine. Remove the peel carefully like you would a banana peel.

- Pre-heat your deep fryer. (If you don’t have a deep fryer you can fry your plantains in a pan on the stove using any kind of vegetable oil. Enough to cover the pan and the plantains. Set burner to medium-high heat) Slice each plantains into rounds on the diagonal. When deep fryer is ready, (or oil in pan is hot enough) add your plantains to the oil and fry for about 5 minutes, or until plantains are a light to medium golden brown.

- Remove plantains from oil and place in a paper towel. You want to remove some but not all of the oil otherwise the seasoning mix won’t stick as good.

- Place plantains in a container that has a fitted or locking lid. Add to the plantains the sugar and Cajun seasoning. Then close the lid and shake well for roughly a minute until all plantains are well coated with seasoning.

- Dump out onto a plate alongside your sandwich and enjoy!


PS: I thought since I was absent on both Saturday and Sunday it was only fair to give you more then one recipe today