Showing posts with label Cashew. Show all posts

Saturday, February 13, 2016

Toasted Cashew Noodles....


This dish came about because I was starving, and craving noodles. I don't normally crave noodles, but I really felt like rice noodles in some kind of Asian style sauce. I didn't feel like Peanut noodles, though I love them, and I suddenly had a simultaneous hankering for Cashews. I didn't really have many fresh veggies on hand, and wanted to keep the dish simple anyway so the preparation would be quick - the faster it's made the faster I eat! - and this is what came about.


Surprisingly this turned out super good, it's got the perfect balance of sweet, salty, spicy, tangy. I also think the cashew butter makes a great stand in for peanut butter, and lends a more mellow, yet complex and nutty flavor to the dish. I also really love the nice bit of crunch in each bite from the red cabbage garnish. I didn't have any cilantro on hand, but I imagine that would make a good garnish too, if you happen to have some. Of course if you want to 'beef' it up, you could also add some cubed baked or fried tofu, or maybe even some tempeh. But I kind of like it exactly as it is, light and easy. Two of my favorite things right now.


Toasted Cashew Noodles

For the Noodles

2 tsp Toasted Sesame Oil
3 Carrots Sliced thin
6 Radishes cut into thin half moons
3 Green Onions sliced (White and green parts separated)
2 Garlic cloves sliced thin
1/4 Cup Cashews
12oz Rice Noodles
1/4 C or less of thin sliced Red Cabbage

For the Sauce

1/4 Cup Creamy Cashew Butter
1/3 - 1/2 Cup Coconut Milk (Depending on how thick you want the sauce)
4 Tbsp Tamari
2 Tbsp Mirin
2 Tbsp Lemon or Lime Juice
2 tsp Cane Sugar
1/2 tsp Ground Ginger
1/4 tsp Smoked Paprika
1/4-1/2 tsp Sriracha or to taste

- Place the noodles in a pot of boiling water and cook for 5 minutes or until they are tender. Drain and set aside.

- Heat the Sesame Oil in a large frying pan. When it's hot add the carrot, and radish. Cook on high for about 5-7 minutes until the veg becomes soft and starts to brown. Add in the white parts of the onions, and the garlic. Lower the heat and sauté for another 3-4 minutes until everything is cooked to your liking.

- Combine all sauce ingredients in a small pot and stir until smooth. Turn the heat on high, and when it begins to simmer whisk it for about a minute. You just want to heat the sauce through long enough for it to smooth out.

- Add the Cooked Noodles to the pan of veg. Pour the sauce over, and mix to combine.

- Divide into bowls, and top with Green onions, and red cabbage.

- In a dry skillet toast the cashews over high heat for 5-8 minutes until they smell nutty and begin to brown.

- Top each bowl with a handful of cashews and enjoy!

Friday, February 27, 2015

Creamy Carob Banana Dream Smoothie...


This has seriously been my favorite breakfast smoothie of late. I came up with it a few weeks ago when I was craving a creamy, chocolate flavor but wasn’t really in the mood for my usual chocolate smoothie. For whatever reason I found myself really craving carob - which I do like, but don’t normally get that crazy about. - Since I had some carob powder on hand I decided to give it a try. The carob, coconut, date, banana, cashew combo works so well! You’ll be amazed, and become totally addicted to it like I did. Plus it’s so simple you can’t not try it, and it’s naturally sweetened, no sugar or artificial sweetener here.


Creamy Carob Banana Dream Smoothie

1 ½ Frozen Bananas
1 C Unsweetened Vanilla Coconut Milk
3 Medjool Dates Pitted
1 ½ Tbsp Carob Powder
1 Tbsp Cacao Nibs
*** 1 heaping Tbsp Cashew Butter

- Place all ingredients in a high-speed blender and blend for 60-90 seconds until completely smooth and creamy.


*** Note - For a different but equally amazing flavor swap out the Cashew Butter with Hazelnut Butter. SO GOOD!*** 

Tuesday, December 3, 2013

An American Thanksgiving Brunch...

My full plate!


I hope that everyone had a lovely American Thanksgiving last week, I know I did. I feel that this year was more relaxed then years previous, which was a real bonus. The thing I love most about American Thanksgiving is that it’s kind of a special time for me - it ‘s my veganversary. That’s right, I went Vegan on Thanksgiving Day three years ago - which wasn’t as hard as you might think since I was already vegetarian at the time. It’s fun getting to celebrate your veganversary, though I feel like such a baby-vegan when I talk to people who’ve been vegan for 10+ years, what an inspiration! I can’t wait until I hit my ten-year mark!


Anyway - onto the food. As I’ve already said my husband and I didn’t really feel like doing dinner, and so we decided to change it up and do brunch instead. A super cool idea, and damn delicious too! Even though I’m not typically a breakfast eater, I do love breakfast food. Since I don’t get it often, this meal really was a treat. Though it did require some advanced planning. The Black Forest ‘Bacon’ for instance I made the day before. I also prepared the English Muffins and the Pumpkin Cinnamon Buns the day before so that they just needed to be baked on Thanksgiving morning. The pies too were baked on Wednesday since creamy pies and cheesecakes really do require a good few hours of refrigeration, though I typically like to let them set for 24 hours if I can.

Tofu Benedict


After much thought and consideration as to what was going to be the focal point of our Thanksgiving Brunch I decided on a Tofu Benedict. In my pregan days - pre-vegan - I used to love a good eggs benny, and though I have made vegan versions it’s not something I do often, so it seemed like the perfect center piece. The only problem was which Benedict recipe to use? I debated between Isa Chandra Moskowitz’s Benny in “Vegan Brunch” and Colleen Patrick-Goudreau’s Benny in “The Vegan Table” until I finally settled on a compromise. I used Colleen’s Benny recipe and Isa’s Hollandaise Sauce recipe! I also made my own home-made English Muffins using Isa’s recipe from Vegan Brunch. It was delicious.


Colleen’s Benny itself was pretty straight forward. You make a tofu scramble, toast some English muffins, saute some spinach with garlic and assemble. It goes Muffin - tomato - vegan bacon - scramble - spinach - hollandaise sauce. Perfection!

Isa’s Hollandaise Sauce was pretty good too. It was thick and creamy like I remember, though more lemony and less rich then I recall dairy based Hollandaise to be. Still good, and it was super simple to make just shallots, white wine, vinegar, flour and a few other things.

Hollandaise Sauce


Isa’s English Muffins were spot on though, and so freaking delicious. I was a bit intimidated making these as I thought it was going to be a lot of trouble and a lot of effort but in reality these whipped together pretty quick, and man they’re better then any English Muffin I’ve ever eaten. Unfortunately I do not own cookie or biscuit cutters and so I used a drinking glass to cut the muffins. Which means they were way smaller then an actual English Muffin, but that was alright. We had many benedicts instead and it was great.

English Muffins 


Now when it comes to the ‘bacon’ or ‘ham’ that is used in a ‘traditional’ benny, Colleen uses tempeh bacon. She has a recipe in “The Vegan Table” for it, and I’ve made it several times but I wanted to try something a little different and ‘out-there.’ this time around. For more then a year I’ve been eying the Black Forest Bacon recipe in Celine Steen and Joni Marie Newman’s wonderful book “The Complete Guide to Vegan Food Substitutions.” I keep telling myself that I’m going to try it one day and then never do. It always seems like so much work but finally I found myself determined to give it a try. That’s the thing with me, when I’m already laboring over something I might as well jump in with both feet and do even more work you know? Anyway, it ended up being way easier then I thought it was going to be, and every second of effort was worth it. This is hands down one of the best damn bacon recipes I’ve ever made. The cool thing about it is that it’s a seitan bacon. It’s made with liquid smoke, garlic, paprika, maple syrup, black pepper and of course vital wheat gluten. Then you make a glaze out of maple syrup, salt, brown sugar, black pepper and liquid smoke. Whisk the glaze together pour it over the bacon and bake in the oven wrapped in aluminum foil. So easy! This is really a delicious blend of sweet, salty, smokey and peppery. Once it’s done you let it cool, and then slice thin and fry up as you would any other bacon. Amazing, and it was great on the benny’s!

Black Forest Bacon!


I also used this delicious bacon in the amazing Smokey Tempeh Bacon, Broccoli and Cheddar Quiche recipe from “Spork-Fed” by Jenny Engel and Heather Goldberg. Honestly I’ve never been the biggest fan of quiche, ‘traditional’ or ‘vegan.’ I’ve made several vegan quiches over the past few years and they’ve always either been gross or mediocre. I suppose quiche is just not one of my things, but this particular quiche looked so good, and I’ve had such great luck with this particular cook book in general that I thought I’d throw caution to the wind and just go with it. Turns out this is the best damn quiche I’ve ever eaten and I loved it. It was slightly sweet, very savory, a little salty, kinda smokey, and oh so creamy. Absolute perfection and the black forest bacon really knocked it out of this world. Plus who doesn't love the broccoli cheddar combo? I used Daiya Cheddar by the way. I also really liked that the crust used cornmeal, oregano, and Dijon mustard to liven things up, and I was happy that even though this quiche uses both nutritional yeast and tofu that neither of those flavors was overpowering.

Smokey Bacon, Broccoli and Cheddar Quiche


To go along with all of that I also made a half-batch of the Tempeh and White Bean Sausage patties from Isa Chandra Moskowitz’s book “Vegan with a Vengeance!” these were really tasty, though they crumbled easily. I think I also put a tad too much tomato paste in them because they were kind of orange-pink looking In the end, but they were still great. I paired them with a half batch of Isa’s Navy Bean Gravy from her book “Vegan Brunch” which was also fantastic - although In the haste of eating I neglected to take a picture of that, sorry! Take my word for it when I say this was a super easy gravy recipe. It was thick, creamy, and delicious, the perfect breakfast gravy and I love that it used beans!

Tempeh and White Bean Sausage Patties 


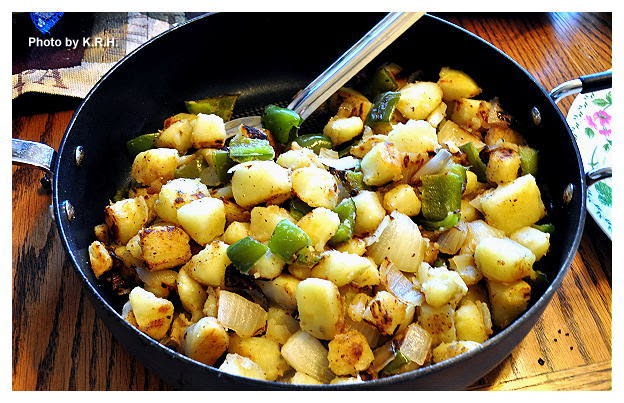
Also from Isa’s “Vegan Brunch” I made the home-style potatoes, because what’s a lavish brunch without potatoes? These were seriosuly some of the best breakfast potatoes I’ve ever had. Oh my, where they amazing! I could have eaten the whole pan, and they were so simple. Just potatoes, onion, green bell pepper, salt, pepper and oil. Perfection.

Home-Style Potatoes 


Last but not least we capped our mid-day meal off with something sweet and decadent. The Pumpkin Cinnamon Rolls with Maple Glaze from Chloe Coscarelli’s beautiful and fantastic book “Chloe’s Vegan Desserts” these were a dream, simply amazing, and so flavorful. Right off the bat my husband and I ate 2 each! We ate another one when we got home that night. By Saturday morning the whole dozen were gone! The glaze is simple, powdered sugar, maple syrup and vanilla. The buns themself are a typical cinnamon roll pastry with the addition of pumpkin. The filling a delicious blend of brown sugar, cinnamon and earth balance studded with raisins. Holy carrots guys! These were incredible! There is not a doubt in my mind that I’ll be making these again.

Pumpkin Cinnamon Rolls with Maple Glaze 


Now, after brunch we were stuffed and so we happily relaxed. Then later in the afternoon we went to my husband’s aunts house to visit family. We did not eat there, as the whole idea of brunch was so that we wouldn’t have to eat dinner. I did however make three pies to bring along. I mean, I didn’t want us to look like total outcasts as the only vegans! I figured as long as I brought pies then we could enjoy dessert with them and ‘fit in.’


I chose to make the pumpkin cheesecake from Isa Chandra Moskowitz and Terry Hope Romero’s joint effort “Vegan Pie in the Sky.” and it was delicious. You can’t have Thanksgiving without a pumpkin dessert of some kind and this fit the bill. I like that the base was made using cashews and tofu - though it didn’t taste like either. This was a very rich, and decadent tasting cheesecake, and I loved the pecan topping. Sorry for the blurry photo, I don’t know what happened!

Pumpkin Cheesecake with Pecan Topping


I also wanted to make some totally off the wall stuff to enjoy and so I made the Banana Tapioca Pudding Pie from Hannah Kaminsky’s wonderful book “Easy as Vegan Pie” I loved the sound of it, and I was not disappointed. It’s like a banana cream pie but with tapioca. Except the tapioca isn’t so noticeable and kind of blends into the pudding you make. My favorite part of this pie though is the home-made coconut whip cream. This was amazing, I am literally blown away by the ease and genius of this particular vegan alchemy. All it is is chilled coconut cream whipped with sugar and vanilla extract and it tasted better then any whip cream I’ve ever eaten, and way better then any commercial vegan whip cream too. Now that I know it’s so easy I’ll be making my own from here on.

Banana Tapioca Pudding Pie 


Next I was completely captivated by Hannah’s recipe for Cannoli Pie - which is exactly what it sounds like. It’s a Cannoli filling inside of a pie crust, delicious! In my pregan days I loved Italian Cannoli. My dad used to take me to this great Italian Bakery in Vancouver and we’d get a whole box of them! It’s been years since I’ve had an actual cannoli so when I saw this pie I knew I’d have to try it out. It’s actually quite easy, mostly it’s made with tofu and cashews though it also uses vegan yogurt - I used my own home-made yogurt - lemon juice, sugar, vinegar, nutritional yeast, and Agar. You top the finished pie with shaved chocolate and chopped pistachio’s and it’s incredible. It’s extremely rich, and very creamy. I loved all the pies I made but this just might have been my favorite - you know, for old times sake. However as far as the rest of the guests were concerned I think the pumpkin cheesecake was the overall winner.

Cannoli Pie


And that about wraps up American Thanksgiving this year. I hope you all had as lovely time as I did.

Sunday, December 2, 2012

Memories of Ireland, Potato and Leek Soup


When my husband and I were in Ireland in 2009 we ate a ton of Potato and Leek soup, we probably ate it once everyday, served with a few slices of thick dark bread. It was the main staple of our diet on that particular trip, and not because we were vegetarian - at the time neither of us were - but because it was cheap, abundant, delicious and filling. My husband and I have never been the kind of people that travel for the food. We don’t seek out exotic culinary delights, or spend copious amounts of money on fine dining. When we travel we spend our money on seeing and doing amazing things, because if you’re not going to get the most out of your trip then what’s the point in going right? Which explains the potato and leek soup. You see, it’s a pretty standard offering in most pubs and restaurants in Ireland, and when we were there you could get a nice hearty bowl of it with bread for between four to six euro, four to six pounds if we’re talking about Northern Ireland. That makes for a pretty cheap lunch or dinner for two people while traveling and because potatoes are so heavy one bowl really is sufficient. If you’re extra hungry you might want to throw a three euro side salad into the mix, but it still keeps the cost pretty low.


We traveled to fourteen different cities in Ireland, and we ate Potato and Leek soup all the way from Dublin to Belfast, to Derry, to Galway, to Killkenny, to Cork, to Waterford, back to Dublin. No matter where we went the soup was always phenomenal, and I just fell in love with it - as I did so many other things about Ireland. After we returned home, despite having eaten it every day for the duration of our trip I wanted more potato leek soup. So began my mission to make a potato leek soup from scratch that was just as good as those I’d sampled in Ireland. For the past 2 and a half years I’ve failed at every turn and I have tried so, so many recipes. Whether the recipes be vegetarian or vegan I was never able to find a good recipe, not online and not in any cook book. Every recipe I’ve tried the soup was too bland, too thick, too much potato, too much thyme. The consistency was never right, the flavor was never spot on, it was never quite rich enough or creamy enough, and for a while I thought all was lost.


Then Friday I woke up to cold weather as one so often does in Chicago at the end of November, and I found myself with a hankering for potato and leek soup! I looked through a handful of my cook books trying to find recipes for said soup that I hadn’t yet tried, but to no avail. Nothing was catching my eye. After some moments of impatient contemplation I realized I didn’t really need a recipe at all. All I needed was my own creativity and knowhow, and so I went to the kitchen and set myself to work, with nothing to guide my endeavor except countless memories of Irish pubs and magical landscapes.


After having tried so many recipes - some from very renown people in the culinary profession - I had no hope that my little effort would yield anything palatable, but I had to try, and in the end, when I tasted what I had created I knew I had come as close to the perfect Irish bowl of potato and leek soup that I ever would. This soup turned out so rich and creamy, and bursting with flavor. It is everything a good potato and leek soup should be, and it’s fairly quick and easy to prepare. If you’re a potato leek soup fan I urge you to try it, and serve it a long a nice thick slice of pumpernickel bread.


Memories of Ireland, Potato and Leek Soup

2 Tbsp Earth Balance or other Vegan non-dairy Butter
1 Very large leek, washed and sliced.
3 medium sized Yukon Gold Potatoes skin on chopped
2-3 Celery Ribs chopped
4 Garlic Cloves Minced
2 Bay Leaves
1 tsp Thyme
½ tsp Sage
½ tsp White Pepper
1/4 tsp Smoked Paprika
Sea salt and Black Pepper to taste
1 ½ C Vegetable Broth
1 ½ C Water + 1 Vegan ‘Chicken’ Bouillon Cube
1 Bunch Parsley Minced
2/3 C Cashews + additional 1/3 C Cashews as needed
1 C Water
1 Tbsp Lemon Juice
1 Tbsp White Miso

- Melt Earth Balance in a pot on the stove over medium heat. Add in the leek and celery. Saute for 4 minutes then add in the garlic, bay leaves, thyme and sage and saute another 4-5 minutes until leeks are tender and bright green.

- Add in the potatoes, the vegetable broth and the water with the bouillon cube. Bring to a boil then reduce heat to a good simmer. Allow to simmer for 15-20 minutes or until potatoes are tender when pierced with a fork.  Around the last five minutes of simmering add in the white pepper, smoked paprika, black pepper and salt. Stir to combine.

- While the soup is simmering combine the cashews, the water, the lemon juice and the white miso in a high speed blender and process on high until completely smooth. About 1 minute. If the mixture looks a little to watery you can add in up to another 1/3 cup of cashews for a thicker cream.

- Remove the cashew cream to a measuring cup and set aside. It should have yielded roughly one and a half cups of cream.

- No need to clean the blender out, instead remove the bay leaves from the soup and discard then transfer the hot soup to the blender being careful not to spill any or burn yourself. Once all of the soup is in the blender blend on high until completely smooth and creamy. Return the soup to the pot.

- Stir in 1 cup of the cashew cream. Stir in minced parsley, and season with any additional salt and pepper.

- Ladle the soup into bowls and serve with an additional swirl of the cashew cream, and a few twists of a black pepper mill. Enjoy!

PS: You can make this soup oil-free by using water to saute instead of earth balance. You can make the soup soy-free by using a chickpea or barley based miso instead of a soy one, or just leave the miso out altogether.

PPS: If you’ve never been to Ireland you really must go. It is one of the most spectacular places I have ever been! 

Wednesday, October 17, 2012

Vegan Mofo #17 - Celine & Tamasin's Tofu Pomegranate Pockets...


Vegan Mofo #17 - Celine & Tamasin's Tofu Pomegranate Pockets 
The Book - Vegan Sandwiches Save the Day!
The Author - Celine Steen & Tamasin Noyes
The Recipe - Tofu Pomegranate Pockets
Page # 67
Difficulty - Easy
Duration - 20-30 minutes not including the time it takes to press and drain tofu, or if you want to marinate your tofu as I did before baking. Once tofu is done it comes together in under 10 minutes.


I chose to make this recipe for one reason and one reason only, Pomegranate! Growing up Pomegranate was one of my favorite fruits, it was one of my favorite parts about the autumn and winter season. As a kid I remember my mom would come home from grocery shopping and she’d have 1 pomegranate for each of us, sometimes there would be extras, but pomegranates were/are expensive and so they were usually a treat. I would cut my Pom open, grab a bowl then hunker down in front of the t.v. watching some show while pulling all the little pom kernels free of their membrane. Snapping and crunching them between my teeth, enjoying their sweet and sometimes sour, occasionally bitter flavor. I tend to eat pomegranates a lot less these days, pomegranate juice sure, pomegranate flavored stuff definitely but actual pomegranate fruit? It’s rare. I’ve got so many fillings, plus a crown and all that fibrous pulp gets stuck between my teeth. When I saw this recipe however I knew I couldn’t pass it up. First of all pomegranate on a sandwich? Who would have thought! I love the originality of that. Plus it’s combined with smoky baked tofu, bitter greens, and a creamy dressing, what’s not to love?


So first, the tofu. Now you all know how picky I am about my tofu I’m sure, so this bare-bones approach to tofu had me a bit skeptical to say the least. All it is, is Tamari, Liquid Smoke, onion powder, sea salt, black pepper and Maple Syrup. The recipe says to coat the tofu in this mixture and then cut it into cubes and bake it for twenty minutes. Instead I decided to let my tofu marinate in the mixture to really give it a chance to soak up the flavor. I probably let it marinate about an hour before slicing it into cubes. Then I made a little extra marinade - because by then all of the original had been soaked up - to brush the cubes with before popping them into the oven. I probably let them back for about 25-30 minutes until they were really nice and brown because I wanted my cubes really crispy and I have to say - these were freaking amazing! No lie, the tofu cubes were so delicious I was eating them plain, right out of the oven. This is definitely a method I’ll be coming back to again and again.


Second there is the sauce which is super easy-peasy. All it is, is Cashews, Apple Juice and Ume vinegar. That’s it! You blend it all together and somehow you get this super creamy, all flavorful sauce that reminded me a bit of a Ranch or a Cesar. I truly appreciate that the ingredients for the sauce were simple and wholesome and it just goes to show that you don’t need a laundry list of items or any fancy vegan this or that to make a good sauce.


Lastly the recipe says to combine the sauce with sliced red onion, and spinach or arugula. Unfortunately I didn’t have either of those greens but I had a box of mixed salad greens in the fridge that needed to get used. Arugula was one of the greens in the mix so I thought it was a good choice. Once the salad is mixed you stuff it into the pockets along with sliced cucumber, the tofu bits and the pomegranate kernels and bam! The most amazing, delicious combination ever! I really, really urge you to give it a try. It’s so simple, yet so impressive, I know I’ll be making it for years to come.


Saturday, October 13, 2012

Vegan Mofo #13 - Jenny & Heather's Southwest Black Bean and Corn Mini Burgers with Smoky Paprika Cashew Cheese...


Vegan Mofo #13 - Jenny & Heather's Southwest Black Bean and Corn Mini Burgers with Smoky Paprika Cashew Cheese

The Book - Spork-Fed
The Author - Jenny Engel & Heather Goldberg
The Recipe - Southwest Black Bean and Corn Mini Burgers with Smoky Paprika Cashew Cheese
Page # 79-80
Difficulty - Easy
Duration - Roughly 30 minutes - longer if you prefer to bake your burgers as opposed to frying them


I made these for two reasons 1) I was really craving a simple bean and grain sort of veggie burger, and 2) I’ve hardly used this cook book since I first purchased it. The promise of a smoky cashew cheese didn’t hurt either I might add.  I wasn’t sure how these burgers were going to turn out, and since my husband does not like beans very much I wasn’t sure if he’d like them, turns out I needn’t have worried because these mini burgers are incredible! They’re so good in fact that my husband loved them and went back for seconds! He even liked the cashew cheese!


What I really appreciate about these burgers is their simplicity and their emphasis on simple whole food ingredients. These burgers are a mixture of black beans, corn, garlic, onion, bell pepper, salt, pepper, chipotle powder, lemon juice, agave, rolled oats, and bread crumbs. At first I thought the addition of oats was a little strange but It’s actually one of the things I ended up liking best about these burgers. The oats give the burgers a great taste, and wonderful texture. They’re hearty, and grainy but in the best way possible. These burgers actually taste a bit like a regular burger, I bet you could even give one of these to someone and they wouldn’t know the difference.

The Cashew cheese is also really simple and utilizes pantry staples like cashews, garlic powder, sea salt, agave, smokes paprika, vegetable oil, lemon juice, thyme, soy or almond milk and black pepper.


I think I may have played around with the spice amounts for both the burgers and the cheese to suit my personal preference but otherwise I followed the recipe by the book. Except I chose to bake these rather then fry them to avoid excess oil. I actually think baking them was a great idea, it really melded the flavor.

To serve I put them on pretzel slider buns with a bit of vegan mayo, a lot of arugula, a dollop of the cashew cheese and some pickled jalapenos. The pickled jalapenos really bring it to another level although if you don’t like heat you could easily serve it with some tomato instead.

This is pure good food, just the way I like it!


Monday, June 4, 2012

Indo-Malaysian Shami Kebabs...


Just incase you thought I was finished experimenting with Malaysian cooking, this post it to assure you that I’m not. I’ve just been very busy lately preparing for vacation, so I haven’t been cooking quite as much as usual, and much of the cooking I have been doing has been for the express purpose of cleaning out my fridge before I take off. Before I do however, this dish really needs to be shared!


Even though a Shami Kebab isn’t exactly the sort of kebab we here in the west are used to, they are delicious. Originally of Indian Origin these kebabs are traditionally made from a mix of lentils and ground lamb. They are a popular item at the Malay and Muslim Hawker stalls and are often served alongside a dish or rice, and a sambal, however they are also sometimes eaten as a burger which is sort of how I chose to enjoy mine.


Of course my Shami Kebabs were not made with ground lamb, (Ew!) Instead to get that kind of texture and ‘sticking together’ effect I decided to use two different kinds of lentils, as well as cashews and mushrooms. The end result was so fantastic and delicious that both my husband and I failed to see how the dish could have in any way been improved by the addition of lamb. These kebabs, or patties as they should more accurately be called - are hearty, flavorful, and down right scrumptious. I dare you to eat just one.


Also instead of eating these kebabs with a heavy side or rice, or on a burger bun I decided to slayer them onto a sliced French Baguette, piled with lettuce, tomato, cilantro, mango chutney, and a drizzle of tamarind sauce, and mint yogurt. Now that I think of it a few sliced onions would have gone perfectly on there as well. Next time!


Shami Kebabs 

1/3 C Red Lentils
1/3 C Green Lentils
2 Onions finely diced
10 Garlic Cloves minced
1 Thumb Size Piece Ginger grated
1 Small Green Chili minced (Optional)
6oz Baby Bella Mushrooms finely diced
½ C Cashews Ground into a meal
1/4-1/3 C Chickpea Flour (depending on how wet your mixture is)
2 tsp Curry Powder
1 tsp Ground Coriander
1 tsp Ground Cumin
1 tsp Gram Masala
½ tsp Ground Turmeric
Sea Salt to taste
2-3 Tbsp Earth Balance
½ Bunch Cilantro minced

Optional Garnishes 

Cilantro
Sliced Tomato
Lettuce
Thin Sliced Red or Yellow Onion
French Baguette or Italian Loaf
Mango Chutney

Quick Tamarind Sauce 

2 tbsp tamarind paste
2 packets stevia or to taste
water to thin

Quick Mint Yogurt 

1/4 C Sour Cream
1 Tbsp Lemon Juice
1 Tbsp White Miso
2 Tbsp Water
Minced Fresh Mint to taste
Salt and Pepper to taste

- Rinse Lentils then place them in a medium sized pot and add enough water to cover. Bring to a boil then reduce heat to simmer and cook lentils until the water has absorbed and the lentils are tender. Roughly 20-40 minutes. If your water absorbs before your lentils are tender add more water.

- When lentils have finished cooking drain and set aside.

- Meanwhile melt the Earth Balance in a large pan. Stir in the diced onions, garlic, ginger, and green chili. Saute over medium-high heat for 5-10 minutes until mixture is fragrant and onions are translucent.

- Add in the diced mushrooms, the curry powder, coriander, cumin, gram masala, and turmeric. Saute for 3-4 minutes then add the lentils. Saute another 5-10 minutes until mushrooms are soft and moisture has evaporated. Transfer the mixture to a large mixing bowl and set aside to cool.

- Once mixture is cool enough to handle season with sea salt and pepper and add in the ground cashews, the minced cilantro and the chickpea flour. Thoroughly combine until the mixture becomes cohesive enough to form patties.

- Form the mixture into 10-12 palm sized patties. Place on a lightly greased baking sheet and bake at 400'F for 10-15 minutes. Remove the baking sheet, gently flip the patties over and bake for another 10-15 minutes until the patties are browned and have firmed up. Let cool for 5-10 minutes before serving if serving as a sandwich. It serving with rice serve immediately.

- To assemble your Shami Kebab sandwich. Slice a French Baguette in half crosswise then slice each half lengthwise down the middle so you have two roughly 6inch sandwiches. Slice three patties in half then layer three halves on each baguette. Top with mint yogurt, mango chutney, tamarind sauce, lettuce, tomato and cilantro and serve!


- To make Tamarind Sauce and Mint Yogurt simply whisk the ingredients for the Tamarind sauce in a bowl. Taste, adjust for seasoning and thickness and serve. For Mint Yogurt whisk all ingredients together in a bowl taste for seasoning and thickness and serve.

Wednesday, April 25, 2012

Creamy Spring Pea Soup...


What better vegetable to represent Spring than peas? Fresh or frozen they are absolutely delicious with their bright green color, pleasant aroma, and sweet snappy crunch. When I was thinking up ideas for what to serve as part of my Earth Day dinner I decided peas would have to get worked in somehow. However after quite a bit of thought on the matter I was no closer to figuring out how exactly I wanted to prepare them, so it was off to my shelves of cook books for inspiration.

After searching and searching through book after book I came upon the realization that peas are A) a strangely under-utilized vegetable, and B) Seem to only get tossed into a lot of rice, and pasta dishes merely as an afterthought. During my search I did happen across a few pea soup recipes that use call for green peas but I found them uninspired. Mostly the recipes called for peas to be pureed with water and spices like parsley or mint - bleh, boring.


I myself love green peas, have always been a fan, and have never had any problem eating them plain. They are both sweet and savory enough to be totally satisfying on their own without any further alteration. In fact as a kid, when my mother or Oma or somebody was cooking with peas I’d often hang around and pop semi-frozen peas into my mouth like they were candy. It sounds strange I know, but they’re surprisingly good in that state. Anyway, I knew if I was going to present my Earth Day dinner to share with all of you, I’d have to do something a little more creative then serve a bowl of plain peas, and lets be honest as good as they are there isn’t anything the least bit elegant or ceremonious about plain peas. Right?

I did quite like the idea of a soup though, and with that idea in mind ingredient parings started bubbling to the surface and a recipe began to take shape. I wanted to keep it quick and simple, lightly seasoned but thick and flavorful and serve it roughly around room temperature rather then piping hot. Since it is suppose to be a spring soup, and many spring days are quite warm I wanted to create a dish that would refresh. What I came up with far exceeded my expectations and my husband went crazy for it.


The soup has a really lovely pale green color - something that’s not very well reflected in my photos, I’m sorry. Unfortunately the photos I took on Earth Day were unusable and so I had to redo them today using the leftovers, however as luck would have it, it’s very overcast out today. Which means very little natural light, which in turn means I had to use my inadequate kitchen lighting, which as I’ve mentioned before tends to give everything a slightly golden hue. Red, Orange, Green, and Yellow foods never properly photograph, but at least you get the idea. - It also has a lovely thick and creamy texture thanks to the cashews. If you want an even creamier soup you can soak the cashews in water for 1-2 hours before you use them, just make sure to drain them and rinse them afterwards and to use fresh water for the soup. Also since peas are quite sweet naturally you may want to opt out of using the Agave, it’s up to you, and finally if you prefer you can use fresh instead of frozen peas. Just keep in mind they’ll take a couple more minutes to cook.


Creamy Spring Pea Soup

1 C Raw Cashews
1 C Water
1-2 Tbsp White Miso (to taste)
1 Tbsp Lemon Juice
1 tsp Agave (Optional)
1 tsp Onion Powder
½ tsp Ground Mustard Powder
3-4 Garlic Cloves
Black Pepper to taste
Smoked Paprika to taste
16oz Frozen Peas + 1 C additional Frozen Peas
½ C water
A bit of minced Parsley to garnish (Optional)

- Place Cashews, water, Miso, lemon juice, onion powder, smoked paprika, garlic, mustard powder, and agave in a high speed blender. Blend on high for 30-90 seconds until completely smooth. Taste for flavor and adjust as needed. Then leave the cashew mixture inside your blender as you move onto the next step.

- Place 16oz of the Frozen peas and ½ C of water in a medium sized pot over medium heat. Bring to boil, and then reduce heat to simmer for 2-4 minutes until peas are bright green and thawed out.

- Carefully add the contents of the pot to your blender. Blend on medium speed until peas have been incorporated. You don’t need to puree the whole thing, it’s okay if some peas don’t get broken up.

- Once peas have been incorporated, pour the mixture back into the pot, over medium-low heat. Add the extra 1C of frozen peas. Along with black pepper to taste. Simmer until warmed through. Taste and adjust seasonings as needed then serve garnished with fresh minced parsley a sprinkle of smoked paprika and enjoy!

*** Note - This recipe can be made soy-free if you use chickpea Miso***

Friday, March 2, 2012

Avgolemono Sauce...


Avgolemono Sauce is a thick, rich, creamy and tangy sauce made primarily of lemon juice and eggs. In Greek cuisine it’s typically served with dolmathes, but can also be served with steamed artichokes or sometimes as a soup. It has always been my favorite Greek sauce after tzatziki.

Dolmathes are a favorite Greek dish of mine, I love them to death but for me one of the best parts about them is the avgolemono! Since going vegan I’ve made dolmathes several times and served them with several different sauces. The cranberry tahini from "Vegan Yum Yum" which was excellent, vegan tzatziki which is good, and a handful of other concoctions, but none of them was ever the same. Dolmathes just aren’t dolmathes without the Avgolemono.


There was a period where I spent a great deal of time searching high and low for vegan versions of avgolemono, without much success. Most of the recipes I came across were for the soup variation and the ones I found that were for the sauce seemed to miss the point drastically. I did not want tofu in my avgolemono, nor did I want chickpeas or cornstarch in it. I wanted a pure and simple avgolemono, one that mimicked the taste and texture I remembered and didn’t require a bunch of ingredients that would have been entirely foreign in the kitchens of my ancestors. It took time, and thought and quite a bit of fiddling before I realized that simple really was the way to go. Essentially all I needed to do was figure out how to substitute the eggs and everything else could be changed easily. In the end I opted to use cashews for three reasons, they cream really nicely, they firm up a bit if given the chance and I wanted to make this sauce soy-free. Initially I had no idea how or if it was going to work but by the time I was finished I couldn’t believe what I’d done.

Now truthfully I can’t recall exactly what a dairy based avgolemono sauce tastes like, aside from it tasting rich and tangy with lemon, but this sauce certainly delivers on both of those fronts. In fact it’s so rich It’s hard to believe there isn’t any egg in it! You can adjust the lemon and caper content to fit your own tangy desire but I think this is really perfect as is, and it tastes incredible alongside dolmathes which is the ultimate test in my opinion. Never again will I have to eat my dolmathes plain or with a sauce that just can’t compare to the culinary traditions I grew up with. This sauce is so good in fact you’re almost tempted to eat it by itself right off a spoon!


Avgolemono Sauce

3 Tbsp Earth Balance
3 Tbsp Whole Wheat Flour
2/3 C Cashews
1/3-1/2 C water, vegetable broth or faux ‘chicken’ broth
1/4-1/3 C Almond milk
3 Tbsp capers
2-3 Tbsp lemon juice
1/8-1/2 tsp Turmeric ***
sea salt and pepper
Additional vegetable or faux ‘chicken’ broth as needed (Optional)

- Blend Cashews, water/stock capers, lemon juice, turmeric, sea salt and black pepper in a high speed blender until completely smooth. Taste for seasonings and adjust as needed. Set aside.
- Melt the Earth Balance in a small pan over medium heat. Add the flour and stir until combined and a roux forms.

- Pour blended cashew mixture into the pot and stir to combine. Slowly stir in the almond milk starting with 1/4 C if too thick proceed to stir in the rest. Let sauce simmer over medium-low heat for 5-10 minutes until thickened.

- If sauce has thickened too much or you prefer a more liquid sauce stir in 1/4-1/3 C vegetable or faux ‘chicken’ broth.

- Taste for flavor and texture, adjust any seasonings as needed and enjoy with a big plate of dolmathes! Yum!

PS: If you don’t know how to make dolmathes of your own stay tuned for my dolmathes recipe which I hope to post this weekend or Monday at the latest.

*** Note - Because you don’t want any of the turmeric flavor to come through I recommend you start off small. Use 1/8 of a tsp of turmeric powder to color your sauce, taste and increase from there until you get the desired yellow shade. ***

*** Note - Soy-Free if using a soy-free non-dairy butter. This dish can also be made Gluten-Free if you use GF flour instead***