Showing posts with label Limes. Show all posts
Sunday, September 13, 2015
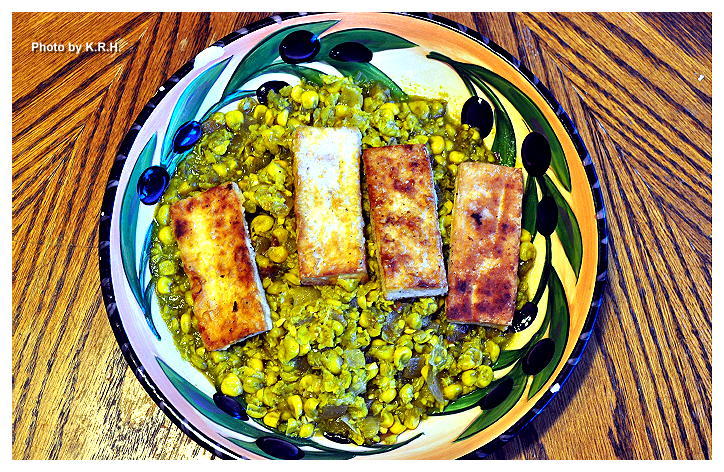
Vegan Mofo #14: Peruvian Corn Puree with Fried Tofu...
Corn is a staple food in Peru, it’s been around since the time of the Inca’s. There are two main varieties, one that grows near the coast that has a slightly bland flavor, and one that grows in the mountains that has a sweeter flavor. Though I don’t typically eat much corn when I’m at home, we did eat quite a bit of it while we were there. It’s cheap, filling and plentiful which makes it such a relied upon crop. Fish too is a staple food in Peru, what with Peru having such a long coastline fish and seafood are abundant. Peruvian cuisine is an interesting blend of South American tradition, Inca influence, Spanish influence, with some Indian and Asian influences due to various waves of immigration over the years.
For this recipe I used tofu in place of fish, and though it doesn’t have an overly fishy taste I think ti works really well here. I kept the tofu a little on the bland side because the corn puree has so much flavor. The planks of tofu make the perfect little scoops for eating up the corn. Though this is a relatively simple dish you’ll be immediately impressed by the powerful flavor punch!
Peruvian Corn Puree with Fried Tofu
2 tsp Olive Oil (or more as needed)
1 16oz Bag Frozen Yellow Corn thawed
2 ½ Cups Water (or more if needed)
½ Bunch Cilantro
1 Red Onion Diced
2 Vegan Chicken Bouillon Cubes
½ tsp Ground Cumin
½ tsp Smoked Salt
1-2 tsp Sriracha
1 lb Extra Firm Tofu drained and pressed for 1 hour.
1/4 Cup All Purpose Flour
Sea Salt and Black Pepper to taste
Kelp or Dulse flakes if desired
Lime Juice and extra Sriracha to serve
- Place the thawed corn in a high-speed blender with 1 cup of water and blend on medium for a few seconds until you have a chunky puree.
- Heat 1 tsp of olive oil in a large pan over medium high heat. Add the onion and saute until nice and golden. Add the cumin, smoked salt, bouillon cubes, sriracha and a ½ cup of water. Whisk together and simmer for 2 minutes or until bouillon cubes have dissolved.
- Add the corn puree to the pan with the onions and spices and stir to combine.
- Blend the cilantro and the remaining 1 cup of water together on high, until completely smooth. Add the cilantro mixture to the pan and stir to combine with the corn. Simmer for 10 minutes. Taste for salt and heat and adjust seasoning as needed.
- Divide the corn puree among serving bowls, wipe out the pan and fry your tofu.
- Heat the remaining oil in your pan over medium high heat.
- Slice your slab of Tofu into 3 pieces. Slice each piece into 3 more pieces so you have 9 planks of tofu.
- Place the flour in a shallow bowl and season with sea salt, pepper and either kelp or dulse.
- Dredge each plank of tofu through the flour until it’s coated on all sides.
- Carefully place each plank of tofu into the hot pan and fry until golden brown on each side. About 5-6 minutes a side. Make sure to flip at least once, to prevent burning or sticking.
- Serve each bowl of Corn Puree topped with a few planks of tofu, a drizzle of lime juice, and a bit of extra sriracha if you like things spicy. Enjoy!
Labels:
Cilantro,
Corn,
Cumin,
Limes,
Onions,
Quick and Easy,
Sriracha,
Tofu,
Vegan Mofo,
Veganize-It
Thursday, January 24, 2013
Post Workout Elixer...
This is just a little something I’ve been drinking lately, that I knew I just had to share with you all. I know it doesn’t sound like much but it’s absolutely delicious, and after a good workout it is so refreshing and quenching. It was actually after a workout a few days ago when I threw this thing together. See I wasn’t hungry enough for a full on smoothie, but just plain old water or even plain old coconut water wasn’t going to cut it either. What I really wanted was some fresh juice but since the juicer I ordered hadn’t arrived yet I had to think of something else. After thinking it over for a few minutes I decided to make a blended drink but with the spirit of a juice.
What does that mean? Well, there aren’t really enough solid ingredients in this to make it a ‘real’ smoothie, but it’s not quite a juice either. It tastes more like a juice because it doesn’t have much pulp or fiber, and it does foam up a bit like a juice. Overall it’s lighter then a smoothie and yet super satisfying at the same time. Surprisingly it’s also quite sustaining, meaning I was pretty well sated until lunch rolled around.
Now, you may be wondering why I chose these particular ingredients. Well ordinally, I was going for a Thai sort of flavor hence the lime, the coconut, the ginger, and the basil. However just a few weeks ago I came across a delicious new smoothie recipe in a cook book that included dried plums and a quarter of a whole lemon. I love dried plums and always have them on hand, and I just happened to have lemons though I’d never considered using either in a smoothie before. Long story short that smoothie was fantastic and I loved it, and so when I was making my morning drink I decided why not pop in a bit of lemon for that extra kick of citrus and why not through in a few plums for added fiber and sweetness. In the end it worked, and I was super impressed with this drink. So for the past three days I’ve been downing a glass after each workout and I’m absolutely loving every drop of it. FYI - the color of the finished drink does leave a little to be desired thanks to green basil and dark purple almost black plums but hey, if it tastes good who cares what it looks like right? Try it! You’ll see!
Post Workout Elixer
1 1/4 C Coconut Water
2 ½ Tbsp Lime Juice
1/4 Lemon Seeded and Peeled
1 Tbsp Maple Syrup
1/4 tsp Ground Ginger
3-4 Dried Plums
4 Basil Leaves
2-3 Ice Cubes
- Place all ingredients into a high-speed blender and blend on high for 60-90 seconds until completely smooth.
- Pour into a glass and enjoy with a slice of lemon to garnish. This drink is particuarlly refreshing when drunk after any workout that has you sweating buckets. I’m sure it would be equally quenching on a hot day.
Thursday, October 25, 2012
Vegan Mofo #22 - Celine & Tamasin’s Navajo Tacos...
Vegan Mofo #22 - Celine & Tamasin’s Navajo Tacos
The Book - Vegan Sandwiches Save the Day!
The Author - Celine Steen & Tamasin Noyes
The Recipe - Navajo Tacos
Page # 47
Difficulty - Easy
Duration - Roughly 30 minutes
I was intrigued by this recipe from the first moment I opened this book. The picture is scrumptious looking and the recipe sounded easy and delicious. I couldn’t wait to give it a try though I’ll admit I was initially daunted at the prospect of making my own bread. Not that I’m not capable of making my own bread but whenever I do it always seems to be such a long process. Not so in this case. This entire recipe is super simple to throw together even with the bread. The dough is simple, only has to rest for fifteen minutes and then it cooks up quickly fried in a pan of hot oil. The dough recipe is suppose to be enough for 4 pieces of bread but I found it was really only enough for two, two plate sized pieces.
As for the other ingredient’s it’s somewhat traditional taco fare all piled onto a piece of fried bread. Perhaps it’s not technically a sandwich but as it is on bread, and as I do believe I mentioned including taco’s in my Mofo theme, and as the recipe does appears in a book of vegan sandwiches I feel it was appropriate.
So what goes onto the bread? Shredded lettuce, corn salsa, tomato salsa lime wedges, avocado, cilantro and chorizo chickpeas. However I changed this around since I didn’t have any limes I just squirted some bottled lime juice over top. I also didn’t have any corn salsa and couldn’t find any organic corn salsa at the store so I just used organic frozen corn - thawed of course - and extra tomato salsa instead. The chickpeas however are the real star of the show, and I have to say - chorizo chickpeas are probably my new favorite thing ever!!
They’re quick and simple to prepare. They’re spicy and sweet. Basically you pan-fry canned chickpeas in a medley of spices - paprika, cayenne, sea salt, onion powder, minced garlic, olive oil, ketchup, apple cider vinegar, lime juice, and cumin. Until the liquid has been absorbed then you pile them on your taco and voila! Delicious! It’s nice to have both a soy and gluten-free option for a vegan chorizo that is nice and wholesome like that.
By far one of my newest favorite meals, you must try it!
Wednesday, September 12, 2012
Grilled Corn and Avocado Salsa...
This salsa is amazing! Or as some of my younger friends might say it’s Fire! And I don’t say that lightly. I’m a big fan of salsa’s and pico’s, especially strange ones, and I’ve certainly sampled my fare share of them, but this is hands down one of my favorites.
I made it for the first time a couple of months ago, right before my husband and I went on vacation. I don’t remember what possessed me to make it, but I think it had something to do with having an abundance of Fresh corn on the cob and avocados that needed to be used before we went away. Grilled corn is a favorite dish of mine particularly in the summer and so I thought why not use my favorite method for cooking corn and combine it with one of my favorite summer time accompaniments? Thus grilled corn and avocado salsa was born. Not that I’m claiming it’s a totally original concept - I’m sure someone, somewhere has thought of it before - but it is nonetheless delicious.
I know that we’re near the end of summer now and you’re probably thinking to yourself why didn’t I post a summer recipe during the heart of summer? Well, as it happens I forgot to take a picture the night I first made this delicious salsa, then I forgot to write the recipe down too! With no recipe and no picture there wasn’t much to post about, and there weren’t even any leftovers to take a picture of the next day because we gobbled the whole thing up.
Luckily my Mother-In-Law was having a get together with some of her girlfriends today and she requested that I make the Grilled Corn Salsa for her little party. I said sure, and then worked from my memory of what I did the last time to make it all over again. It came out exactly like I remember, a beautiful blend of bold flavors, with lots of potent garlic, tangy lime, and creamy avocado, not to mention that fantastic ‘just off the grill’ flavor from the corn.
This time around I made sure to take a photo, and write the recipe down. Oh and the best part? This Grilled Corn Salsa is totally omnivore approved! It was a big hit at my mother-in-law’s party and there wasn’t a vegetarian to be found amongst them - let alone a vegan - so make it for your next gathering or party and be prepared to wow your friends/family.
Grilled Corn and Avocado Salsa
4 Ears of Corn with Husk on
4 Large Garden Tomatoes diced
8 Cloves Garlic minced (or more to taste)
1 Red Onion finely diced
1/4 C Olive Oil
1/4 C + 2 Tbsp Lime Juice
½ tsp Ground Cayenne Pepper (more if you like more heat)
1 ½ tsp Sea Salt (or more or less depending on your taste)
Black Pepper to taste
3/4 - 1 tsp Smoked Paprika (to taste)
1 Large bunch Cilantro minced
4 Large Avocados Diced
- Soak corn in a large pot of salted water for 1-2 hours.
- Remove corn from the soaking pot and shake off excess water. Using a medium heat grill corn until husks are blackened and corn kernels are bright yellow. Depending on your grill and your heat setting this can take as little as 8 minutes or as long as 20 keep an eye on it!!!
- Remove corn from grill and place onto a plate to cool. Once sufficiently cool to the touch remove the husks and any silk. Cut all the corn away from the cob and place it into a large bowl. Discard any kernels that may have burned during grilling.
- Add all the remaining ingredients except cilantro and Avocado to the salsa. Mix until thoroughly combined.
- Add in the Cilantro and Avocado mix gently until just combined. Taste for seasonings and flavor and adjust as needed. Serve with your favorite tortilla chips and for a lovely presentation garnish with thin slices of avocado and big leaves of cilantro. Enjoy!
*** Note - This recipe makes A LOT! So if you’re just making it for a couple of people, or just yourself, then half the recipe. However if you’re making it for a party or gathering this is a perfect amount. It will get eaten I assure you! Also this is super easy to make in advance. Prep everything in the morning or even the night before, then add the cilantro and avocado in at the last minute right before serving.***
Labels:
Appetizer,
Avocados,
Cayenne Pepper,
Cilantro,
Corn,
Dip,
Ethnic,
Garlic,
Gluten-Free,
Latin Fusion,
Limes,
Olive Oil,
Onions,
Quick and Easy,
Smoked Paprika,
Soy-Free,
Sugar-Free,
Tomato
Thursday, June 7, 2012
Curry Kapitan with Coconut and Chili Relish...
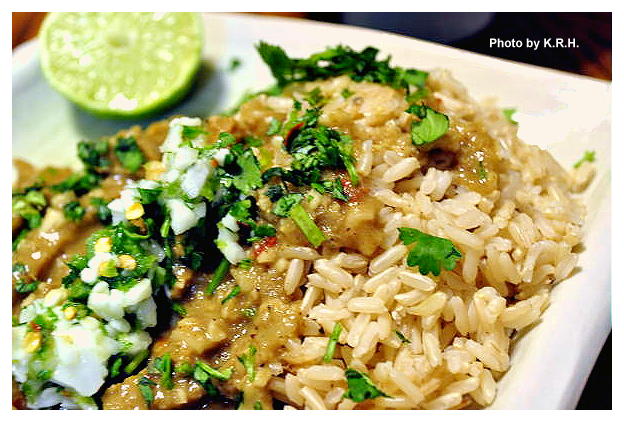
My latest foray into Malaysian Cooking. Curry Kapitan is traditionally made with chicken, and it’s said that the dish recalls the traditional role of the Chinese Kapitan, who was a man of considerable social standing amongst the Malay and Chinese people in old Melaka. Possibly invented by the Peranakans - the Malay-Chinese - to present to the Kapitan or to celebrate his role. It owes it’s flavor to the cultural melting pot of Old Melaka, and to the traditions of Chinese, Malay, Portugese, and Indian cuisine. Of course for my version I used homemade seitan instead of chicken, and decided to use soy sauce for a salty taste instead of dried shrimp paste.
This dish is nothing if not flavorful. The aroma alone is mouth-watering, but the taste... incredible! Though the ingredient list may seem long, this dish actually comes together rather quickly and it is worth every ounce of effort. When I first set out to make this dish I had no idea what to expect, and there were a few moments at least where I thought the whole thing would end in disaster. However when it came time to eat, and I took my first bite of curry Kapitan I was in love. The flavor is so complex that it’s hard to describe, but it has every flavor note you could possibly want in a dish. You can adjust the seasonings to make it as hot or mild as you like, but a little bit of kick is part of what makes this dish so fantastic. Use the chilies as a garnish, with a squeeze of lime and you won’t be disappointed. It tastes even better the next day!
Curry Kapitan with Coconut and Chili Relish
For the Rempah
½-1 tsp red pepper flakes
1 large red onion
10 cloves garlic
thumb sized piece of ginger
1 tbsp soy sauce
½ tsp ground turmeric
2 tsp Chinese five spice powder
1/4-1/2 tsp ground cinnamon
For the Curry
2 Tbsp tamarind paste
Flesh from half of 1 Fresh Thai Coconut (roasted)
2 tbsp peanut oil
1 15oz can coconut milk + 1/3 c water
1-2 Pack Stevia
1 ½ lb Seitan (Homemade or Store bought)
For the Chili Relish
½ - 1 Jalapeno Minced (Depending on how spicy you want it)
½-1 Red Chili Minced or ½-1 tsp red pepper flakes
½ Bunch Cilantro Minced
Flesh from half of 1 Fresh Thai Coconut
Juice of 1 Lime
To Serve
1 Lime
Extra Cilantro minced
Cooked Brown Rice
- First you must open your coconut. To do this the easiest way is to get a cleaver. It doesn’t have to be a good cleaver, it doesn’t have to be a $500 one, a $50 one will work just as good. Use the cleaver to whack your coconut a couple of times to break through. Drain the liquid out into a bowl or measuring cup and refrigerate to dink later, it’s not needed for the recipe.
- Once the liquid has been drained from the coconut you can split it in half. Use your cleaver and give the coconut a great whack in the middle. If like me you’re not strong enough to get the cleaver all the way through the coconut in one whack, and not skilled enough to keep hitting it in the exact same spot, use a rubber mallet to hammer the cleaver down through the coconut. This works really great, and fast.
- Once your coconut is in half use a spoon to scoop out the delicious white flesh. Once all the flesh has been removed rinse it under cold water and rub any filament away. Pat the coconut dry, and then slice it thin. Reserve half the amount of coconut in a bowl, to use as part of the relish and dry roast the other half in a pan over medium heat until it’s golden brown. Be careful not to burn it. The coconut should emit a slight nutty aroma.
- Once the coconut is a nice golden brown remove it and grind it either in a food processor or mortar and pestle until it resembles corse sugar grinds. Place in a bowl and set aside.
- Now to make the Rempah. In a food processor blend together the garlic, ginger and onion. Add in the soy sauce and pulse to combine. Stir in the turmeric, cinnamon and five spice powder.
- Heat the oil in a large pan over medium-high heat and stir in the rempah. Fry for five to eight minutes until the mixture becomes fragrant.
- Add the seitan to the pan and fry another 3-5 minutes, to let the seitan brown a little.
- Add in the coconut milk, water, Tamarind, stevia and season with sea salt and black pepper. Bring the mixture to a boil, then reduce heat and let simmer for 10-20 minutes. Add in the reserved roasted coconut.
- In the meantime combine all the relish ingredients in a bowl.
- Serve the Curry Kapitan over a bed of brown rice, garnished with extra cilantro, some squeezed lime, and the chili relish.
*** Note - To make this dish Gluten-Free use Wheat Free Tamari and a soy-based ‘meat’ or tofu. To make this dish Soy-Free use Coconut Amino’s instead of soy sauce.***
Labels:
Chinese 5 Spice,
Cilantro,
Cinnamon,
Coconut,
Coconut Milk,
Curry,
Garlic,
Ginger,
Gluten-Free,
Jalapeno,
Limes,
Onions,
Red Pepper Flakes,
Seitan,
Soy Sauce,
Soy-Free,
Sugar-Free,
Tamarind,
Turmeric,
Veganize-It
Thursday, May 31, 2012
Roasted Chili Lime and Indian Spiced Chickpeas...
Garbanzo Beans or Chickpeas as they’re also called are my hands down favorite bean ever! Well, I love other beans of course, and If I had to pick I’d say black beans, lima beans and edamame are right up there with chickpeas but chickpeas were the first bean I fell in love with so they’d always hold a special place in my heart.
I truly love them in anything. Soup, chili, stew, salad, sauteed with greens and other veggies. In rice, cous cous, or farro dishes, obviously as hummus. I love them in traditional Indian, Middle Eastern and Hispanic dishes, I just love, love, love them. They are probably the bean I buy and eat most frequently but sometimes - if you’re like me - you don’t want to go through the whole rigamarole of making something just to enjoy the one ingredient you love. Am I right? Now, I am no stranger to eating chickpeas right out of the can, I do it often, and it’s delicious, but some days you jsut need a little more than that, but you want something less than a meal. Well roasted snack chickpeas are just the thing!
| Roasted Indian Spiced Chickpeas |
Now roasting chickpeas isn’t exactly a new idea, so I can’t take credit for it. I’d seen mention of it before in magazine’s and online articles that connected to ‘healthy snacking’ though always intrigued by the idea I’d never actually thought to do it until last week. By then the recipes I’d previously seen were distant memories but roasting chickpeas seemed an easy enough task. All I needed to do was decide what flavorings I wanted to use. In the end I decided to go with a Mexican inspired flavor, and an Indian inspired flavor. Since they are two of my favorite types of cuisine and both traditionally use chickpeas it seemed a no-brainer.
| Chili Lime Roasted Chickpeas |
I was so impressed with the finished result. Not only do these things cook up fast, but they’re delicious! Absolutely-freaking delicious. They’re a truly healthy snack, and hearty too. The perfect thing to munch on pre-dinner when you usually reach for the sweets. They’re great served hot out of the oven or at room temperature, and truth be told they’re not half bad cold either. Bring a batch to your next BBQ or pot-luck and stick them on the snack table beside the chips, dips, pretzels, and party mix. They’ll be a sure fire hit.
Roasted Chickpeas 2 ways
(Cooking Instructions are the same for both)
Chili Lime Roast Chickpeas
1 15oz can Chickpeas
1 ½ Tbsp Lime Juice
½ Tbsp Agave Nectar
3/4 tsp Chili Powder
3/4 tsp Ground Cumin
Sea Salt
Indian Spiced Roast Chickpeas
1 15oz Can Chickpeas
1 Tbsp Lemon Juice
½ Tbsp Agave
½ Tbsp Olive Oil
3/4 tsp Curry Powder
3/4 tsp Gram Masala
1/4 tsp Ground Coriander
1/4 tsp Ground Cumin
Sea Salt
- Preheat oven to 400'F
- Drain and Rinse Chickpeas, then pat dry. Try to get them as dry as possible, before transferring them to a bowl.
- In a separate small bowl whisk together all flavor ingredients, both liquids and spices.
- Pour over the chickpeas and stir until thoroughly combined.
- Spread chickpeas in a single layer over a parchment lined baking sheet. Bake for 10-15 minutes then stir and bake another 10-15 minutes until chickpeas are brown and crispy.
- Remove from oven and transfer to a serving bowl, serve hot or refrigerate in an airtight container for later.
*** Note - For an Oil-Free version of the Indian Spiced Chickpeas Omit Olive Oil and use Lemon Juice or Tamarind Paste instead.***
PS: This probably goes without saying but if you decide to make both flavors at once do not put them on the same baking sheet. Use two different sheets!
Monday, May 21, 2012
Lemongrass Tofu Marinated Maki...
For those days when you’re looking for a heartier more protein rich maki may I make a suggestion? Lemongrass tofu! This dish came about simply out of my desire to do something different with my maki. Asparagus, and avocado, sweet potato, and cucumber rolls are brilliant, but sometimes you just want something different. My local health food store sells a really tasty fried tofu maki that I enjoy occasionally, and I happened to have a block of extra firm sitting in my fridge, so I put two and two together. However unlike the tofu maki at my local grocery I wanted to create a sweet, tangy and spicy sauce to marinate the ‘fu in.
Since I’ve been playing around a lot with Asian flavors lately I found myself reminiscing about Vietnamese food. I absolutely love the richness and complexity of Vietnamese fare, one dish can have so many flavor notes. I also love the liberal use of lemongrass stalk in South East Asian cooking, it’s an ingredient that’s completely neglected in every other cuisine. Which in my opinion is unfortunate. The world at large should not be deprived of the awesomeness of a really good lemongrass coconut milk ice cream, but I digress.
The marinade I made for my tofu, is inspired by the countless recipes and menu listings I’ve seen over the years for lemongrass chicken. It seems to be everywhere in Vietnamese restaurants, and though I’ve only eaten it once - years and years ago - I can tell you that lemongrass tofu is infinitely better. However I should say that I’d never go so far as to claim this marinade is in any way authentic - just the happy outcome of me tossing things together, - it is absolutely delicious, and makes for an equally good dipping sauce for the finished maki, instead of or in addition to soy sauce.
Lemongrass Tofu Marinated Maki
4 Sheets Nori
1 ½-2 C Brown Rice
3 C Water
2 Tbsp Brown Rice Vinegar
1 Tbsp Sugar
2 Carrots grated
4 Green onions thinly sliced
1lb Block of Extra Firm Tofu
Sweet Lemongrass Marinade
1/3 C Soy Sauce
1/4 C Agave
1/4-1/2 C water
2-4 Tbsp Minced Lemongrass
2-3 Tbsp Kieffier Lime Leaves minced
4 garlic cloves
1 piece ginger
½ tsp red pepper flakes
Soy Sauce or Thai Chili Sauce for Dipping
Pickled Ginger and Wasabi to Garnish
- First prepare your tofu. Drain your tofu and squeeze out as much water as possible. You want it to become dense. I used my tofu press for this, and left it in for about 2 hours. If you don’t have a tofu press you can simply wrap the tofu in a clean dish towel and place heavy objects on top of it.
- In the meantime pour all marinade ingredients into a blender and blend on high until thoroughly combined. 30-60 seconds. Set aside.
- Now is a good time to think about making your rice. For this recipe I used brown rice because that’s what I had, but if you prefer you can easily switch it out for sushi rice and there won’t be any difference. So combine your rice, your water, the vinegar and sugar in your rice cooker and cook as directed. If you don’t have a rice cooker combine rice, water, vinegar and sugar into a pot, stir to combine cover and bring to a boil. Reduce heat and let simmer until all water is absorbed and rice is cooked. Cooking time varies but for brown rice I’d say it’s usually done within 35 - 40 minutes so just check on it every now and again and make sure to stir so the bottom doesn’t burn. Add more water if necessary. However if you are using sushi rice the cooking time will be shorter, count on 20-25 minutes cook time but be sure to check.
- When your rice is cooked set aside until cool enough to handle.
- When tofu has finished marinating. Heat a large non-stick or cast iron pan over medium-high heat. Spray with a touch of non-stick spray. Remove the tofu from the marinade and reserve marinade. On a clean cutting board slice the tofu into 1/4 inch thick strips. Dip the strips back into the marinade to coat and then place in the heated pan.
- Fry tofu slices until firm, crisp, golden, and slightly blackened. Roughly five minutes per side, perhaps a little longer if using a non-stick pan. Once all slices have been fried on both sides remove the tofu to a plate and set aside. Once cooled slice each strip into thinner slices lengthwise.
- Now you’re ready to assemble your Maki, which is by far the trickiest part, but trust me you’ll be okay. On your clean work surface. - I use a clean bamboo cutting board - lay down your bamboo sushi rolling mat. On top lay down 1 sheet of Nori with the shiny side facing up. Have a bowl of cold water at your work station and with wet - but not profusely dripping - hands grab handfuls of rice and spread evenly over the sheet of nori. Spread the rice as close to the edges as possible but leave about a half to a quarter inch of space on the horizontal side of the Nori furthest from you. This little boarder will help your rolled Maki stick together. Rinse your hands before moving onto the next step.
- Next layer in 2-3 strips of tofu on the left parallel with the horizontal edge of the nori closest to you. Laying them down over the rice you just spread out. If they’re not long enough to reach from left to right then layer in 3 more strips on the right so that the edge closest to you is completely filled with tofu. If some poke out past the nori you can trim them off, or leave them as is.
- Sprinkle desired amount of grated carrots and sliced green onions over top of the tofu,
- Now, using your mat, and working slowly pull the mat up slightly and roll it over. Moving slowly and using both hands slowly roll your Maki, using the bamboo mat to press down and make the roll tight. You may have to stop at some point to push the filling back under the Nori or to help guide the roll. Stop just before you get to the opposite edge that you’ve left empty. Dip your fingers into the water, run them along the empty edge then roll your nori closed. Press down tightly to seel.
- It’s okay if it’s not perfect, rolling Maki takes practice and even though I’ve done it a ton of times I still don’t make a perfect roll each time. Sometimes my rolls are to fat, sometimes they don’t seel properly, sometimes I don’t cut them well. It happens, don’t beat yourself up about it. Remember that you’re doing it for the fun of it, and it’s - maybe - your first time, you’ll get better the more you practice.
- Next, and this step is very important. Before cutting your Nori into one inch sections run your chef knife under cold water. By the way you should always use a chef knife or other similar smooth edged knife to cut sushi. If you use a steak knife, or a bread knife or some other kind of knife with a jagged edge your Maki is going to get shredded and will likely fall apart. Once seaweed is wet it is very, very durable, your roll will fall apart before the seaweed cuts properly. I know from experience. So run your Chef knife under cold water. Give it a shake and then starting from one edge and working towards the other cut your roll into rounds.
- The best way to cut your roll is to do it in one smooth motion. Do not use your knife as a saw. Press down firmly it’s okay if the roll doesn’t cut right away, it’s okay if it looks like it’s getting squished a bit this is normal. Use one fluid motion, press down on the knife with your knife hand and hold the long end of the roll steadily in place with the opposite hand. Press the knife firmly down until it has cut all the way through. To separate the round from the rest of the roll you may have to give one quick saw motion depending on the sharpness of your knife, but otherwise that is it. Run your knife under cold water before EACH cut! This is important. Before each cut your knife must be wet. The drier your knife Is the more difficult this will be and the more likely your roll will fall apart.
- Congratulations! Now that one roll is finished - You should have gotten 6-8 rounds out of it by the way - give yourself a pat on the back, and then begin again from step one. Repeat all steps until ingredients are used up. At the end you may have some leftover rice. If this is the case no worries, stick it in the fridge and toss it into a salad tomorrow, or make a veggie roll for lunch!
- To serve arrange on plates and serve with dipping bowls of soy sauce, the reserved lemongrass marinade and my favorite Sweet Thai Chili Sauce. Serve with dollops of wasabi if desired and pickled ginger, yum!
*** Note - Gluten-Free if using GF Tamari. If you don't have Kieffier lime leaves you can just use some fresh grated lime zest and fresh lime juice.***
Labels:
Agave,
Asian,
Asian Fusion,
Carrots,
Ethnic,
Garlic,
Ginger,
Gluten-Free,
Green Onions,
Lemongrass,
Limes,
Nori,
Oil-Free,
Red Pepper Flakes,
Rice,
Soy Sauce,
Sushi,
Tofu
Friday, May 11, 2012
Mesquite and Lime Marinated White Bean and Kale Salad...
This salad was born of a need to start re-introducing large quandaries of leafy greens back into my diet. While I never give up on leafy greens altogether sometimes over the course of the winter I get so bogged down with warming soups, and stews that I neglect my salads. By spring I’m really starting to feel the need for green and sometimes it’s a hard cycle to break. I’ve also been trying to find ways to work more beans into my diet, and different kinds of beans. I absolutely love black beans and chickpeas but that’s about it. The other beans for the most part I can take or leave, which makes me a very inconsistent bean eater. Some weeks I eat lots of beans and lentils and some weeks I eat none. In trying to make different kinds of beans a more regular part of my diet I needed to come up with some new and interesting ways of eating them. After my Cannellini Beans and Ramps feast I realized that Cannellini beans were actually quite good if prepared in the right way, and so my desire to use them creatively has been piqued.
On the day that I decided to make this for lunch, I had a couple of beautiful limes sitting around and a lovely avocado just begging to be used. I also happened to be in the mood for something spicy, smokey and vaguely Latin inspired. This is what I came up with and it knocked my socks off. A really great, tasty, hearty lunch that fills you up, and is relatively healthy yet feels like a decadent treat! What more could you ask for, really?
Mesquite and Lime Marinated White Bean and Kale Salad
15oz can Cannellini Beans
Zest and Juice of 1 Lime
1 ½-2 tsp Mesquite Seasoning
4 cloves Garlic Minced
1/4 C Olive Oil
2 Tomatoes diced
1 Avocado diced
Minced Cilantro to taste
1/3 C Sliced Green Onions
2 tbsp Capers
Smoked Paprika
Black Pepper and Sea Salt to taste
1 tsp Agave
3 C Kale chopped in bite-size pieces
- Combine beans, minced garlic, 2 tbsp of lime juice, 1 tbsp of olive oil, half the lime zest and the mesquite seasoning in a small bowl. Marinate in the fridge for 45 minutes to an hour.
- Heat remaining oil in large pan over medium heat. Add the white bean mixture, the diced tomatoes, half the green onions and capers. Season to taste with black pepper, salt and smoked paprika. Saute for 5 minutes.
- Add remaining lime juice, and lime zest, along with agave stir and saute another 2 minutes.
- Divide Kale amongst individual bowls and evenly distribute the white bean mixture over each bowl. Top with remaining green onion, avocado, and cilantro.
Tuesday, May 8, 2012
Maitake Udon Soup...
I’ve been wanting to post all weekend but it seems as though time keeps slipping away from me. I’ve been very busy of late, not only with school, work and other activities but with cooking as well as exploring new and interesting ethnic markets. I’ve been very inspired lately to create vegan versions of many of the Asian, and Indian dishes I used to love as an omnivore. It’s been a fun and interesting experience, because I’ve been picking dishes that I’ve never seen vegan recipes for. The world doesn’t need another vegan Sambar, or Tofu Saag. We don’t need another Pad Thai or fried rice recipe what we need are all those delicious recipes no one’s thought to veganize yet. We need the obscure ones! Or at least I do. That’s not exactly what this post is about though, that’s just an explanation for where I’ve been and what I’ve been doing.
This post is about a delicious soup inspired by my travels to a Japanese Market in Arlington Heights. The market is called Mitsuwa, and my sole purpose for going there was so I could buy Glutenous White Rice Flour to make a favorite Chinese dessert of mine. (More about that in another post) I saw the flour for sale on Amazon and almost bought it until I read the reviews. The flour cost $6 on Amazon, and every reviewer said they’d bought the same exact product at their local Asian Grocery for $1. So rather then buy the flour for a totally inflated price online and then have to wait for it to arrive I decided to track down the nearest Asian Market. Mitsuwa kept coming back with the highest reviews and so my husband and I decided to check it out one afternoon.
Mitsuwa is amazing! If you live in the area you need to check it out! They have almost everything you could possibly need or want. to make delicious Japanese food at home. They have everything from oodles of noodles, to fresh produce, to exotic mushrooms, dozens of varieties of rice and seaweed, sauces, condiments, snacks, desserts, they even have a bakery, and a food court. There isn’t much vegan in the food court or the bakery but there are a couple of dairy free pastries, and some delicious veggie maki! Initially I went into Mitsuwa with the intention of buying 2 items, and ended up coming home with a bulging bag of goodies. With amazing products being sold for a fraction of the price I pay at my local grocery or health food store how could I resist? After all would you rather pay $4.99 for 10 sheets of Nori or $4.99 for 30? $4.99 for 12 oz of dried udon or $6.99 for 2 pounds of dried Udon? It was an easy choice for me, but I digress.
There were three purchases in particular that I knew I’d have to use immediately. Fresh Maitake mushrooms - which I’ve never seen before, if I see Maitake mushrooms at all, they are always dried. - Fresh Udon Noodles - something I haven’t seen since I lived in Vancouver, Fresh udon is commonly sold lots of places in Vancouver, so going to a speciality Asian market isn’t exactly required. - and a vegetable called Tokyo Negi which is sort of a Japanese Green onion. I’d never tasted it, seen it, or even heard of it before so I knew I had to get it. Since I’d never cooked with any of these three ingredients before I felt the safest thing to do was soup. In fact I’d made a delicious rice noodle soup the week before and still had a hankering for something with a similar flavor.
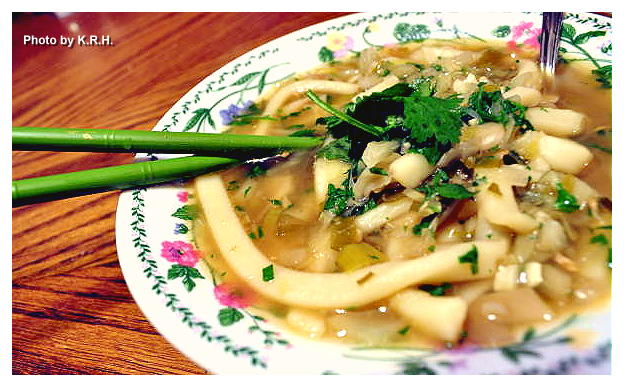
So after surveying my pantry and jotting down a few ideas, I took my maitake mushrooms, my udon and my Tokyo Negi and set to work. The finished product was outstanding! It definitely exceeded my expectations. While I can’t claim that there’s anything at all ‘traditional’ about this dish, it does remind me of a lot of the udon soups I used to eat in Japanese restaurants and Asian markets when I lived in Vancouver.
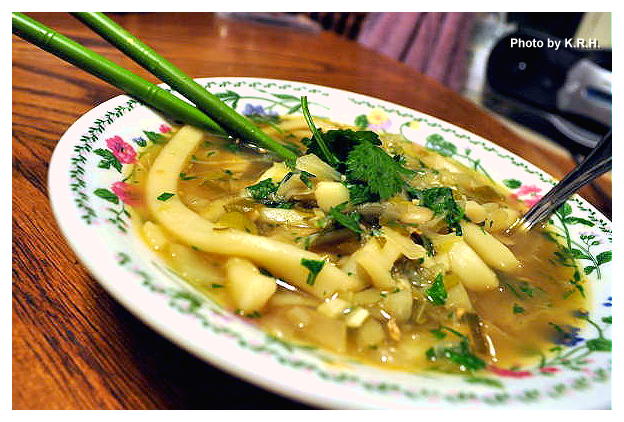
The Negi lent a wonderful flavor to the soup as did the maitake mushrooms. I’d never eaten maitake mushrooms and so I wasn’t sure what to expect, but they were wonderful. The real showstopper however was the Udon. It has been a long, long time since I ate fresh udon, and the last time I did I wasn’t exactly an adventurous eater. I thought they looked like worms or brains and they unnerved me a little, so I wasn’t all that thrilled with them. Now I’ve been shown the error of my ways. Fresh udon are where it’s at yo! They are a must! They’re fat, and soft, and squishy yet chewy. They’re delicate and almost buttery. They are perfection, and far more complex both in flavor and texture than the dried variety. If you can find them you must try them, and when you make this soup I highly suggest you have both a spoon and a pair of chopsticks handy. A spoon to ladle up the broth and the smaller veggies. Chopsticks for the udon. Since they’re so long, fat and slippery they don’t exactly sit still on a spoon, chopsticks are a much more practical utensil, and they certainly imbue an air of authenticity to the meal.
Maitake Udon Soup
1 tsp Sesame Oil
8 Cloves Garlic Minced
1 Thumb sized piece of Ginger Grated
1 Thumb Sized Piece Kombu
2 Tokyo Negi
1 lb Fresh Wide Udon Noodles
5oz Fresh Maitake Mushrooms chopped
2 C Green or Napa Cabbage Shredded
6 C Water + 2 vegan “Chicken” style Bouillon Cubes
2 Tbsp Soy Sauce or Coconut Amino's
1-2 Tbsp Lime Juice
2-4 Tbsp Mirin (to taste)
Sprinkle of Umeboshi Vinegar to taste
½ bunch of Cilantro finely minced.
- Heat oil in a medium sized sauce pan over medium-high heat. Add garlic, and ginger and saute for 3-5 minutes until fragrant.
- Add in Maitake mushrooms and saute 2 minutes.
- Combine water and Bouillon in a measuring cup, then add to the pot along with the Komband stir to combine.
- Add the Udon Noodles and bring to a boil. Let boil for five minutes then add Tokyo Negi and reduce heat to a low boil/simmer.
- Cook for 10 minutes then add the sliced cabbage. Cook for 5 minutes then stir in the soy sauce, umeboshi vinegar, lime juice and mirin. Stir to combine and simmer 2 minutes. Taste for flavor and adjust seasoning as needed.
- Remove the Kombu from the pot and discard. Turn off the heat and add in the cilantro. Divide amongst bowls and serve garnished with more cilantro.
*** Note - If you can’t find fresh udon you can use dried udon or soba noodles. Though fresh are really worth looking for if you have a good Asian market by you. If you can’t find Tokyo Negi then use about 5 green onions instead. ***
*** Note - Soy-Free if using Coconut Amino’s instead of soy sauce or Tamari***
Friday, February 24, 2012
Roasted Vegetable Mango Salsa...
Now I am of the opinion that you can’t have a good taco without good salsa. I am a big fan of salsa’s and Pico de gallo, any kinds and all kinds, the more unusual the better. Though I am particularly fond of salsa’s or pico’s that include fruits such as mango, pineapple, peach etc.. There’s just something so divine about that combination of tart tomatoes and spicy chili blended with the sweetness of fruit and the pungency of garlic. A winner in my book every time.
Since I was feeling in a very tropical mood the other night, and since the tacos I was making included coconut, avocado, and plantains I thought it only fitting that I make a fruity salsa to accompany them. As luck would have it I had mangoes on hand and pineapple juice in the fridge, so I set to work. Since I’ve always been rather fond of roasted and fire roasted salsa’s I decided to use that method and in the end It worked out brilliantly.
Fair warning this recipe does make quite a bit of salsa, but it’s so delicious you’re going to be glad that it does. Even when all your taco’s are eaten and you have no more leftovers to compile into a tortilla you can use this salsa on chips or wherever else you might typically use salsa. It’s really fantastic, especially for all the mango lovers - like me - out there.
Roasted Vegetable Mango Salsa
2 Large Tomatoes
1 Red Onion
1 Red Pepper
5 Cloves Garlic
1 Bunch Cilantro minced
2 Ripe Mangos
Sea Salt and Black Pepper to taste
Crushed Red Chili or Cayenne Pepper to taste (Start with 1/4 tsp and work your way up)
3-5 tbsp Pineapple Juice
3-5 tbsp Lime Juice
Garlic Powder to taste if needed
- Preheat your oven to 400'F (200"C) and lightly spray a baking sheet with non-stick spray.
- Slice each tomato into 6-8 pieces, quarter your onion and pepper. Separate onion layers. Lay all the veggies and garlic cloves out onto the baking sheet and place in the oven. Roast for 15-20 minutes until
veggies begin to get soft and fragrant.
- Peel and chop mangoes, place into a food processor. When veggies are done remove them from the oven and let cool for 5-10 minutes. Place them into the food processor with the mango and pulse until everything is finely diced but not pureed.
- Remove contents of food processor to a bowl. Mince cilantro with a chef knife then add it to the bowl, along with the pineapple juice, lime juice, sea salt, pepper and chili or cayenne. Stir until thoroughly combined. Taste and adjust seasoning as needed. If you don’t feel that the 5 cloves give enough garlic flavor to your salsa once they’ve been roasted you can add in some garlic powder to taste or 1-2 cloves raw minced garlic if you like.
- Enjoy served with my Coconut ‘Shrimp’ Tacos or any of your favorite taco, burrito, fajita’s or just with chips.
*** Note - How much pineapple and lime juice you’ll need are going to be dependant on how much your fruit and vegetables yield. Your tomatoes, mangoes etc... may be larger or smaller then mine, so adjust the liquid as needed. You don’t want it soupy. ***
Labels:
Bell Pepper,
Cilantro,
Dip,
Garlic,
Gluten-Free,
Limes,
Mango,
Oil-Free,
Onions,
Pineapple,
Quick and Easy,
Soy-Free,
Sugar-Free,
Tomato
Subscribe to:
Posts (Atom)