Showing posts with label Sugar-Free. Show all posts

Wednesday, May 6, 2015

Chickpea Flour Scramble - With Breakfast Taco Option...


I’ve been meaning to post this recipe for a while now, but I’ve found myself preoccupied of late. Sorry for the long absence, but I hope this recipe will make up for it. So, on the 23rd of April I really wanted a hearty breakfast. I woke up ravenous and desiring a scramble of some sort. Unfortunately I didn’t have any tofu on hand, neither did I have any canned chickpeas to make Isa’s Chickpea Scramble. However, it occurred to me in a brief moment of culinary genius that if I could make a scramble with whole beans, why couldn’t I make a scramble with chickpea flour? I had heard of it done before, and didn’t think it could be all that hard. I imagined it was somewhat like making a socca - which I love - and so I set to the task of making a chickpea flour scramble.

I was very skeptical that it would work out, especially in the beginning when I realized that the chickpea flour mix just didn’t want to break apart. The whole thing clumped together and wasn’t cooking. I thought I was going to have to scrap the whole endeavor - and no doubt if you try this recipe you might just think the same thing at first, but trust me, it works! - lucky for me I have patience - which is what this recipe needs - I kept at it and was rewarded by one of the most brilliant breakfasts ever. In fact I loved it so much I ended up making it the next day for my husband and I, as he hadn’t been home when I made it the first time. Skeptical as he was, he loved it too, and we devoured this scramble in taco form, though in my opinion it’s also just as good without the tortillas and extras.


What I love about this recipe is you can make the chickpea flour taste like whatever you like, I kept it simple and kept a traditional scramble flavor but you can literally add anything. You can add any spices you can add any vegetables and it creates the perfect gluten-free, and soy free scramble alternative for those who have allergies or sensitivities. More and more people are avoiding soy and gluten but that doesn’t mean they have to cut scrambles out of their lives too.


Personally I think this scramble has a better texture and mouth feel then a tofu scramble. Don’t get me wrong I do love tofu scrambles but I prefer a slightly dryer scramble and tofu scrambles usually have a bit of wetness to them. Also I think that the chickpea scramble mimics eggs better then tofu as it gets firm, but also retains that spongy, springy, softness of an egg. So if you’re looking for a new scramble to try give this one a go. I know it probably sounds weird but trust me the reward is worth it, I know you’ll love it.


Chickpea Flour Scramble 

1 ½ C Chickpea Flour
2 ½ C Water
1 tsp Black Slat
1 tsp Garlic Powder
1 tsp Onion Powder
½ tsp Turmeric
½ tsp Smoked Paprika
1/4 tsp Black Pepper

3 Green Onions diced
1 Ripe Tomato Diced

For Tacos 

Corn Tortillas
Shredded lettuce or Salad Mix
Vegan Cheese
Ketchup
Hot Sauce


- Lightly oil a medium sized pan, and heat over medium heat.

- In a bowl combine the chickpea flour through the black pepper and mix until thoroughly combined.

- Once the pan is hot add the chickpea flour mixture to the heated pan. Cover the pan and cook for about 4-5 minutes until the top looks glossy and the edges look cooked.

This is how it'll look when you first pour it into the pan


- Using a metal spatula begin scrambling the half-cooked mixture as you would scrambled eggs. Begin by folding and flipping the mixture over. Let it cook another 2 minutes or so and begin flipping again. Bare in mind that the mixture will be sticky and it will only be partially cooked making it difficult to fold, and separate but keep at it. It does take some time but use your spatula to continue to break the mass into smaller and smaller chunks, flipping them and cutting them. It should take at least 10 minutes.

After about 10 minutes


- After 10 minutes the mixture should be a bit dryer and it should be easier to break into pieces. The pan may well be very dry at this time and you can add a touch more olive oil to the pan to help prevent sticking as well as to help crisp up the chickpea mix. About a tablespoon of oil should be more then enough. Continue to flip and break up the chickpea mixture into smaller pieces with your spatula. Another 10 minutes and you should have some small and medium sized chunks, it should by now resemble a more traditional tofu or egg scramble.

Another 10 Minutes 


- When you have the chickpea mix broken into the size chunks you prefer, and they’re nicely dried and cooked through add in your green onions and cook another minute.

We're almost there, it's time for green onions!


- Add in your tomatoes and cook another 2 minutes.

Just about done, add your tomatoes!


- Your scramble should be more then ready now, and you can eat it as is - as you would any traditional tofu scramble. You can eat it on toast, as a side with ketchup, or as I did in tacos.

The finished product, so worth the effort!


- For Chickpea Flour Scramble Tacos spoon some of the chickpea scramble into a corn tortilla, top with your favorite shredded vegan cheese, a handful of shredded lettuce or salad mix, and then drizzle with ketchup or hot sauce as you desire. It would probably even be good with salsa.

Tacos anyone?


ENJOY!!

Friday, April 10, 2015

Cream of Leek Soup with Pink Peppercorns...


Believe it or not I came up with this recipe on the plane from Brussels to Chicago. It was partially inspired by a side dish of curried leeks I ate while in Luxembourg City. I was thinking about that dish on the plane ride home, and thinking how happy I was that spring was finally upon us. Leeks seemed to be a pretty popular meal item most places we went in Europe, which was fine by me since I love them so. You might think that after weeks of eating them I might be bored of them, but that wasn’t the case at all, in fact I only wanted more, and for whatever reason I kept thinking curry, coconut leek soup. This idea just wouldn’t leave my brain the entire plane ride home, and somewhere over the Atlantic I came up with the idea of adding fancy pink peppercorns and tarragon into the mix. Sounds crazy I know, but damn if it wasn’t delicious! This made a nice sized pot of soup, but my husband devoured most of it in one sitting. I wouldn’t be surprised if you did as well.


Cream of Leek Soup with Pink Peppercorns 

3 Medium-Large sized Leeks
6 Cloves Garlic Minced
1 Tbsp Coconut Oil
1 tsp Curry Powder
1 tsp Tarragon
1 15oz Can Coconut Milk
2 C Vegan Chicken Broth
½-1 tsp Pink Peppercorns crushed
Green Onions or Chives to Garnish
Sea Salt to taste

- Thoroughly wash the leeks and slice thinly.

- Melt the coconut oil in a pot over medium heat. Add sliced leeks, garlic, and curry powder and saute for 6-10 minutes until leeks are bright green, soft and fragrant.

- Add the Vegan Chicken broth and simmer for about 10 minutes.

- Carefully remove leek and broth mixture form the pot, place in a high-speed blender and blend on high until completely smooth.

- Return the soup to the pot, and add in the coconut milk, tarragon and ½-1 tsp of Sea Salt - or to taste. Stir until the coconut milk is completely blended into the soup, then let simmer for about 5 minutes.

- Turn off the heat and stir in the pink pepper corns and green onions or chives. Saving a little of each to garnish each bowl. Serve and enjoy.


Friday, February 27, 2015

Creamy Carob Banana Dream Smoothie...


This has seriously been my favorite breakfast smoothie of late. I came up with it a few weeks ago when I was craving a creamy, chocolate flavor but wasn’t really in the mood for my usual chocolate smoothie. For whatever reason I found myself really craving carob - which I do like, but don’t normally get that crazy about. - Since I had some carob powder on hand I decided to give it a try. The carob, coconut, date, banana, cashew combo works so well! You’ll be amazed, and become totally addicted to it like I did. Plus it’s so simple you can’t not try it, and it’s naturally sweetened, no sugar or artificial sweetener here.


Creamy Carob Banana Dream Smoothie

1 ½ Frozen Bananas
1 C Unsweetened Vanilla Coconut Milk
3 Medjool Dates Pitted
1 ½ Tbsp Carob Powder
1 Tbsp Cacao Nibs
*** 1 heaping Tbsp Cashew Butter

- Place all ingredients in a high-speed blender and blend for 60-90 seconds until completely smooth and creamy.


*** Note - For a different but equally amazing flavor swap out the Cashew Butter with Hazelnut Butter. SO GOOD!*** 

Friday, December 12, 2014

Stir-Fried Tempeh and Snow Peas in Black Bean Sauce...


This is just a really quick and easy stir-fry that would be good for dinner any night of the week. Simply prepared, it comes together without much effort making it perfect for busy nights. It was inspired by the limited produce I had in my fridge last week, and by my last trip to the Asian market where I got a huge jar of Black Bean Paste for a reasonable price. If you love Black Bean Sauce as much as me, and you’re in need of a good stir-fry recipe to throw into rotation, this one certainly satisfies.


Stir-Fried Tempeh and Snow Peas in Black Bean Sauce 

1tsp Sesame Oil
½ Large Yellow Onion Diced
*** 8oz Tempeh Sliced
10oz Snow Peas trimmed
3 Large Green Onions Sliced
3 Tbsp Black Bean Paste
4 Tbsp Water (or more to thin as desired)
2 Tbsp Agave Nectar
4 Cloves Garlic Minced
Brown Rice for serving

- In a small bowl whisk together the black bean paste, water, agave nectar and minced garlic.

- Place the tempeh in a shallow dish or sealable container, pour the marinade over top and cover. Let marinate at room temperature for 1 hour, or refrigerate and marinate for several hours.

- Heat Sesame Oil in a large pan over medium-high heat. When sizzling add the yellow onion and saute for 3-5 minutes until soft.

- Using a fork remove the tempeh form the marinade, shaking off as much marinade as possible before placing the tempeh into the sizzling pan.

- Cook Tempeh without stirring for 2-4 minutes until browned. Then flip and cook another 2-4 minutes. If needed, add a little bit of water to the pan to deglaze the pan and prevent the tempeh from sticking.

- Add the snow peas and cook for 3 minutes until bright green.

- Pour the reserved marinade into the pan and stir to combine everything. Cook for 3-4 minutes until everything is heated through and the marinade has reduced slightly. Add in the green onions and stir to combine. Let the dish sit for a couple of minutes to let the green onions wilt slightly.

- Serve the stir-fry over brown rice and enjoy!


*** Note - To make this soy-free you could use seitan in place of the tempeh*** 

Monday, December 8, 2014

Zuppa Toscana...


This may come as a surprise to ‘die-hard’ Zuppa Toscana fans but I have never had a bowl of this - seemingly - famous soup, until today. Unbeknownst to me this is everyone’s favorite soup at the ‘Italian’ Restaurant chain Olive Garden, and though I’ve eaten there many times I’ve never had it. So why did I decide to make a vegan version? Well, the answer is really quite simple, this past week I kept seeing recipes for homemade Zuppa Toscana popping up on Facebook and other social media. My first reaction after reading the ingrieients list was ‘gross’ and ‘so unhealthy’ as the original contains loads of sausage, bacon and heavy cream, but then my second thought was ‘but what if it was vegan?’ and so for the past few days I’ve been dreaming of a veganized version of a soup I’ve never eaten, crazy right?


Today, as it happens was also a perfect day for soup as it’s quite damp, cold and rainy outside. Wonderful soup weather and so I happily set to the kitchen to try my hand at this unknown delicacy. I’m not quite sure what I was expecting, something creamy, salty, smokey and spicy I guess, and really this soup did not disappoint. It’s loaded with so much delicious flavor, and made me go back for a second bowl. Further proof that food doesn’t need animal flesh or secretions to be tasty and decadent.


Zuppa Toscana 

1 Tbsp Olive Oil
1lb Vegan Italian Sausage Sliced - I used Field Roast
1 Large Yellow Onion diced
12 Garlic Cloves minced
1 tsp Red Pepper Flakes
1 tsp Fennel Seeds
4 ½ C Vegan Chicken Broth - or Vegetable Broth
6-8 Russet or Yukon Gold Potatoes diced- I used 8 and made a  mix of both
1 tsp Sea Salt
2 C Kale torn into bite-sized pieces
½ to 2/3 of a 15oz Can Full Fat Coconut Milk - How much you use depends on how many potatoes you use.
1-2 tsp Liquid Smoke - I used 2 tsp.
Ground Black Pepper to taste
1/4 C Minced Parsley

- Heat half the Olive Oil in the medium sized sauce pan over medium-high heat.

- When sizzling, add in the sliced Italian Sausage and cook until browned. About 5 minutes. Remove the sausage from the pot, and place on a plate, set aside.

- Heat the remaining oil in the pot, and add the onions and garlic. Saute for 3-5 minutes until golden and fragrant.

- Add in the red pepper flakes, and fennel seeds, saute another 2 minutes.

- Add in the Vegan Chicken broth, the potatoes, and the salt. Bring to a boil, and cook for five minutes. Reduce to a simmer and cook an additional 10-15 minutes until the potatoes are tender.

- Using a potato masher or the back of a wooden spoon crush some of the potatoes to thicken the soup. Leave some potatoes whole because you want the soup chunky, you want to crush just enough to get a nice creamy thickness.

- Once potatoes have been crushed, add in the cooked Italian Sausage, and simmer for five minutes.

- Add in the Kale, and coconut milk and simmer for an additional 6 minutes until the kale is wilted and tender.

- Turn off the heat, add in the minced parsley, and liquid smoke and stir to combine. Add in black pepper as desired and taste for seasonings, adjust as needed. Let stand 10 minutes before serving so that the flavors have time to develop.

- Enjoy with some nice crusty bread and a glass of red wine.


*** Note - Field Roast is NOT gluten-free, but you can make this soup Gluten-Free buy using a GF Vegan Sausage.***

Tuesday, November 25, 2014

Quickie Pan Gravy...


The other day when My husband and I had our little impromptu Thanksgiving celebration I needed to make a gravy to go with our holiday roast. Unfortunately since the dinner was impromptu my resources were limited as I had not been shopping. Using what I had on hand at the time I came up with this super simple, yet super flavorful gravy. I couldn’t believe just how good it turned out, and it tasted amazing on our roast and our mashed potatoes. So if you’re in a bind this year, and you need a quickie gravy, this is the one for you. Or if you just want to cut a few corners, and do less work - who’d blame you? - I got you covered.


Quickie Pan Gravy 

1/4 C Earth Balance
1/4 Whole Wheat Pastry Flour
2 tsp Minced Dried Onion
½ tsp Garlic Powder
1 Vegan Beef Bouillon Cube
1 ½ C Water
2 Tbsp Tamari
2 Tbsp Red Wine
1 tsp Thyme Leaves
Black Pepper to taste

- Melt the Earth Balance in a medium sized sauce pan over medium heat.

- Whisk in the flour. Whisk vigorously to form a roux, when the Earth Balance and Flour have come together and are beginning to turn golden, and smell toasty, add in the water, vegan bouillon, onion, and garlic.

- Bring to a boil, and then lower heat and let simmer, whisking frequently.

- Add in the Tamari, Red Wine, Thyme Leaves and black pepper.

- Continue to whisk on low heat until the gravy has thickened. This should take about 5 minutes.

- Once you’ve reached your desired consistency, remove the gravy from the heat. Pour it into a serving bowl and use liberally on your favorite holiday roast or a mound of mashed potatoes.

Monday, November 17, 2014

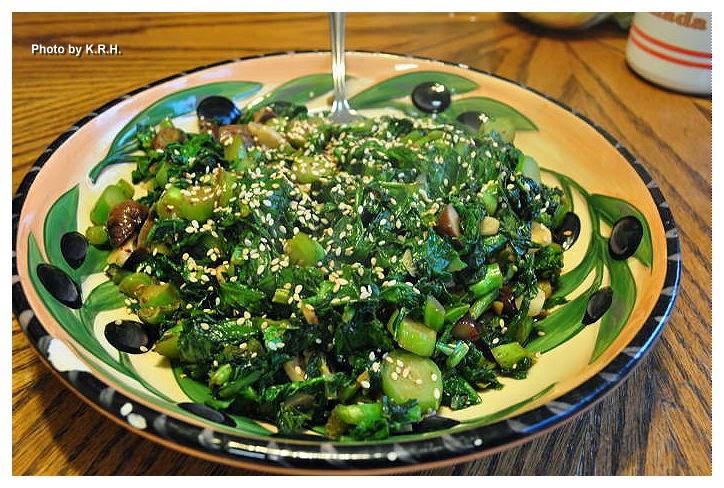
Garlic Sesame Gai Lan with Chestnuts...


My husband and I have been really diggin’ on Chinese food lately. I think every day this week I’ve made something from Donna Klein’s “The Chinese Vegan Kitchen,” and we just can’t get enough. Asian cuisine in general is our favorite, and my husband would be quite happy to live the rest of his life on noodles and rice. So this week when we were doing our grocery shopping I found myself particularly enamored with the fresh Asian greens. The Choy’s, the Chives, the Cabbages, and then there were these huge bunches of Gai Lan that really caught my attention. Growing up in Vancouver - with Chinese food being a particular staple, I’m quite familiar with Gai Lan, but despite having eaten it at many restaurants I’ve never actually cooked it at home. Despite not knowing what exactly I was going to do with it I just couldn’t help but grab a bunch.


Gai Lan - in case you don’t already know - also goes by the name of Chinese Broccoli, and as that name would suggest it’s very similar. Though the stems are longer and thinner, and it has a lot long, flat, spinach-like leaves. The taste of Gai Lan is mild, but slightly more bitter then broccoli. Gai Lan is eaten throughout China, but is particularly common in Cantonese Cuisine. Oh, and fun fact, Broccolini - those cute little baby broccoli’s - are actually a hybrid of regular broccoli and Gai Lan. Cool right? Anyway, you can use Gai Lan in just about any way you like, stir-fry’s, soups, vegetable side dishes. You can boil it, roast it, fry it, or saute it. You can season it lightly, or drench it in a nice sauce. The possibilities are endless, but I decided to go with a very simple preparation for my lunch yesterday. I was really craving sesame and garlic and I knew that combination would taste great paired with Gai Lan. I wasn’t wrong. I also had a package of chestnuts leftover from another dish I made a while back and so I decided to toss those in too. You can leave them out if you prefer but I think they really add something to the overall dish. If you’ve never had Gai Lan I urge you to give it a try next time you see it at the market.

Just a little note about this recipe, it is not in any way meant to be a 'traditional' Chinese recipe, as you might have guessed from my use of Korean Chili Pepper, but it is delicious!


Garlic Sesame Gai Lan with Chestnuts 

1 Large Bunch Gai Len
8 Cloves Garlic Sliced thin
1 Tbsp Toasted Sesame Oil
1 ½ Tbsp Soy Sauce
1 Tbsp Agave
3oz Roasted Chestnuts Chopped
1-2 Tbsp Sesame Seeds
1/4 Gochugaru (Korean Red Chili Powder)
Sea Salt and Black Pepper to taste (Optional)

- Slice the ends off the stems of the Gai Lan and discard.

- Remove the stems from the leaves, set the leaves aside and slice or chop the stems.

- Heat the Sesame Oil in a large pan over the stove, when hot add in the sliced garlic and chopped Gai Lan stems. Saute on high for 5-6 minutes until garlic is golden and fragrant and stems are bright green.

- Add in the soy sauce, agave, and Gai Lan leaves. Saute for 2-3 minutes until leaves are wilted.

- Add in the Chestnuts, sesame seeds, gochugaru, and salt and pepper. Saute 1 minute.

- Remove the pan from the heat and serve with additional Sesame seeds and gochugaru if desired.

*** Note - You can make this Gluten-Free by making sure to use a Gluten-Free Soy Sauce. You can make this Soy-Free by making sure to use a soy-free sauce like Bragg's Liquid Aminos, or Coconut Aminos***

Sunday, November 16, 2014

Pumpkin Pie Oatmeal...


As I think I’ve mentioned before I pretty much love pumpkin flavored everything. I’ve also been on a real oatmeal kick lately, and so I’ve had the idea to combine these two things for weeks now, only I’ve just been to lazy to actually do it. Finally this morning as I was enjoying a piping mug of peppermint hot chocolate and watching the snowflakes fall I decided it was time to give creativity a whirl.

I wasn’t exactly sure what to expect when it was all said and done, but I figured adding traditional pumpkin pie flavors to a bowl of oatmeal couldn’t go too wrong. I was right. This is a really warming comforting bowl of morning oats, full of autumnal and winter flavor. Perfect for any cold morning or any day you’re craving a bit of a pumpkin fix. Even my husband who despises all things pumpkin loved this sweet soothing breakfast. If you like your pumpkin pie a bit on the spicy side you can increase the ginger to 1 tsp, and up the nutmeg as well. I’m pretty picky when it comes to nutmeg which is why I only used a 1/4 tsp. These oats are fantastic topped with maple syrup and dried cranberries but you could use dried cherries as well or another sweetener of your choosing, and if you’re interested in kicking up the pumpkin another notch serve this with one of the delicious non-dairy pumpkin spice milks instead of regular old almond, soy or rice milk. Trust me on this!


Pumpkin Pie Oatmeal 

2/3 C Steel Cut Oats
1 15oz Can Coconut Milk
½ C Pumpkin Puree
½-1 Tbsp Blackstrap Molasses
1 tsp Ground Cinnamon
½ tsp Ground Ginger
1/4 tsp Cardamom
1/4 tsp Ground Nutmeg
Pinch of Cloves

To Serve 

Maple Syrup
Dried Cranberries
Chopped Pecans or Walnuts
So Delicious Pumpkin Spice Coconut Milk - or your favorite non-dairy pumpkin spice milk, or any regular non-dairy milk.

- Combine Oats, Coconut Milk, Pumpkin Puree and Molasses in a medium sized saucepan and bring to a boil.

- Once boiling reduce to a simmer and add in all of the spices.

- Let simmer gently on the stove top, stirring occasionally for 30-40 minutes until oats are tender and much of the liquid has been absorbed.

- Divide the oats into bowls and top with Maple Syrup, Dried Cranberries and Your Choice of Non-Dairy Milk.


Friday, October 24, 2014

Super Easy Superfood Oatmeal...


Quinoa for breakfast is nothing new. In fact, combining quinoa and oats for a delicious protein rich breakfast isn’t new either, but it is new to me. As quinoa continues to grow in popularity here in the United States I continue to come across new and interesting uses for it. Of course, I never have time to try all the recipes I see, or even half of them, and when it comes to breakfast food I’m usually at a disadvantage anyway since I’m not much of a morning eater anyway. Which is why I normally opt for a fruit or green smoothie.

Of course, there are those rare days when I wake up with breakfast on my mind, and today was one of those days. Normally when I crave breakfast it’s something carby, or decadent. It’s always something that requires work and effort and it’s very seldom wholesome. Today was different, maybe it’s the cool autumnal weather, or the fact that I’ve been feeling less then ideal lately, but I woke up craving oats. Actually, that’s a lie, I’ve been craving oats for days now actually but I’ve just been to lazy to make them. Since I woke up extremely early this morning for no apparent reason, and have the day off I decided that if I wanted oatmeal then there was no time like the present.


The original idea was just to make a basic pot of oatmeal that would be large enough to last me through the weekend, but as I was standing in front of my pantry I thought “why not try that whole quinoa breakfast thing?” So I decided to add some quinoa to my oats. Then I started thinking about what else might be good. I had a single apple sitting in my fruit basket, and that always tastes great in oatmeal, I have bags of random Superfood burning holes in my pantry shelves and so why not add them too for a super nutrient dense, antioxidant rich breakfast? See how it is? Once you get started down a certain path you can’t stop, and I ended up with one of the most enjoyable bowls of oatmeal ever. The goji and mulberries really added a nice element to the oatmeal, a subtly sweet and complex blend of flavors. Even my husband who is no fan of oatmeal, but reluctantly agreed to try it, loved it!


The beauty of this oatmeal is you can literally do whatever you want with it. There are so many things you can add in, so many variations, an endless amount of options to keep you interested. This morning I chose to add the blueberries, cherries, flaxseeds, sunflower seeds, maple syrup, pomegranate molasses, and unsweetened almond milk to my bowl and it was divine. My husband meanwhile chose blueberries, cherries, flaxseeds, chia seeds, raisins, maple syrup, pomegranate molasses and vanilla almond milk.

However you choose to eat it, I hope you enjoy it!


Super Easy Superfood Oatmeal 

1 ½ C Steel Cut Oats
½ C Quinoa
5 C Water
1 Granny Smith Apple Peeled and cubed
4 Tbsp Goji Berries
4 Tbsp White Mullberries

Optional Add Ins per Serving 

2 Tbsp Fresh or Frozen Blueberries, Raspberries, or Blackberries
8 Fresh or Frozen Whole Pitted Cherries
2 Tbsp Ground Flaxseed
1 Tbsp Raw Sunflower Seeds
1 Tbsp Hemp Seeds
1 Tbsp Chia Seeds
1-2 Tbsp Raisins
1-2 Tbsp Walnuts
Sliced Banana
½ - 1 Tbsp Maple Syrup
½ - 1 Tbsp Pomegranate Molasses
Almond, Coconut or other favorite non-dairy milk

- Combine the Oats, Quinoa and Water in a medium saucepan and bring to a boil. Once boiling reduce heat and let simmer on the stove for 40-60 minutes, stirring occasionally until the oats have thickened and are tender.

- Ten minutes before the end of cooking add in the peeled chopped apple and stir to combine.

- Five minutes before the end of cooking add in the Goji and White Mullberries and stir to combine.

- Remove the cooked oatmeal from the heat, and spoon out individual servings. Top each serving with desired add-ins.

*** Note - To ensure this is Gluten-Free use GF oats. *** 

Friday, August 15, 2014

Spicy Beef and Spinach Lasagna...


It’s been unseasonably cool here the past week. Mostly the days are warm but in the evening it cools considerably and there’s a good breeze. Don’t get me wrong, I’m not complaining, I love cooler weather - fall is my favorite time of year - but this kind of weather really makes me want to eat ‘out of season’ you know? The other day when it was particularly grey and quite cool I suddenly felt in the mood for lasagna. I have about a million different lasagna recipes in my arsenal but I didn’t want to use any of them. Instead, I wanted to get creative, so I took a look around and found a package of Beyond Meat Feisty Beef Crumbles that I’d bought when they were on sale but never used. I don’t normally buy these kinds of things but since they were new, my husband and I thought we’d try them out but I just never knew what to use them in, until I realized they would be perfect in lasagna.


Since I was only making a lasagna for my husband and I, and I only had one package of beef and one package of cheese I made a small one using my 8x8 baking pan. You could probably double the recipe for a larger lasagna if you needed to, but this dish is super hearty and filling, we only ate one slice each which is a real anomaly for us - especially my husband who’s been known to turn into Garfield at the site of lasagna. This recipe exceeded my expectations and I was quite happy with the end result. So next time you need to make a really hearty, meaty, cheesy lasagna for the omnivore in your life give this one a shot - provided they don’t mind a little heat of course!


Spicy Beef and Spinach Lasagna 

6 Square Lasagna Sheets (8x8)
1 Tbsp Olive Oil
1 Yellow Onion Diced
8 Cloves Garlic Minced
*** 1 Package Feisty Beyond Meat Beef Crumbles thawed (Or your favorite vegan beef)
1 ½ tsp Crushed Fennel Seeds
14oz Can Diced Tomatoes
8oz Can Tomato Sauce
1 Tbsp Dried Oregano
1 Tbsp Dried Basil
1 tsp Sea Salt
1/4 tsp White Pepper
1/4 tsp Red Pepper Flakes
2 Tbsp Capers
3-4 Tbsp Minced Pepperoni Peppers
10oz Fresh Baby Spinach
*** 1 Package Daiya Mozzarella Shreds (Or your favorite vegan Mozzarella)

Tomato Sauce for Topping 

1 8oz Can tomato sauce
2 Tbsp Tomato Paste
4oz water
2 garlic cloves
2 tsp olive oil
1 tsp onion powder
2 tbsp capers
2 tbsp minced pepperoni peppers
½ bunch minced parsley
Sea Salt and Black Pepper to taste
1 tsp Dried Basil


Noodles 

- Set a pot of water on the stove and bring to a boil. When boiling add the lasagna sheets and boil for 5-6 minutes until the sheets become soft and pliable. They don’t need to be fully cooked. Drain them, and rinse them.


Filling 

- Heat the olive oil in a large pan over medium heat. Add the garlic and onion and saute for 5-6 minutes until softened.

- Add in the crushed fennel seeds and the beef crumbles. Saute for 5 minutes, until crumbles have browned.

- Add in the diced tomatoes, tomato sauce, oregano, basil, salt, pepper, capers, red pepper flakes, and Pepperoni Peppers. Simmer for about 10 minutes then remove from the heat.

Sauce 

- Heat the olive oil in a small pot on the stove. Add in the garlic and saute for 4 minutes until golden.

- Add in all the other ingredients and bring to a boil. Then decrease the heat and let simmer for 20 minutes.

- Remove from the heat and set aside until ready to use.


Assembly

- Preheat oven to 350'F

- Lightly grease an 8x8 baking pan. Layer in 2 of the lasagna noodles. Cover the lasagna noodles with enough spinach to cover them. Layer in enough of the meat filling mixture to cover the spinach. Then sprinkle enough of the cheese over the filling to cover.

- Layer 2 more lasagna sheets overtop, and repeat with remaining spinach, meat filling and cheese.

- Layer the last 2 lasagna noodles on top. Cover the top with the tomato sauce, and then cover in foil and bake in preheated oven for 45 minutes. Alternately you can bake the lasagna without the sauce and spoon the sauce over top after it finishes baking.

- Once finished remove from the oven, garnish with fresh minced parsley, then cut and serve! Preferably with a nice side salad.


*** Note - Just because I used Beyond Meat crumbles and Daiya Cheese doesn’t mean you have to. Use whatever you favorite vegan meat and cheese are, though if you use a plainly seasoned vegan beef you may want to add a bit more heat to the dish, it’s up to you. Something to keep in mind that this dish is gluten-free and soy free - as long as you use gluten-free lasagna noodles -because both beyond meat and daiya are gluten and soy free products. If you're using other vegan products and gluten or soy is an issue you'll have to read the labels to make sure.*** 

Tuesday, August 12, 2014

Scrambled Pintos...


This morning I was feeling a ravenous hunger. I knew my typical breakfast of a bowl of fruit or a smoothie just wasn’t going to cut it, and besides I was really craving something savory. Tofu scramble was sounding really good to me, the only problem was that I didn’t have any tofu. I briefly considered making a tempeh scramble until I realized I was all out of tempeh too! I flipped through my wealth of cook books in desperate search of another breakfast option but everything I saw was sweet, or bready and I didn’t want that. Then I remembered Isa Chandra Moskowitz’s Mad-Genius invention of Chickpea Scramble from her latest book “Isa Does It” and I knew that was what I wanted.


I went eagerly to the kitchen, opened up the pantry and would you believe I didn’t have a single can of chickpeas. The girl who loves chickpeas, who eats them all the time, had somehow unknowingly ran out! Now I was beginning to get frustrated. I took a look around the kitchen and saw a few things I had a lot of were potatoes, spinach, and onions, but how to make a breakfast out of that. I took another look in the pantry, took inventory of the beans I did have, and thought to myself “Hey, if a scramble can work with chickpeas, why not another bean?” and that, is how the Pinto Scramble was born.


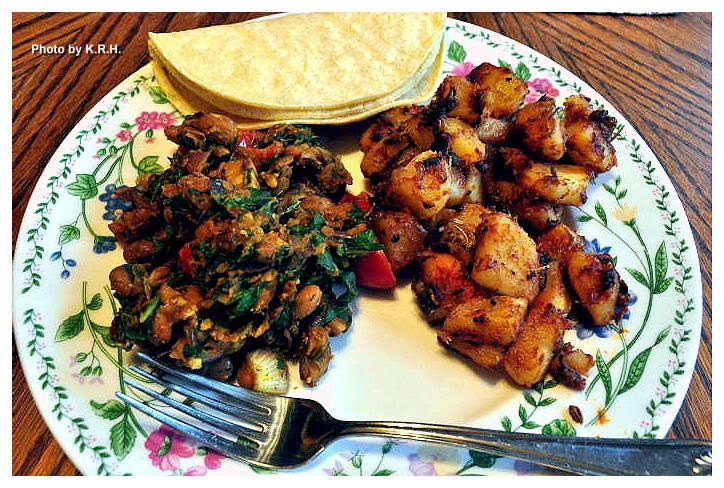
Man, this exceeded all expectations, and even my husband - who’s a notorious bean-hater, but getting better on that front - loved it. Now I want to try making different kinds of scrambles with all sorts of beans to see what kind of awesome combinations I can come up with. In the meantime I hope you try this one out, it’s super delicious, healthy, hearty and comes together in a flash. Serve it however you like - on a piece of lightly buttered toast with some fresh sliced tomatoes, on it’s own, or as I did with some fried potatoes, corn tortillas and extra hot sauce!


Scrambled Pintos 

1 Tbsp Olive Oil
4 Garlic Cloves Minced
½ Red Onion Minced
1 15 oz Can Pinto Beans rinsed and drained
½ tsp Chili Powder
½ tsp Ground Cumin
½ tsp Ground Turmeric
½ tsp Sea Salt
Black Pepper to taste
1-2 tsp Hot Sauce (or to taste)
1-2 Tbsp Fresh Dill Minced
8 Cherry Tomatoes Halved
1 Large Handful Baby Spinach Chopped

- Heat the olive oil in a pan over medium heat.

- Add the garlic, and onion and saute for 5-6 minutes until softened.

- Add in the pinto beans, chili powder, cumin, turmeric, salt, pepper, and hot sauce. Mix to combine and saute for 3 minutes until the beans are warmed through.

- Using a potato masher mash the beans right in the pan, so that they turn into a thick chunky paste. You do not need to get all the beans, leave some whole. Mash about two-thirds of the mixture.

- Add in the dill, tomatoes and spinach and saute for about 2 minutes or until the spinach has wilted.

- Taste for seasonings and add additional hot sauce if desired.

*** Note - If you want a more 'Mexican' feel you can omit the dill and add in an equal amount of minced cilantro instead. Though I quite like the unique flavor that dill brings to the overall dish.*** 

Tuesday, July 22, 2014

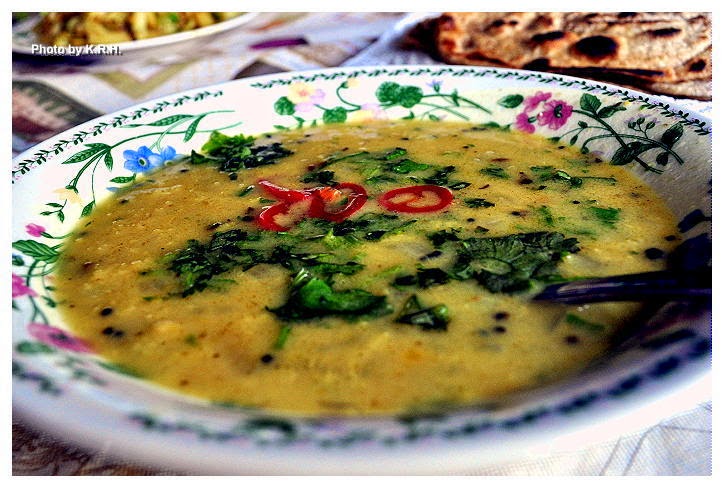
Moong and Toor Dal Tadka with Coconut and Red Chilies...


I know what you’re thinking, hot soup or dal in the middle of summer? You’re crazy! And normally I would agree with you only I just recently came off five days of being ridiculously ill with what was probably Norovirus and so I didn’t want to push the limits of my digestion. Since Thursday afternoon I’d been living off of crackers, bread, tea, and on Saturday evening when I finally began to feel stable enough to take in something heartier I made a very brothy vegetable soup. It was pretty basic - potatoes, carrots, celery, onion, broth, water, and spike seasoning. It was tasty, but come Monday when I was feeling roughly 85%-90% better I wanted to eat something fun!

I’ve really been craving Indian food lately, specifically lentils, and when I think of lentils I automatically think of dal, there are few things more nourishing and comforting then a big ‘ole bowl of dal. Specifically I wanted dal tadka, which I’ve only recently discovered There’s a great little Vegetarian Indian Restaurant not far from where I live that serves a wicked good Dal Tadka, I had it the week my mother was in town visiting me, and I’ve been kind of dreaming about tadka ever since.


Tadka incase you don’t know is really just a cooking technique in which you fry whole spices in oil so that they release their natural oils, and after a minute or so you pour the whole thing - oil and all - into the dish you’ve prepared. It sound a bit strange maybe since we’re used to putting spices in our food at the beginning of cooking rather then at the end but let me assure you that this technique imparts some truly phenomenal flavor! And that’s exactly what I wanted.


Now, I’m not going to lay any claims saying that this is in any way a traditional dal tadka, or even a traditional dal, but it is delicious. It’s full of ingredients that are delicious and healing, however if you’re unaccustomed to cooking Indian food at home you may not have them all on hand. Still, they should be easy enough to find at your local Indian grocery - that’s where I get mine - and they are well worth hunting down. Trust me once you taste the slightly bitter, onion flavor of Nigella seeds you’ll be hooked! Similarly the buttery, garlic/onion flavor of asafetida can not be matched, and black mustard has a unique flavor itself, different from that of yellow mustard. As for pickled red chilies I make them myself, and so I’m not sure if you can actually buy such a thing anywhere. Though if you have a basic pickling recipe you can easily pickle some of your own chilies. It’s not necessary but I love the added flavor note.


Moong and Toor Dal Tadka with Coconut and Red Chilies 

Dal

1 tsp Olive Oil
1 Large Yellow Onion Diced
1 C Moong Dal - soaked for 1 hour and rinsed
½ C Toor Dal - soaked for 1 hour and rinsed
4 C Water
½ tsp Ground Turmeric
1 - 1 ½ tsp Salt - to taste
1 13.5oz can Full Fat Coconut Milk
½ Bunch Cilantro Minced

Tadka 

2-3 tsp Olive Oil
1 ½ tsp Black Mustard Seeds
½ tsp Nigella Seeds
½ tsp Coriander Seeds
½ tsp Fenugreek Seeds
1 tsp Asafetida Powder
6 Garlic Cloves Minced
1-2 Red Chilies Minced - depending on heat preference.

To Garnish -

Extra Minced Cilantro
Sliced Pickled Red Chillies - optional but highly recommended!


For the Dal 

- Heat the Olive oil in a large soup pot over medium high heat. Add the diced onion and saute for 5-6 minutes until lightly golden.

- To the pot add the soaked and rinsed Moong Dal as well as the Toor Dal. Stir to combine.

- Add the 4 cups of water, the turmeric, and the salt. Cover and bring to a boil. Boil for 10 minutes then reduce the heat and let simmer for 20 minutes.

- Check on the doneness of your dal. If the lentils are still hard, or too firm for your liking continue to simmer for an additional 10 minutes until they become soft. If the lentils are soft already, and have reached a somewhat mushy consistency add in the coconut milk and stir to combine. Simmer for 5 minutes.

- Remove the pot from the heat and add in the minced cilantro. Stir to combine.

For the Tadka 

- Heat the oil on high in a heavy bottomed frying pan. Once hot add in the mustard seeds, nigella seeds, coriander seeds, fenugreek seeds, asafetida powder, minced garlic and minced chili. Fry for one minute or until the seeds pop, the garlic has turned golden and the chilies have softened slightly. It’s okay if the spices brown a little, it adds to the flavor.

- Remove the pan from the heat and scrape the entire contents - spices and residual oil - into your pot containing the dal.

Assembly - 

- Stir the Tadka into the dal until it’s been well combined. Let sit for 5-10 minutes to let the flavors mingle. Then divide amongst serving bowls and garnish with additional cilantro and pickled red chilies if desired.

- Serve with basmati rice, and/or Indian Flatbread. I made a batch of Roti to scoop the dal up and it was a delicious accompaniment.