Showing posts with label Sugar. Show all posts
Saturday, February 13, 2016
Toasted Cashew Noodles....
This dish came about because I was starving, and craving noodles. I don't normally crave noodles, but I really felt like rice noodles in some kind of Asian style sauce. I didn't feel like Peanut noodles, though I love them, and I suddenly had a simultaneous hankering for Cashews. I didn't really have many fresh veggies on hand, and wanted to keep the dish simple anyway so the preparation would be quick - the faster it's made the faster I eat! - and this is what came about.
Surprisingly this turned out super good, it's got the perfect balance of sweet, salty, spicy, tangy. I also think the cashew butter makes a great stand in for peanut butter, and lends a more mellow, yet complex and nutty flavor to the dish. I also really love the nice bit of crunch in each bite from the red cabbage garnish. I didn't have any cilantro on hand, but I imagine that would make a good garnish too, if you happen to have some. Of course if you want to 'beef' it up, you could also add some cubed baked or fried tofu, or maybe even some tempeh. But I kind of like it exactly as it is, light and easy. Two of my favorite things right now.
Toasted Cashew Noodles
For the Noodles
2 tsp Toasted Sesame Oil
3 Carrots Sliced thin
6 Radishes cut into thin half moons
3 Green Onions sliced (White and green parts separated)
2 Garlic cloves sliced thin
1/4 Cup Cashews
12oz Rice Noodles
1/4 C or less of thin sliced Red Cabbage
For the Sauce
1/4 Cup Creamy Cashew Butter
1/3 - 1/2 Cup Coconut Milk (Depending on how thick you want the sauce)
4 Tbsp Tamari
2 Tbsp Mirin
2 Tbsp Lemon or Lime Juice
2 tsp Cane Sugar
1/2 tsp Ground Ginger
1/4 tsp Smoked Paprika
1/4-1/2 tsp Sriracha or to taste
- Place the noodles in a pot of boiling water and cook for 5 minutes or until they are tender. Drain and set aside.
- Heat the Sesame Oil in a large frying pan. When it's hot add the carrot, and radish. Cook on high for about 5-7 minutes until the veg becomes soft and starts to brown. Add in the white parts of the onions, and the garlic. Lower the heat and sauté for another 3-4 minutes until everything is cooked to your liking.
- Combine all sauce ingredients in a small pot and stir until smooth. Turn the heat on high, and when it begins to simmer whisk it for about a minute. You just want to heat the sauce through long enough for it to smooth out.
- Add the Cooked Noodles to the pan of veg. Pour the sauce over, and mix to combine.
- Divide into bowls, and top with Green onions, and red cabbage.
- In a dry skillet toast the cashews over high heat for 5-8 minutes until they smell nutty and begin to brown.
- Top each bowl with a handful of cashews and enjoy!
Labels:
Asian Fusion,
Carrots,
Cashew,
Cashew Butter,
Coconut Milk,
Garlic,
Ginger,
Green Onions,
Lemon,
Mirin,
Radish,
Red Cabbage,
Rice Noodles,
Sesame Oil,
Smoked Paprika,
Soy Sauce,
Sriracha,
Sugar
Monday, September 14, 2015
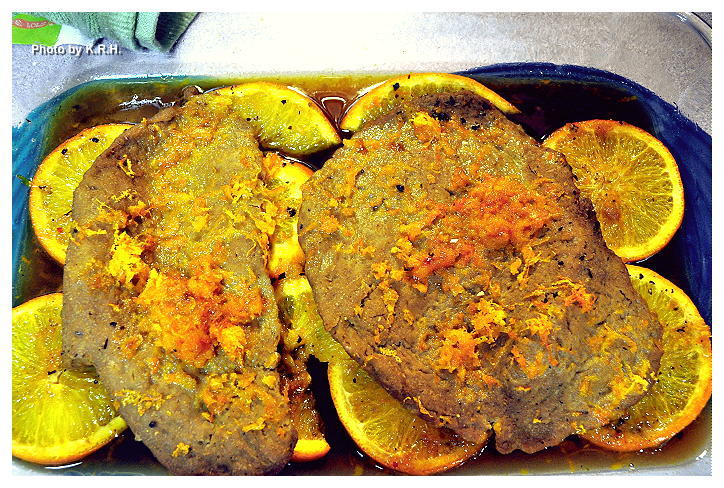
Vegan Mofo #16: Seitan a l’Orange...
I’ve never had Duck a l’Orange before, because I never liked duck, but there was something really intriguing to me about trying to veganize this recipe. I thought it might work out well with seitan in place of duck and since I had some ‘duck’ style seitan left over from making the Duck with Raspberries I thought I’d give it a try. I have to admit I was really skeptical about it, because I had to really play around with the cooking method and times, and I wasn’t at all sure it was going to be any good, but much to my surprise it turned out really, really well. The sauce is so flavorful and on a nice juicy piece of seitan it works so well. Though I imagine the sauce would also be a nice accompaniment to tofu or tempeh as well.
Certainly there is a bit of work involved in a recipe like this, but that’s French cooking for you right? The end result is worth it, so I hope you give it a try. Enjoy your seitan a l’Orange with some simple sides like rice and broccoli as we did, or potatoes and asparagus.
Seitan a l’Orange
(AKA Canard a l’Orange, AKA ‘Duck’ a l’Orange, )
2-4 Homemade or store bought Chicken Style Seitan Cutlets
5 Large Oranges
2 Cinnamon Sticks
1-2 Tbsp Minced Fresh Mint Leaves
½ Cup Brown Sugar
½ Cup Apple Cider Vinegar
1/3 Cup Grand Marnier
4 Tbsp of Nondairy Butter + 1 Tbsp
1 Tbsp Cornstarch
- Preheat the oven to 300'F
- Grease a glass baking dish that’s large enough to hold your seitan. Slice two of the oranges into thin slices. Line the bottom of the glass dish with the slices from one orange. Place the cinnamon sticks over top of the oranges and sprinkle with mint. Layer your seitan cutlets over top, and then top those with the remaining orange slices.
- Roast in the Oven for roughly 30 minutes.
- Meanwhile zest and juice the remaining 3 oranges. Heat a small pot of water over high heat. When it’s boiling blanch the orange zest Refresh under cold water, drain, and set aside.
- Heat the sugar in a saucepan over low heat until it melts and caramelizes, use a whisk to whisk the sugar a bit so that it caramelizes evenly. When the sugar is a rich brown add in the vinegar, but be carefully as it might splatter. Boil for three minutes then add the reserved orange juice and grand Marnier. Simmer the mixture for 2 minutes.
- Remove the seitan from the oven, and pour a third of the sauce over the cutlets. If using 2 cutlets place 2 Tbsp of Butter on each Cutlet, if using 4 Cutlets place 1 Tbsp on each cutlet. Then Sprinkle the cutlets with about a quarter of the orange zest. Place back into the oven and roast for another 30 minutes.
- Mix the Tablespoon of cornstarch with a bit of water and whisk to combine. Slowly add it into the pot with the sugar, vinegar, juice mixture. Increase heat and simmer, whisking constantly until the sauce has thickened. Add in the remaining tbsp of butter and the orange zest stir to combine and turn off the heat. Set aside.
- When the seitan is ready, remove it from the oven. Place one cutlet on each plate, and top with as much sauce as you like. FYI the sauce also tastes great over broccoli and rice!
Tuesday, September 8, 2015
Vegan Mofo #9: Seitan with Raspberries...
Today’s recipe I found in a French cook book and couldn’t help but be intrigued. Unfortunately the book didn’t provide any information on history or origin of the dish, and so I have no idea where it comes from. Though it is a pretty common practice throughout Europe to cook rich meats with sweet fruits, and the French sure like to make food look fancy so regardless of origin this dish at least fits with my theme.
I’ll admit I was pretty skeptical about this dish when I first attempted to make it. I just didn’t know how seitan would taste when mixed with fruits, guess I needn’t have really worried because the dish turned out amazing! Seriously, it far exceeded my expectations. I myself have only ever eaten duck once, a long time ago, in a Chinese restaurant and I hated it. I thought it was greasy, and fatty and disgusting, I never ate it again. When eating poultry I never liked dark meat anyway and duck is all dark meat. So I was a bit flummoxed as how to make this seitan taste ‘duck-like’ and Google raveled nothing further then what I already knew “Tastes like greasy chicken” thanks, so helpful! In the end I decided to make a basic chicken-style seitan but included in the met ingridients I added a spoonful of marmite and I used sesame oil instead of regular oil. Before I boiled the cutlets I also coated them in oil, then when they came out of the broth I oiled them again and let them sit in the fridge in a bit of their cooking liquid until I used them the next day. I can’t say that the seitan tasted like ‘duck’ but it didn’t have a ‘chicken’ taste either, it was richer, and slightly more greasy then your average seitan. So, while it might not be an ‘authentic’ duck taste, it was certainly different, and enjoyable, and why do you need your seitan to taste exactly like duck anyway?
The true star of this show however is the raspberry sauce. Oh... my.... god.... the sauce alone is amazing and I wish I’d made more cutlets just so I could eat more sauce! If it sounds weird to you to cook raspberries in a somewhat savory dish, I hear you, but trust me when I tell you this will literally blow your mind! Try it, and see! Enjoy with a nice glass of wine, a side of mashed potatoes, a side salad, or as we did, simply with a side of Vichy Carrots.
Seitan with Raspberries
(AKA Canard aux Framboises aka ‘Duck’ with Raspberries)
A Splash of Olive Oil
2-4 Homemade or Store Bought Chicken Style Seitan Cutlets
1 tsp Sea Salt
1 tsp Ground Cinnamon
2 tsp Sugar
½ Cup Red Wine
1/3 Cup Creme de Cassis (A Red Current Liquor)
1 Tbsp Cornstarch
9oz Fresh Raspberries
- Heat the olive oil in a large frying pan over medium high heat. Add in your cutlets and brown 4-5 minutes per side.
- In a small bowl mix together the salt, sugar and cinnamon. Set aside.
- In another bowl whisk together the red wine and creme de cassis, set aside.
- When the seitan is done cooking carefully remove it from the pan and put on a plate. Leave the pan, you are going to uses it again.
- After the seitan has cooled for a minute or two carefully rub the salt sugar, cinnamon mixture into the seitan on both sides. Then return the seitan to the pan and cook on medium heat for another 2-3 minutes per side.
- Add most of the red wine, creme de cassis mixture to the pan with the seitan, reserving a couple of Tablespoons. Mix this reserved wine mix with the cornstarch and then add that into the pan as well. Stir to combine and let simmer 2 minutes until thickened.
- Add raspberries, stir to coat with the sauce, and then simmer for an additional 2-3 minutes stirring occasionally until the sauce is thick and the berries are cooked.
- Remove seitan cutlets from the pan, place on individual plates and spoon the sauce and berries over top. Enjoy!
Monday, March 11, 2013
Irish Tea Time Seed Cake...
When it comes to traditional Irish baking the only thing I ever seem to hear about in North America is Irish Soda Bread. Now I love Irish Soda Bread as much ad the next person but there’s way more to Irish baking then just that! So forget all your Soda bread recipes today and make this delicious tea cake instead. Seed cake as it’s known utilizes one ingredient that I would never have thought ot put into a sweet dessert, caraway. In fact I rarely use Caraway anyway even though I like it, it just never seems to feature in anything I make, so I was particularly interested to see how this cake would turn out.
Seed Cake is apparently a long standing feature of Irish baking and is - or was - particularly common in rural and farming communities. It’s perfect for tea time because it’s packed with flavor, yet it’s light, moist and only mildly sweet. Though you could also serve It for a light dessert perhaps alongside a scoop of vanilla coconut milk ice cream. However you decide to serve it, you must give this cake a try, trust me when I say that the caraway lends a really magical element to the cakes complexity. In fact I enjoyed the flavor combination so much I think I just might use caraway in my baking more often.
Irish Tea Time Seed Cake
1 C Unbleached All Purpose Flour
1 C Whole Wheat Pastry Flour
½ C Earth Balance slightly melted
½ C Raw Sugar + ½ Tbsp
2 Tbsp Ground Flax Seed - Mixed with 6 heaping Tbsp Water until frothy
1 tsp Baking Powder
2 tsp Ground Caraway + 1 tsp
1 tsp Ground Cinnamon + ½ tsp
1/4 tsp Ground Nutmeg + 1/4 tsp
3 Tbsp - 1/4 C Unsweetened Almond Milk (Depending on consistency)
- Preheat the Oven to 350'F
- In a large bowl mix the flour, baking powder, and spiced together.
- In a separate bowl cream the Earth Balance and sugar using an electric hand mixer on high-speed. Once creamed beat in the flax seed/water mixture.
- Make a well in the center of the dry ingredients. Pour the wet into the dry and mix with a wooden spoon until thoroughly combined.
- Add three Tbsp of Almond Milk to make a smooth consistent batter. It shouldn’t be wet, but it shouldn’t be too dry either. If it looks a little stiff add additional almond milk up to 1/4 C.
- Pour the batter into a greased loaf pan or small cake pan. Then evenly sprinkle ½ Tbsp of sugar, along with 1 tsp of caraway, ½ tsp of cinnamon , and 1/4 tsp nutmeg over the top.
- Place in the oven and bake for 45 minutes to 1 hour until a toothpick inserted into the center comes out dry and the top is a nice golden color.
- Enjoy with tea in the afternoon or as a dessert after an Irish inspired dinner!
*** Note - Traditionally Seed Cakes contain whole Caraway seeds, both in the cake and on top of the cake. I however did not have whole Caraway seeds just ground. If you do have whole Caraway seeds or would prefer to make it with them use roughly 1 Tbsp of Whole Seeds in the cake with another ½ Tbsp of seeds sprinkled over top. Or more or less depending on how you feel about Caraway.***
Monday, December 31, 2012
Christmas Eggnog Cheesecake in a Cinnamon Graham Cracker Crust...
I think it’s absolutely shameful that I haven’t posted since the 20th, but you know how crazy it gets with the holidays. Between Christmas Eve, Christmas Day, Boxing Day, My Husband’s Birthday and now New Years I haven’t had much time - nor quite frankly much energy - to get my shit together and do a big holiday recap post. One is coming I promise, just not tonight, and maybe not even tomorrow night, but it’s on it’s way.
We had a lovely holiday, and I hope you did as well. I cooked like a demon for days, making entirely too much food, and eating way more then I should have. However as I told my husband, my twin brother E and my good friend N that the mark of a successful holiday is that you eat and drink as much as you like, and as long as you fit into your pants the next day you’ve won. Which I definitely did, though honestly next year I think I’m doing Christmas low-key and simple. Some sort of crock pot dish and a salad, that’s it.
But now onto what this post is really about. Before going vegan I used to love egg nog. Some of you might remember my Vegan Nog review from last year? Anyway, I bought a carton at the end of November and thoroughly enjoyed it, and one day while drinking it I decided that I absolutely needed to make a nog cheesecake for Christmas. Somehow I convinced myself that Christmas just wouldn’t be Christmas without one and so I tried to find a good recipe. Can you believe that out of the nearly 100 cook books I own not a single one of them had a nog cheesecake recipe? What a disappointment, but instead of getting upset about it I hit up Google looking for a recipe. However I struck out again when Google only popped up like 4 Nog Cheesecake recipes that were vegan. Every other recipe that popped up was some re-posted and tweaked version of one of the original four recipes. The reason I didn’t like any of those recipes was because they were either too complicated or either two simple. I know, you’re probably thinking I’m complicated but I really wanted a good nog cheesecake that was sweet, rich, and tasted like nog, and many of the recipes only had you using ½ cup of Nog. Not nearly enough in my opinion. So after some careful consideration I decided to throw caution to the wind and try and come up with my own delicious nog cheesecake recipe.
I think I hit it bag on. This is exactly what I wanted, and tasted so good. Exactly how I had it pictured in my mind. Now fair word of warning, there is absolutely nothing healthy or low fat about this cheesecake but it is fantastic! And for one or two days a year you can certainly indulge a little. The cake is definitely omnivore approved, and even my husband who never used to like cheesecake and never liked nog - doesn’t even particularly care for Vegan nog - thought it was phenomenal. So make it and enjoy!
Now I hope you all have a Happy New Year, and I’ll see you back here in 2013. I hope to be a little more active on the blog next year.
Christmas Eggnog Cheesecake in a Cinnamon Graham Cracker Crust
16oz Silken Tofu
2 8oz Containers Vegan Cream Cheese
1 C Sugar
1 C So Delicious Coconut Milk Nog (or Favorite non-dairy eggnog)
2 Tbsp Lemon Juice
6 Tbsp Dark Rum
1 tsp Vanilla Extract
3/4 tsp Ground Nutmeg
1/2 tsp Ground Cinnamon
6 Tbsp Cornstarch
Pinch of Sea Salt
Crust
!0-14oz Cinnamon Flavored Graham Crackers
1-2 Tbsp Vanilla Almond Milk
1-2 Tbsp Melted Coconut Oil
Pinch of Sea Salt
Extra cinnamon if desired.
Preheat Oven to 350'F
- Pulse Graham crackers to a fine meal in a food processor. Then add in the wet ingredients salt and extra cinnamon and pulse a few times until the mixture is moist and cohesive.
- Grease a 9 inch round cake pan and press crust into the bottom.
- Bake at 350'F for 10 minutes and remove from the oven to cool.
- To make the filling combine all ingredients into a food processor and process until completely smooth. Taste for flavor and adjust ingredients to taste as needed.
- Pour mixture into the cooled Graham crust and place into the oven. Bake at 350'F for 55-75 minutes. Checking often after the 50 minute mark to make sure the cake doesn’t burn or brown. You want it to cook, but stay as close to white as possible. When you pull the cake out it will still be wobbly in the middle that’s okay.
- Leave the cake out and let cool at room temperature for 1 hour. Then place in the fridge uncovered and let cool completely 2-3 hours. Then cover and keep in the fridge until ready to serve.
- Enjoy topped with a caramel rum sauce, or vegan whipped cream!
PS: Sorry for the lack of pictures but I had something of a mishap Christmas Eve night. I brought this cheesecake to my Husband’s aunts house, and like usual my arms were full of different dishes. As I tried to balance the dishes in my arms while reaching out to open the door to let myself into the house I dropped the cake! Lucky for me it landed right side up and so the only damage was a big ripple through the surface that occurred when the cake hit the pavement. To make the prettiest picture I could I sliced a piece of relatively unharmed cake out and took a picture of it alone on a plate. Voila! Still tasted great, even if it ended up looking a bit ugly.
Tuesday, November 27, 2012
Kyleigh’s All-Time Favorite Salad Dressing...
Some days all I want is a big green salad. It doesn’t have to be fancy, it doesn’t have to be elaborate. Some lettuce, onion, and maybe a bit of tomato or some dried cranberries will do, with a light sweet garlicky vinaigrette. Now, don’t get me wrong, I love all those big honkin’ salads that are complete meals in themselves and contain upwards of fifty ingredients, but when I’m really craving greens, I go for simple more often then not, and while I love all those rich, elaborate, and creamy salad dressings too a lot of times I just want a dressing that tastes ‘clean’ without having to sacrifice on flavor.
This is the perfect summer salad in my opinion, clean and simple, but it’s also the perfect winter salad. It’s great for serving alongside heavier meals like Spaghetti and bean balls, in rich tomato sauce, or for serving next to a big ‘ole bowl of chili, or as a component to a large holiday dinner such as Thanksgiving. It’s a great starter salad, because it’s so delicious, yet it’s flavor won’t overwhelm the main course.
When I first ditched bottled salad dressing’s - years ago, before I ever went vegan or vegetarian - this was the first homemade dressing I came up with, and it was a hit with everyone. Since the day I first served a salad with this dressing to someone other then my husband I have been frequently told by people that they ‘love my salads’ and that I ‘make the best salads’ I don’t know about that, but it’s nice knowing that I’m at least capable of making something satisfying that a wide range of people can enjoy and appreciate. I hope you enjoy this simple dressing too.
Kyleigh’s All-Time Favorite Salad Dressing
4-6 Garlic Cloves
7 Tbsp Olive Oil
2 Tbsp Red Raspberry Vinegar
1-2 Tbsp Water - to thin and dilute as needed.
1 tsp Sugar - more or less to taste
A pinch of Black Pepper, Dried Basil, and Dried Oregano to taste
- Heat a dry skillet over medium heat until hot. Add the garlic cloves and toast until golden brown on both sides, stirring frequently to prevent the garlic from burning or sticking.
- Remove the garlic from the pan and place in a food processor. Add Oil, Vinegar, sugar, and spices. Blend until completely smooth. Taste for flavor and then add water as needed, adjusting oil, vinegar and spices as you see fit.
- Pour over a a big ‘ole green salad and enjoy!
PS: You could use this dressing on virtually any kind of salad but my favorite types of greens to use with this dressing are Bibb, Green Leaf, Romaine, Iceberg and Spinach. Typically I use Romaine more often then not. You also have an endless amount of ‘add-in’ options such as tomato, red onion, green onion, nuts, seeds, dried fruits, olives, bell pepper, red cabbage, chopped veggies, apples, pears etc.. though I like to keep it simple leaving it around 3-4 ingredients at most.
PPS: If you like you can make this sugar-free by leaving out the sugar, or by adding in another mild flavored sweetener of your choice.
Subscribe to:
Posts (Atom)