Showing posts with label Capers. Show all posts
Friday, August 15, 2014
Spicy Beef and Spinach Lasagna...
It’s been unseasonably cool here the past week. Mostly the days are warm but in the evening it cools considerably and there’s a good breeze. Don’t get me wrong, I’m not complaining, I love cooler weather - fall is my favorite time of year - but this kind of weather really makes me want to eat ‘out of season’ you know? The other day when it was particularly grey and quite cool I suddenly felt in the mood for lasagna. I have about a million different lasagna recipes in my arsenal but I didn’t want to use any of them. Instead, I wanted to get creative, so I took a look around and found a package of Beyond Meat Feisty Beef Crumbles that I’d bought when they were on sale but never used. I don’t normally buy these kinds of things but since they were new, my husband and I thought we’d try them out but I just never knew what to use them in, until I realized they would be perfect in lasagna.
Since I was only making a lasagna for my husband and I, and I only had one package of beef and one package of cheese I made a small one using my 8x8 baking pan. You could probably double the recipe for a larger lasagna if you needed to, but this dish is super hearty and filling, we only ate one slice each which is a real anomaly for us - especially my husband who’s been known to turn into Garfield at the site of lasagna. This recipe exceeded my expectations and I was quite happy with the end result. So next time you need to make a really hearty, meaty, cheesy lasagna for the omnivore in your life give this one a shot - provided they don’t mind a little heat of course!
Spicy Beef and Spinach Lasagna
6 Square Lasagna Sheets (8x8)
1 Tbsp Olive Oil
1 Yellow Onion Diced
8 Cloves Garlic Minced
*** 1 Package Feisty Beyond Meat Beef Crumbles thawed (Or your favorite vegan beef)
1 ½ tsp Crushed Fennel Seeds
14oz Can Diced Tomatoes
8oz Can Tomato Sauce
1 Tbsp Dried Oregano
1 Tbsp Dried Basil
1 tsp Sea Salt
1/4 tsp White Pepper
1/4 tsp Red Pepper Flakes
2 Tbsp Capers
3-4 Tbsp Minced Pepperoni Peppers
10oz Fresh Baby Spinach
*** 1 Package Daiya Mozzarella Shreds (Or your favorite vegan Mozzarella)
Tomato Sauce for Topping
1 8oz Can tomato sauce
2 Tbsp Tomato Paste
4oz water
2 garlic cloves
2 tsp olive oil
1 tsp onion powder
2 tbsp capers
2 tbsp minced pepperoni peppers
½ bunch minced parsley
Sea Salt and Black Pepper to taste
1 tsp Dried Basil
Noodles
- Set a pot of water on the stove and bring to a boil. When boiling add the lasagna sheets and boil for 5-6 minutes until the sheets become soft and pliable. They don’t need to be fully cooked. Drain them, and rinse them.
Filling
- Heat the olive oil in a large pan over medium heat. Add the garlic and onion and saute for 5-6 minutes until softened.
- Add in the crushed fennel seeds and the beef crumbles. Saute for 5 minutes, until crumbles have browned.
- Add in the diced tomatoes, tomato sauce, oregano, basil, salt, pepper, capers, red pepper flakes, and Pepperoni Peppers. Simmer for about 10 minutes then remove from the heat.
Sauce
- Heat the olive oil in a small pot on the stove. Add in the garlic and saute for 4 minutes until golden.
- Add in all the other ingredients and bring to a boil. Then decrease the heat and let simmer for 20 minutes.
- Remove from the heat and set aside until ready to use.
Assembly
- Preheat oven to 350'F
- Lightly grease an 8x8 baking pan. Layer in 2 of the lasagna noodles. Cover the lasagna noodles with enough spinach to cover them. Layer in enough of the meat filling mixture to cover the spinach. Then sprinkle enough of the cheese over the filling to cover.
- Layer 2 more lasagna sheets overtop, and repeat with remaining spinach, meat filling and cheese.
- Layer the last 2 lasagna noodles on top. Cover the top with the tomato sauce, and then cover in foil and bake in preheated oven for 45 minutes. Alternately you can bake the lasagna without the sauce and spoon the sauce over top after it finishes baking.
- Once finished remove from the oven, garnish with fresh minced parsley, then cut and serve! Preferably with a nice side salad.
*** Note - Just because I used Beyond Meat crumbles and Daiya Cheese doesn’t mean you have to. Use whatever you favorite vegan meat and cheese are, though if you use a plainly seasoned vegan beef you may want to add a bit more heat to the dish, it’s up to you. Something to keep in mind that this dish is gluten-free and soy free - as long as you use gluten-free lasagna noodles -because both beyond meat and daiya are gluten and soy free products. If you're using other vegan products and gluten or soy is an issue you'll have to read the labels to make sure.***
Labels:
‘Beef’,
'Cheeze',
Basil,
Capers,
Fennel,
Garlic,
Gluten-Free,
Lasagna,
Main Meal,
Onions,
Oregano,
Red Pepper Flakes,
Soy-Free,
Spinach,
Sugar-Free,
Tomato,
Veganize-It
Friday, July 12, 2013
Arugula Lasagna with Garlic Scape Pesto and Tofu Ricotta...
Okay, so I know it’s summer, and I know a lot of you are living in placed where it’s currently hot, hot, hot, but here in IL yesterday it was actually quite nice. It felt more like spring then summer with a cool breeze and no humidity. It was a perfect day, and while it might not have been a lasagna day per say, that’s inevitably what I ended up making for dinner.
You see, yesterday I was extremely busy writing essays and doing other homework. It consumed most of my day up until about 3pm. By then I was feeling a little tired and brain-fried and so I didn’t really feel like thinking to hard about making dinner. Originally I was just going to cook something from a cook book, but every recipe I found that was ‘quick and easy’ and looked appealing didn’t really utilize the bounty of fresh produce I had on hand. I had pounds of arugula, garlic scapes, kale, spinach, tomatoes, cabbage and beets and so I really wanted to make something that would use at least one or more of the most perishable items in that list. I started thinking about noodles, using my garlic scapes and kale to make a pasta dish but I didn’t feel like spaghetti. Then I remembered a box of whole wheat lasagna noodles my mom gave me to take home with me when I left Vancouver in May. Hm... Lasagna.....
So the wheels got turning, and I must say as much as I love a good lasagna I really hate actually making lasagna. It’s always such a process, but once I got thinking about it I couldn’t stop. I mean what if I put garlic scapes and arugula in a lasagna? I’d never heard of that before, It could be very interesting. What about some olives? Do I have tofu to make ricotta? What if I made a pesto out of the garlic scapes? Hm.. The questions just kept on coming and finally I decided, ‘lets do this thing!’ Of course pesto alone in a lasagna might be a bit too overpowering I thought, so I made a red sauce too, and everything combined together made the most perfect, and delicious lasagna. My husband says this is one of my best ever. No one flavor overpowers another, they all work In perfect harmony together. So If you like lasagna I urge you to make this one, it’s unique blend of flavors is really a pleasure. Of course, if it’s a bit too hot where you live to turn on the oven, then wait for a cool day to try it!
Arugula Lasagna with Garlic Scape Pesto and Tofu Ricotta
Lasagna
14oz Whole Wheat or Gluten Free Lasagna Noodles
1 Large Yellow Onion Diced
½-1 lb Baby Arugula (I used roughly 1/2 to 2/3 of a 1 lb package)
1 Tbsp Olive Oil
2 Tomatoes Sliced
Handful of Kalamata Olives
Sea salt and Black Pepper to garnish if desired
1 Recipe Tomato Sauce
1 Recipe Garlic Scape Pesto
1 Recipe Tofu Ricotta
Tomato Sauce
1 28oz Can Diced Tomatoes
8oz Can Tomato Sauce
3 Cloves Garlic
2 tsp Dried Basil
2 tsp Dried Oregano
1 tsp Red Pepper Flakes
Sea Salt and Black Pepper to taste
1/4 C Capers
Garlic Scape Pesto
14 Garlic Scapes Steamed
½ C Walnuts
½ C Olive Oil
½ C Water
2-4 Tbsp Nutritional Yeast (to taste)
2 Tbsp Lemon Juice
1 tsp Smokes Paprika
1 tsp Sea Salt
1 tsp Garlic Powder
2oz Fresh Basil
Tofu Ricotta
1 lb Extra Firm Tofu drained and Pressed
4 Garlic Cloves Minced
2 tsp Dried Basil
2 tsp Dried Oregano
½-1 tsp Sea salt
Black Pepper to taste
4 Tbsp Lemon Juice
2 Tbsp Tahini
1 Tbsp Mellow White Miso
Slightly less then 1/4 C Water
To Make the Tomato Sauce
- Combine all ingredients except capers and blend until smooth, add in the capers and give a gentle blend for 2 seconds just to incorporate.
- Set aside until ready to use.
To Make the Pesto
- Trim the ends off of your garlic scapes and steam in a pot fitted with a steamer basket for 5-7 minutes until bright and fragrant.
- Pulse Walnuts in a food processor until very fine.
- Add in Olive oil and garlic scapes. Process until relatively smooth. You may need to scrape down the sides of the bowl.
- Add in all other ingredients along with the water. Process again until you reach your desired consistency. (I like my pesto slightly textured.)
- Set aside till ready to use
*** Note - You can use more or less water depending on your desired thickness. You can also leave the garlic scapes raw if you prefer, but some people find the taste too strong which is why I suggest steaming them for a few minutes before hand.***
To Make the Tofu Ricotta
- Crumble Tofu into a mixing bowl.
- Mix the White Miso with the water until smooth.
- Add all other ingredients to the tofu including the miso water mixture and use a fork to mash until everything is thoroughly combined and tofu reached desired ricotta-like consistency.
- Set aside until ready to use.
For the Lasagna
- Boil the Noodles per package directions then drain and rinse under cold water.
- Heat 1 Tbsp of olive oil in a pan and saute the onion until soft. Add in the arugula and saute for roughly 5 minutes until wilted. Remove from heat and let cool for a few minutes.
Assembly
- Preheat oven to 400'F
- Fill the bottom of a baking dish with a thin layer of the sauce. Place a layer of cooked noodles over top.
- Place half of the pesto mixture on top of the Noodles and spread to coat evenly.
- Spread half of the arugula mixture over top of the pesto.
- Spread half of the tofu mixture over top of the arugula mixture and spread as evenly as possible.
It’s okay if the Arugula shows through the tofu.
- Spread another thin layer of sauce over the tofu mixture, then top with another layer of noodles.
- Spread the remaining pesto over the noodles.
- Spread the remaining arugula mixture over the pesto
- Spread the remaining tofu over the arugula and top with another layer of noodles.
- Spread the remaining sauce over top of the noodles. Then garnish with thinly sliced tomatoes, kalamata olives and a bit of freshly ground sea salt and black pepper if desired.
- Place in the oven and bake for 20-30 minutes until tomatoes are shriveled and sauce is bubbling.
- Let cool for 15 minutes then cut into the Lasagna and enjoy!
***Note: This can be made gluten-free by using gluten-free noodles.***
Labels:
Arugula,
Basil,
Capers,
Garlic,
Garlic Scapes,
Gluten-Free,
Lasagna,
Lemon,
Main Meal,
Miso,
Nutritional Yeast,
Olives,
Onions,
Pesto,
Sugar-Free,
Tahini,
Tofu,
Tomato,
Walnuts
Thursday, July 4, 2013
Garlic Scape Socca with Hummus and Steamed Greens in Balsamic Dijon Vinaigrette...
Where does the time go? I’ve been sitting on numerous recipes that I’ve been dying to share and yet it seems this week I didn’t have a spare moment to post. It was a busy week though, and Monday was my birthday so I’ve spent my free time over the past few days celebrating. Monday was also Canada day so to all my fellow Canadian friends and readers I hope you had a good holiday and enjoyed yourself!
So anyway, back to those recipes. Well, the whole reason I posted my Classic Hummus recipe last week, was because I was planning to post this socca recipe the day after! But time got away from me and now I’m posting it a week late, though better late then never right?
Now, the last time I posted about Socca was last December, and I had fully intended to post more Socca recipes because it really is a new favorite food of mine and I make it quite often. Though it seems to always work out that I tend to make socca when I have limited time - which means my camera is never at the ready and so I wolf the food down without snapping any pics. This time however I was preparing a socca recipe with the full intention of posting about it because one of my absolute favorite things is back in season GARLIC SCAPES! As soon as I saw them at the market I knew I would have to use them to make Socca, it seemed to me to be the perfect marriage of two amazing things. I’m sure you recall my love of Garlic Scapes, and if you haven’t tried them yet I strongly encourage you to go out and buy some. If you don’t know what to do with them you can always try these recipes Mighty Green Pasta with Garlic Scapes and Creamy Lemon Dill Sauce , Garlic Scape Soup, Garlic Scape and Collard Green Pizza or make this socca!
So since Socca are French, I decided that for this particular recipe I wanted to use some French flavor pairings like Herbs de Provence, and Dijon Mustard, with a lot of greens and a nice bean spread. After some careful consideration I thought a simple classic hummus would taste fantastic spread over socca, and so that’s how this recipe was born. It’s an interesting amalgamation of flavors and somehow they all work beautifully together. Try it and See, I think you’ll be just as happy as we were with the finished result.
Garlic Scape Socca with Hummus and Steamed Greens in Balsamic Dijon Vinaigrette
Socca
8 Garlic Scapes sliced
1/4 red onion diced
3 Tbsp Capers
1 ½ C chickpea flour
1 ½ C water
1 Tbsp Olive Oil
1 Tbsp Herbs de Provence
½ tsp Smoked Paprika
½ tsp White Pepper
Sea Salt to taste
Greens
1 Bunch Kale
1 Bunch Arugula
2 ½ Tbsp Balsamic Vinegar
2 Tbsp Dijon Mustard
1 ½ Tbsp Maple Syrup
1 Recipe Classic Hummus or Hummus of your choice
For the Socca -
- Preheat the Oven to 425'F
- Mix all of the dry ingredients together in a bowl. Make a well in the center and add the water and stir to combine into a smooth batter. Add the sliced garlic scapes, red onion, and capers. Stir to combine.
- Lightly oil a cast iron skillet, then heat it over medium high heat. When the skillet is hot, pour in the batter and let it cook for 1 minute.
- Remove the skillet from the heat, and place it into the preheated oven. Cook for 20 minutes or until the socca is dry and pulling away slightly from the edges. Let the Socca cool for ten minutes then slice into quarters or eighths.
For the Greens -
- Fill a medium sized pot with an inch or two of water. Fit with a steamer basket and place the greens inside. Steam lightly for 3-5 minutes until the greens are wilted but the kale still has a bit of texture. Transfer mixture to a bowl.
- Combine the Balsamic Vinegar, Dijon Mustard, and Maple Syrup in a bowl. Whisk until smooth then pour over the steamed greens.
Assembly -
- Spread a generous amount of humus on each slice of Socca, and top with a generous amount of the steamed greens/ Then enjoy.
- Alternately, you can spread the humus over the socca, and eat the steamed greens on the side as a salad. It’s up to you, but it all tastes great mixed together!
PS: Apologies for the pictures, I know it's kind of hard to see the socca because I really loaded up my plate with the steamed greens. That's the way it's suppose to be though right?
Labels:
Arugula,
Balsamic Vinegar,
Capers,
Chickpea Flour,
Dijon Mustard,
Garlic Scapes,
Gluten-Free,
Hummus,
Kale,
Main Meal,
Maple Syrup,
Onions,
Quick and Easy,
Smoked Paprika,
Socca,
Soy-Free,
Sugar-Free
Friday, March 8, 2013
Franco-Moroccan Inspired Eggplant, Squash and Tempeh Crumble...
Who doesn’t love a good crumble? On a crisp fall evening there are few better ways to end the night then with a warm homemade apple or plum crumble. Am I right? But, have you ever had a savory crumble before? Have you ever eaten crumble for dinner? Yeah neither had I, until I came across a savory crumble recipe in Beatrice Peltre’s ‘La Tartine Gourmande’ that caught my interest. I was so intrigued by the idea that I did a little internet research and as it turns out crumbles in general are thought to be of British or Irish origin, and have always been made in both sweet and savory varieties, although the sweet versions are far more common. Interestingly crumbles didn’t become a popular or widespread menu item until the second world war, when strict rationing of flour, sugar and butter made it nearly impossible for people to make pies since pie crusts require so much of the three rationed ingredients. Instead some ingenious people decided to make the pie filling and throw a crust-like mixture on top, and since it was so easy, and cheap to make it really caught fire. Cool right?
Anyway, crumble for dinner? I’d never considered such a thing before, but all this information really got me interested in trying one out for myself, the only thing I had to figure out was what kind of crumble to make. Peltre’s recipe used eggplant and squash and had a gluten-free crust and I liked the idea of those things. Eggplant and squash I both had on hand and they fueled my daydreams of warmer more hospitable climates such as those in the Mediterranean, the South of France, Africa and The Middle East. So I took that inspiration and ran with it, combining a mixture of Middle Eastern and French elements to form this super savory, slightly tangy, a tad sweet, flavor packed and decadent crumble. I kept the idea fo a gluten-free crumble topping because, well why the hell not? But I added cooked amaranth and nutritional yeast to make it a bit more substantial and to give it that creamy cheesy flavor that savory crumbles are suppose to boast.
I had no idea how this experiment was going to work out, but in the end I was more then surprised. This was definitely one of the most surprisingly delicious meals I’d made in some time. No matter how odd you might think the idea of a savory crumble is, the bottom line is that this worked. Plain and simple, it was so delicious that there’s no doubt you’ll go back for seconds! I know this recipe has a few steps, and it requires you to dirty a few different dishes but trust me when I say every ounce of effort is so worth it! So expand your horizons and give it a try.
Franco-Moroccan Inspired Eggplant, Squash and Tempeh Crumble
For the Tempeh
1lb Tempeh
1 Tbsp Fennel Seed
1 tsp Dried Basil
1 tsp Dried Oregano
1 tsp Onion Powder
1 tsp Garlic Powder
1 tsp Red Pepper Flakes
1/4 tsp Ground Mace
1 ½ C Water + 1 Beef Bouillon Cube
3/4 C Red Wine
For The Crumble Topping
2/3 C Finely Chopped Walnuts
1/3 C Millet Flour
1/4 C Brown Rice Flour
4 Tbsp Nutritional Yeast
1/4 C Amaranth Cooked in 3/4 C Water
1 tsp Ground Cumin
Sea Salt and Black Pepper to taste
4 Tbsp Earth Balance
½ Bunch Parsley Minced
For The Crumble Filling
1 Medium Butternut Squash, peeled, seeded and chopped. Roughly 4 C
1 Medium Eggplant chopped. Roughly 4 C
4 Tomatoes Blanched, peeled and chopped
1 Large Yellow Onion Chopped
2 Stalks Celery Chopped
2 Tbsp Olive Oil
8 Garlic Cloves Minced
1 tsp Ground Cumin
1 tsp Ground Coriander
8oz Tomato Sauce
1 tsp Dried Rubbed Sage
½ tsp Ground Cinnamon
Sea Salt and Black Pepper to taste
1/3 C Chopped Sun-dried tomatoes
6 Tbsp Capers with liquid
To Make the Tempeh -
- Mix 1 Beef Bouillon cube with 1 C of water.
- Crumble the Tempeh into a large pan, and add all the spices. Cover with the water/Bouillon mixture and the red wine. There should be enough liquid to cover the tempeh but it depends on the size of your pan. If it doesn’t quite cover add up to ½ C more.
- Bring the mixture to a boil, then reduce the heat and simmer on medium or medium-low until all or most of the liquid has been absorbed by the tempeh. Roughly 20-25 minutes. Remove from the pan and set aside.
To Make the Filling -
- Heat the olive oil in the same pan you used to make your tempeh mixture. Add the onion, celery and garlic and saute for roughly five minutes. Add the cumin, coriander, cinnamon, black pepper and salt and cook for another two minutes.
- Add the blanched chopped tomatoes, the tomato paste, the chopped eggplant and the cubed squash. Stir to thoroughly combine, then cover. Over medium-high heat let the mixture come to a roaring simmer, let simmer for 5 minutes then stir, and reduce heat to medium-low. Simmer the mixture for another 25 minutes. Make sure to check frequently to make sure the liquid doesn’t evaporate and the filling doesn’t burn. If it is looking too dry add a quarter cup of water.
- After 25 minutes add the tempeh mixture into the pan, along with the sage, capers, and sun-dried tomatoes. Stir well to combine and simmer an additional 10 minutes until squash is nice and tender.
- Remove from heat, and spoon the mixture into a large greased casserole dish.
- To Make the Crumble Topping.
- While your mixture is simmering combine all dry ingredients in a medium sized bowl.
- Melt the Earth Balance in the microwave, and add it into the dry mixture along with the cooked amaranth. Mix until nice and crumbly.
To Assemble and Bake.
- Preheat the oven to 400'F
- Spread the crumble mixture evenly over top of the filling in the greased casserole dish. Then place the casserole dish uncovered into the oven and bake for 25-30 minutes until filling is bubbly and topping is lightly browned.
- Remove from oven and let rest for 10 minutes. Then enjoy with a nice salad and a glass of sangria!
*** Note - If you need this to be soy-free you can replace the tempeh with Seitan. However if you need this to be soy and gluten-free you can try replacing the tempeh with a bean of your choosing. Either chickpeas or something hearty would be my suggestion.***
Labels:
Amaranth,
Butternut Squash,
Capers,
Celery,
Cumin,
Eggplant,
Ethnic,
European Fusion,
French,
Gluten-Free,
Middle Eastern Fusion,
Onions,
Parsley,
Sugar-Free,
Sun Dried Tomatoes,
Tempeh,
Tomato,
Walnuts
Friday, January 18, 2013
Black Quinoa, Arugula Bowl with Chickpeas and Capers
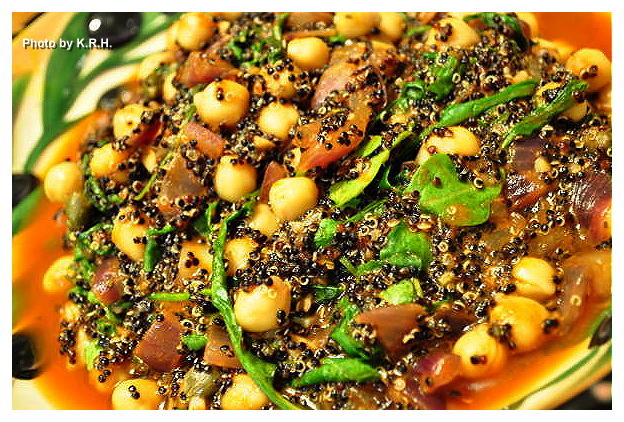
Need something quick and easy to throw together for either dinner or lunch that tastes great and has a lot of nutrition? This is the dish for you. Last weekend I needed to make something to take with me for lunch at work, but didn’t have a lot of time - or ingredients for that matter - to prepare anything. So I took a look around the kitchen hoping for inspiration. I had onions and garlic of course - always a good base I thought to myself, - and I had a ton of arugula. - Now we’re getting somewhere! Quite often when I need a meal in a pinch I make some variation of sauteed greens, onions, and garlic and throw a can of beans into the mix. It’s quick, easy and delicious and very, very satisfying. On this particular day however I was looking for something a little more - well, creative and filling. That’s when I opened up the pantry and found a solitary can of crushed tomatoes, chickpeas and a big ‘ole bag of black quinoa. Perfect!
So I grabbed up all this stuff, dumped it onto my kitchen counter and without thinking too much about it employed my twin brother E’s favorite method of cooking. Which is “Throw some stuff in a pot and see what happens.” Well, what happened was magic. Seriously this is such a simple dish and yet ti’s so filling, satisfying and bursting with flavor. I love the flavor of arugula, love it’s bitterness, and the capers add a really neat element to the overall dish. I also love that this is a plate of all wholesome whole foods ingredients so you can eat it, and not feel guilty because you know you’re nourishing your body in the right way. I strongly recommend the black quinoa, it’s delicious and I love it! It’s really my favorite type. However if you don’t have any, or can’t find any you can always sub in Regular quinoa, or red quinoa. The contrast won’t be quite the same but it’ll still taste fantastic! The best part is you can throw this together in under 25 minutes, how awesome is that?
Black Quinoa, Arugula Bowl with Chickpeas and Capers
1 C Black Quinoa
2 C Water
1 tsp Olive Oil
10 Cloves Garlic minced
1 Large Red Onion diced
1 tsp Chili Powder
½ tsp Red Pepper Flakes
1 14 oz Can Crushed Tomatoes with Basil
4 Cups Arugula
15 oz Can Chickpeas Drained
Sea Salt and Black Pepper to taste
2-3 Tbsp Capers
2-3 Tbsp Liquid from Capers
- Add Quinoa and water to a medium sized saucepan and bring to a boil. Boil for 5 minutes then lower to a simmer. Simmer until all the water has been absorbed roughly 15-20 minutes.
- Meanwhile minced the garlic and dice the onions. Heat the olive oil in a large pan over medium-high heat and once hot add in the onions. Saute for 3-4 minutes until starting to become fragrant and a little soft. Lower the heat to medium and add the garlic, chili powder and red pepper flakes. Saute for another 3 minutes. The onions should be tender but still a little crisp.
- Add in the crushed tomatoes and lower heat to medium-low. Stir to combine with the onions and garlic and then add in the arugula. Stir until arugula has been worked into the tomato mixture and has wilted. About 3-5 minutes. If the quinoa hasn’t finished cooking by this time lower the heat to the lowest possible setting and let sit.
- Add in the cooked quinoa, the chickpeas, capers, caper liquid, and salt and pepper to taste. Taste for flavor and adjust seasoning as needed. Then spoon into large bowls and enjoy!
PS: If you don’t have crushed tomatoes with basil you can just use any crushed tomatoes and add in an additional 1-2 tsp of dried basil. Also this is a perfectly filling and delicious meal on it’s own but for a bit more substance you can serve it with some lightly roasted squash as I did. I used Acorn squash. To roast squash cut into slices, sprinkle with olive oil, sea salt, black pepper, and basil and roast at 425'F for roughly 30 minutes.
Friday, November 9, 2012
Colleen's Tempeh Eggplant Pot Pie...
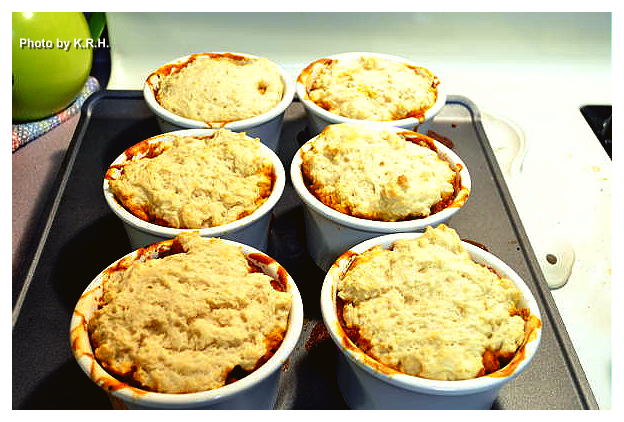
I’ll admit that even though I’d been dying to make this for some time I wasn’t at all convinced that I was actually going to like it. Of course there’s only ever one way to find out if you’ll like something or not and so I decided to take the chance. It’s a super easy recipe and comes together really quick which for me was an added bonus.
First you start by steaming tempeh and eggplant together. While that’s going you saute onions - I also added garlic of course - then you add spices like fennel and red pepper flakes, - I added smoked paprika also - tomato sauce, and capers and let it simmer. Add the steamed tempeh and eggplant and let it simmer a bit longer. While that’s going you make your biscuit dough, and once everything is done you divide your filling into the ramekins spread some biscuit dough over top and bake, voila! Super easy right?
And let me tell you, I was worried about not liking them? Well they were incredible! Seriously one of the most delicious savory ‘pies’ I’ve ever eaten. In fact my husband and I loved this recipe so much we were happy that it made six pot pies, so we had some for dinner the next night as well. For a quick and easy side I served these pot pies along with some Brussels Sprouts that I seared in my cast iron pan with a bit of olive oil, lemon juice, salt, pepper and a few droplets of agave nectar. Delicious, and my husband and avid sprout hater even had a few sprouts too!
If you don’t already own a copy of Colleen’s “The Vegan Table” you should order one, this recipe is worth it, as are the many, many other things I’ve made from this book over the years.
Monday, October 15, 2012
Vegan Mofo #16 - Colleen’s Muffuletta Sandwich...
Vegan Mofo #16 - Colleen’s Muffuletta Sandwich
The Book - Color Me Vegan
The Author - Colleen Patrick-Goudreau
The Recipe - Muffuletta Sandwich
Page # 245
Difficulty - Easy
Duration - Roughly 40 minutes, but most of that time is inactive.
Who doesn’t love roasted vegetables? I know I freaking love them! There is something so amazing about them. You don’t need sauce, or dressing you just pop an assortment of veggies into the oven with a little olive oil, a dash of salt and pepper and something absolutely wonderful comes out. It’s easy, clean, delicious and oh so satisfying. That’s how I felt about this sandwich. It’s full of super simple ingredients and doesn’t take a lot of time or effort to throw together and yet it’s so mind-blowingly good.
Though I’d of course heard of Muffuletta sandwiches before I’d never actually had one before making Colleen’s version. Originally I hadn’t intended to make this sandwich for Mofo, but just before Thanksgiving I was starting to feel burnt out on sandwiches, specifically the really heavy ones and I was just craving something simple. I also had some homemade white Panini rolls left over that I needed to use, plus a sad looking zucchini and a small eggplant. I had all the making’s of the Muffuletta and so there was no better time to give it a try, and you should too.
So first things first you need to roast up some veggies. You need a zucchini, an eggplant, a sweet onion, a red bell pepper and a tomato, or a couple of bell peppers and tomatoes if you like a little extra. You slice them thin toss them with oil, salt and pepper and let them do their thing in the oven. Meanwhile you make a Tapenade of green olives, kalamata olives, capers, garlic, celery, parsley, oregano, red pepper flakes, olive oil, red wine vinegar, green onions and a little more salt and pepper.
Then when the veggies are ready you spread the Tapenade over both sides of your bread of choice - a thick crusty bread or some homemade rolls would be best - layer in your veggies and chomp away. Colleen recommends that you refrigerate the Tapenade for an hour or two to let the flavors meld but I didn’t bother, and it tasted great just as it was. A perfect late afternoon lunch or light dinner.
Friday, May 11, 2012
Mesquite and Lime Marinated White Bean and Kale Salad...
This salad was born of a need to start re-introducing large quandaries of leafy greens back into my diet. While I never give up on leafy greens altogether sometimes over the course of the winter I get so bogged down with warming soups, and stews that I neglect my salads. By spring I’m really starting to feel the need for green and sometimes it’s a hard cycle to break. I’ve also been trying to find ways to work more beans into my diet, and different kinds of beans. I absolutely love black beans and chickpeas but that’s about it. The other beans for the most part I can take or leave, which makes me a very inconsistent bean eater. Some weeks I eat lots of beans and lentils and some weeks I eat none. In trying to make different kinds of beans a more regular part of my diet I needed to come up with some new and interesting ways of eating them. After my Cannellini Beans and Ramps feast I realized that Cannellini beans were actually quite good if prepared in the right way, and so my desire to use them creatively has been piqued.
On the day that I decided to make this for lunch, I had a couple of beautiful limes sitting around and a lovely avocado just begging to be used. I also happened to be in the mood for something spicy, smokey and vaguely Latin inspired. This is what I came up with and it knocked my socks off. A really great, tasty, hearty lunch that fills you up, and is relatively healthy yet feels like a decadent treat! What more could you ask for, really?
Mesquite and Lime Marinated White Bean and Kale Salad
15oz can Cannellini Beans
Zest and Juice of 1 Lime
1 ½-2 tsp Mesquite Seasoning
4 cloves Garlic Minced
1/4 C Olive Oil
2 Tomatoes diced
1 Avocado diced
Minced Cilantro to taste
1/3 C Sliced Green Onions
2 tbsp Capers
Smoked Paprika
Black Pepper and Sea Salt to taste
1 tsp Agave
3 C Kale chopped in bite-size pieces
- Combine beans, minced garlic, 2 tbsp of lime juice, 1 tbsp of olive oil, half the lime zest and the mesquite seasoning in a small bowl. Marinate in the fridge for 45 minutes to an hour.
- Heat remaining oil in large pan over medium heat. Add the white bean mixture, the diced tomatoes, half the green onions and capers. Season to taste with black pepper, salt and smoked paprika. Saute for 5 minutes.
- Add remaining lime juice, and lime zest, along with agave stir and saute another 2 minutes.
- Divide Kale amongst individual bowls and evenly distribute the white bean mixture over each bowl. Top with remaining green onion, avocado, and cilantro.
Monday, April 30, 2012
Steamed Broccoli with Creamy Garlic Mustard Dressing...
Today’s recipe is super quick and super simple. It’s a perfect side dish to make on a busy night when all you want is to be done in the kitchen fast, yet don’t want to sacrifice on flavor.
As a broccoli lover I could eat broccoli all day long, I can eat it steamed and plain without any need at all to jazz it up or make it fancy. However on this particular night I felt like something more. I had a ton of broccoli in the fridge that needed to get used, and felt like being a bit more creative about serving it. Earlier in the day I’d been flipping through my copy of Deborah Madison’s book “Vegetarian Cooking for Everyone” It’s a book I’ve rarely used for two reasons, 1) most of the recipes seem like they’re made for beginners or at least vegetarians just starting out, and 2) Since it’s vegetarian cooking for everyone and not vegan cooking, a lot of the recipes are quite heavy on the dairy ingredients, which I didn’t feel like working around once I’d gone vegan. That said I don’t like to neglect my books, and on this particular day I was casually flipping through it thinking in the very least I might find something interesting.
Which of course I did. I stumbled across a recipe for a mustard vinaigrette that sounded pretty good. It wasn’t vegan of course but I could fix that in a pinch. Madison suggested that this would taste good over steamed broccoli and so I was intrigued. Unfortunately as I looked over the list of ingredients I realized that I was lacking several of them. No matter I decided, I would just have to put my own spin on it. What I ended up with was absolutely delicious and paired beautifully with the tender-crisp broccoli I’d steamed. It turned out to be the perfect accompaniment to the main dish I’d decided to serve, and as I found out the following day the leftover dip also made a pretty tasty spread for raw veggies. Grape tomatoes and carrots in particular paired well with this garlicky, mustard, and caper concoction. The blend of flavors are pure magic! Give it a try next time you need to use some broccoli and just see if you don’t fall in love!
Steamed Broccoli with Creamy Garlic Mustard Dressing
4 Heads broccoli trimmed and separated
2 Tbsp Red Wine Vinegar
½ a small or medium sized red onion finely diced
4 garlic cloves minced (to taste)
2 Tbsp Dijon Mustard
2 ½ Tbsp non-dairy sour cream
½ C Olive Oil
1/8 C chopped green onion
1/8 C finely minced parsley
2 heaping Tbsp Capers
1/4 tsp smoked paprika
Sea salt and Fresh Cracked Black Pepper to taste
- Fill a medium sized pot with enough water to cover the bottom. Fit it with a steamer basket and add your broccoli. Steam for 5-8 minutes until broccoli is bright green, tender and crisp.
- To make your dressing combine the red wine vinegar, red onion, garlic, salt and pepper in a small bowl. Let stand 10 minutes.
- Whisk the in the olive oil, Dijon Mustard, and non-dairy sour cream. Stir vigorously until the dressing is nice and creamy.
- Stir in the parsley, green onion, capers and smoked paprika. The dressing will be thick and chunky however if it’s a little too thick for you don’t hesitate to add in a bit more olive oil. Taste for flavor and adjust as needed.
- When the broccoli is finished remove from the steamer basket and plate. Spoon the dressing over top and enjoy!
*** Note - Can be made Soy-Free if using soy-free non-dairy sour cream. ***
Subscribe to:
Posts (Atom)