Showing posts with label Breakfast. Show all posts

Tuesday, February 9, 2016

The Ultimate Stoner Breakfast....


It's not called The Ultimate Stoner Breakfast for nothing. This meal is pure 'meat' and potatoes, it's 'carbs, carbs, and more carbs.' it is exactly the kind of food you want to eat and should indulge in when you're grooving in your happy place, and everything is beautiful. One of the best things about it is how low effort it is, yet the flavor is not sacrificed. It's also super hearty, it'll tame even the wildest munchies, of course, don't limit yourself to just eating it at breakfast time!

Now, there are two ways you can eat this. The 'traditional' way with each food having it's own separate space on the plate. Or you can eat it like a taco. Yeah, you heard me, a pancake breakfast taco. How awesome is that? I know it sounds strange but trust me when I say it's amazing. My husband was really skeptical at first too, but after he watched me down 3 of these bad boys he was convinced enough to try it. If you enjoy it in Taco form then you can essentially add anything you like as a topping which is awesome, it makes it versatile. So trust me on this one, and give it a try.

(PS: You can use any pancake recipe you like, but I've included my go-to just incase you don't have one. I have also made these with gluten-free flour before and they have turned out well.)


Cheese Tots

Olive Oil
1lb Frozen Tater Tots
1 Small Yellow Onion Diced
Garlic powder
Sea Salt
4 Sliced Green Onions
1/2-1 Cup Daiya Cheddar or Mozzarella Cheese.

- Preheat Oven to 400'F

- Dump the tater tots into a baking dish with the diced onions. Drizzle a little olive oil over them then sprinkle them with salt, and garlic powder. Stir to combine everything.

- Pop it in the oven and bake for 15-20 minutes until tots are cooked to your taste.

- Remove from the oven, Sprinkle cheese, and green onions over top. Return to the oven and cook for 2-3 minutes or until the cheese has just melted and the onions are soft.

- Enjoy on their own as part of your breakfast, smothered in ketchup, sour cream, or mayo. Or enjoy in a taco!


Classic Go-To Pancakes

2 Cups White Flour
2 Tbsp Baking Powder
1 tsp Sea Salt
1 1/2 Cups water
3 Tbsp Olive Oil
3 Tbsp Maple Syrup

- Mix all dry ingredients in a bowl.

- Combine the water, maple syrup and olive oil.

- Pour the wet into the dry and stir until just combined.

- Heat a pan, spread a 1/4 C of batter out into the pan, spread it thin, but not too thin, similar to the thickness of a flatbread.

- Cook for a few minutes until bubbles appear on the surface of the pancake. flip and cook another couple of minutes until golden brown. Repeat.


The Ultimate Stoner Breakfast.

Add-Ons and Extras

Avocado
Sour Cream
Mayo
Ketchup
Maple Syrup
Your Favorite Tofu Scramble
Jalapeno Slices or Hot Sauce if you like it spicy

To Serve the "Traditional Way" Heap a mound of Cheese Tots onto your plate, Slap down 3-4 Pancakes next to it, then add on a portion of your favorite Breakfast Sausage, a portion of your favorite bacon, with half an avocado on the side. Serve with ketchup and mayo for the tots, and Maple Syrup for the pancakes and sausage.


To Serve it the "Taco Way" Spread a thin layer of Syrup over one pancake. Place 1/2 a slice of bacon (or a full slice if you prefer) on top of the pancake, then a breakfast link.  Pick the pancake up, and hold it in your palm like you would a taco shell. Take a spoon and scoop a small portion of the cheese tots inside your pancake shell. If you're using tofu scramble as well, scoop a small portion of that into the pancake taco along with the tots. Drizzle a bit of ketchup over top, and then serve with dollops of sour cream and/or mayo and whatever other add-on's you wish. It's great with or without avocado, and I personally like the mix of sour cream and mayo. So delicious!


Saturday, September 19, 2015

Vegan Mofo #24: Brussels/Belgian Waffles...


Well, this is my last Mofo Post. Today I leave for Vacation and I won’t be back until October. I had a lot of fun this Mofo, I really enjoyed veganizing non vegan recipes. I surprised myself a lot, and found new and interesting ways to combine food, and flavor. I even got to try out a few ‘new to me’ cooking methods, such as flambee!  It’s been a fun ride, unfortunately I didn’t get to veganize all the reicpes I had intended, nor did I get to veganize foods from all the countries I’d wanted. I had really hoped to have more cultural variety but I got kind of hung up on Irish and French cooking, I don’t know why.  Maybe when I come back from my trip I’ll keep going with the veganizing, who knows.


Anyway, for my last recipe I decided to make Belgian Waffles. When we were in Brussels there were waffle shops literally everywhere, you couldn’t throw a rock without hitting a waffle shop or a frites stand, and I loved it! What cool street food right? Interestingly what we call Belgian Waffles here in North America are quite different then what a true Belgian - or Brussels Waffle - really is. Actual Brussels waffles are made a little more complicated by the addition of yeast, it isn’t as simple as whipping together a standard pancake batter and sticking it in a waffle iron. Traditional waffles also use a lot of fat in the form of eggs and butter, so I was really interested to try a vegan version.


I wouldn’t call my experiment perfect, they were a little more dense and bready then I had anticipated, however using yeast that’s only to be expected. Flavor wise however these were amazing! Seriously, my husband said they were some of the best waffles I’ve ever made, and that’s a big compliment.


Now, to serve you can’t simple pour syrup on them, because that’s not how they do it in Belgium, what you need is an assortment of fruits, whipped cream, and chocolate sauce. Some people even top their waffles with ice cream. My personal favorite combinations were Banana and Chocolate or Strawberry and Chocolate Hazelnut. For this recipe I used what I had on hand, Raspberries and made up a Chocolate Peanut Butter Sauce. A big dollop of Coconut Whip wouldn’t be the worst idea on these!


Brussels Waffles 

5 Cups All Purpose Flour
½ tsp Sea Salt
7g Active Dry Yeast
2 Tbsp Light Brown Sugar
1 tsp Vanilla Extract
2 Cups Soy Milk
1 Cup Melted Non-dairy Butter
Ener-G Egg Replacer, enough to equal 6 Eggs

- Combine Flour and Salt in a Large bowl.

- Sprinkle the yeast and Sugar over top

- Using a hand mixer beat together the Ener-G and Milk until foamy. Beat in the vanilla extract.

- Make a well in the center of the dry ingredients. Pour in the milk mixture and fold to combine.

- Add in the melted butter and combine until a dough forms. It might seem a bit loose, not like a bread dough, pretty squishy, and that’s okay.

- Lightly grease a clean bowl with a bit of nonstick spray. Pour the batter/dough into the clean, greased bowl. Then cover with plastic wrap and let rise for 1 hour.

- Preheat a waffle Iron. Use the setting just below half way. (This is important!) When the iron is preheated add enough batter to fill it. Now the batter will be very sticky and stretchy, just use your spoon to break it off from the rest of what is in the bowl. Close the waffle iron and cook until your iron beeps. Do not open the iron before the waffles are done.

- Remove the cooked waffles from the iron, and add the remaining dough to the iron. You’ll probably get 8 waffles out of this recipe if you have a 4 waffle iron.

- Serve waffles with fruit, whipped cream, chocolate sauce, or any of your favorite assorted toppings. They also taste great with a bit of powdered sugar and non-dairy butter.

Enjoy! See y’all In October!


Thursday, September 10, 2015

Vegan Mofo #11: Irish Brown Soda Bread Scones....


Unfortunately I don’t have a lot of time today and so my post is going to be rather short. I suppose it’s fitting because the recipe is rather short too. It’s a real easy one, and may seem like a bit of a ‘cheat’ considering it didn’t take all that much effort to veganize but if I’m going to post everyday, while working full-time, and preparing for my upcoming trip, I gotta cut corners somewhere you know? So anyway, Irish Soda Bread is one of my favorite things to make and eat around St. Patrick’s Day. It’s typically a pretty easy thing to make, though depending on the recipe it can take a bit of time. Taking delicious soda bread and turning it into scones cuts your baking time below half, and you get perfect individual sized pieces of bread that you can just scoop up. Enjoy these deliciously light scones for breakfast smothered in non-dairy butter, jam or marmalade, or enjoy them as a nice counterpart to a savory suppertime soup. However you choose to enjoy them, you’ll be pleasantly surprised at how easy they are to whip up, and even happier that they contain almost no fat! How cool is that? Though, due to the low fat content they must be eaten quickly and are best consumed fresh out of the oven. Though they will keep for a day, two at most.


Irish Brown Soda Bread Scones 

2 Cups All Purpose Flour
2 Cups Wheat Flour
1tsp Baking Soda
½ tsp Sea Salt
1 ½ Cups Non-Dairy Milk (I used Soy)
2 Tbsp Apple Cider Vinegar

- Preheat the Oven to 425'F

- In a measuring cup combine your non-dairy milk and the apple cider vinegar. Let sit for 5 or so minutes until the milk curdles.

- In a large bowl mix together the 2 flours, the baking soda, and the salt. Make a well in the center and add the milk, vinegar mixture.

- With a wooden spoon combine the milk mixture with the flour mixture until a dough forms.

- Now, you can go the traditional route and flour a work surface, roll the dough out and use a biscuit cutter to cut the scones, or do what I do. Grab a spoon, scoop up blobs of dough and plop them down onto an oiled baking sheet. I don’t have time for all that rolling and cutting nonsense and truth be told I don’t own a biscuit cutter anyway. I like my biscuits and scones to look ‘rustic.’

- When all your scones are cut - or plopped - on to the baking sheet, and the oven has finished preheating, place the baking sheet in the oven and bake for 10-12 minutes until risen and golden brown.

- If desired brush the tops with a little melted non-dairy butter before baking.


*** Note - If you want a slightly richer scone, use a combination of non-dairy milk and non-dairy sour cream. Mix 1 Cup non-dairy milk, with ½ Cup non-dairy sour cream, and 2 Tbsp Apple Cider Vinegar, and proceed as directed above.***

Wednesday, September 9, 2015

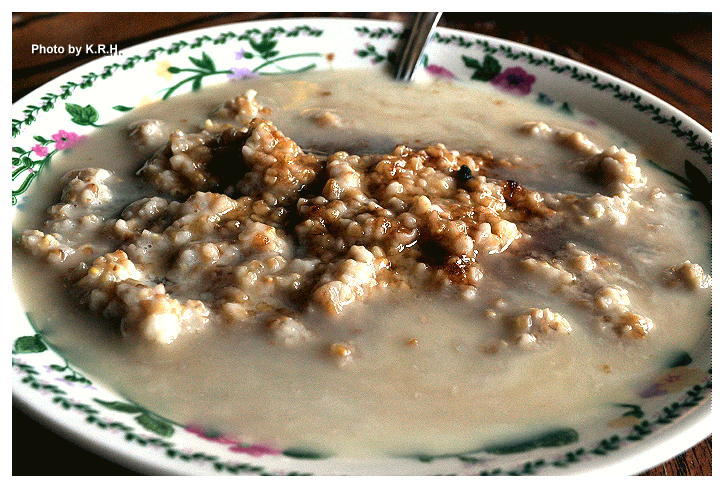
Vegan Mofo #10: Irish Weekender Oatmeal...


I’m going to break away from France for a moment and go back to Ireland because I want to talk about oatmeal. I know, you’re thinking oatmeal, boring! But it’s not! Not if you do it right anyway. Oatmeal or porridge is a pretty common breakfast staple in Ireland, Scotland, and England, it’s been eaten in various ways for centuries, and there’s a reason why people have relied on it as a staple food for all that time. It’s easy, it’s hearty, and it’s filling, best of all it’s cheap, and healthy too.  Of course no one really likes plain old cooked with water oats, and so it can be more or less healthy depending on what you add into it.


In reading about Irish cooking I came across a paragraph discussing oatmeal in which it said oatmeal is usually cooked with water and salt and served with a bit of brown sugar or honey, though on the weekends oatmeal might get ‘dressed up’ as a treat, or if it’s being served to guests it may be made a bit fancier. It also said that when staying in an Irish guesthouse you’re bound to get treated to a bowl of oatmeal loaded up with ‘the works’ and so it was these additions that I found particularly interesting and decided to combine them all in one bowl for what I think is hands down the best, and most delicious oatmeal I’ve ever eaten.

Honestly, I’ve eaten it three times since I’ve made it, though I wouldn’t recommend you eat your oatmeal quite like this every day, it’s certainly nice for a treat, a weekend, guests, or just a simple change of pace from your daily routine. Give it a try, even my husband liked it and he's never been a fan of oatmeal.


Irish Weekender Oatmeal 

Basic Recipe

1 Cup Steel Cut Oats
2 Cups Water
Pinch of Sea Salt

Optional to Serve 

Nondairy Milk
Nondairy Cream (Either store bought such as Silk, So Delicious or Califia, or thick homemade Cashew cream)
Bee Free Honey (or Agave if unavailable but I really recommend Bee Free)
Brown Sugar
Irish Whiskey

- Combine Oats, water and salt in a medium sized pot on the stove and bring to a boil over medium high heat. Stir a few times and then reduce the heat and let simmer 20-30 minutes until oats are cooked and most of the water has been evaporated.

- Make sure to keep an eye on the simmering oats and to stir from time to time to prevent them sticking to the bottom of the pan.

- Scoop your oatmeal into individual serving bowls and top as desired with optional serving ingredients.

- For my oatmeal I added a good amount of Soy milk, then sprinkled the top with a couple of teaspoons of brown sugar. Then I drizzled a bit of Bee Free Honey over the bowl, swirled in a spoonful of Califia Cream, and topped it off with a thimbleful of Irish Whiskey. So damn good! Try it!

- Enjoy your Irish Oats with some fresh baked scones, and a large steaming mug of Irish Breakfast Tea, Earl Grey, or Coffee.

Tuesday, September 1, 2015

Vegan Mofo #1: Irish Buttermilk Pancakes...


Today is the first day of the much awaited Vegan Mofo, are you excited? I am. I didn’t realize it until today but I guess there are some new guidelines this year. Apparently there are daily prompts/suggestions for what to blog about there is one for each day of the month, a lot of people seem to like this idea - it requires less thinking and planning I suppose, but I hate it. There is nothing more boring to me then doing the same thing everyone else is doing. For me part of the fun of Vegan Mofo is to see all the different things people are coming up with. Why do I want to look at twenty posts all talking about the same thing? I also don’t like being limited. I couldn’t be less interested in ‘following’ what everyone else is doing and that goes for every aspect of my life. So, needless to say I’m not following these prompts, I’m doing my own thing, if that means I’m excluded from Vegan Mofo then so be it, but I really want to continue on with my original idea.


The theme I decided on is Veganized Dishes From Countries To Which I’ve Traveled. I do so much traveling and food is a big part of traveling, when away I always tell myself that I’ll experiment at home with the foods of my travels but I rarely do. I figured this year’s Mofo would give me the perfect opportunity and excuse to do just that. I also thought it might be nice to provide you with some new recipes, considering I haven’t been very active lately. Every year I cook other people’s recipes for Mofo, but this year is the first time I’ll be blogging original recipes. Though, just a point of warning, I’m going to be veganizing ‘traditional’ recipes, and so I’m going for authenticity in my creations, not health. Most likely the recipes will not be gluten-free, soy-free, sugar-free, salt-free or any other kind of healthy. They will not be unhealthy on purpose, but a lot of them are going to be based off of ‘meat and potatoes’ recipes and so I am envisioning a lot of seitan usage in the coming month. So, anyway, I hope you enjoy it!

Coincidently today’s recipe actually goes along with the prompt for September 1st, which is ‘Breakfast” I had planned to start Mofo out simple with a quick and easy recipe, Buttermilk Pancakes!


Now despite my best efforts I can’t find a reliable source on the internet claiming that Buttermilk Pancakes are an original Irish creation. It seems every English speaking country has their own version of this classic breakfast. Though I’ve flipped through a couple of Irish Cook books and they all have a variation on Buttermilk Pancakes. Considering that Buttermilk is quite common, readily available, and widely used in Irish baking it is not unreasonable to think that Buttermilk Pancakes might have originated in Ireland or at least somewhere in the United Kingdom before migrating.

Perhaps it’s a typically Irish practice to serve pancakes drizzled in Honey, but I’m not sure. I myself have always served pancakes - any kind - with maple syrup, so I thought dousing them in honey was a bit weird myself but I decided to give it a try, and really enjoyed it. The honey really melted into these soft fluffy cakes, and it was a really nice compliment to the savory butter. It had a lighter, more mellow sweetness then serving the cakes with maple syrup.

To mimic the buttermilk I used non-dairy milk with a large quantity of apple cider vinegar, but don’t worry you can’t taste the vinegar. Due to the sugar, these pancakes are a little sweeter then what you might be used to, but they are not so sweet as to be unpleasant. They are very simple and easy to make, with few ingredients, and due to their simplicity you can whip up a good batch virtually any day of the week. Enjoy with a nice steaming mug of Irish Breakfast Tea!


Irish Buttermilk Pancakes 

2 Cups All Purpose Flour
1 ½ tsp Baking Soda
4 Tbsp Sugar
Ener-G Egg Replacer or Flax Egg to = 1 Egg
1 ½ Cups Non-dairy Milk (Soy or Almond recommended)
2 Tbsp Apple Cider Vinegar
Non-Dairy Butter, and Bee-Free Honey to Serve 

- Heat greased skillet over medium heat.

- Combine Milk and Apple Cider Vinegar in a measuring Cup and let stand for five minutes.

- Combine all dry ingredients in a bowl.

- Make Well in center and add Ener-G Egg or Flax Egg, along with Milk/Vinegar Mixture. Stir with a wooden spoon until just combined. Don’t over mix.

- Using a 1/4 Cup measuring cup scoop the pancake batter onto the hot greased skillet, spreading batter into a circle. Let cook until bubbles form on top, then gently flip the pancake over.

- Repeat until all batter is used and pancakes are cooked.

- Serve drenched in melted vegan butter with a hearty drizzle of Bee-Free Honey over top.

Monday, August 31, 2015

Our 8 Year Anniversary...


The 25th of August was me and my Husband’s anniversary, and though our celebration was pretty low key this year we did start the day off right with a delicious breakfast. I didn’t go all out this year as I tend to do some years because I didn’t get home from work until 8am and then we had a little overnight getaway planned. I chose three simple - yet tasty - dishes from my new copy of Mastering the Art of Vegan Cooking by Annie and Dan Shannon (of Betty Goes Vegan fame)

A combination of something savory and something sweet sounded just right to me and so I started with the Cinnamon Peach Skillet Rolls. Yes, these are exactly what they sound like, Cinnamon Rolls filled with sliced peaches with a peach glaze. Oh my god! I don’t know why I don’t make Cinnamon Rolls more often! They are a bit time consuming but always so worth the effort. Unfortunately my cast iron skillet wasn’t near big enough to accommodate the rolls and so I ended up just baking them in a glass dish, but that’s okay, they were amazing regardless. We each ate 2 right out of the gate, and they didn’t survive longer then a second day, that’s how fantastic these were.


For the ‘main’ course I made the Tofu a la Goldenrod which is a simple plain seasoned tofu scramble served over toast and drenched in a milk based gravy. It probably sounds weird, and if you’re like me you might even think that sounds slightly disgusting, but trust me, it was soooo good! The only reason I even made it was because it was simple and I thought I could at least utilize the tofu scramble even if I wasn’t interested in drenching it in gravy but I’m really glad I took the chance on this dish as it was super filling, and so unexpectedly wonderful. I loved the flavor combo of the tofu, the toast, and the savory gravy.


As a side I made the Roasted Red Flannel Hash, which is a standard Hash of potatoes and beets baked in the oven with red onion and some spices, there’s even kale thrown in there for good measure. This was pretty good too, though I thought it could use a bit more salt, but that’s me.


It was a fantastic way to start our anniversary, and the perfect opportunity to try out some new and interesting recipes.

Wednesday, May 6, 2015

Chickpea Flour Scramble - With Breakfast Taco Option...


I’ve been meaning to post this recipe for a while now, but I’ve found myself preoccupied of late. Sorry for the long absence, but I hope this recipe will make up for it. So, on the 23rd of April I really wanted a hearty breakfast. I woke up ravenous and desiring a scramble of some sort. Unfortunately I didn’t have any tofu on hand, neither did I have any canned chickpeas to make Isa’s Chickpea Scramble. However, it occurred to me in a brief moment of culinary genius that if I could make a scramble with whole beans, why couldn’t I make a scramble with chickpea flour? I had heard of it done before, and didn’t think it could be all that hard. I imagined it was somewhat like making a socca - which I love - and so I set to the task of making a chickpea flour scramble.

I was very skeptical that it would work out, especially in the beginning when I realized that the chickpea flour mix just didn’t want to break apart. The whole thing clumped together and wasn’t cooking. I thought I was going to have to scrap the whole endeavor - and no doubt if you try this recipe you might just think the same thing at first, but trust me, it works! - lucky for me I have patience - which is what this recipe needs - I kept at it and was rewarded by one of the most brilliant breakfasts ever. In fact I loved it so much I ended up making it the next day for my husband and I, as he hadn’t been home when I made it the first time. Skeptical as he was, he loved it too, and we devoured this scramble in taco form, though in my opinion it’s also just as good without the tortillas and extras.


What I love about this recipe is you can make the chickpea flour taste like whatever you like, I kept it simple and kept a traditional scramble flavor but you can literally add anything. You can add any spices you can add any vegetables and it creates the perfect gluten-free, and soy free scramble alternative for those who have allergies or sensitivities. More and more people are avoiding soy and gluten but that doesn’t mean they have to cut scrambles out of their lives too.


Personally I think this scramble has a better texture and mouth feel then a tofu scramble. Don’t get me wrong I do love tofu scrambles but I prefer a slightly dryer scramble and tofu scrambles usually have a bit of wetness to them. Also I think that the chickpea scramble mimics eggs better then tofu as it gets firm, but also retains that spongy, springy, softness of an egg. So if you’re looking for a new scramble to try give this one a go. I know it probably sounds weird but trust me the reward is worth it, I know you’ll love it.


Chickpea Flour Scramble 

1 ½ C Chickpea Flour
2 ½ C Water
1 tsp Black Slat
1 tsp Garlic Powder
1 tsp Onion Powder
½ tsp Turmeric
½ tsp Smoked Paprika
1/4 tsp Black Pepper

3 Green Onions diced
1 Ripe Tomato Diced

For Tacos 

Corn Tortillas
Shredded lettuce or Salad Mix
Vegan Cheese
Ketchup
Hot Sauce


- Lightly oil a medium sized pan, and heat over medium heat.

- In a bowl combine the chickpea flour through the black pepper and mix until thoroughly combined.

- Once the pan is hot add the chickpea flour mixture to the heated pan. Cover the pan and cook for about 4-5 minutes until the top looks glossy and the edges look cooked.

This is how it'll look when you first pour it into the pan


- Using a metal spatula begin scrambling the half-cooked mixture as you would scrambled eggs. Begin by folding and flipping the mixture over. Let it cook another 2 minutes or so and begin flipping again. Bare in mind that the mixture will be sticky and it will only be partially cooked making it difficult to fold, and separate but keep at it. It does take some time but use your spatula to continue to break the mass into smaller and smaller chunks, flipping them and cutting them. It should take at least 10 minutes.

After about 10 minutes


- After 10 minutes the mixture should be a bit dryer and it should be easier to break into pieces. The pan may well be very dry at this time and you can add a touch more olive oil to the pan to help prevent sticking as well as to help crisp up the chickpea mix. About a tablespoon of oil should be more then enough. Continue to flip and break up the chickpea mixture into smaller pieces with your spatula. Another 10 minutes and you should have some small and medium sized chunks, it should by now resemble a more traditional tofu or egg scramble.

Another 10 Minutes 


- When you have the chickpea mix broken into the size chunks you prefer, and they’re nicely dried and cooked through add in your green onions and cook another minute.

We're almost there, it's time for green onions!


- Add in your tomatoes and cook another 2 minutes.

Just about done, add your tomatoes!


- Your scramble should be more then ready now, and you can eat it as is - as you would any traditional tofu scramble. You can eat it on toast, as a side with ketchup, or as I did in tacos.

The finished product, so worth the effort!


- For Chickpea Flour Scramble Tacos spoon some of the chickpea scramble into a corn tortilla, top with your favorite shredded vegan cheese, a handful of shredded lettuce or salad mix, and then drizzle with ketchup or hot sauce as you desire. It would probably even be good with salsa.

Tacos anyone?


ENJOY!!

Friday, February 27, 2015

Creamy Carob Banana Dream Smoothie...


This has seriously been my favorite breakfast smoothie of late. I came up with it a few weeks ago when I was craving a creamy, chocolate flavor but wasn’t really in the mood for my usual chocolate smoothie. For whatever reason I found myself really craving carob - which I do like, but don’t normally get that crazy about. - Since I had some carob powder on hand I decided to give it a try. The carob, coconut, date, banana, cashew combo works so well! You’ll be amazed, and become totally addicted to it like I did. Plus it’s so simple you can’t not try it, and it’s naturally sweetened, no sugar or artificial sweetener here.


Creamy Carob Banana Dream Smoothie

1 ½ Frozen Bananas
1 C Unsweetened Vanilla Coconut Milk
3 Medjool Dates Pitted
1 ½ Tbsp Carob Powder
1 Tbsp Cacao Nibs
*** 1 heaping Tbsp Cashew Butter

- Place all ingredients in a high-speed blender and blend for 60-90 seconds until completely smooth and creamy.


*** Note - For a different but equally amazing flavor swap out the Cashew Butter with Hazelnut Butter. SO GOOD!*** 

Wednesday, December 31, 2014

Breakfast For Dinner: My Husband's Birthday Celebration 2014...

My Plate


December 30th is my husband’s birthday, and it’s a particularly terrible time to have a birthday if you ask me. With Christmas just barely over, and New Years right around the corner most people are full, tired and ready for the holidays to be over - myself included - the last thing anyone wants to do is go to another party, eat another massive amount of food, and have to shell out more money for more gifts. December is an especially bad time to have a birthday if you live in Chicago, because it’s so damn cold you can’t even have the consolation of being able to go out and do anything nice. Forget outdoor activities in -20 degree weather. So, with this in mind I always try to give my husband the most special birthday I can think of. We’re not big on gifts since we normally by whatever we want whenever we want but I try to pick him up a few surprises that he might not purchase himself. I offer to make him anything he wants for his birthday dinner, and since it’s his day we can do whatever he wants. This year it was simple, we saw some movies, had dinner, went bowling. Bowling is always something that happens on his birthday, because it’s something he enjoys but I do not, except since it’s his birthday it’s the one day of the year I voluntarily and un-grumpily go along.


Last year for his special birthday dinner he wanted sushi. This year, he wanted Breakfast for dinner. Breakfast is probably his favorite meal, and he loves breakfast foods but since I am so rarely in the mood to eat in the morning I don’t normally make breakfast. At first I was disappointed that he wanted breakfast. I was hoping for more of a challenge, I was hoping for something decadent, but it’s his birthday after all and after taking some time to think about it I realized what a relief it would be to make a simple meal after having made so much decadent food already.

So breakfast is what I made, specifically he requested Banana Stuffed French Toast and some kind of Tofu Scramble. He also said he wanted Sweet Earth Bacon and Field Roast Breakfast Sausages, but wasn’t more specific then that. I like to have a little freedom to play around with and so that was a good enough guideline for me.

Field Roast Breakfast Links
Sweet Earth Hickory Sage Smoked Bacon 


I decided upon the Stuffed Banana Berry French Toast from Lauren Ulm’s book “Vegan Yum Yum” I’ve made this before - and posted about it - and we’d both loved it so it seemed the right choice. The only trouble was that the french bread I’d bought was a few days too old and so it was hard as a bloody brick. Needless to say that after much effort I could not cut the bread properly to ‘stuff’ it and so I simply used it to make regular french toast and topped it with the berries and bananas. Still good. I should have known better and picked up a new bread but oh well. My husband offered no complaints as he scarfed down 4 pieces!

Stuffed Banana Berry French Toast 


Since I had never made Lauren Ulm’s Tofu Scramble before and my husband didn’t give me a specific scramble that he wanted I decided to make the Tofu Scramble with Seitan Sausage also from “Vegan Yum Yum” This is a simply seasoned scramble packed with protein. Not only does it have tofu, and seitan but black beans too! Plus broccoli, shredded carrot, wine vinegar, soy sauce, nutritional yeast, turmeric, mustard seeds, and cumin seeds. I really liked the idea of these seasonings and though it’s not how I normally make tofu scramble I have to say this was absolutely delicious!

Tofu Scramble with Seitan Sausage 


Then I decided that breakfast just couldn’t be breakfast without some kind of fried potato and so I dug out my copy of Isa Chandra Moskowitz’s book “Vegan Brunch” and decided on her Peruvian Home Fries. It seemed a fitting choice considering we were just in Peru in September. This potato hash uses Peruvian Purple Potatoes, Coriander Seeds, Red Pepper Flakes, Red Bell Pepper, Red Onion, salt, cilantro and oil. I loved the flavor combination on these potatoes, the coriander seeds tasted great and I liked the little pop you got when you bit into one. Though red pepper flakes are used in this dish these potatoes are not spicy, as most Peruvian food isn’t spicy. There is just enough red pepper to give them some flavor without lending much heat. I could have gobbled up the entire skillet if I wasn’t already so full.

Peruvian Home Fries 


Then there was the plate of Sweet Earth Hickory and Sage Smoked Bacon and The Field Roast Breakfast Links. Both of which cook up nice and easy and taste great, especially when dipped into some ketchup and maple syrup. All in all I’d have to say this was a damn successful breakfast dinner, unfortunately by the time we were done eating we were both too full for the cake I’d made. So instead we’re having the cake tonight as the coup de grace to our New Years/Birthday Pizza Party. Until tomorrow!