Showing posts with label Chickpeas. Show all posts

Wednesday, September 16, 2015

Vegan Mofo #18: Toulousaine Sausage and Bean Salad...


I don’t know how traditional this recipe is or how common, but after doing a bit of googling I found there are all kinds of recipes for sausage salads in Toulouse, the ingredients vary but usually it’s a vinegar mustard dressing, and has beans and sausage. This particular recipe I found when flipping through an interesting book called “The French Market” written by Joanne Harris and I thought it sounded so good that I wanted to try and veganize it, just to see how it was. I think it ended up being really good, and even my husband loved it which amazed me since he typically is no fan of beans, certainly not this many beans all at once!


I love the simplicity of the dish, I love both the bold and subtle flavors, the creamy beans mixed with the chewy sausage. Loved it over a bed of greens though you can simply eat it as is without the lettuce. Obviously the original recipes call for sausages from Toulouse, but in liu of that Harris recommended Italian Sausages so I went with my favorite, Field Roast.


Toulousaine Sausage and Bean Salad
(AKA Salade Toulousaine) 

4 Vegan Italian Sausages
1 15oz Can Chickpeas Rinsed and Drained
1 15oz Can Navy Beans Rinsed and Drained
1/4 Olive Oil
2 Tbsp Red Wine Vinegar
1 Tbsp Whole Grain Mustard
1/4 tsp Dried Sage
Sea Salt and Black Pepper to taste
4 Ripe Tomatoes
Lettuce, Arugula or Mixed Greens for serving (Optional)

- Heat a bit of Olive oil in a large frying pan over medium high heat. Slice the sausages into rounds and fry in the oil until browned on both sides, 5-10 minutes. Remove from the heat and place on a plate.

- Place the Chickpeas and Navy Beans in the same pan. Add the Oil, Vinegar, Mustard, Sage, Salt and Pepper. Mix to combine well and then cook for about 5 minutes until heated through.

- Add the tomatoes to the beans, mix well, and cook about 2 minutes. Remove from the heat, and place the bean mixture into a large serving bowl. Add the sausages and toss to combine. Taste and season with salt and pepper as needed.

- Line serving bowls or plates with a bit of lettuce or mixed greens, then top with 2 generous scoops of the Sausage and Bean Salad. Enjoy Hot, at room temp, or cold, I personally liked it best at room temperature.

Saturday, September 12, 2015

Vegan Mofo #13: Avocados Stuffed with Peruvian Chicken Mayonnaise 2 Ways...


When we were in Peru last September we ate a lot of really good vegan food. Vegan food is not as easy to come by in Peru as it was for us in other places in Central/South America but when you can find it, it’s very good. We enjoyed a lot of simple stews, lima beans, butter beans, corn, and definitely avocados. We took full advantage of the popular ‘plate of the day’ set up that most Peruvian restaurants have around lunchtime. Usually for a few bucks you get a nicely portioned meal with all the staples.


We didn’t have a Vegetarian version of Chicken Mayonnaise while we were in Peru, but I found a recipe for it in a Peruvian cook book that I found intriguing. There is certainly no shortage of Avocados in Peru, and they’re a lot bigger then the ones you buy around here. Anyway, since avocados are one of my favorite foods, and everyone loves a good ‘chicken’ salad, I thought I’d try my hand at making a more compassionate, chicken friendly version of this dish.

I think this would make a great starter to a dinner party, but it’s just as easily enjoyed as a main course along with a side salad. You’ll be surprised at how filling these little avocado boats are!


Avocados Stuffed with Peruvian Chicken Mayonnaise 2 Ways


Beyond Meat Version 

2 tsp Olive Oil
2 Ripe Avocados Peeled, Sliced in Half, Pits removed
1 Box Beyond Meat Chicken Strips Diced
1 Small Carrot Minced
1 Celery Stalk Diced
4 Green Onions Sliced
4 Kalamata Olives Minced
½-1 tsp Smoked Sea Salt
1/3 Cup Vegan Mayo
Black Pepper to taste
Strips of Red Bell Pepper to Garnish (Optional)


Chickpea Version 

2 tsp Olive Oil
2 Ripe Avocados Peeled, Sliced in half, pits removed
1 15oz Can Chickpeas rinsed and Drained
1 Small Carrot Minced
1 Celery Stalk Diced
4 Green Onions Sliced
4 Kalamata Olives Minced
½-1 tsp Smoked Sea Salt
1/3 Cup Vegan Mayo
Black Pepper to taste
Strips of Red Bell Pepper to Garnish (Optional)


Instructions - Beyond Meat Version 

- Heat the Olive Oil in a pan over medium heat. Add the diced beyond meat and cook for 6-8 minutes until nicely browned on all sides. Remove from the pan and place into a large mixing bowl.

- Add the carrot, celery, and half the onion. Saute for 4-5 minutes until the carrot is soft. Add a dash more oil if needed. When the veggies are soft remove from the pan and place into the bowl with the beyond meat.

- Add the remaining raw onion, olives, smoked salt, pepper, and vegan mayo to the bowl, stir thoroughly to combine.

- Taste and adjust seasonings as needed.

- Spoon the beyond meat mixture into the center of each avocado half. Place the halves on a serving plate, and garnish with red pepper strips. Add a dash of sriracha if you like things spicy!

Instructions - Chickpea Version.

- Place the drained, rinsed chickpeas into a serving bowl and mash with a potato masher. You do not need to mash every pea, just get a somewhat mashed consistency.

- Heat the oil in a pan over medium heat. Add the carrot, celery, and half the onion. Saute for 4-5 minutes until the carrot is soft. When the veggies are soft remove from the pan and place into the bowl with the mashed chickpeas.

- - Add the remaining raw onion, olives, smoked salt, pepper, and vegan mayo to the bowl, stir thoroughly to combine.

- Taste and adjust seasonings as needed.

- Spoon the chickpea mixture into the center of each avocado half. Place the halves on a serving plate, and garnish with red pepper strips. Add a dash of sriracha if you like things spicy!


Thursday, June 27, 2013

Classic Hummus...


I love hummus - who doesn’t - I love it, and I make it often. It’s one of my favorite foods, and it’s often a saving grace when it comes to eating healthfully - and sometimes just plain eating - as a vegan traveler. No matter where you go, no matter how small the town, or how vegan-unfriendly the city, someone, somewhere has hummus. It seems to be universally loved, and it seems that everyone and their mother has a personal hummus recipe that they like best.

When it comes to hummus I don’t care if it’s thick, thin, creamy, extra-creamy, or a little textured. I love them all just so long as the flavor is good. That’s that’s really the key, because hummus just ain’t no good if it’s bland or boring. I don’t mean that you have to dress it up and make if fancy - although I love that too - I just mean that when it comes to a good hummus you should be able to taste the nutty tahini, the tart lemon, the bitter cumin, and the garlic, oh gods the garlic!  Hummus without garlic is like a hand without fingers. You definitely, definitely need the garlic!

For years and years I used to make hummus with canned chickpeas and the result was always good it comes out smooth and creamy like I like, and the flavor is wonderful. Until this year I had never made hummus with dried beans before, and this is because my old stove just wasn’t up to the challenge of cooking a bean as hard as the garbanzo. I don’t know why this is, but no matter how long I cooked them on the stove they never got soft. Now my new stove cooks these things like a champ in about an hour, and I have to say the flavor of hummus with home-cooked beans is really out of this world.

Another thing I love about hummus is that it’s so versatile. Really as long as you have chickpeas you can do basically anything else you like. You can season it with whatever you have on hand, and often times while I’ve been on vacations where I’ve had access to a kitchen - or at least a food processor - I’ve been able to whip up hummus using almond butter instead of tahini, lime juice instead of lemon, garlic powder instead of fresh garlic. Hell I’ve even used basil, oregano, curry, and other random seasonings to flavor it when I didn’t have enough cumin. It’s easy, simple, filling and oh so satisfying!

For the sake of your convenience you can use either canned or home-cooked in this recipe, but I highly recommend you trying the home-cooked method, because it really is amazing. So here I go tossing my hat into the ring and adding another hummus recipe into the


Classic Hummus 

2 ½ C Home-Cooked Chickpeas (about 1 heaping cup dried)
4-6 Garlic cloves
3 tsp Ground Cumin
2 tsp Ground Coriander
3/4 tsp Smoked Paprika
½ tsp Onion Powder
5 Tbsp Lemon Juice
3 Tbsp Olive Oil
6 Tbsp Tahini
Sea Salt and Black Pepper to taste
1/3C -2/3C water - (Or enough to reach your desired consistency, the more you use the creamier and thinner the hummus)


- Combine the chickpeas and the garlic in a food processor and process until you have corse crumbs.

- Add in the spices, salt, pepper, tahini, lemon juice, and olive oil. Process until you have a thick paste. Scrape down the sides of the bowl.

- Add in the water and process until you have a smooth creamy dip. Add enough water to reach your desired consistency. This may take a few minutes depending on your processor and you may need to scrape down the sides of the bowl a couple of times.

- Scrape the hummus out into a serving dish and garnish with a drizzle of olive oil, some smoked paprika or a dash of cayenne pepper, and a little minced cilantro. Enjoy as a dip for veggies or toasted pita or forget the serving dish and use the hummus in a wrap, on a sandwich, scooped onto a salad, spread out onto some falafels, or spread across some socca. Enjoy!

Wednesday, March 20, 2013

Broccoli Stem and Kohlrabi Salad with Chickpeas and Smoky Pepper Tahini Dressing...


I love a big ‘ole salad, by now this should be perfectly obvious. For me, any day of the year - but particularly on sunny Spring and summer days - there are few things better then a gigantic bowl filled to the brim with a luscious array of rainbow colored vegetables, fruits, nuts, seeds and legumes.  There are days where I just crave salad, and nothing had me craving salad more then my week long foray into Irish cooking. As much as I loved the Irish cuisine I cooked up leading up to St. Patrick’s Day, the Irish aren’t exactly known for ‘light’ meals, nor are they particularly known for their salads. So after a long week of heavy seitan and potatoes fair I was desperate for a good old fashion salad.


Unfortunately the usual salad fixings were pretty scarce in my house yesterday. There wasn’t a scrap of any sort of lettuce, no avocado, no fresh herbs, and only one tomato. What’s a girl who needs a salad to do? Well, she’s got to get creative. I took a quick inventory of my crisper drawers and then began to formulate a plan. I might not have had lettuce, but I had two kohlrabi that had been in my fridge since who knows when, and two broccoli stalks leftover from the night before. Since I got my juicer I’ve been a big fan of re-proposing vegetables. I save all of my stalks and stems now instead of junking them, and feed them through my juicer. That was the original plan for these broccoli stalks but then I thought, why juice them when I can eat them? Washed and steamed and combined with a bit of red cabbage that I had, some red bell pepper, green onions, sesame seeds and tomato I was well on my way to lunch!


This is a really great way to use up your broccoli stalks, if you’re saving them or don’t want to throw them away, and if you’ve never had Kohlrabi before you’re really in for a treat. Kohlrabi is such a strange vegetable, it’s round like a beet but green, and it tastes like something between a potato, a cabbage and a sunchoke. They’re really unique and they can be eaten either raw or cooked. So a light steam is a really nice way to have them. They also pair really nice with a creamy-smoky dressing. It makes the perfect lunch salad.


Broccoli Stem and Kohlrabi Salad with Chickpeas

2 Broccoli Stems Chopped
2 Medium Sized Kohlrabi Peeled and Chopped
1 Tomato Chopped
½ Red Bell Pepper Chopped
1/4-1/2C Shredded Red Cabbage
1/4C Green Onions Sliced
½ Can of Chickpeas rinsed and drained
2 Tbsp Sesame Seeds (to taste)
3 Garlic Cloves Minced (or to taste)

Smoky Pepper Tahini Dressing 

3 Tbsp Lime Juice
3 Tbsp Tahini
2 Tbsp Bragg’s Liquid Amino’s
2 Tbsp Water (to thin and dilute as needed)
1 Tbsp Agave Nectar
1/4-1/2tsp Smoked Paprika
White Pepper to taste
Black Pepper to taste

- Steam the Broccoli and Kohlrabi together in a steamer basket fitted into a medium sized pot. Steam for about 5-6 minutes until tender, but still a bit firm.

- Combine all other salad ingredients in a large bowl. Add the steamed vegetables and mix together.

- Whisk together all dressing ingredients in a bowl until smooth and creamy. Then pour desired amount over your salad, mix well and enjoy!


Friday, January 18, 2013

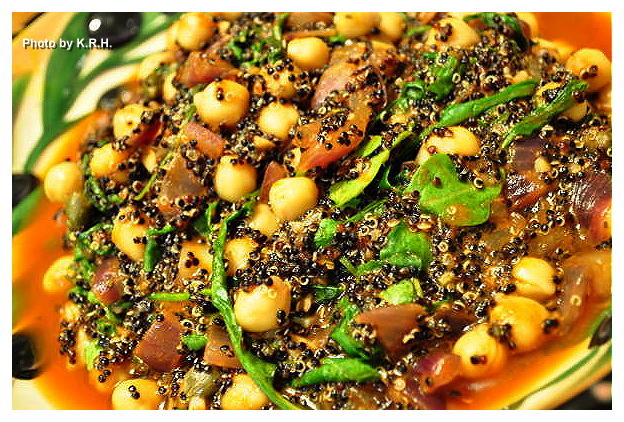
Black Quinoa, Arugula Bowl with Chickpeas and Capers


Need something quick and easy to throw together for either dinner or lunch that tastes great and has a lot of nutrition? This is the dish for you. Last weekend I needed to make something to take with me for lunch at work, but didn’t have a lot of time - or ingredients for that matter -  to prepare anything. So I took a look around the kitchen hoping for inspiration. I had onions and garlic of course - always a good base I thought to myself, - and I had a ton of arugula. - Now we’re getting somewhere! Quite often when I need a meal in a pinch I make some variation of sauteed greens, onions, and garlic and throw a can of beans into the mix. It’s quick, easy and delicious and very, very satisfying. On this particular day however I was looking for something a little more - well, creative and filling. That’s when I opened up the pantry and found a solitary can of crushed tomatoes, chickpeas and a big ‘ole bag of black quinoa. Perfect!


So I grabbed up all this stuff, dumped it onto my kitchen counter and without thinking too much about it employed my twin brother E’s favorite method of cooking. Which is “Throw some stuff in a pot and see what happens.” Well, what happened was magic. Seriously this is such a simple dish and yet ti’s so filling, satisfying and bursting with flavor. I love the flavor of arugula, love it’s bitterness, and the capers add a really neat element to the overall dish. I also love that this is a plate of all wholesome whole foods ingredients so you can eat it, and not feel guilty because you know you’re nourishing your body in the right way. I strongly recommend the black quinoa, it’s delicious and I love it! It’s really my favorite type. However if you don’t have any, or can’t find any you can always sub in Regular quinoa, or red quinoa. The contrast won’t be quite the same but it’ll still taste fantastic! The best part is you can throw this together in under 25 minutes, how awesome is that?


Black Quinoa, Arugula Bowl with Chickpeas and Capers

1 C Black Quinoa
2 C Water
1 tsp Olive Oil
10 Cloves Garlic minced
1 Large Red Onion diced
1 tsp Chili Powder
½ tsp Red Pepper Flakes
1 14 oz Can Crushed Tomatoes with Basil
4 Cups Arugula
15 oz Can Chickpeas Drained
Sea Salt and Black Pepper to taste
2-3 Tbsp Capers
2-3 Tbsp Liquid from Capers

- Add Quinoa and water to a medium sized saucepan and bring to a boil. Boil for 5 minutes then lower to a simmer. Simmer until all the water has been absorbed roughly 15-20 minutes.

- Meanwhile minced the garlic and dice the onions. Heat the olive oil in a large pan over medium-high heat and once hot add in the onions. Saute for 3-4 minutes until starting to become fragrant and a little soft. Lower the heat to medium and add the garlic, chili powder and red pepper flakes. Saute for another 3 minutes. The onions should be tender but still a little crisp.

- Add in the crushed tomatoes and lower heat to medium-low. Stir to combine with the onions and garlic and then add in the arugula. Stir until arugula has been worked into the tomato mixture and has wilted. About 3-5 minutes. If the quinoa hasn’t finished cooking by this time lower the heat to the lowest possible setting and let sit.

- Add in the cooked quinoa, the chickpeas, capers, caper liquid, and salt and pepper to taste. Taste for flavor and adjust seasoning as needed. Then spoon into large bowls and enjoy!


PS: If you don’t have crushed tomatoes with basil you can just use any crushed tomatoes and add in an additional 1-2 tsp of dried basil. Also this is a perfectly filling and delicious meal on it’s own but for a bit more substance you can serve it with some lightly roasted squash as I did. I used Acorn squash. To roast squash cut into slices, sprinkle with olive oil, sea salt, black pepper, and basil and roast at 425'F for roughly 30 minutes.

Monday, October 29, 2012

Vegan Mofo #25 - Celine & Tamasin’s Bulgur Hummus Wraps...


Vegan Mofo #25 - Celine & Tamasin’s Bulgur Hummus Wraps 

The Book - Vegan Sandwiches Save the Day!
The Author - Celine Steen & Tamasin Noyes
The Recipe - Bulgur Hummus Wraps
Page # 70
Difficulty - Easy
Duration - Roughly 30 minutes


I love these wraps, they are bursting with flavor and full of delicious, nutritious simple whole foods ingredients. They may not sound all that exiting or innovative at first, at least that’s what I thought, but one night I was looking for something super quick and easy to throw together that I could also use for Mofo, and this wrap just jumped out at me. I also happened to be in the mood for something with a middle eastern flavor so this was the perfect choice.


To prepare the bulgur Celine and Tamasin suggest that you place it in a bowl with water, sea salt , pepper, cayenne, garlic, onion powder and lemon juice then cover it in plastic and leave it in the fridge for 2 hours. That was too long for me so I used my tried and true method of preparing bulgur which is to pour boiling water over the bulgur then cover it and let it sit for fifteen to twenty minutes until all the water is absorbed. It’s much faster this way and yields the same result.


While your bulgur is plumping up you can make the hummus. Hummus is something I make a lot and I’ve tried a lot of different recipes and variations, most of them have been pretty damn good but I typically always prefer my own version of humus. For the sake of this recipe though I decided to use Celine and Tamasin’s Hummus and boy was it good! I’m telling you, this is probably one of the best hummus recipes I’ve ever tried and it has a totally unexpected ingredient in it. Capers! I know it sounds strange but love it! And it went surprisingly well with everything else in the dish.

So aside from capers and chickpeas the hummus also has the usual suspects of olive oil, tahini, lemon juice, garlic, paprika, plus some brine from the capers. You whip it up in a food processor and voila! Instant deliciousness!


The final component of the wraps is some simple sauteed veggies such a shredded red and green cabbage, carrots salt and pepper and a bit of olive oil. Celine and Tamasin say to make this an even quicker meal you can just toss the raw veg with the oil and salt and serve that way but I chose to saute the veggies and it turned out really well. Once all the steps are completed you smear a generous amount of hummus onto a tortilla, layer on some bulgur top it with the veggies and roll it up! You really have to try these, they are absolutely to die for!


Thursday, October 25, 2012

Vegan Mofo #22 - Celine & Tamasin’s Navajo Tacos...


Vegan Mofo #22 - Celine & Tamasin’s Navajo Tacos 

The Book - Vegan Sandwiches Save the Day!
The Author - Celine Steen & Tamasin Noyes
The Recipe - Navajo Tacos
Page # 47
Difficulty - Easy
Duration - Roughly 30 minutes


I was intrigued by this recipe from the first moment I opened this book. The picture is scrumptious looking and the recipe sounded easy and delicious. I couldn’t wait to give it a try though I’ll admit I was initially daunted at the prospect of making my own bread. Not that I’m not capable of making my own bread but whenever I do it always seems to be such a long process. Not so in this case. This entire recipe is super simple to throw together even with the bread. The dough is simple, only has to rest for fifteen minutes and then it cooks up quickly fried in a pan of hot oil. The dough recipe is suppose to be enough for 4 pieces of bread but I found it was really only enough for two, two plate sized pieces.


As for the other ingredient’s it’s somewhat traditional taco fare all piled onto a piece of fried bread. Perhaps it’s not technically a sandwich but as it is on bread, and as I do believe I mentioned including taco’s in my Mofo theme, and as the recipe does appears in a book of vegan sandwiches I feel it was appropriate.


So what goes onto the bread? Shredded lettuce, corn salsa, tomato salsa lime wedges, avocado, cilantro and chorizo chickpeas. However I changed this around since I didn’t have any limes I just squirted some bottled lime juice over top. I also didn’t have any corn salsa and couldn’t find any organic corn salsa at the store so I just used organic frozen corn - thawed of course - and extra tomato salsa instead. The chickpeas however are the real star of the show, and I have to say - chorizo chickpeas are probably my new favorite thing ever!!


They’re quick and simple to prepare. They’re spicy and sweet. Basically you pan-fry canned chickpeas in a medley of spices - paprika, cayenne, sea salt, onion powder, minced garlic, olive oil, ketchup, apple cider vinegar, lime juice, and cumin. Until the liquid has been absorbed then you pile them on your taco and voila! Delicious! It’s nice to have both a soy and gluten-free option for a vegan chorizo that is nice and wholesome like that.


By far one of my newest favorite meals, you must try it!


Thursday, October 18, 2012

Vegan Mofo #18 - Chloe’s Falafel Sliders with Avocado Hummus


Vegan Mofo #18 - Chloe’s Falafel Sliders with Avocado Hummus 
The Book - Chloe’s Kitchen
The Author - Chloe Coscarelli
The Recipe - Falafel Sliders with Avocado Hummus
Page # 107
Difficulty - Easy
Duration - 30-40 minutes


I love a good falafel, and I enjoy them pretty regularly but I never thought of turning one into a burger. I also never thought of making hummus with avocados, what a brilliant idea! Two of my favorite things hummus and avocados in one dish? Amazing!


These sliders are actually really quick to throw together. The burgers come together quickly and once they’re formed into patties they only need a few minutes of frying on both sides. You can bake them if you prefer, which will take a little longer, but still it’s relatively quick. Again I like that these were made with wholesome pantry-staple ingredients. Chickpeas, red onion, garlic, sun-dried tomatoes, parsley, cumin, coriander, sea salt, garbanzo flour, and olive oil. The only change I made here was I used cilantro instead of parsley because I didn’t have any.


Next the avocado hummus is just as simple. You whip a quarter cup of chickpeas together with an avocado, some parsley - cilantro again in my case - olive oil, garlic, lemon juice, sea salt and cayenne, and you’ve got some of the most delicious hummus I’ve ever eaten. Being the garlic lover that I am of course I added more garlic then she suggests.


Lastly you make a creamy tahini sauce that is also super easy. Blend some tahini with water, garlic, lemon juice, and salt and bam, super creamy goodness. Served on a slider bun with sliced red onion, and tomato it’s a quick, and delicious dinner.  I used Pretzel slider buns because who doesn’t love a good pretzel but you could use any kind, just don’t skimp on the hummus.


Monday, October 1, 2012

Vegan Mofo #2 - Chloe’s Thai Chickpea Burgers with Sweet ‘n’ Spicy Sauce...


Vegan Mofo #2 - Chloe’s Thai Chickpea Burgers with Sweet ‘n’ Spicy Sauce
The Book - Chloe’s Kitchen
The Author - Chloe Coscarelli
The Recipe - Thai Chickpea Burgers with Sweet ‘n’ Spicy Sauce
Page #121
Difficulty - Easy
Duration - 30-40 minutes depending on how fast you’re able to whip everything together. Longer if you’d prefer to bake the patties as opposed to frying them.


I am a big fan of anything chickpeas, they are without a doubt my favorite bean, and I could eat them cold straight out of the can. I’m also a huge fan of falafel and falafel type things, so I was eager to test this recipe out. The fact that it’s pretty simple to prepare and comes together rather fast was a bonus since I had to make it all yesterday morning before heading off to work.


I haven’t made a lot of recipes in Chloe’s Kitchen, but of the one’s I’ve made I haven’t been steered wrong yet, and these burgers are no exception. I love the robust combination of flavor as well as the density of the patties. They’re hearty, they’re filling, they feel like they should be really bad for you but really they’re not. I also love the simplicity. No wheat-gluten, no seitan, no tempeh not even tofu. Just good down-home ingredients that most people already have handy in their fridges and pantries. It’s perfect for a busy weeknight meal, a quick weekend throw-together or an afternoon lunch.


The patties are a blended mixture of chickpeas, onion, garlic, ginger, cilantro, lime juice, jalapeno and a couple of other things. They have a slightly spicy subtly tangy twist, and a vague Thai or Asian fusion feel. They’re especially good paired with the super simple and easy sweet ‘n’ spicy sauce which is just a combination of tomato paste, olive oil, water, agave, vinegar, red pepper flakes and salt though for some extra kick I also added Siracha. Of course no spicy burger would be complete without the addition of cooling avocado.


In the end I served these burgers pretty plain. On simple wheat burger buns, with sweet orange tomatoes from our garden and a smear of Earth Balance Mindful Mayo. I know it sounds so simple, but sometimes simple is all you’re looking for, sometimes simple is what you need.

I’m looking forward to trying more recipes out of Chloe’s Kitchen in the future.

PS: Please excuse the bad lighting I took these pictures close to Midnight and you know how my kitchen lighting is. Also excuse the poor presentation, I wasn’t about to make a side dish just for aesthetics.


Thursday, May 31, 2012

Roasted Chili Lime and Indian Spiced Chickpeas...


Garbanzo Beans or Chickpeas as they’re also called are my hands down favorite bean ever! Well, I love other beans of course, and If I had to pick I’d say black beans, lima beans and edamame are right up there with chickpeas but chickpeas were the first bean I fell in love with so they’d always hold a special place in my heart.

I truly love them in anything. Soup, chili, stew, salad, sauteed with greens and other veggies. In rice, cous cous, or farro dishes, obviously as hummus. I love them in traditional Indian, Middle Eastern and Hispanic dishes, I just love, love, love them. They are probably the bean I buy and eat most frequently but sometimes - if you’re like me - you don’t want to go through the whole rigamarole of making something just to enjoy the one ingredient you love. Am I right? Now, I am no stranger to eating chickpeas right out of the can, I do it often, and it’s delicious, but some days you jsut need a little more than that, but you want something less than a meal. Well roasted snack chickpeas are just the thing!

Roasted Indian Spiced Chickpeas


Now roasting chickpeas isn’t exactly a new idea, so I can’t take credit for it. I’d seen mention of it before in magazine’s and online articles that connected to ‘healthy snacking’ though always intrigued by the idea I’d never actually thought to do it until last week. By then the recipes I’d previously seen were distant memories but roasting chickpeas seemed an easy enough task. All I needed to do was decide what flavorings I wanted to use. In the end I decided to go with a Mexican inspired flavor, and an Indian inspired flavor. Since they are two of my favorite types of cuisine and both traditionally use chickpeas it seemed a no-brainer.

Chili Lime Roasted Chickpeas


I was so impressed with the finished result. Not only do these things cook up fast, but they’re delicious! Absolutely-freaking delicious. They’re a truly healthy snack, and hearty too. The perfect thing to munch on pre-dinner when you usually reach for the sweets. They’re great served hot out of the oven or at room temperature, and truth be told they’re not half bad cold either. Bring a batch to your next BBQ or pot-luck and stick them on the snack table beside the chips, dips, pretzels, and party mix. They’ll be a sure fire hit.


Roasted Chickpeas 2 ways
(Cooking Instructions are the same for both)

Chili Lime Roast Chickpeas

1 15oz can Chickpeas
1 ½ Tbsp Lime Juice
½ Tbsp Agave Nectar
3/4 tsp Chili Powder
3/4 tsp Ground Cumin
Sea Salt

Indian Spiced Roast Chickpeas

1 15oz Can Chickpeas
1 Tbsp Lemon Juice
½ Tbsp Agave
½ Tbsp Olive Oil
3/4 tsp Curry Powder
3/4 tsp Gram Masala
1/4 tsp Ground Coriander
1/4 tsp Ground Cumin
Sea Salt

- Preheat oven to 400'F

- Drain and Rinse Chickpeas, then pat dry. Try to get them as dry as possible, before transferring them to a bowl.

- In a separate small bowl whisk together all flavor ingredients, both liquids and spices.

- Pour over the chickpeas and stir until thoroughly combined.

- Spread chickpeas in a single layer over a parchment lined baking sheet. Bake for 10-15 minutes then stir and bake another 10-15 minutes until chickpeas are brown and crispy.

- Remove from oven and transfer to a serving bowl, serve hot or refrigerate in an airtight container for later.

*** Note - For an Oil-Free version of the Indian Spiced Chickpeas Omit Olive Oil and use Lemon Juice or Tamarind Paste instead.***

PS: This probably goes without saying but if you decide to make both flavors at once do not put them on the same baking sheet. Use two different sheets!