Showing posts with label Dill. Show all posts

Tuesday, August 12, 2014

Scrambled Pintos...


This morning I was feeling a ravenous hunger. I knew my typical breakfast of a bowl of fruit or a smoothie just wasn’t going to cut it, and besides I was really craving something savory. Tofu scramble was sounding really good to me, the only problem was that I didn’t have any tofu. I briefly considered making a tempeh scramble until I realized I was all out of tempeh too! I flipped through my wealth of cook books in desperate search of another breakfast option but everything I saw was sweet, or bready and I didn’t want that. Then I remembered Isa Chandra Moskowitz’s Mad-Genius invention of Chickpea Scramble from her latest book “Isa Does It” and I knew that was what I wanted.


I went eagerly to the kitchen, opened up the pantry and would you believe I didn’t have a single can of chickpeas. The girl who loves chickpeas, who eats them all the time, had somehow unknowingly ran out! Now I was beginning to get frustrated. I took a look around the kitchen and saw a few things I had a lot of were potatoes, spinach, and onions, but how to make a breakfast out of that. I took another look in the pantry, took inventory of the beans I did have, and thought to myself “Hey, if a scramble can work with chickpeas, why not another bean?” and that, is how the Pinto Scramble was born.


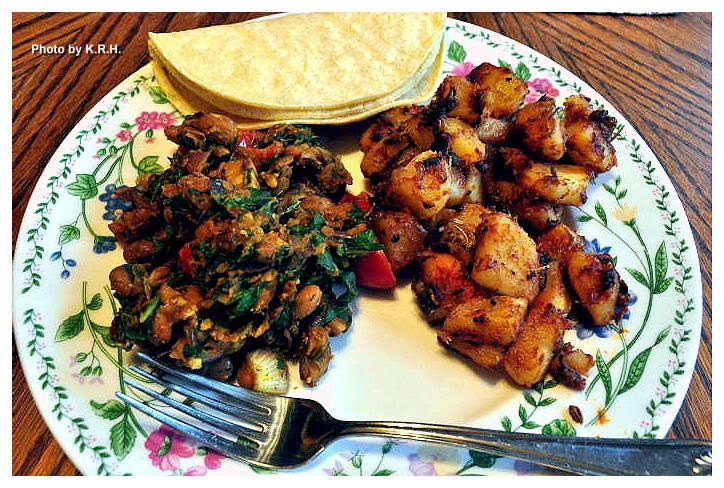
Man, this exceeded all expectations, and even my husband - who’s a notorious bean-hater, but getting better on that front - loved it. Now I want to try making different kinds of scrambles with all sorts of beans to see what kind of awesome combinations I can come up with. In the meantime I hope you try this one out, it’s super delicious, healthy, hearty and comes together in a flash. Serve it however you like - on a piece of lightly buttered toast with some fresh sliced tomatoes, on it’s own, or as I did with some fried potatoes, corn tortillas and extra hot sauce!


Scrambled Pintos 

1 Tbsp Olive Oil
4 Garlic Cloves Minced
½ Red Onion Minced
1 15 oz Can Pinto Beans rinsed and drained
½ tsp Chili Powder
½ tsp Ground Cumin
½ tsp Ground Turmeric
½ tsp Sea Salt
Black Pepper to taste
1-2 tsp Hot Sauce (or to taste)
1-2 Tbsp Fresh Dill Minced
8 Cherry Tomatoes Halved
1 Large Handful Baby Spinach Chopped

- Heat the olive oil in a pan over medium heat.

- Add the garlic, and onion and saute for 5-6 minutes until softened.

- Add in the pinto beans, chili powder, cumin, turmeric, salt, pepper, and hot sauce. Mix to combine and saute for 3 minutes until the beans are warmed through.

- Using a potato masher mash the beans right in the pan, so that they turn into a thick chunky paste. You do not need to get all the beans, leave some whole. Mash about two-thirds of the mixture.

- Add in the dill, tomatoes and spinach and saute for about 2 minutes or until the spinach has wilted.

- Taste for seasonings and add additional hot sauce if desired.

*** Note - If you want a more 'Mexican' feel you can omit the dill and add in an equal amount of minced cilantro instead. Though I quite like the unique flavor that dill brings to the overall dish.*** 

Wednesday, April 11, 2012

Mediterranean Scramble...


My husband and I are suckers for a good tofu scramble. I think in the beginning we were both a little bit skeptical but we quickly came to the realization that tofu scrambles are the way to go. They look like scrambled eggs and taste a million times better, plus they’re so versatile. You can literally add anything in that you like.


I generally only make scrambles for special occasions, - I don’t know why since they’re so darn good! - and typically I only make one of two versions that have become my go too scramble recipes. One is just a basic garden scramble that I came up with. The other is a slightly sweeter tad spicier scramble that includes vegan chorizo, sort of meant to be like a Mexican Eggs and Chorizo sort of thing. Both are wonderful - I’ll have to post the recipes some time. - However when my husband requested a scramble for Easter breakfast, rather then the quiche I’d originally planned I decided to stick with the Mediterranean theme we’d set for dinner.


When I started out I just had a vague idea of what I wanted. Sausage and peppers to start, seasoned with Greek spices, but beyond that I didn’t really have a clue as to what I was going to do. So I picked through my cabinets, sorted through my fridge and pilfered my brain of every tiny bit of it’s culinary knowledge and Greek inspiration. What I ended up with was so utterly mind blowing that neither my husband nor I could resist the urge to utterly gorge ourselves silly. Everything about this scramble is perfect! The flavors are subtle and play off each other beautifully, the aroma is heavenly, and the entire dish transports you to a new level of culinary bliss. It must also be said that long ago my husband happened upon the realization that if you add a bit of ketchup to a tofu scramble it makes it taste all the more like eggs. Both of us know people who actually eat ketchup on real chicken’s eggs and both of us have always found this utterly sickening. However, ketchup on a scramble makes total sense and over time I’ve picked up this habit as well. Although, this is one scramble that definitely doesn’t need it. I gobbled my plate up as was, without making any alterations. If you like Mediterranean flair, and both Greek and Italian spices I strongly suggest you give this scramble a try, you won’t be sorry!


Mediterranean Scramble

2 Tbsp Olive Oil
1 lb Firm Tofu (Pressed and Drained)
1 lb Vegan Italian Style Sausage (I used Field Roast)
1 C chopped Mixed Peppers (I Used Red and Orange)
1 Small Yellow Onion Diced
10 Cloves Garlic Minced
10 Sun-dried tomatoes chopped
2 Large handfuls Baby Spinach
10-15 Kalamata Olives Halved
½-3/4 tsp ground Fenugreek ***
½ tsp ground Fennel ***
1 tsp ground Cumin
1 ½ tsp ground Thyme
1-2 tsp Dried Oregano
1/4-1/2 tsp Dried Crushed Rosemary
1/8 Ground Turmeric
Dash of Dried Dill
Dash of Smoked Paprika
Sea Salt and Black Pepper to taste
1/8-1/4 C Nutritional Yeast
Water as needed

- Put tofu in a tofu press - or wrap in a towel and place between two heavy objects - and press for about 2 hours.

- Heat 1 tbsp of oil in a pan over medium-high heat. Slice Italian sausages into thin rounds and fry in the oil until nicely browned on both sides. Roughly 5-10 minutes. You can add a bit more oil or water if needed. Once browned, remove to a plate and set aside.

- Heat remaining tbsp of oil in the same pan. - No need to clean it out. - Add garlic, onion, and peppers and saute over medium heat for 5-8 minutes until flagrant, and onions are translucent and peppers are soft.

- Drain tofu and crumble into the pan. Alternately if you want large pieces you can cube it using a knife rather then just crumble it.

- Add in all your spices. The fenugreek, fennel, cumin, thyme, oregano, rosemary, turmeric, dill, smoked paprika, sea salt, pepper, and nutritional yeast. Adjust for personal taste preferences and color and stir until everything is well combines and tofu has taken on a yellow color. If the pan seems dry you can add in a bit more oil or water to de-glaze and moisten it, as needed.

- Add in the cooked Italian Sausage, Spinach and sun-dried tomatoes. Stir to combine and saute over medium for 2-4 minutes until tofu and sausage are well heated through and spinach has wilted. Add in the kalamata olives, saute another minute then taste for flavor, adjust as needed and serve.


*** Note - Both Fenugreek and Fennel may only be sold in seed form. If this Is the case no worries, just grind the seeds yourself in a spice or coffee grinder. It works perfectly. I actually have a coffee grinder for just this purpose. Also fenugreek may not be in everyone’s average grocery store depending on where you live. However grocery retailers such as Whole Foods, as well as specialty and spice shops, typically carry it. You could also check out your nearest Mediterranean, Indian, Turkish, Middle Eastern, or even Chinese Grocery as Fenugreek is used in all of these cuisines. Trust me when I say it’s worth your looking for!***


*** Note - Can be made Gluten-Free by using a GF Vegan Sausage*** 

Tuesday, April 3, 2012

Simple Asparagus Tip and Cucumber Salad...


Remember my ‘Sesame Asparagus Maki’ recipe from way back in January? Well, I love asparagus, and I love asparagus sushi, if you’re anything like me, you do too. Which means you probably have a whole bag of asparagus tips sitting in your fridge that you either don’t know what to do with or keep forgetting about. Have no fear because I have the perfect solution for all those delicious tips! They can easily be converted into a tasty salad that takes absolutely no time at all to whip together. Free too of fussy ingredients and subtly seasoned with ingredients the majority of us already have on hand.


This simple salad truly screams spring to me. It’s full of spring flavor and freshness, and is the perfect accompaniment to any spring or summer inspired meal. It’s also great on it’s own for a light lunch, an appetizer or alongside a nice bowl of chilled or warmed soup. Best of all it’s a fantastic way to clear your fridge of leftover asparagus tips, half used onions and those fresh herbs you picked up from the market or plucked from your own garden. Try it out and see what I mean, you’ll be amazed at how something so seemingly simple can taste so divine and really hit the spot on a warm spring evening.


Simple Asparagus Tip and Cucumber Salad

2 Large Cucumbers
Asparagus tips from a 1 ½-2 lb bunch of Asparagus
1/4-1/2 Red Onion diced small (to taste)
Small handful fresh Basil minced (to taste)
Small handful fresh Dill minced (to taste)
3 Tbsp Olive Oil
2 Tbsp Lemon Juice
1 tsp Maple Syrup
White Pepper, Black Pepper, and Sea Salt to taste
Pinch of Dried Crushed Rosemary (you can use fresh if you have it)

- Fill a pot fitted with a steamer basket with an inch or so of water. Add your asparagus tips and steam for five to ten minutes until tips are tender-crisp and bright green.

- While tips are steaming peel your cucumbers. Slice them lengthwise in half then remove the seeds. Slice each half into thin half moon shapes.

- Add the sliced cucumber and the diced red onion to a large bowl add the minced basil and minced dill. Add the asparagus tips when they’re ready.

- In a small bowl whisk together the olive oil, lemon juice, maple syrup, Rosemary, pepper and salt. Taste for seasoning and adjust as needed. Pour over salad and serve either at room temperature or chilled. Personally I prefer It when the asparagus is still a bit warm.

Thursday, February 23, 2012

Coconut ‘Shrimp’ Tacos with Fried Plantains and Collard Greens...


Ah - I’ve been trying to post for the past two days and was unable to due to some sort of technical difficulty that appears to now be sorted out. This is the recipe I’d planned to post Tuesday, and since I haven’t been able to post in a couple I’ve got a nice backlog of posts waiting to be published. So stay tuned for all the delicious treats I have in store!


As winter is slowly coming to it’s end for another year I find I too am gradually moving away from the cozy, comforting meals associated with the colder months. It seems to always happen this way, about a month or so before the true end to a season my body is already geared up to enter the next phase. While I’m still enjoying soups, and other wintery treats, for the most part my heart and tastebuds are set on spring and summer.


Now before I was a vegetarian, shrimp was always a food I associated with spring, and especially summer. Coconut shrimp in particular, and over the course of the weekend I found myself longing for that sweet, crisp, coconut flavor. Of course I had no desire to eat actual shrimp, and no intention of doing so, but I wanted to find a way to recreate that flavor and texture, and I wanted to enjoy it wrapped in a summery Caribbean inspired kind of taco.


I have to say that despite some of my reservations while cooking, this dish turned out phenomenally and totally satisfied that tropical flair I was craving. Of course these little tempeh bites taste nothing like what I remember of shrimp but that’s not the point, the point is the fried coconut! Combined with the plantains, the collards, the coconut milk drizzle and the mango salsa this dish was heaven on a plate!


Now to put this whole thing together it does require a bit of work. There are several steps you have to go through to make the different taco components but it is so worth it, and if you prepare ahead of time it actually doesn’t take that long. So give it a go, really in the grand scheme of things it’s not a lot to ask for some good homemade coconut ‘shrimp’ tacos! Enjoy, and stay tuned for the salsa recipe which I plan on posting tomorrow.


Coconut ‘Shrimp’ Tacos with Fried Plantains and Collard Greens

Coconut ‘Shrimp’

1 lb Tempeh cut in cubes
1 15 oz can coconut milk
½ tsp garlic powder
½ tsp dried dill
1 tsp hot sauce
1 tsp kelp granules
½ C Panko Breadcrumbs (or gluten-free breadcrumbs if you're GF)
3/4 C Coconut Flakes (I used unsweetened)
1 tsp Cajun Seasoning Blend (or to taste)

Taco Fixin’s

1 Bunch Collard Greens chopped in bite sized pieces.
Whole Wheat or Corn Tortillas
1 Recipe Sweet Shredded Fried Plantains (Recipe Follows)
Roasted Vegetable Mango Salsa (Recipe to come)
Diced Avocado
Diced Green Onion
Coconut Milk Drizzle (Optional)

Sweet Shredded Fried Plantains

3 Plantains
2 Tbsp Coconut Oil
½ tsp Cinnamon
½ tsp Cajun spice blend
1 tbsp Brown Sugar
Water if needed

- First prepare your tempeh. If you’re working with two 8oz blocks of tempeh as I was cut each block horizontally into 6-8 slices. Then slice vertically in half or in thirds depending on how big you want your cubes. Place tempeh into an airtight container when cubed.

- Mix together the coconut milk, garlic powder, dill, kelp, and hot sauce. Pour over the tempeh. Close the container give it a good shake until all the tempeh is covered and then place in the fridge and let marinate for 1-2 hours.

- After the tempeh has marinated mix breadcrumbs, coconut flakes and Cajun seasoning in a shallow bowl. Grab a tempeh cube from the marinating dish give it a shake to remove any excess coconut milk then roll it in the breadcrumb mixture until it’s breaded on all sides. Set aside and repeat until all cubes have been breaded. Reserve the marinade mixture if you want to make a coconut drizzle.

- Once all of your tempeh has been breaded you can cook it 1 of 2 ways. The first way being to fry them. If you have a deep fryer just pop them in there for a few minutes until they’re golden brown. Then remove them and drain on a plate lined with paper towels. If you don’t have a deep fryer you can fry them in about a ½ cup of coconut oil or nuteral vegetable oil in a large frying pan, until golden brown. If however you’re like me and like to try and keep on the healthier side of things you can bake your coconut tempeh in the oven.

- Preheat your oven to 400'F (200'C) lightly grease a baking sheet then place your tempeh cubes on it. Spray the top of each cube with a tiny bit of non-stick spray then place in the oven and bake for 15 minutes. Remove from the oven turn each cube over and return to the oven to cook for another 10-15 minutes. Make sure to keep an eye on them so they don’t burn. Smaller cubes will cook faster and larger cubes will take longer so times may vary.

- While your tempeh is cooking you can work on your plantains. Grab 3 large, green plantains. Cut off the ends and peel. I find the easiest way to be running the tip of a knife down two sides then just dig in with my nail and roll the peel off.

- Once the peel has been removed take a vegetable peeler and run it along the plantains like you would to peel a carrot. You’ll get nice long thin strips of plantain, continue until all plantains have been turned into strips. You’ll probably be left with a core of plantain that your peeler can’t turn into strips, and that’s okay just cut it into thin rounds and toss it in with the strips. Waste not want not right?

- Heat the coconut oil in a large frying pan over high heat. Once melted add the plantains and stir until all strips are coated. Add in the cinnamon, sugar and Cajun Seasoning. Stir again until thoroughly coated and then cook on medium heat until plantains are golden brown and soft. About 8-10 minutes. Make sure to stir frequently so no plantains stick to the bottom, and you may need to add more oil, or water. I added in about a 1/4 of water because I didn’t want to use more oil, and it worked brilliantly. When plantains are finished remove them from the heat and if you like you can drain them on a paper towel. I personally didn’t bother draining them.

- To make your collards just add an inch of water into a pot fitted with a steamer basket. Add your chopped up collards and steam for 3-5 minutes until they’re bright green and wilted. They shouldn’t be mushy but soft, with still a bit of texture. Remove them immediately from the steamer basket and place onto a plate or in a bowl.

- To make the coconut drizzle all you have to do is stir 1-2 packets of stevia into the reserved coconut marinade along with 1-2 tbsp flaked coconut. Set aside, until ready to use.

- To assemble your taco place one tortilla on a plate. Layer on some collard greens and then a generous spoonful of shredded plantains. Top with 4-5 cubes of coconut tempeh, and a bit of coconut milk drizzle. Top with diced green onion, avocado, and a generous spoonful or two of roasted vegetable mango salsa. Wrap up tight and enjoy!


*** Note - This dish can be made Gluten-Free if using Corn Tortilla's and GF Breadcrumbs***

Thursday, February 16, 2012

Valentine’s Day Rotini with Roasted Beets, Spinach, Red Onion and Sun-Dried Tomatoes...


As promised my Valentine’s Day Rotini recipe. As I mentioned yesterday this came about after a lot of stress, searching and frustration. I wanted to make a dish that was both simple yet elegant. I wanted to make a dish that embodied the spirit of love and romance associated with Valentine’s Day, and I wanted to utilize the beets I had sitting in my crisper drawer. Unfortunately despite all my frantic searching I couldn’t find any creative or inspiring beet recipes, or V-day recipes in general - well not ones that fit my criteria anyway.


Everything was strawberry dessert this, chocolate raspberry dessert that. Pages upon pages of recipes for roasted beets and borscht served as a side dish or afterthought rather then a show stopping main, assaulted me as I scanned the internet. Not to mention virtually every "Valentine’s Day" recipe I came across seemed utterly lacking in romance. I’m sorry but Seitan Parmesan doesn’t scream love to me, it just doesn’t. Spaghetti and marinara isn’t romantic it’s economical! Not to bash these dishes, which are delicious if it’s what you’re in the mood for, but come on! Valentine’s only comes once a year, and even though it’s a stilly, bull-shit, Hallmark holiday, that doesn’t mean you and your loved ones can’t make it your own and make it something special. That’s what I do. In honesty there isn’t a single holiday - Thanksgiving, Christmas, Easter, St. Patrick’s Day, Victoria Day, Canada Day, Hanukkah, Halloween, Labor Day etc.... - that hold any real deep sentimental or significant meaning for me. Not culturally, not religiously. I love holidays, but not because society tells me I should, and not because someone somewhere hundreds or thousands of years ago supposedly did something significant. I love them because they give you an excuse to really go all out and do something extra special. Sometimes I do this anyway, but it’s always nice to have a ‘special occasion’ to back it up with. Holidays whether big or small are a great time to spend with the ones you love, and to shower them with a little extra love. You don’t have to buy the hype, but you don’t have to be a miserable old cynic either. So it’s that desire that was driving me to want to do something lovely for my beloved.


Though pasta doesn’t normally scream romance to me, I figured since I finally settled on an Italian appetizer I may as well make an Italian inspired main dish to go along with it. After all it would be pretty silly if I made caponata to start and say a red coconut curry to follow, or a red lentil dahl. It made the most sense to stay within one culinary tradition, so pasta it was. The beauty of pasta - besides the economical factor - is that it really is versatile. It’s like a good pair of jeans you can dress them down with a t-shirt or dress them up with a blouse. With pasta you can ‘dress it down’ with marinara or olive oil, or make it fancy with just a little thought and effort. With this dish I tried to stay within the color tradition of Valentine’s day by trying to use pink, purple and red foods but I threw a little spinach in, both for a colorful pop and a bit of added nutrition. This dish worked out so well, and it far exceeded my expectations. My guests were just as impressed as myself, and everyone went back for seconds which I consider to be the highest compliment.

However the thing I love most about this dish, - which was entirely unintentional - the thing that really tickles me about it and puts a little smile on my face is that the beets turned the pasta a lovely shade of pink! How perfect is that for Valentine’s Day? Perhaps Aphrodite the dear goddess of love was smiling down on my kitchen on Tuesday.


Valentine’s Day Rotini with Roasted Beets, Spinach, Red Onion and Sun-Dried Tomatoes

Roast Beets

3 Beets peeled and cubed
2 Tbsp Olive Oil
2 Tbsp Balsamic Vinegar
½ tsp Crushed Rosemary
½ tsp Dried Dill
1 tsp Dried Basil
Sea Salt and Black Pepper to Taste
1 Packet Stevia (Optional)

Pasta

2 lb Whole Wheat Rotini (or Gluten-Free)
2 Bunches Spinach, trimmed, washed and patted dry
1 Large Red Onion sliced in half moons
10-12 Garlic Cloves minced
10 Oil-Packed Sun-dried Tomatoes chopped or sliced
1/4 C Olive Oil
1/4 C Vegetable Broth
2 Tbsp Tomato Paste
3-4 Tbsp Balsamic Vinegar
1-2 Packets Stevia (Optional)
Sea Salt and Black Pepper to taste
Garlic Powder to taste (Optional if you want an extra garlicky kick)

- Preheat oven to 400'F (200'C) To make the beets peel and cube them into roughly ½ inch cubes. Place in a baking dish. Combine oil, vinegar, stevia and spices in a bowl and stir until well combined. Pour over beets and toss to coat. Cover with aluminum foil and place in the oven and roast for 45-60 minutes until beets are nice and tender and most of the liquid has absorbed.

- Cook pasta according to package directions. Drain when finished and then return to pot and cover until ready to use.

- Heat a tsp of olive oil in a large pan over medium heat and add the sliced onion and minced garlic. Saute for 5-7 minutes until fragrant and onion becomes translucent. Add sun-dried tomatoes and stir to combine. Saute another 3-4 minutes.

- Add the spinach to the pan, cover and let steam a couple of minutes. Remove the lid then gently stir to combine the spinach. Careful so that nothing topples over the rim of the pan continue to stir the spinach into the onion-garlic-tomato mixture until the spinach has wilted and cooked down. Be careful not to overcook it though. You don’t want spinach mush! Add the roasted beets which should be down at this point, with any pan juices and stir until just incorporated.

- Next, in a bowl combine the 1/4 C Olive oil with the 1/4 Vegetable broth, tomato paste, vinegar, salt and pepper and garlic powder and stevia if using. Whisk together until well blended.

- Carefully add the sauteed vegetables into the pot with your reserved pasta, and pour in half of the sauce mixture. Stir until thoroughly combined. If the pasta looks a little dry add the remainder of the sauce and stir until well combined. Taste and adjust seasoning as needed.


*** Note - You can make the beets hours in advance if you like then just cover and refrigerate them until ready to use. This makes throwing dinner together later a lot quicker. Also as far as the sauce goes I only ended up using maybe ½-3/4 of it because I didn’t want the pasta to be overly saucy. However everyone’s tastes are different so feel free to use as much or as little as you like. Also it must be said that this dish was developed to feed about 5 people. If you don’t need to feed that many people feel free to decrease the ingredients by half or however best suits your family.***

*** Note - Gluten-Free if using GF Rotini***

Thursday, December 1, 2011

Mashed Red Skinned Potatoes with Fresh Dill and Sour Cream...


With the holiday season comes business, and with business inevitably comes exhaustion, which unfortunately is exactly what I’ve been experiencing since Thanksgiving. As much as I hate being absent from the blog, especially when I have so many things I’m dying to share with you, health and sanity always come first, and so this past week I’ve been relaxing and taking it easy when I’ve been at home. I haven’t really even been all that creative in the kitchen. Cooking more from cookbooks then my own imagination and even slacking on that front by forgetting to have my camera handy at meal times. I’m hoping that now after my period of rest things can finally get back on track and I wanted to start things off with sharing a dish I made a couple of weeks ago.

Have you ever found yourself craving a food you haven’t eaten or even thought about in years? Well that’s exactly what happened to me a couple of weeks ago. I was sitting at home plainly minding my own business when all of a sudden I got a craving for mashed potatoes. Not just your ordinary garden variety mashed potatoes mind you but a very specific sort, of which I hadn’t had since I was a child. Let the back story begin!


In the summer of 96 I went with my Oma to Minneapolis to visit my aunt who was living there at the time. We did a lot of fun stuff while we were there but a lot of it has escaped me now since I was so young and the trip was so long ago. One thing however that I guess has always stuck with me is a particular side dish that my aunt’s husband made with dinner one night. He is by all accounts quite proficient in the kitchen and I remember being particularly blown away by his ‘upscale’ version of mashed potatoes. I don’t know where he got the recipe, I can’t recall detail for detail everything that went into it, and though I know now that it isn’t unheard of to do this kind of thing with mashed potatoes, at the time it was new, exciting and amazing to me. I think up until that point I’d always considered mashed potatoes to strictly be a winter food, suitable only when served alongside a roast or turkey, and certainly never without a generous helping of thick brown pan gravy.

But this take on mashed potatoes opened my young eyes to a world of possibilities, and even though I haven’t thought about that dish, or that moment for years it must have stuck with me. For two weeks ago I found myself salivating at the very idea of trying to re-create it. Who knows why these unconnected little moments stick with us, or why they float to the surface unannounced and unbidden years later. One thing I do know however is that they often provide some much needed creative stimulation.

Now I have no idea what actually went into my aunt’s husbands original recipe, all I recall are a few flavor notes. Garlic, dill and sour cream. So from there I worked with the memory of my tastebuds and did my best to recreate a flavor from the past. I have to say I did a pretty damn good job of recreating the flavor I remember, though whether this recipe bares any resemblance to the one that inspired it I couldn’t say. Likely it doesn’t, but it is extremely satisfying and delicious. Even my husband gobbled it up with unbridled zeal, a surprise indeed considering he doesn’t like sour cream in the least, non-dairy or otherwise.

Though as good as these mashed potatoes are, before you dare to embark on making them - and I do dare you - I believe a word of warning is in order. These mashed potatoes most definitely fall under the category of ‘comfort food’ not ‘health food’ but trust me when I say they are so worth it!


Mashed Red Skinned Potatoes with Fresh Dill and Sour Cream

2 lb Red Skinned Potatoes, peel left on and quartered
1/4 Unsweetened Almond Milk
½-1 C Non-dairy Sour Cream (or to taste) (I used Wayfare which is Dairy-Free, Soy-free, Gluten-Free and Non-GMO)
2 Tbsp Earth Balance
1 Large bunch Dill finely minced (or to taste)
4-8 Cloves Garlic, crushed, minced or pressed (to taste, or garlic powder to taste)
1 tsp Olive Oil
Salt and Black Pepper to taste
Dash Onion Powder to taste
1/4-1/2C Diced Green Onion for Garnish (or to taste)

- Since you are leaving the skin on these potatoes you must wash them very well, and scrub every nook of possible dirt. Once washed quarter them and place them in a pot of salted boiling water.

- While potatoes are boiling saute garlic over medium-high heat in 1 tsp of olive oil until fragrant and golden. About 5-8 minutes.

- When potatoes are fork tender, drain and return to pot. Add the sauteed garlic, Earth Balance, Almond milk and 1/2C of non-dairy sour cream. Using a handheld blender whip potatoes until they are broken down and creamy. Because of the skin they will not be entirely smooth, there will be lumps but that’s what you want!

- Taste and add salt, pepper, and a dash of onion powder to taste. If not garlicky enough for your taste add a few dashes of garlic powder as well. If not creamy enough or not sour creamy enough add in more sour cream 1/4 C at a time until you reach desired taste and consistency. Blend again until all spices have been combined.

- Add minced dill and blend until incorporated. Taste and adjust seasoning as needed.

- When ready to serve garnish with the chopped green onions and enjoy!

PS: I think the raw chopped green onions give the potatoes a really nice texture and flavor, so if you’re like me feel free to use more.

PPS: Apologies for the poor lighting. My kitchen is a bit dark, gloomy and slightly ‘golden’ once the sun goes down. I do try my best but sometimes even that is no match for bad lighting.

Thursday, November 3, 2011

Creamy Garlicky Artichoke Leek Dip...


One of my favorite ways to eat Artichokes is in a dip. I used to love me a spinach artichoke dip before I went vegan, so creamy, garlicky, sweet and tart. Artichoke dip is great to spread on crackers, bread, veggie sticks or to use on a sandwich as a spread. Amazing! Yet as much as I love it, I haven’t eaten an artichoke dip since going vegan. Honestly most of the recipes I’ve come across just don’t sound very appetizing. Virtually all of them use tofu as a base, or some kind of non-dairy sour cream, non-dairy mayo, or non-dairy cream cheese substitute. Personally I prefer my dips and sauces sans tofu, and products like non-dairy sour cream, non-dairy mayo, and non-dairy cream cheese are not things I always have on hand.

So when I found myself, just before Thanksgiving last month, jonesing for artichoke dip I had to get creative. I thought of all the ways I could make a creamy base, and then remembered that cashews could be used just as effectively as tofu, and in my opinion with a much better taste. Excited I ran to my kitchen and set to work. Since I had no spinach on hand I couldn’t make a spinach artichoke dip. I did however have one nice leek begging to be used, and since I love leeks I thought it would be the perfect opportunity to test how well they mingled with artichoke. The result was so much better then I was expecting it to be, so creamy and garlicky with a good artichoke flavor, a mild onion taste and a nice dash of dill. My omni-friends whom I had over to dinner that night loved it too, and by the end of the night there was hardly any left.


Creamy Garlicky Artichoke Leek Dip

Dip Base

1 C Raw Cashews
½ C water
1-2 Tbsp lemon juice
A pinch of Sea salt and Black Pepper

½ tbsp olive oil
10-16 oz jarred artichoke hearts (Depending on how strong you want the artichoke flavor)
1 medium sized leek
6-10 cloves garlic (or to taste)
½-1 tsp Smoked Paprika (or to taste)
Sea Salt and Black pepper to taste
1 ½ tbsp Pear Vinegar
1/4-1/2 tsp White pepper (or to taste)
Handful of dill
Handful of parsley
Pinch of garlic powder (if needed. To taste)

- To make your dip base, blend cashews, water, lemon juice, sea salt and pepper in vitamix or high-speed blender for 30-60 seconds until very smooth, and creamy.

- Heat a few drops of olive oil in a nonstick pan over medium-high heat then add whole garlic cloves. Stirring frequently to make sure the garlic cloves don’t burn, saute until the cloves become lightly browned. About 5-7 minutes. Remove pan from heat, and scrape garlic cloves into a Food Processor or blender.

- Trim the tough green ends off of the leek. About a quarter to a third and discard. Slice leek in half lengthwise and place in a colander under running water. Use your fingers to separate each layer and rub away any dirt or grit. Pat dry with a towel then slice width-wise. Slices do not need to be uniform.

- Return your pan to medium heat, and add the half tbsp of olive oil. When heated add your sliced leek. Saute over medium heat until leek has softened and become fragrant, 7-10 minutes. Add the leek to your garlic in the food processor.

- Add all remaining ingredients. Artichokes, vinegar, dill, parsley, spices and your cashew base. Pulse until well combined and most of the artichokes and garlic cloves have been broken down into small bits. You can pulse this dip until it’s completely smooth but I prefer a coarser artichoke dip with nice bits of artichoke in it.

- Taste and adjust seasoning as needed. If not garlicky enough for your liking you can add a pinch or two of garlic powder rather then go through the process of browning more garlic cloves.


Serve with pita bread, flax crackers, and veggie sticks. Enjoy!!!

Monday, October 3, 2011

Vegan Mofo #6 - Isa & Terry’s Mediterranean-Style Cashew-Cucumber Dip...


Vegan Mofo #6 - Isa & Terry’s Mediterranean-Style Cashew-Cucumber Dip

The Book - Veganomicon
The Author - Isa Chandra Moskowitz & Terry Hope Romero
The Recipe - Mediterranean-Style Cashew-Cucumber Dip
Page # 66
Difficulty - Easy
Duration - 15 minutes total time

Posting this today I see a third unintentional theme emerging during my Vegan Mofo. "Foods I loved as an omnivore that I never thought I’d eat again as a Vegan." Tzatziki certainly fits the bill there.

I absolutely love Tzatziki! Honestly, just how much I love it could never accurately be described in words. It is the quintessential Greek food for me. Growing up I ate a lot of Greek food, sometimes homemade but usually take-out from a very good authentic Greek place near where I lived. I remember the square white carry-out containers my dad would bring home, the aromatic scent of lemon and garlic wafting out of them like steam. Inside, each box would contain a portion of Greek Salad, Chicken or Beef Souvlaki, Greek Rice Pilaf, sometimes dolmathes or Greek style potatoes, a lemon wedge, thick warm Pita bread, and of course a generous dollop of tzatziki. Though we always ordered extra tzatziki because however generous that dollop it was never enough to satisfy us - or at least me. The food was divine but it was the tzatziki I loved the most. It was the tzatziki I craved, and waited in eager anticipation for. It was always perfect, thick, creamy, garlicky, and lemony. It is and has always been my favorite part of Greek Cuisine. I smothered it on everything. The pita, the souvlaki, the rice, the dolmathes and the potatoes. If there was any left over after that I’d literally eat it straight from a spoon.

In Greek restaurants when we ordered pita and tzatziki as an appetizer every bite I took was more tzatziki then pita. I loaded up on it - much to everyone else's amusement. I literally couldn’t get enough, and I was quite the tzatziki connoisseur and critic. Though Vancouver and the greater Vancouver area plays home to many very good Greek restaurants, all serving very good tzatziki I definitely favored some over others. In fact to this day the best ‘conventional’ tzatziki I’ve ever eaten was at a small hole in the wall Greek place downtown, on Davie Street. Unfortunately I’ve since forgotten the name, and honestly have no idea whether or not it’s still there. When I moved to Chicago another North American city that boasts a relatively large Greek population I found the tzatziki to be a bit different, slightly more watery, but still pretty good.

The perfect tzatziki is thick, creamy with nice shreds of cucumber and minced mint or dill. It’s level of garlic should be overpowering but in a good way!


Yet strangely despite my love and passion for tzatziki it was the one Greek dish I always seemed incapable of making properly. Everything else in Greek Cuisine? No problem. Moussaka? No problem. Spanokopita? No problem. Baklava? No problem. Tzatziki? Huge freaking problem! How ironic that, that’s the one culinary skill my Greek Ancestors didn’t see fit to impart on me.

I have tried so many recipes over the years and failed miserably at every single one. Before I went vegan I’d made tzatziki so many times with so many differing ingredients from regular yogurt, to Greek yogurt to cultured yogurt to goats milk yogurt. Different levels of herbs and lemon varying degrees of garlic, and every experiment only left me in frustrated tears. It’s really impressive when you think about it, there is not one other dish on earth that has seen me fail so spectacularly so many times.

Then I went vegan, and I thought happily that things might change. I excitedly tried a handful of vegan tzatziki recipes all to the same glorious end. I failed, utterly and completely over and over again. At that point what’s a pour tzatziki loving Greek Vegan to do? Give up, that’s what. I decided to give up, and resigned myself to the certainty that I would never eat tzatziki again. It broke my heart of course but I found that as long as I didn’t think about it, as long as I pushed it to the furthest reaches of my mind I was okay.

Then I got hold of Isa and Terry’s brilliant "Veganomicon" Of course an initial read-through of the Contents revealed they had a vegan tzatziki, which I bitterly decided to ignore. No way could it be good, not after so many failures. I just wasn’t ready to try again. I’d given up hope of ever making a delicious vegan tzatziki and didn’t want to get my spirits up again if this recipe too proved to be a failure.

Then I decided to throw a party, and found myself in a mad scramble to find creative yet delicious appetizer recipes. Most people tend to make their tried and true recipes for parties, but not me. You see I cherish originality, I crave creativity and eating the same thing - tried and true or not - at every party is just well... boring. Making something new for the first time for a party is always a gamble but at this point in my life I’m very confident in my culinary ability and so far everything - with the exception of a disastrous Pineapple Upside-down cake, which I’ll write about later - turns out top notch.

Originally I wasn’t even interested in the tzatziki recipe, I was interested in another recipe on the opposite page. Then I caught a glance at the ingredients list and found myself intrigued. Nowhere was there a non-dairy yogurt sub listed. Also nowhere to be found was the traditional mint. Now, how silly I thought. How can you make tzatziki without yogurt and mint? In their place were raw cashews and dill. Who’d ever heard of such a thing, really! I thought it so silly I nearly laughed. Yet as absurd as it sounded I couldn’t stop myself from periodically flipping back to the recipe. My curiosity was definitely peaked, and we all know what happens next. Despite my many reservations I set about the task of making yet another tzatziki.

I went about preparing this tzatziki like a chemist working with potentially volatile compounds. Carefully following all instructions exactly. Carefully measuring out all ingredients exactly. Offering up a few whispered words to Buddha. When the tzatziki was finally finished I hesitantly poked my finger into my vitamix for a taste test. Quickly closed my eyes in anticipation of pain, like you would when getting a shot at the doctor, and literally could not believe my tastebuds. It was amazing! Phenomenal even, in need of slightly more garlic and dill but otherwise incredible! I quickly added in a little more garlic and dill to taste and tried it again. It was a miracle! Not only was it the best tzatziki I’d ever made, but it was easily one of - if not - the best tzatziki I’d ever eaten vegan or not. It’s as good if not better then my gold standard for tzatziki from that now nameless Greek restaurant in Vancouver’s downtown.


This tzatziki is so rich, so creamy and so garlicky. All of the things a good tzatziki should be. It might not have been prepared in a ‘traditional’ way with the ‘traditional’ ingredients and yet it tastes more ‘traditional’ then ‘traditional’ tzatziki. How that’s possible I have no idea. What I do know is that I’m super ecstatic that I no longer need to live a tzatzikiless life. I can now eat my favorite Greek food with pleasure anytime I desire.

And how did my omni friends and family feel about it you might ask? Several of whom are also at least in part Greek? They freaking loved it! Everyone praised it, everyone was amazed by it, everyone agreed that it was one of the best tzatziki’s they’d ever eaten. They had no idea that it was full of cashews and missing yogurt. They devoured it. Smothered it on pita bread, Naan bread and dunked raw veggies into it. They could hardly keep away from it and in fact several people just decided to plunk themselves down at the table in front of it to make eating easier.

If you love tzatziki as much as I do and haven’t tried this recipe yet, it is a must! Serve it with pita, naan, flatbread crackers or raw veggies. Spread it onto a vegan Donair or gyro, thin it and use as a salad dressing. Smother Seitan, Tempeh or Tofu kebabs in it, or pour it over Gardein ‘Beefless Tips’ dip a dolmathes in it or just eat it by the spoonful. Whatever you decide to serve it with I’m absolutely sure you won’t be disappointed.

PS: Do not be tempted to skip the step in which you are asked to squeeze all the water from the grated cucumber. This step is absolutely crucial even if it is a pain in the ass.

Sunday, July 24, 2011

Watercress, Tomato and Avocado Sandwich with Smokey Garlic Mayo


Since my unexpected success with my super simple dill mao I’ve been rather interested in concocting other interesting mayo flavors to pair with interesting yet easy sandwiches that can be thrown together for a quick bite to eat. This particular sandwich came about out of sheer necessity. I had an avocado and a bunch of watercress sitting in my fridge begging to be used. Even though I’m not too familiar with watercress (I actually only tried it for the first time this month! Wow, that’s a little embarrassing to admit actually.) I thought it’s peppery, parsley reminiscent bite would pair well with smooth and creamy avocado. Of course tomato and avocado are a match made by Hera, so that was a no-brainer. Developing the mayo however took a little brainpower but eventually I came to the realization that you can never go wrong with garlic and a bit of smokiness, especially where tomatoes and avocados are concerned, and I was right.

This sandwich was the perfect lunch, filling, cooling and refreshing in the face of this ridiculous heat wave we’ve been having. All the components paired beautifully together. The best part of course is that it’s super quick and easy to throw together, and you can pair it with some veggie chips, fresh fruit, fresh raw veggie sticks or my Sweet Cajun Plantains as I did here.


Watercress, Tomato and Avocado Sandwich with Smokey Garlic Mayo

1 handful watercress
4-5 slices tomato about 1 small-medium
4-6 slices avocado (or to taste, about half to one avocado)
2 slices whole wheat bread
pinch of white pepper
Smokey Garlic Mayo
1 ½ tbsp mayo (I used Earth Balance Mindful Mayo)
1 heaping 1/4 tsp smoked paprika
dash of black pepper
½ tsp garlic powder

- Toast your bread till lightly golden.

- While bread is toasting you can slice your vegetables and make your mayo. To make mayo all you have to do is combine your favorite non-dairy may with the your spices in a bowl, and mix until smooth and everything has been incorporated.

- The best way that I’ve found to slice and peel an avocado. Is to just take a knife and cut down lengthwise all the way around the circumference of the avocado. Then twist and the two halves will come apart, then you can easily remove the peel and the pit, then slice the avocado into nice strips.

- When your bread, your veggies and your mayo are all ready, slather mayo onto one slice of bread, pile with tomatoes, a sprinkle of white pepper, watercress and then avocado. If you like you can slather your second slice of bread with the remaining mayo (I did, I also used the whole avocado, because I’m not the type to worry about such things) and press on top.

- Slice your sandwich in half, and enjoy with your favorite light summer side dish, and a glass of Iced Ginger Lime Green Tea, or Cranberry Lemonade.

Friday, July 22, 2011

Mighty Green Pasta with Garlic Scapes and Creamy Lemon Dill Sauce...


You’ll have to excuse the poor quality of the pictures, the lighting in my kitchen at anytime of day is not very good, not ‘photographer’ good anyway, and it’s particularly bad at night. On top of that, on the particular day that I made this recipe I was cooking for a guest, and because the hour was growing late I was in something of a hurry to take the photograph. Don’t let the poor photo quality deter you in any way from trying this dish though, trust me when I say it’s phenomenal. It far exceeded even my wildest expectations.

Now, a note about Garlic Scapes, they are a revelation! I can’t believe I’ve never eaten them before! Now, if you’re like me, and not very familiar with Garlic Scapes, it’s very simple. All they are is the green shoots that grow out of the garlic bulb. In order for the bulb to grow into maturity the scapes have to be removed. Usually they were just tossed away into the garbage or compost, but it seems that some ingenious person decided, "Hey, why don’t I cook them?" and that set the foodie world on fire, as garlic scapes are now quite the in and trendy thing to cook with. Garlic Scape pesto in particular seems to be the hot new dish making the rounds, but since I don’t care much for food fashion or food trends, and I generally approach the foodie elite with scorn and much eye rolling I chose to do something else with them.


Look at all those beautiful Scapes!

Originally I bought the scapes for a soup I planned to make using a recipe from "Super Natural Cooking" however as I didn’t have the recipe on hand I bought six bunches of scapes just to cover my bases. Turns out I only needed three for the soup, and so the other three I decided to stir-fry with various other green vegetables and toss with pasta. It was a wonderful combination, as the scapes have a texture similar to asparagus, and a flavor like mild garlic. Mixed with Lemon and Dill it was a winning combination.


Mighty Green Pasta with Garlic Scapes

1 lb Whole Wheat Spaghetti
2 Tbsp Earth Balance Coconut Butter or non-dairy butter or olive oil (optional)

3 Bunches Garlic scapes (Roughly 24 scapes)
1-2 heads Broccoli chopped into florets (or more to taste)
Roughly ½ lb Shaved Asparagus
½ Yellow Onion cut into half-moons
2-3 large handfuls baby Spinach
1 tsp olive oil

Creamy Lemon Dill Sauce

7 tbsp olive Oil
Half a large bunch of fresh Dill
5 tbsp Lemon Juice (or to taste)
1 tsp apple cider vinegar
2 tsp agave nectar
1-2 cloves garlic
4-5 sprigs fresh Oregano (or more to taste)
1/4 C Mellow White Miso
water to thin as needed
Black pepper and Sea Salt to taste

- Fill a pot with water and set in on the stove to boil. Once boiling cook pasta as directed by package.

- In the meantime trim all the flowers or buds from your garlic scapes. You really only want to use the firm part of the scapes, the bud and the thin wispy curl beyond it you can discard. Once trimmed, cut your scapes in 2-3 inch pieces.

- In a pan heat your tsp of olive oil, add your sliced onions and garlic scapes and cook for 5-10 minutes on medium until onions are translucent and scapes are soft.

- While onions and scapes are sauteeing in oil shave your asparagus. This is a very easy thing to do. All you need is a vegetable peeler. Peel thin strips off of your asparagus spears until you’re only left with the asparagus tops and some nubs. I recommend keeping the nubs and top pieces and tossing them in at this point to soften up a bit.

- Once onions and garlic scapes are softened add in your broccoli florets and saute for another 5-7 minutes until broccoli has softened and turned a bright green. You want to get the broccoli in that perfect stage of doneness. A little crisp but not overly crunchy, so keep an eye on it and keep testing.

- Once Broccoli is softened, reduce heat slightly and add in both the shaved asparagus and spinach. Stirring them both in until the spinach has wilted slightly. Remove from heat.

- By now your pasta should be done, drain it, and return it to the pot with 2 tbsp of Earth Balance Coconut Butter or your favorite non-dairy butter, or oil. (Optional of course) Stir to combine and add in your pan of mixed vegetables. Stirring again until combined.

- To make your sauce, add all of your ingredients into a food processor or high speed blender. (Food processor works great for this so a Vitamix isn’t necessary for those of you who don’t have one) pulse, or blend until sauce is creamy and smooth. Taste for flavor, tartness, and spices and adjust as needed. Then pour the sauce into your pot of pasta and veggies, stir well until all pasta and veg are coated and sauce is well combined. Then distribute amongst plates or bowls and enjoy, perhaps with a small side salad, or a slice of crusty garlic bread. Though it’s entirely suitable on it’s own as well.


*** Note- Garlic Scapes are apparently only available for a shot time each year, between June and July, so if you can’t find them you could always substitute with some additional chopped asparagus in addition to the shaved, some whole green onions, and a few garlic cloves. ***

P.S. Apologies to my good friend C.S, for I promised to post this recipe for you weeks ago and I never did. Better late then never though I suppose right? Peace/Love.

Wednesday, July 20, 2011

Grilled Vegetable Sandwich with Lemon Herb Sauce....


It sure is hot today, the heat advisory says it could reach anywhere from 105'F (40.5'C) to 110'F (43.3'C), right now it’s about 101'F (38.3'C). If it were to reach 110'F that would be record breaking for the Midwest! And yet there are still people out there who deny the existence of climate change, and the rise in extreme weather patterns. It boggles the mind! But that’s another post altogether, today I wanted to share a simple yet delicious recipe. Yesterday was slightly cooler with a high of 100'F (37.7'C) and the kind of balmy humidity that could suffocate a person. Heat I can do, but humidity kills me. Having grown up in a relatively temperate climate I just can’t get used to the stagnant, sizzling summers of the Midwest. During these extreme heat waves even though I live in a house where I’m privileged enough to have air-conditioning I just can’t justify using the stove top or the oven, not at least for very long. In this kind of blistering heat I don’t even want to eat cooked food most of the time, or if I do want to, I don’t want it to be piping hot. This is the kind of weather that brings a lot of fresh fruit to my plate, and a lot of salads, sandwiches, living foods, lightly steamed foods, and grilled foods.

Yesterday I found myself craving a grilled vegetable sandwich, and some potato salad, and so I whipped this sandwich up to go alongside the Spicy Blue Potato and Corn salad from Isa Chandra Moskowitz’s fantastic book "Appetite for Reduction" Seriously if you do not yet own this book, it is a must have, and if you ever see blue potatoes they too are a must have! Delicious, but the sandwich. At first I wasn’t sure, but after my husband and I messily devoured our overstuffed sandwiches, juice and sauce dripping down our arms I can happily and confidently declare this sandwich a roaring success! The Lemon Herb Sauce was pretty damn delicious as well!


Grilled Vegetable Sandwich with Lemon Herb Sauce

2 Red Peppers Sliced in half and seeded
1 Zucchini ends removed and cut in half width wise. Then each slice, sliced into four lengthwise pieces (You can peel them if you like, but if you’re using organic there is no need)
1 Medium sized Yellow Onion sliced into thick rings
6 Medium sized Cremini Mushrooms, rinsed, dried and stems removed
1 Tomato sliced
Lettuce (Iceberg, Romaine or whatever you have)
Pickles (optional)
2 Long Whole Wheat rolls

2 tbsp Olive oil
1 tbsp Balsamic Vinegar
1 tsp Oregano
½ ish tsp crushed Rosemary

1 Batch Lemon Herb Sauce (recipe follows)

- Place your prepared Peppers, Zucchini, and Mushrooms in a sealable container, and drizzle overtop the olive oil, vinegar, oregano and rosemary. Seal container and shake well for about 1 minute until all vegetables are coated. Then leave to rest and soak up the flavor for about 45 minutes to 1 hour. (During that time you can slice the rest of your ingredients, pre-heat your grill, slice your buns, set the table, and make the Lemon Herb Sauce.)

- Take your marinated vegetables along with your un-marinated onions out to your grill. Place your vegetables on the hot grill, peppers skin side down, the rest it doesn’t matter. Grill for about 5-7 minutes over medium heat, flipping once. You know the vegetables are done when you start to see those nice grill marks appearing. The onions and the peppers may take 2-3 minutes longer. Peppers are done when skins are black.

- Remove your vegetables from the grill, and place on a serving platter along with tomato and lettuce. Remove red peppers to a separate bowl and place in the freezer for a couple of minutes until they are cool enough to handle. Once able to handle them remove the charred blackened skins, then slice each pepper half in half again and place onto the serving plate.

- To assemble sandwich spread a layer of lemon herb sauce over one half of your bun, then layer on the red pepper, zucchini, onion, tomato, lettuce, and mushrooms. Drizzle with additional sauce if desired, or spread sauce over other side of bun. (If not using sauce feel free to use any combination of condiments from non-dairy mayo, to mustard, to bbq sauce. Or use the lemon herb sauce with a combination of those as well)

Enjoy, paired with a nice green salad, a potato salad, or some baked sweet potato fries or my sweet Cajun Plantains. The sandwiches are a bit messy I’ll admit, but they are sooo worth it. My husband and I were extremely blissful as we munched away.


Lemon Herb Sauce

1/4 cup packed dill
1/4 cup packed basil
juice of 2 lemons
2-3 tbsp white miso (to taste)
2-4 tbsp olive oil (to taste)
1-2 tsp agave (to taste)
water as needed (to dilute, to taste)
1-2 garlic cloves
sea salt and black pepper to taste

- Place lemon juice, 1 tbsp white miso, 1 tsp agave, garlic cloves, 2 tbsp olive oil, and fresh herbs in highspeed blender and blend on high until everything is well combined. Taste for seasoning, add black pepper and sea salt.

*** Note - The lemon flavor might be very strong at this point, which is why most of the seasonings are to taste. If you’re looking for a less tart flavor add in remaining olive oil, miso, agave, and a several tbsp of water to dilute and mellow out the sauce. Even with the additional ingredients you might think it a bit tart, but it really does pair beautifully with the grilled vegetables, so give it a try, I don’t think you’ll be disappointed.***

Monday, July 18, 2011

Toasted Tomato Cucumber Sandwich with Dill Mayo and Sweet Cajun Plantains


Today’s recipe(s) is super simple but also super delicious. It’s the perfect thing to whip up for a quick filling lunch or a light dinner. The best part is that it doesn’t have you slaving over a hot stove or grill in this agonizing heat. The sandwich is simple I know, using few ingredients, but it packs a flavorful punch. It’s very reminiscent of the toasted tomato mayo sandwiches I ate and loved during the summers of my childhood. Though grown this is still a meal I find myself craving at least a few times each summer season. Something about the texture, the toasted bread, the creamy mayo, and the cool refreshing tomato.... the sweet juicy taste of fresh vine-ripened tomato paired with black pepper... mmm... This version of course is slightly different then the Toasted tomato sandwich of my childhood, but no less delicious, more so in fact. Also back then my sandwich was usually paired with chips, fresh fruit or raw veggies. I highly recommend the fresh fruit and raw veggies but on this particular day I was feeling something slightly more decadent... sweet, fried plantains!

Revamped Toasted Tomato Cucumber Sandwich

2 Slices Whole Wheat Bread (lightly toasted)
4 Slices tomato
8 Thin slices cucumber
Fresh ground Black Pepper to taste (3-4 grinds of a pepper mill usually does the trick)
Pinch of White Pepper (Optional)
Dijon Mustard (Optional)
1 Batch Dill Mayo (Recipe Follows)

- Toast your bread till lightly golden. You don’t want it to be soft but you don’t want it to be super crunch either.

- Spread a thin layer of Dijon mustard over one slice if desired. Spread the Dill Mayo on the other slice of bread. Add cucumbers in an even layer over Dijon side of bread. Evenly layer over tomatoes, add your ground pepper and then place mayo slice of bread on top and cut in half if desired. Serve with fresh fruit, raw vegetables or Sweet Cajun Plantains (recipe Follows) like I did.

Dill Mayo

1 ½ Tbsp Vegan Mayo (My new Favorite is Earth Balance’s ‘Mindful Mayo’ original, SO GOOD!)
1-2 Tbsp fresh chopped Dill (or to taste) (I used 2 heaping tbsp)

- Place mayo and dill in a small bowl and whisk until well combined. May be a bit chunky depending on how much dill you use but that’s okay.


Fried Sweet Cajun Plantains

*** Note - Now normally I don’t eat fried foods, but every once and a while I don’t think it hurts to indulge a little, and in all honestly frying plantains is my all-time favorite way to eat them. If you prefer you can bake the plantains in the oven as you would any type of potato fries, but it will take a lot longer then the frying method, making this dish slightly less ‘quick’ so keep that in mind.***

2 Ripe Plantains (The yellow kind with black spots)
½ - 1 Tsp your favorite Cajun Seasoning (or to taste)
1 Tbsp Brown Sugar (or less if desired)

- To Peel plantains cut the a tiny bit off each end and use your knife to score down the side of the skin. Deep enough to get through the peel but not deep enough to cut into the flesh of the plantaine. Remove the peel carefully like you would a banana peel.

- Pre-heat your deep fryer. (If you don’t have a deep fryer you can fry your plantains in a pan on the stove using any kind of vegetable oil. Enough to cover the pan and the plantains. Set burner to medium-high heat) Slice each plantains into rounds on the diagonal. When deep fryer is ready, (or oil in pan is hot enough) add your plantains to the oil and fry for about 5 minutes, or until plantains are a light to medium golden brown.

- Remove plantains from oil and place in a paper towel. You want to remove some but not all of the oil otherwise the seasoning mix won’t stick as good.

- Place plantains in a container that has a fitted or locking lid. Add to the plantains the sugar and Cajun seasoning. Then close the lid and shake well for roughly a minute until all plantains are well coated with seasoning.

- Dump out onto a plate alongside your sandwich and enjoy!


PS: I thought since I was absent on both Saturday and Sunday it was only fair to give you more then one recipe today