Showing posts with label Peas. Show all posts
Monday, January 14, 2013
Indian Spiced Lentil Loaf...
Everyone loves a good lentil loaf right? At least it seems that way. I say that because out of the 100 + cook books that I own I would say at least three quarters of them contain a recipe for a vegan ‘meatloaf’ or some variation of the classic hippy lentil loaf. Now, I was never that big a fan of ‘meatloaf,’ because well... for starters meat shouldn’t come in a loaf, ans secondly when you really think about what it is you’re eating - a big ole slab of ground beef with ketchup and breadcrumbs - it doesn’t really sound that appetizing. Certainly it’s not a very creative dish. A good lentil loaf on the other hand can blow your mind, after all lentils are a really versatile food, and I never fail to be amazed at what they can be made into. Plus on these cold winter nights when you’re dying for something savory and comforting but don’t want to do a lot of work a lentil loaf is perfect. They’re quick and easy to throw together with minimal active time. Once you have it in the oven baking you can take a shower, read a book, do some yoga, or just relax with a hot cup of tea.
Lentils loafs are also rich in nutrients. You get protein from the lentils, plus lots of healthful nutrients, vitamins, minerals and antioxidants from the array of spices and vegetables you decide to put into them. The problem though - at least for me - is that so many of the lentil loaf recipes floating around out there are the same. It’s always the same kind of lentils - usually brown - with the same basic combination of vegetables - onions, carrot, celery, - and the same combination of herbs - parsley, thyme, salt, pepper, basil, oregano. - Vegetable brother is another typical component as is soy sauce and are almost always topped with ketchup or BBQ sauce. Now, don’t get me wrong, I like this combination - a lot - but as you know I like variety. I’ve never been the type of person who makes the same thing over and over again and so I require a little more creativity in my life.
I had been thinking a lot about lentil loafs last November when I happened upon an interesting recipe in Robin Asbell’s book “Big Vegan” it was a French inspired lentil loaf with Herbs de Provence and a Dijon Mustard glaze, yum! I was immediately excited and so I made the loaf. It was beyond excellent, and it got me thinking about what other kind of cultural twists I could throw into a lentil loaf to shake things up a bit. Initially I wrote down a bunch of ideas that I’m eager to try out, but since Indian food is one of my - and my husband’s, - favorites, that seemed the most natural direction to go in first.
When I first came up with the idea I had no idea how I was really going to do it. I had no idea if it would be good or if it would even be edible, but in the end I really surprised myself because the loaf turned out really fantastic. It tasted like a big samosa covered in mango chutney. It had all the great flavors I love about Indian Cuisine, the sweet, the spicy, the pungent, all rolled up in one easy package. My husband loved it too and so we enjoyed this delicious Indian spiced loaf for 2 days as dinner and 2 days as leftovers in lunches. It was the perfect hearty meal for those cold nights that proceeded the beginning of the Christmas season.
One thing to keep in mind about this recipe however is the fact that this makes a very large loaf. It was too large for my regular loaf pan and so I baked it in a cake pan instead. If you’re not looking to make quite so much you could easily half the recipe, but remember that halving it will mean a shorter cooking time also. Anywhere from 25-40 minutes less, depending on the consistency of the loaf at the time you pour it into the pan. Though if you were so inclined to make the recipe as is it tastes fantastic as leftovers, either on it’s own or stuffed into whole grain pita bread with sliced tomato, onion, lettuce, cucumber and a little additional chutney. Or be a little more traditional and roll it up into some Naan bread. However you decide to make it just enjoy it!
Indian Spiced Lentil Loaf
1 C Green lentils
½ C Red Lentils
3 C Water
1 1/4 C Oat Flour
6 Garlic Cloves Minced
1 Tbsp Ginger grated
1 Yellow Onion Diced
1 tsp Mustard Seeds
3 Yukon Gold Potatoes diced
1 Tbsp Peanut Oil
2 C Cauliflower Chopped
1 Large Carrot
½ Frozen Green Peas
5-6 Tbsp Curry Powder
1 tsp Ground Turmeric
½ tsp Ground Cinnamon
1/4 tsp Ground Cardamom
4 tsp Ground Cumin
2 tsp Ground Coriander
Sea salt and Black Pepper to taste
2-4 Tbsp Mango Chutney
2 Tbsp Tamarind Paste
8oz Mango Chutney
- Preheat oven to 400'F/200'C
- Cook Green and Red Lentils in 3 Cups water until tender and most of water has been absorbed. If not all the water has been absorbed by the time the lentils are tender drain in a colander. If lentils are not tender by the time the water has absorbed add more. Once cooked set aside to cool.
- Steam the Potatoes and Cauliflower until just tender, then set aside to cool.
- In a pan over medium-high heat saute the mustard seeds for a few seconds until they begin popping. Add the peanut oil, the onion, garlic and ginger and saute for 5-7 minutes until translucent.
- In food processor combine the cooked lentils, potatoes, cauliflower, onion mixture, and the oat flour. Pulse until just combined.
- Add the Cardamom, Cumin, Coriander, Salt, Pepper, cinnamon, turmeric, curry powder, tamarind paste, and the 2-4 Tbsp of Mango Chutney. Pulse until it the mixture just becomes cohesive, and the spices have been incorporated.
- Turn the mixture out into a mixing bowl. Add in the grated carrot and the frozen peas. Stir to combine. Taste for flavor and texture and adjust seasoning as needed. More curry powder, chutney, salt etc... If the mixture is too wet add in a bit more oat flour. If it’s too dry add in a bit of oil, water, or more chutney or tamarind paste.
- Grease a 9 inch round cake pan - I used a sprongform pan, - and scrape the mixture into it. Smooth the top with the back of a spatula then top with the 8oz of Mango Chutney.
- Bake uncovered in the oven for roughly 60-75 minutes until the top is bubbling and the loaf seems firm when you insert a knife or wooden skewer into it.
- Remove from the oven and let cool on the counter top for 10-15 minutes before slicing. Serve with a giant salad!
***Note - I chose to make this recipe wheat-free, but to ensure it’s 100% gluten-free make sure you buy gluten-free oat flour, or make your own by using gluten-free oats. Alternately if you do not have a wheat or gluten intolerance you can use any type of flour that you prefer.***
Labels:
Carrots,
Cauliflower,
Curry,
Garlic,
Ginger,
Gluten-Free,
Indian Fusion,
Lentils,
Mustard Seeds,
Oats,
Onions,
Peas,
Potato,
Soy-Free,
Sugar-Free,
Tamarind
Thursday, December 13, 2012
Coconut Curry Miso Soup...
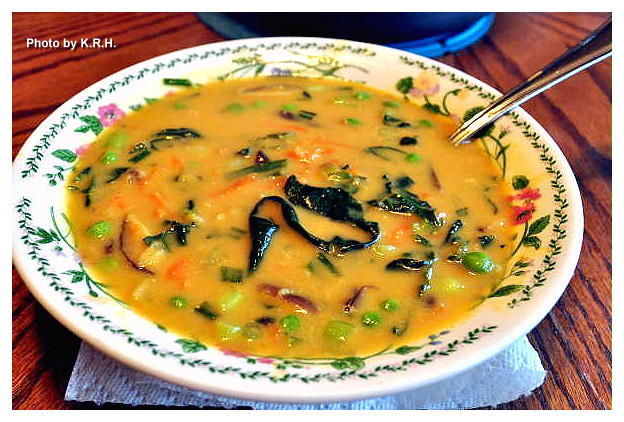
I can’t believe I forgot to post about this recipe, or maybe I can believe it. Things have been so busy around here lately that it’s easy to loose track. Well, the day I received my first CSA box I was so excited to use that Tat Soi that I decided to make it for lunch. It was a Friday afternoon and I needed something filling, hearty and warming before heading to work for the night shift. Originally I thought about making Miso soup, that seems to be my most common go to meal when I need something delicious and filling on short notice, but as much as I love Miso soup I was looking for something more. The more I thought about it the more I realized I was also in the mood for curry, and coconut. Now I know from past experiments that miso and curry actually go pretty well together but I wasn’t sure on the coconut. I envisioned like a Thai coconut curry of sorts but with the addition of Miso to give it that bold, well rounded, and savory flavor I love so much from miso soup.
I didn’t know if it would workout but in the end I thought I couldn’t do that much harm. I guess I needn’t have worried too much, because the soup turned out so good that my husband and I gobbled up the whole pot. That’s two huge heaping bowls a piece. Now as much as you may want to eat this whole pot yourself once you make it, I highly suggest you share it with a loved one instead and serve a salad alongside it to complete the meal.
Coconut Curry Miso Soup
2 ½ C Water
2/3 C Coconut Cream***
1/4 C Red Miso
4 Garlic Cloves Minced
Thumb Sized piece of Ginger minced
2 tsp Red Curry Paste
1/4 C Frozen Green Peas
1/4 C Green Onion sliced
½ Head of Tat Soi Sliced
1 Carrot Grated
1/3 C Black Soybeans
½ C Sliced Shiitake Mushrooms
1/4 tsp Ground Turmeric
2 ½ tsp Sliced Lemon Grass
Black Pepper to taste
- Combine Water, coconut cream, and red miso in a medium sized pot. Place over medium heat and stir until all the miso and coconut cream is dissolved and the mixture is smooth.
- Add in the garlic, ginger, lemon grass, curry paste, and turmeric. Mix to incorporate, until curry paste is dissolved.
- Add mushrooms, tat soi, and simmer for 10-15 minutes over medium or medium low heat until vegetables are soft.
- Add all other ingredients and simmer for 5-8 more minutes until warmed through.
-Serve hot and enjoy!
*** Note - Coconut Cream is the thick cream that normally rises to the top of a can of coconut milk. Scrape the cream out of the can and use, do not use the liquid for this recipe. Reserve it for another use. Also in some Asian groceries and markets canned coconut cream is available.
PS: If you don't have Tat Soi you can use another Asian Green, though I highly recommend searching for the tat soi.
Labels:
Asian Fusion,
Black Soy Beans,
Carrots,
Coconut,
Garlic,
Ginger,
Gluten-Free,
Green Onions,
Lemongrass,
Miso,
Mushrooms,
Oil-Free,
Peas,
Red Curry Paste,
Soup,
Sugar-Free,
Tat Soi,
Turmeric
Wednesday, April 25, 2012
Creamy Spring Pea Soup...
What better vegetable to represent Spring than peas? Fresh or frozen they are absolutely delicious with their bright green color, pleasant aroma, and sweet snappy crunch. When I was thinking up ideas for what to serve as part of my Earth Day dinner I decided peas would have to get worked in somehow. However after quite a bit of thought on the matter I was no closer to figuring out how exactly I wanted to prepare them, so it was off to my shelves of cook books for inspiration.
After searching and searching through book after book I came upon the realization that peas are A) a strangely under-utilized vegetable, and B) Seem to only get tossed into a lot of rice, and pasta dishes merely as an afterthought. During my search I did happen across a few pea soup recipes that use call for green peas but I found them uninspired. Mostly the recipes called for peas to be pureed with water and spices like parsley or mint - bleh, boring.
I myself love green peas, have always been a fan, and have never had any problem eating them plain. They are both sweet and savory enough to be totally satisfying on their own without any further alteration. In fact as a kid, when my mother or Oma or somebody was cooking with peas I’d often hang around and pop semi-frozen peas into my mouth like they were candy. It sounds strange I know, but they’re surprisingly good in that state. Anyway, I knew if I was going to present my Earth Day dinner to share with all of you, I’d have to do something a little more creative then serve a bowl of plain peas, and lets be honest as good as they are there isn’t anything the least bit elegant or ceremonious about plain peas. Right?
I did quite like the idea of a soup though, and with that idea in mind ingredient parings started bubbling to the surface and a recipe began to take shape. I wanted to keep it quick and simple, lightly seasoned but thick and flavorful and serve it roughly around room temperature rather then piping hot. Since it is suppose to be a spring soup, and many spring days are quite warm I wanted to create a dish that would refresh. What I came up with far exceeded my expectations and my husband went crazy for it.
The soup has a really lovely pale green color - something that’s not very well reflected in my photos, I’m sorry. Unfortunately the photos I took on Earth Day were unusable and so I had to redo them today using the leftovers, however as luck would have it, it’s very overcast out today. Which means very little natural light, which in turn means I had to use my inadequate kitchen lighting, which as I’ve mentioned before tends to give everything a slightly golden hue. Red, Orange, Green, and Yellow foods never properly photograph, but at least you get the idea. - It also has a lovely thick and creamy texture thanks to the cashews. If you want an even creamier soup you can soak the cashews in water for 1-2 hours before you use them, just make sure to drain them and rinse them afterwards and to use fresh water for the soup. Also since peas are quite sweet naturally you may want to opt out of using the Agave, it’s up to you, and finally if you prefer you can use fresh instead of frozen peas. Just keep in mind they’ll take a couple more minutes to cook.
Creamy Spring Pea Soup
1 C Raw Cashews
1 C Water
1-2 Tbsp White Miso (to taste)
1 Tbsp Lemon Juice
1 tsp Agave (Optional)
1 tsp Onion Powder
½ tsp Ground Mustard Powder
3-4 Garlic Cloves
Black Pepper to taste
Smoked Paprika to taste
16oz Frozen Peas + 1 C additional Frozen Peas
½ C water
A bit of minced Parsley to garnish (Optional)
- Place Cashews, water, Miso, lemon juice, onion powder, smoked paprika, garlic, mustard powder, and agave in a high speed blender. Blend on high for 30-90 seconds until completely smooth. Taste for flavor and adjust as needed. Then leave the cashew mixture inside your blender as you move onto the next step.
- Place 16oz of the Frozen peas and ½ C of water in a medium sized pot over medium heat. Bring to boil, and then reduce heat to simmer for 2-4 minutes until peas are bright green and thawed out.
- Carefully add the contents of the pot to your blender. Blend on medium speed until peas have been incorporated. You don’t need to puree the whole thing, it’s okay if some peas don’t get broken up.
- Once peas have been incorporated, pour the mixture back into the pot, over medium-low heat. Add the extra 1C of frozen peas. Along with black pepper to taste. Simmer until warmed through. Taste and adjust seasonings as needed then serve garnished with fresh minced parsley a sprinkle of smoked paprika and enjoy!
*** Note - This recipe can be made soy-free if you use chickpea Miso***
Labels:
Agave,
Cashew,
Garlic,
Gluten-Free,
Lemon,
Miso,
Oil-Free,
Peas,
Smoked Paprika,
Soy-Free,
Sugar-Free
Monday, January 23, 2012
Garden Veggie Miso Soup...
I was inspired to make this soup last month when I was really in the mood for some miso soup but didn’t have any seaweed, or tofu on hand, and frankly wasn’t interested in eating either that particular night anyway. What I really wanted was something light, colorful, and warm yet not necessarily ‘cooked.’ Scanning the fridge I realized I was running low on groceries, but what I did have was just enough to make a delicious, healthful, and surprisingly hearty soup. Everything about this soup screams Spring to me, but really I think it’s perfect anytime of year, and the great thing about it is that you can have it done and on the table in 25-30 minutes. Using some frozen vegetables helps make the soup come together fast, and slicing the veggies thin or grating them helps them soften while simmering without needing to cook or boil them to death, so you retain more nutrition. Who doesn’t love that? This soup can also conveniently be made in a large batch and stored in the fridge for a couple of days for easy access to a nice healthy meal at lunch or dinner, on days when you might not have as much time to cook as you’d like. The first time I made this soup I served it with a simple salad, last night I served it with some hand-rolled sushi, but this soup can just as easily be enjoyed on it’s own. I really do love the combination of miso with the sweetness of peas, and the crispness of broccoli... Mm... mm... Try it for yourself and see!
Garden Veggie Miso Soup
1 Large Carrot Grated
2 Small Zucchini cut in half moons or 1 large cut in quarters
1 bunch green onion chopped (green part only)
1 C Frozen Green Peas
Frozen Broccoli to taste (Couple handfuls)
Garlic Powder, Ginger Powder and Black Pepper to taste
1/4-2/3 C Mellow White Miso
3-5 C Water
- Whisk together the Miso and Water in a medium sized pot until dissolved. Turn the heat onto medium and bring to a simmer.
- Add in all of your veggies, and season to taste with garlic powder, ginger powder and black pepper.
- Simmer for 20-25 minutes until veggies are tender but still crisp. Do not bring to a boil. If over medium heat the soup starts bubbling too heavily reduce the heat to low and finish simmering. You want the veggies to be soft, but not cooked all the way though, you don’t want them to be boiled to death and mushy. You want texture and a nice bite.
- Serve with homemade hand-rolled sushi, Summer or Spring Rolls, or a salad, and enjoy.
*** Note - If you have fresh garlic and ginger feel free to finely mince or grate them and use it instead of powdered. I didn’t have fresh on hand, otherwise I would have used it. Also keep in mind that the amount of miso you want to use will be dependant on your personal taste preference. I like a medium flavored miso broth, not weak, and not too overpowering. Usually 1/4-1/2C is good for 3-4 C of water, and ½-2/3 C is good for 4-5 C of water, depending on your taste. You can also use any color miso you want, but remember that darker shades of miso have a more pungent flavor and so less will be required. White miso is personally my favorite because I find it to be the most versatile. But feel free to experiment ***
Labels:
Broccoli,
Carrots,
Gluten-Free,
Green Onions,
Low-Fat,
Miso,
Oil-Free,
Peas,
Soup,
Sugar-Free,
Zucchini
Tuesday, October 4, 2011
Vegan Mofo #7 - Isa & Terry’s Samosa Stuffed Baked Potatoes...
Vegan Mofo #7 - Isa & Terry’s Samosa Stuffed Baked Potatoes
The Book - Veganomicon
The Author - Isa Chandra Moskowitz & Terry Hope Romero
The Recipe - Samosa Stuffed Baked Potatoes
Page # 60
Difficulty - Easy
Duration - 1 hour 30 minutes roughly, unless you bake potatoes in advance.
Who doesn’t love a stuffed baked potato, or a potato skin? Am I right? They seem to appear on the appetizer menu of every American-style restaurant, and are a popular finger food at parties. I always loved baked potatoes growing up - perhaps I should amend that, I still love them I just eat them far less frequently - and when I took a home economics class at 14 one of the first things we learned how to make was a ‘loaded baked potato skin’ Before taking that class I don’t think I’d ever cooked anything in my life. Sure I’d been around the kitchen a lot when my mom was cooking. Many nights I’d stand over the counter talking to her and watching as she made dinner. Sometimes she let me help mix or stir things especially when I was younger, but I’d never actually cooked. When I made those potato skins and they turned out brilliantly on the first try I was so proud of myself that I couldn’t wait to run home and make them for my family. Surprisingly after looking over the recipe and providing a little kitchen supervision my mom allowed me to make them for us. I say surprisingly because as wonderful as my mom is, for whatever reason growing up she was very particular about her kitchen. She would never, ever let us kids use the stove for anything other then boiling water to make boxed macaroni and cheese. There are very few occasions that I can remember cooking at home, and on only two of those occasions did I actually cook for my whole family. The rest of those times was usually me using leftover rice to whip up a batch of fried rice for lunch or dinner if I found myself on my own for dinner. But back to the potatoes! They turned out fantastically and my whole family praised them, ever since I guess I’ve been a little bit in love with baked potato skins.
Then there’s Indian food, which I love and adore! The textures, the flavors, the aromas! Just walking into an Indian restaurant gets my mouth watering. Strangely though Vancouver and the greater Vancouver area has a large Indian population and many very good Indian restaurants it wasn’t until I was 21 that I had real honest to Buddha Indian food. It was at my bachelorette party actually if you can believe that. My very good friend A, who is Canadian born but who’s parents are from India brought along samosa’s and chutney. This was my first ever introduction to the popular Indian appetizer and though they were quite spicy - she didn’t ask for mild - I absolutely loved them. To this day samosa and sweet tamarind chutney are one of my favorite parts of Indian Cuisine. It is a rare day indeed that I’ll ever pass up a samosa that’s offered to me. However as much as I love them making samosa at home can be a bit of a pain. Easy enough to be sure, it’s just time consuming. Also I try to shy away from fried foods, so I fear if I start making them at home I’ll never want to stop!
That’s what I love so much about this dish. These little appetizer stuffed potatoes skins are both delicious and ingenious. Combining a lovely east meets west idea. They have all the rich and spicy flavor of a samosa, all the ingredients you’d find in a samosa, yet they’re assembled in a familiar western way. They’re also quite versatile. Eat them plain as they are or serve them with a small bowl of non-dairy sour cream for dipping or even a small bowl of tamarind chutney to dip or drizzle over top. This is the perfect dish for those days where you’re feeling like a samosa but are to broke too get take-out and too lazy to make them yourself, or if you’re just looking for something a bit healthier.
I’ve made these twice so far. Once for just my husband and I and once for a party I threw. I wasn’t sure how they’d go over at a party if I labeled them Samosa stuffed potatoes. You know how people are, anything remotely foreign sounding can get their hackles up. So I labeled them ‘East meets West stuffed potatoes’ and people ate them up. There were a lot of oo’s and ahh’s and I received a lot of compliments afterwards. However it must be noted that I did make a few changes. The biggest change is that I simply found the recipe under spiced. I found I had to nearly double all the spicing suggestions, but that might just be me. As I’ve said before I like bold flavor not mild. I suggest measuring out all the spices as listed first then tasting and seeing if they’re too your liking before adding in more. Secondly I found the potatoes to be a bit dry, and not as creamy as I’d like. This was an easy fix though. I just added in 1-2 tbsp of Earth Balance and that gave them a lovely buttery whipped texture.
If you like samosa and you like potato skins this is a must try recipe! And may I say that ‘Veganomicon’ is a wealth of great creative and interesting recipes. So far I’ve only made a handful of things from it but each dish has turned out aces. Though fair warning some of the recipes may appear to be quite intimidating with all of their steps. Let me assure you that the recipes are not hard, though they may on occasion be time consuming and require a little forethought and advanced prep. Though I can assure you it’s always worth it.
Labels:
Appetizer,
Carrots,
Cook Book,
Indian Fusion,
Onions,
Peas,
Potato,
Vegan Mofo
Friday, August 19, 2011
Coconut Lime Curried Greens Over Volcano Rice...
As I mentioned the other day we really should be making leafy greens a significant part of our daily food consumption, so I’ve been experimenting all week with interesting and exciting ways to jazz them up. Personally I don’t mind greens served relatively plain with a bit of garlic, lemon juice, olive oil and salt and pepper, but I know most people are looking for a bit more of a kick for the old tastebuds. So this is what I came up with last night for dinner and I think it more then serves the purpose of delivering a creative new way to eat greens. It’s got a wonderful blend of Asian flavor, and is completely oil-free, which you gotta love right?
Coconut Lime Curried Greens Over Volcano Rice
Greens
1 Bunch Kale
½ Bunch Collards
1 red pepper medium dice
1 yellow onion medium dice
1 cup frozen peas
8-10 cloves garlic crushed
Vegetable broth to saute
Small handful basil leaves torn
Sea salt and black pepper
Coconut Lime Curry Sauce
1 can coconut milk plus a little water - slightly less then 1/4 cup water
1 tbsp lime juice
1 packet stevia (Optional - to taste)
1-2 heaping tbsp Thai red curry paste (To taste)
½ tbsp kaffir lime leaves minced (Optional)
Volcano Rice
1 ½-3/4 C Volcano Rice (Depending on how hungry you are)
2 - 2 1/4C Vegetable broth or water (Depending on the amount of rice)
- To make Rice add broth and rice to rice cooker and follow manufacturer’s directions. If you don’t own a rice cooker, cook as package directs.
- While rice is cooking, saute onions, red pepper, and garlic in a few tbsp of vegetable broth over medium heat. Until onions are translucent and peppers are soft. About 7-10 minutes.
- Add in your cooked greens and stir to coat with broth, and vegetables. Place lid over pan and cook on medium/medium-low heat stirring occasionally about 10 minutes.
- While greens are cooking make your marinade. Whisk together Coconut milk, lime juice, curry paste, stevia, water and lime leaves. Taste for seasoning and adjust as needed. If you like a bit more heat add more curry paste. Also you can use either red, green or yellow curry paste. I just prefer red. If you don’t have stevia you can use another sweetener of choice. Agave, brown sugar, granulated cane sugar etc...
- After 10 minutes your greens should have decreased in size and broken down a bit. Add your coconut milk mixture along with your torn basil leaves, sea salt and black pepper. Let boil, the reduce to simmer about 5 minutes. Add in frozen peas and simmer roughly 5 minutes longer.
- Serve coconut greens over rice and enjoy.
*** Note - Volcano rice is a product made by Lotus Foods http://www.lotusfoods.com/Volcano-Rice/p/LOT-503219&c=LotusFoods@SRI packed with minerals and antioxidants. It’s delicious, and has a mild flavor but if you can’t find it or don’t want to go searching for it you can just use regular brown rice. Also as for the greens you can use any kind you have on hand. I prefer kale and collards for this dish, but you can do all kale, or all collards or throw in some chard, whatever you want, don’t be afraid to be creative.***
Labels:
Asian Fusion,
Basil,
Bell Pepper,
Coconut Milk,
Collard Greens,
Curry,
Garlic,
Gluten-Free,
Kale,
Limes,
Main Meal,
Oil-Free,
Onions,
Peas,
Rice,
Soy-Free,
Sugar-Free
Thursday, August 18, 2011
Momma’s Traditional ‘Beef’ Stew...
For the past two week I’ve had this wicked bad and very strange craving for some kind of a ‘beef’ stew. Now cravings are nothing new to me, especially weird ones. For as long as I can remember I’ve always been struck out of the blue by some intense craving or other. In fact it happens frequently, and is just like pregnancy cravings - so I’m told - minus the pregnancy part. What makes this craving particularly strange is that I was never the kind of person who enjoyed a hearty beef soup or stew. Even as a kid, it was not my favorite dish. Yet here I’ve been craving ‘beef’ stew for nearly two weeks, and so finally yesterday I gave in and tried my hand at pulling together a vegan version.
I was very skeptical as I was making it. For most of the cooking process it just didn’t look right, smelt okay but that I’ve found that aroma isn’t always the best indicator of taste. I’d also never used Gardein Beefless tips before and wasn’t sure how that was going to be. Yet by the time I was done, not only did it smell wonderful, it actually looked like a traditional beef stew, and the flavor! It was out of this world! I’m telling you. I was so amazed, I turned to my husband and said "I think this is the best beef stew I’ve ever made." I’m not kidding when I say this tastes almost exactly like the stew I remember my mom making as a kid. The texture is a little different, meaty of course but not tough, chewy or grisly like actual meat, which I appreciate.
Now I realize a lot of you reading are living in climates in which it is summer, but you never know, if a rainy day swings your way I urge you to make this, and for those of you ‘down under’ this is a perfect fall/winter food. Warm, and comforting on a chilly evening.
Momma’s Traditional ‘Beef’ Stew
1 tbsp olive oil
1 Large yellow onion chopped in medium sized chunks
2 Ribs celery sliced into 1 inch pieces
12 Baby carrots sliced in half lengthwise then halved crosswise
10 Garlic cloves crushed (or to taste)
3 Medium sized potatoes chopped in small cubes
2 C frozen peas
18 oz Gardein Beefless Tips (Two packs)
3 1/2C Water
1/2C Red Wine
½ tsp Ground Thyme
½ tsp Crushed Rosemary
1 tsp dried oregano
Sea Salt & Black Pepper to taste
2 Not-Beef Bullion Cubes (Edward & Sons makes a good one)
3 tbsp flour
1-2 Tbsp Earth Balance
- Heat Oil in medium-large sized pot. Add chopped onion and garlic and saute 3-4 minutes. Add carrots, and celery and saute until onions and carrots have softened slightly. About 10 minutes. Stir occasionally.
- Whisk together water, flour, and bullion cubes. Then add to the pot along with potatoes, thyme, rosemary, oregano, pepper and salt.
- Cover and bring to boil. Let boil for 5-10 minutes then add 3/4 of the half cup of red wine and reduce heat and let simmer about 20 minutes, or until potatoes and carrots are fork tender. Stir occasionally.
- Meanwhile empty beefless tips into a separate pan on medium-high heat. Pour the remaining wine over top and cook them till they’re nicely seared and brown on all sides.
- By this time the potatoes and carrots should be fork tender. Add the Peas, Earth Balance and beefless tips to the pot, along with any pan juices. If there are crusty bits of beefless tip coating the bottom of your pan, scrape them into the stew pot. It’ll add a great flavor. Simmer another 10 minutes to let flavors mingle, stirring once or twice, then remove pot from heat and let it rest ten minutes before serving.
- Taste for seasonings and add more salt, pepper, or red wine to your liking. Serve in a large wide mouthed bowl, with a couple of pieces of crusty whole grain bread.
This really is a rich and warming stew, and heavenly aromatic. It makes the whole house smell like Thanksgiving or Christmas, and in fact the broth form this stew would be the perfect substitute for a ‘traditional’ turkey or beef gravy.
PS: If you’ve never heard of Gardein and would like to know more about them and the products they offer you can check out their website here -http://www.gardein.com/index.php
Labels:
‘Beef’,
Carrots,
Celery,
Comfort Food,
Gardein,
Garlic,
Onions,
Peas,
Potato,
Red Wine,
Stew,
Sugar-Free
Subscribe to:
Posts (Atom)