Showing posts with label Vanilla Extract. Show all posts

Sunday, February 21, 2016

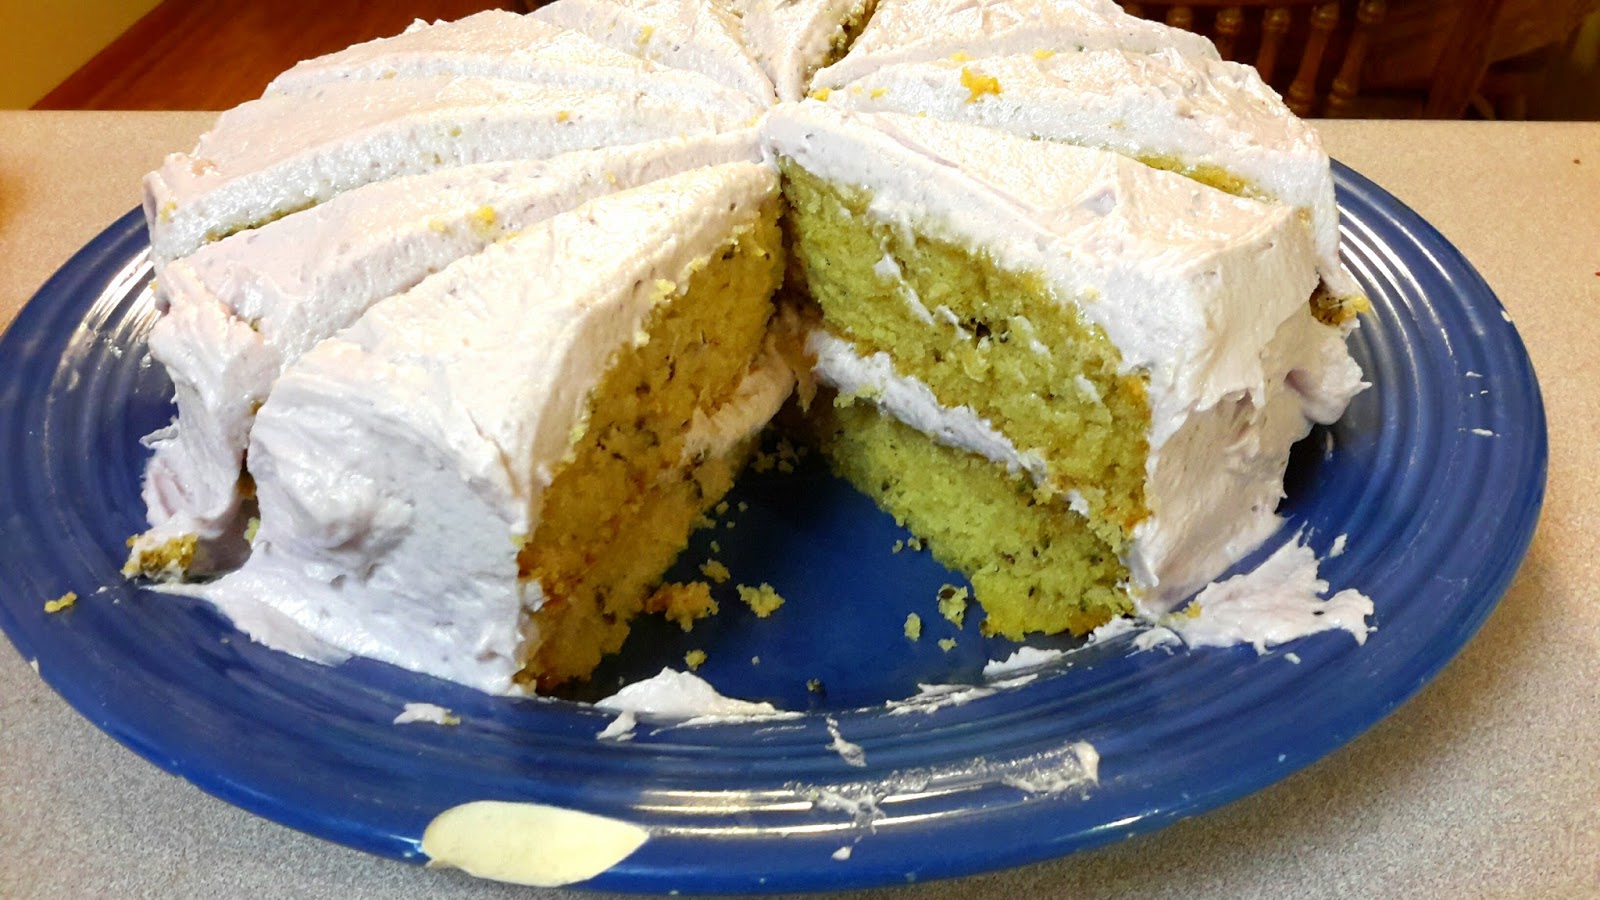
Vanilla Lavender Cake...


I wanted to make a nice dessert for Valentine's Day, but none of the recipes I looked at appealed to me. Everything was chocolate this and chocolate that, everything was heavy, decadent and 'romantic' I'm okay with the romance but everything being pink or red, and everything being chocolate was a bit overwhelming and overdone to me. I wanted something lighter, that was fun, fluffy, and romantic, yet light, and springy. I kept coming back to the idea of something 'floral' which seemed to really fit the bill in my mind. I thought vanilla rose, only I didn't have any rose petals, and then I remembered the Lavender extract I picked up at the Botanical Garden last summer. I was further reminded that I still had a lot of leftover lavender from when I made a lavender Chocolate cake a while back.


Suddenly everything clicked. Vanilla is light, but a bit boring on it's own, Lavender really jazzes it up and breaths new life into an otherwise ordinary cake. I do not normally use food coloring but considering it was Valentine's Day and I wanted the color of the frosting to match the mood and the romance I decided to give in, and I'm glad, I think it really heightens the overall presentation and makes you feel like you're eating something special.


Vanilla Lavender Cake

3 Cups All Purpose Flour
2 Cups Sugar
2 tsp Baking Soda
1 tsp salt
1 3/4 C Vanilla Almond Milk
1 C Canola Oil
1/4 C Apple Cider Vinegar
1 Tbsp Vanilla Extract
4 Tbsp Dried Culinary Lavender

- Preheat Oven to 350'F and grease two cake pans.

- Mix the dry ingredients into a bowl. Whisk the Wet Ingredients1 together in a measuring cup.

- Make a well in the center of the dry mix, pour the liquid in and stir to combine but do not over mix.

- Divide the batter between the two pans and bake in the oven for 25-35 minutes.

Lavender Frosting

1/2 C Earth Balance
1/2 C Coconut Oil
3 C Powdered Sugar
1 tsp Lavender Extract
2-3 Tbsp Almond Milk
6 Drops Red Food Coloring
4 Drops Blue Food Coloring

- Combine the Earth Balance and the Coconut Oil in a medium sized bowl and blend it together using a hand mixer.

- Add in the powdered sugar and blend until smooth.

- Add in the extract, almond milk and food coloring. You may have to tweak the number of coloring drops you put in to get the right kind of purple.

Assemble -

Place one cake on a plate. Frost the top with a generous amount of lavender frosting. Place the second cake on top and use the remaining frosting to frost the top and sides of the entire cake. Serve and enjoy!

Saturday, September 19, 2015

Vegan Mofo #24: Brussels/Belgian Waffles...


Well, this is my last Mofo Post. Today I leave for Vacation and I won’t be back until October. I had a lot of fun this Mofo, I really enjoyed veganizing non vegan recipes. I surprised myself a lot, and found new and interesting ways to combine food, and flavor. I even got to try out a few ‘new to me’ cooking methods, such as flambee!  It’s been a fun ride, unfortunately I didn’t get to veganize all the reicpes I had intended, nor did I get to veganize foods from all the countries I’d wanted. I had really hoped to have more cultural variety but I got kind of hung up on Irish and French cooking, I don’t know why.  Maybe when I come back from my trip I’ll keep going with the veganizing, who knows.


Anyway, for my last recipe I decided to make Belgian Waffles. When we were in Brussels there were waffle shops literally everywhere, you couldn’t throw a rock without hitting a waffle shop or a frites stand, and I loved it! What cool street food right? Interestingly what we call Belgian Waffles here in North America are quite different then what a true Belgian - or Brussels Waffle - really is. Actual Brussels waffles are made a little more complicated by the addition of yeast, it isn’t as simple as whipping together a standard pancake batter and sticking it in a waffle iron. Traditional waffles also use a lot of fat in the form of eggs and butter, so I was really interested to try a vegan version.


I wouldn’t call my experiment perfect, they were a little more dense and bready then I had anticipated, however using yeast that’s only to be expected. Flavor wise however these were amazing! Seriously, my husband said they were some of the best waffles I’ve ever made, and that’s a big compliment.


Now, to serve you can’t simple pour syrup on them, because that’s not how they do it in Belgium, what you need is an assortment of fruits, whipped cream, and chocolate sauce. Some people even top their waffles with ice cream. My personal favorite combinations were Banana and Chocolate or Strawberry and Chocolate Hazelnut. For this recipe I used what I had on hand, Raspberries and made up a Chocolate Peanut Butter Sauce. A big dollop of Coconut Whip wouldn’t be the worst idea on these!


Brussels Waffles 

5 Cups All Purpose Flour
½ tsp Sea Salt
7g Active Dry Yeast
2 Tbsp Light Brown Sugar
1 tsp Vanilla Extract
2 Cups Soy Milk
1 Cup Melted Non-dairy Butter
Ener-G Egg Replacer, enough to equal 6 Eggs

- Combine Flour and Salt in a Large bowl.

- Sprinkle the yeast and Sugar over top

- Using a hand mixer beat together the Ener-G and Milk until foamy. Beat in the vanilla extract.

- Make a well in the center of the dry ingredients. Pour in the milk mixture and fold to combine.

- Add in the melted butter and combine until a dough forms. It might seem a bit loose, not like a bread dough, pretty squishy, and that’s okay.

- Lightly grease a clean bowl with a bit of nonstick spray. Pour the batter/dough into the clean, greased bowl. Then cover with plastic wrap and let rise for 1 hour.

- Preheat a waffle Iron. Use the setting just below half way. (This is important!) When the iron is preheated add enough batter to fill it. Now the batter will be very sticky and stretchy, just use your spoon to break it off from the rest of what is in the bowl. Close the waffle iron and cook until your iron beeps. Do not open the iron before the waffles are done.

- Remove the cooked waffles from the iron, and add the remaining dough to the iron. You’ll probably get 8 waffles out of this recipe if you have a 4 waffle iron.

- Serve waffles with fruit, whipped cream, chocolate sauce, or any of your favorite assorted toppings. They also taste great with a bit of powdered sugar and non-dairy butter.

Enjoy! See y’all In October!


Sunday, August 3, 2014

White Chocolate Cherry Smoothie...


I don’t know about you but I’ve been addicted to cherries lately. I probably buy a few pounds per week and every morning I eat a bowl of them for breakfast. I’ve always loved cherries, but this summer they seem to be particularly ripe and delicious, and I just can’t get enough. I’ve also been really addicted to peanut butter lately, and I’ve had a strange craving for white chocolate which got me thinking this week that I might like combining all three of these things in one way or another.

This morning after a little bit of deliberation I decided to try mixing them together in a smoothie. It was either that or a dessert and I just didn’t feel like baking today. As it happens though this smoothie is like a dessert in a glass, super yummy, and decadent! Actually - as weird as it sounds this smoothie tastes a little bit like Christmas - probably the nutmeg. Anyway it came as a big surprise to me because I didn’t have any real idea of what the end result would be. I can honestly say it far exceeded my expectations, and if you like decadent dessert like smoothies definitely give this one a try!


White Chocolate Cherry Smoothie 

1 1/4 C Vanilla Almond Milk
1/3 C Vegan White Chocolate Chips
1/3 C Frozen Cherries
½ Frozen Banana
** 2 Tbsp Peanut Butter & Co’s White Chocolate Wonderful Peanut Butter
1 ½ tsp Vanilla Extract
1 tsp Maca Powder
1 tsp Lucuma Powder
½ tsp Mucuna Powder
1/8 tsp Ground Nutmeg
1/8 tsp Ground Cinnamon
4-6 Ice Cubes

- Place the vegan white chocolate in a small saucepan over medium heat. After about a minute the chocolate should begin to melt, add in a 1/4 cup of the almond milk and stir the two together until the white chocolate has melted fully.

- Remove the saucepan from the heat and stir in the vanilla extract.

- Combine the white chocolate mixture with the cherries, banana, peanut butter, maca, lucuma, mucuna, nutmeg, cinnamon, remaining almond milk and ice cubes in a highspeed blender. Blend on high for 90 seconds or until the mixture is smooth.

- Pour into a glass and garnish with a dash of nutmeg and a few dried cranberries or cherries for a festive feel. Enjoy!

*** Note - I don’t know if there’s any real substitute for Peanut Butter & Co’s White Chocolate Peanut butter, but you could just use regular peanut butter and add in more vegan white chocolate to compensate. Also you can use fresh cherries rather then frozen if you prefer, but then you may want to use more ice to get the same consistency.*** 

Monday, July 28, 2014

Chocolate Cinnamon Power Shake...


I’ve always been a big fan of protein shakes/smoothies. Since I’m not normally a big eater in the morning these have always been my salvation. Since my last cleanse however I’ve been mostly sticking to fruit for breakfast in the morning, and so I haven’t bought protein powder or anything like that in ages, but lately I’ve been really craving a good ‘ole chocolate protein smoothie. Today since I was particularly ravenous upon waking, - and since I still don’t have any protein powders - I decided to just throw together my own little power shake.

I was amazed by the result. It tastes so good, and so decadent, and it’s very reminiscent of some of my favorite protein shakes. After I scarfed down a peach and a mango, I drank this, and it really hit the spot. I might just make it again tomorrow and the next day and the next! 


Chocolate Cinnamon Power Shake 

1 C Vanilla Almond Milk
1 Ripe Banana 
2 Tbsp Cocoa Powder 
1 tsp Lucuma Powder
1 tsp Maca Powder 
½ tsp Ground Cinnamon 
1 tsp Vanilla Extract 
** 2 Tbsp Peanut Butter & Co’s Cinnamon Raisin Swirl Peanut Butter
1 tsp Instant Espresso Powder (Optional) 
6 Ice Cubes

- Place all ingredients into a highspeed blender and blend on high for 60-90 seconds until completely smooth.

- Pour into a glass and enjoy! 

*** Note - If you don’t have or can’t find Peanut Butter & Co’s amazing Cinnamon Raisin Swirl Peanut butter, Sub your favorite peanut butter, with an added dash of cinnamon and a small handful of raisins. *** 

Friday, August 23, 2013

Almost Raw Mango Cheesecake with Mango Glaze...


A few days ago I really wanted something sweet. I was dying for dessert, but as I mentioned a couple of days ago I’m staying away from sugar until I’m fully recovered. That means no dessert, or at least no traditionally sweetened desserts. I tried for a while to let the craving pass, and when it wouldn’t I started thinking about fruits. Only just sitting down and chomping away on a piece of fruit wasn’t really doing it for me. Then I got thinking about what I was going to do with the batch of home made cream cheese I’d made last week, and then I got thinking about cheesecake. Then I really wanted cheesecake except cheesecake is loaded with sugar. Hm! What to do?


It was then that a vague idea for a raw cheesecake popped into my head. Most raw cheesecakes are not sweetened with sugar, and a lot of them use fruit as a sweetener instead. I could get behind that right? Except I’ve made raw cheesecakes in the past and while I do enjoy them I find they always have a very strong cashew, date, coconut flavor, which is fine if that’s what you want, but it’s not really ‘cheesecake’ you know? I wanted a cake that was creamy, and cheesy, sweet and tangy, and suddenly I started thinking about mango. I mean it’s summer after all - even if it’s getting near the end of summer - and a Mango Cheesecake sounded just about perfect in that moment. Only, I was tired, and drained from being sick and didn’t want to go through the process of having to bake and look after a cheesecake, especially in the middle of an already hot evening.


So I started wondering if I could make a more traditional cheesecake using my homemade cream cheese and frozen mangos - which were the only kind I had - by employing the basic principals of raw cheesecake making. Once I got thinking like that it all kind of came together in a snap. As it turns out you can make a cheesecake in this way, and it tastes awesome. This cheesecake was so sweet, cool and mangoey the perfect treat on a humid summer evening. Yet it was creamy and tangy like a regular cooked cheesecake with not coconut, or nut aftertaste. The only problem with this particular cheesecake is storage. You see since the filling is quite liquidy you can’t store it in the fridge even after it’s been frozen, because it’ll melt and leak. I didn’t have a problem with it melting completely losing it’s shape and reverting back to pre-frozen state but it melted enough. Of course because cheese doesn’t taste great frozen, and you loose that creamy texture if it’s frozen solid leaving it in the freezer isn’t so great either. My recommendation is that this is a cake best eaten right away. Of course if you need to store it I suggest cutting the entire cake into individual slices first, then storing in the freezer. When you want to eat a slice, take it out and let it thaw for 30 minutes so it gets creamy again.

Though that might seem like some unnecessary trouble this cake is so amazing flavor-wise, that it’s really worth it, even if there’s no perfect way to store it. Of course you could always store most of it in the freezer and store individual slices in the fridge in a snap-lock container that way if it melts a little it won’t get all over your fridge. I think next week I’ll experiment and make this a full-on traditional cooked cheesecake, so I’ll let you know how that goes, but for now enjoy!


Mango Cheesecake with Mango Glaze 

Crust -

1 C Pecans
1 C Rolled Oats
½ tsp Ground Cinnamon
4 Medjool Dates Pitted and Soaked
1 tsp Vanilla Extract
2 Tbsp Coconut Oil
Pinch of Sea Salt
5-8 Drops Liquid Stevia

Filling - 

***1 ½ C Cream Cheese preferably homemade
3 C Frozen Mango Chunks Divided
2 Tbsp Lime Juice
Date Soak Water
1/4 tsp Ground Ginger
2 tsp Maca
1 tsp Vanilla Extract
Pinch of sea salt
2 Tbsp Coconut Oil
8-12 Drops Liquid Stevia

Glaze - 

1 C Frozen Mango Chunks
4 Medjool Dates pitted and soaked
Water
5-8 Drops Liquid Stevia

Instructions -

Crust -

Add Pecans and oats to a food processor and process into fine crumbs.

Add in the dates - reserve the soaking water - and coconut oil along with all other ingredients. Process until a smooth dough forms.

Turn out into a spring-form pan and press down evenly spreading the mixture across the bottom of the pan.

Freeze until ready to add the filling.

Filling -

Add 2 C mango chunks along with the date soak water leftover from the crust recipe to a high speed blender. The water should roughly yield between a third and a half cup. Add in the lime juice and vanilla extract and blend on high until completely smooth.

Add the cream cheese to the food processor along with the pureed mango mixture, coconut oil, maca, ginger, sea salt and stevia. Blend until smooth and fully incorporated.

Add in the remaining cup of mango chunks and process. You can process this until very smooth or leave it a little chunkier, it’s up to you.

Pour the filling into the prepared crust and return to the freezer. Freeze for 2-3 hours until solid but still creamy.

Glaze -

Add all ingredients to a high speed blender and blend until smooth. Pour over cheesecake when ready to serve and then serve immediately or freeze for an additional 30 minutes to firm up the glaze a little bit. Enjoy!


*** Note - I used homemade cream cheese that was made with cashews, salt, water, and 2 tbsp of coconut milk yogurt to culture it. The recipe I used was from Miyoko Schinner’s “Artisan Vegan Cheese.” though I think you could use any homemade vegan cream cheese just as long as it’s cultured. You could try making this with store-bought vegan cream cheese but honestly I don’t know how that would alter the taste and texture of this recipe. Store-bought cream cheese is full of preservatives and other ingredients and it may not freeze as well. Since my homemade cream cheese was practically raw I think it might work better then a cooked cream cheese, but feel free to experiment and let me know what you discover.*** 

Tuesday, March 26, 2013

Vanilla Orange Berry Blast Smoothie...


You all know how much I love a good smoothie right? Well over the past week this one has become my absolute favorite breakfast. The flavor is so unique a mixture of berry, vanilla, citrus and that oh so distinct grassy taste of wheatgrass. I love the not quite blended texture of the dates as well. Overall this smoothie packs an energizing antioxidant punch that’ll both nourish and satisfy you, not to mention help you through any busy Spring morning, and if it doesn’t quite feel like spring where you live then at least the light citrus notes will make you daydream of the warmer days to come. Plus, you can’t beat that beautiful, rich, majestic color. Doesn’t it make you want to smile?


Vanilla Orange Berry Blast Smoothie 

1-1 1/4C Vanilla Almond Milk
1 Large Navel Orange
2 Pitted Dates
1 Scoop Wheatgrass Powder (I use Amazing Grass)
2/3-3/4C Frozen Blueberries
4 Frozen Peach Slices
½ tsp Ground Cinnamon
Dash of Ground Ginger

- Place all ingredients into a high-speed blender and blend on high for 1 minute or until smooth. Bits of unblended date pieces are okay, and highly recommended in my opinion.


*** Note - If you prefer you can use unsweetened almond or other non-dairy milk and use a tablespoon of vanilla extract instead. Though I quite like the taste and texture of the vanilla almond milk. Also how much milk and blueberries you use depends on the strength of your blender and your personal preference for how thick you want the smoothie to be.***

Monday, December 31, 2012

Christmas Eggnog Cheesecake in a Cinnamon Graham Cracker Crust...


I think it’s absolutely shameful that I haven’t posted since the 20th, but you know how crazy it gets with the holidays. Between Christmas Eve, Christmas Day, Boxing Day, My Husband’s Birthday and now New Years I haven’t had much time - nor quite frankly much energy - to get my shit together and do a big holiday recap post. One is coming I promise, just not tonight, and maybe not even tomorrow night, but it’s on it’s way.

We had a lovely holiday, and I hope you did as well. I cooked like a demon for days, making entirely too much food, and eating way more then I should have. However as I told my husband, my twin brother E and my good friend N that the mark of a successful holiday is that you eat and drink as much as you like, and as long as you fit into your pants the next day you’ve won. Which I definitely did, though honestly next year I think I’m doing Christmas low-key and simple. Some sort of crock pot dish and a salad, that’s it.


But now onto what this post is really about. Before going vegan I used to love egg nog. Some of you might remember my Vegan Nog review from last year? Anyway, I bought a carton at the end of November and thoroughly enjoyed it, and one day while drinking it I decided that I absolutely needed to make a nog cheesecake for Christmas. Somehow I convinced myself that Christmas just wouldn’t be Christmas without one and so I tried to find a good recipe. Can you believe that out of the nearly 100 cook books I own not a single one of them had a nog cheesecake recipe? What a disappointment, but instead of getting upset about it I hit up Google looking for a recipe. However I struck out again when Google only popped up like 4 Nog Cheesecake recipes that were vegan. Every other recipe that popped up was some re-posted and tweaked version of one of the original four recipes. The reason I didn’t like any of those recipes was because they were either too complicated or either two simple. I know, you’re probably thinking I’m complicated but I really wanted a good nog cheesecake that was sweet, rich, and tasted like nog, and many of the recipes only had you using ½ cup of Nog. Not nearly enough in my opinion. So after some careful consideration I decided to throw caution to the wind and try and come up with my own delicious nog cheesecake recipe.

I think I hit it bag on. This is exactly what I wanted, and tasted so good. Exactly how I had it pictured in my mind. Now fair word of warning, there is absolutely nothing healthy or low fat about this cheesecake but it is fantastic! And for one or two days a year you can certainly indulge a little. The cake is definitely omnivore approved, and even my husband who never used to like cheesecake and never liked nog - doesn’t even particularly care for Vegan nog - thought it was phenomenal. So make it and enjoy!

Now I hope you all have a Happy New Year, and I’ll see you back here in 2013. I hope to be a little more active on the blog next year.


Christmas Eggnog Cheesecake in a Cinnamon Graham Cracker Crust 

16oz Silken Tofu
2 8oz Containers Vegan Cream Cheese
1 C Sugar
1 C So Delicious Coconut Milk Nog (or Favorite non-dairy eggnog)
2 Tbsp Lemon Juice
6 Tbsp Dark Rum
1 tsp Vanilla Extract
3/4 tsp Ground Nutmeg
1/2 tsp Ground Cinnamon
6 Tbsp Cornstarch
Pinch of Sea Salt

Crust 

!0-14oz Cinnamon Flavored Graham Crackers
1-2 Tbsp Vanilla Almond Milk
1-2 Tbsp Melted Coconut Oil
Pinch of Sea Salt
Extra cinnamon if desired.

Preheat Oven to 350'F

- Pulse Graham crackers to a fine meal in a food processor. Then add in the wet ingredients  salt and extra cinnamon and pulse a few times until the mixture is moist and cohesive.

- Grease a 9 inch round cake pan and press crust into the bottom.

- Bake at 350'F for 10 minutes and remove from the oven to cool.

- To make the filling combine all ingredients into a food processor and process until completely smooth. Taste for flavor and adjust ingredients to taste as needed.

- Pour mixture into the cooled Graham crust and place into the oven. Bake at 350'F for 55-75 minutes. Checking often after the 50 minute mark to make sure the cake doesn’t burn or brown. You want it to cook, but stay as close to white as possible. When you pull the cake out it will still be wobbly in the middle that’s okay.

- Leave the cake out and let cool at room temperature for 1 hour. Then place in the fridge uncovered and let cool completely 2-3 hours. Then cover and keep in the fridge until ready to serve.

- Enjoy topped with a caramel rum sauce, or vegan whipped cream!

PS: Sorry for the lack of pictures but I had something of a mishap Christmas Eve night. I brought this cheesecake to my Husband’s aunts house, and like usual my arms were full of different dishes. As I tried to balance the dishes in my arms while reaching out to open the door to let myself into the house I dropped the cake! Lucky for me it landed right side up and so the only damage was a big ripple through the surface that occurred when the cake hit the pavement. To make the prettiest picture I could I sliced a piece of relatively unharmed cake out and took a picture of it alone on a plate. Voila! Still tasted great, even if it ended up looking a bit ugly.

Friday, November 30, 2012

Almond Banana Oatmeal...


How many of you eat oatmeal everyday? Or even a few times a week? I know I don’t, and it’s not because I don’t like oatmeal, it’s just that... well I’ve never really been a breakfast eater. That’s not to say I don’t like a good breakfast now and again but typically when I wake up early I don’t eat much for an hour or two and then I end up grabbing an apple and making a smoothie. It’s quick, it’s easy, and by that time I’m ravenous so it works. Some fruit and a smoothie for breakfast certainly isn’t a bad way to start the day but there are some days where you just want more, and I feel that oatmeal is one of those unutilized breakfast foods. It definitely is in my house anyway. It also comes with the unfortunate stigma of being bland, flavorless and boring.


But oatmeal Is so good for us. It’s filling, it provides sustainable energy throughout the morning, it gives us beneficial nutrients, and best of all it helps to stabilize blood sugar and lower cholesterol which keeps our hearts and arteries happy. As for the taste, well, the oatmeal I made this morning knocks the socks off of any other oatmeal I’ve ever eaten. It’s super flavorful, extremely delicious and pretty quick.


I guess because the weather is getting colder now, I’ve started to crave more hearty winter fare, oatmeal definitely falls into that category and since I was still a bit hungry after my morning apple bu not quite ravenous I decided to take the time and make myself a bowl. For lack of ingredient variety and for the comfort of having something familiar I chose to incorporate ingredients into my oatmeal that I generally through into my morning smoothie. Such as banana, almond butter, flax, and hemp. What’s really great about this oatmeal is rather then add sliced bananas on top after it’s cooked, I cook the bananas right in the oatmeal itself. When bananas cook down they develop a truly amazing sweet, full bodied flavor that’s addictive. It made for a super satisfying morning meal that’s kept me full all day. You have to try it, even if you think you don’t like oatmeal!


Almond Banana Oatmeal 

½ C Steel Cut Oats
2 C Water
1 Large Banana
1 ½ - 2 heaping TBSP Almond Butter
½ - 3/4 tsp Ground Cinnamon
1 tsp Vanilla Extract
1 Tbsp Maple Syrup
1 tsp Hemp Seeds
1 tsp Ground Flax Seeds
2 Dried Apricots Sliced
2 Dried Plums Sliced
Splash of your Favorite Almond Milk (Optional - I used Vanilla)

- In a medium sized saucepan combine the steel cut oats and the water. Bring to a boil, boil for ten minutes then reduce the heat to a simmer and simmer for an additional 20-30 minutes until the water has been absorbed to your liking and the oats are soft and creamy.

- During the last 8 minutes of cooking slice the banana into the pot and stir to combine. Also add in the almond butter and stir to combine. By the time the oats are done cooking the banana slices should have cooked down into the oatmeal leaving no chunks. Though a few bits are okay.

- Once oats are done remove the pot from the heat and stir in the cinnamon, maple syrup and vanilla extract.

- Scrape oatmeal into a large bowl if you’re very hungry or divide into two bowls for two smaller portions.

- Top with hemp seeds, flax seeds, and chopped fruit - though you may need more of each of these if your making two portions. Then add your favorite almond milk if you like a wet oatmeal and enjoy!


PS: If you prefer a dry oatmeal this taste amazing just as is, the milk isn’t really necessary. I mostly used it for consistency and for a bit of extra vanilla flavor. Also feel free to experiment with different types of dried fruits. I used Apricots and Plums because that’s what I had, plus I’m quite partial to dried plums in things. Though you could use any dried fruit you like.

PPS: Oatmeal can be made Gluten-Free if you are using Gluten-Free Oats


Wednesday, October 31, 2012

Vegan Mofo #28 Celine & Tamasin’s Mango Butter & Ginger Whoopie Pies...


Vegan Mofo #28 Celine & Tamasin’s Mango Butter & Ginger Whoopie Pies 

The Book - Vegan Sandwiches Save the Day!
The Author - Celine Steen & Tamasin Noyes
The Recipe - Mango Butter & Ginger Whoopie Pies
Page # 167
Difficulty - Easy
Duration - Roughly 30-40 minutes


What Sandwich theme Mofo would be complete without the addition of a dessert sandwich? I’ve already offered you breakfast sandwiches, lunch sandwiches, dinner sandwiches, lite sandwiches, snack-like sandwiches and now I shall give you a ‘sandwich’ fit for dessert.

Now I’ve never really understood the craze over Whoopie Pies. I didn’t actually know what a Whoopie Pie was until I moved to the United States. While I’ve of course tried the standard chocolate vanilla whoopie pie - essentially a soft oreo in my opinion - the classic red velvet whoopie pie, and a peanut butter whoopie pie I thought they were all alright but nothing spectacular. Then I saw this recipe in Vegan Sandwiches Save the Day and thought Mango and Ginger? What a unique and interesting combination. I knew I had to give them a try, and I knew I’d have to make them before Mofo ended.


This recipe does involve a bit of work, but trust me when I say it’s all worth it. To make the mango butter you boil frozen mango chunks, brown sugar, water and lemon juice in a small pot, then puree it in the blender and let it cool. Then you get working on the cookies by combining vegan butter, brown sugar, cornstarch, ginger, salt, flour, baking powder, baking soda and the cooled mango butter. You roll the dough into small balls bake them in the oven then let them cool while you make the frosting.


The frosting like all frosting is super simple. Just powdered sugar, ginger, vegan shortening and vegan butter, vanilla extract and a non-dairy milk of your choosing. When the cookies have baked you spread the frosting over half of them, stick the other half on top of the frosted ones and voila! Delicious, sweet and spicy whoopie pies. Love them! And I have to say they were all gone by the next morning! Whoops!


Friday, April 27, 2012

Blackberry Vanilla Buttercream Cake with Blackberry Vanilla Buttercream Frosting...


And now for the grand finale... We ended our Earth Day dinner with a delicious Blackberry Vanilla Buttercream Cake!

I absolutely adore blackberries, have since I was a kid. To me they’ve always meant spring, and summer, because when I was growing up my Opa used to pick ice cram buckets full of wild blackberries that grew in brambly areas along the roadsides. He would pick enough buckets of blackberries all summer for each of his six children to have a couple of buckets, plus a few buckets for him and my Oma too. My mom would always turn those buckets of blackberries into blackberry pie which was then and still remains my all time favorite pie. To me there is absolutely nothing better then a juicy ripe blackberry eaten fresh of the vine or cooked down with a bit of sugar.


Unfortunately I think blackberries - despite their awesome array of phytonutrients and antioxidants - are a relatively underappreciated and underused berry. They never get the appreciation of blueberries, nor the love of raspberries most people just complain that their seeds are annoying. While I can’t deny that simple little fact, I do own floss, and never leave home without it. Blackberries are just too good to ignore, especially when they’re fresh, ripe and in their prime.

So I wanted to use them on Earth Day, but I wasn’t interested in going through all the hassle of making a pie crust. I sort of loath pre-made store crusts, and so almost always opt to make my own, but they’re work. More work then I felt like investing on Saturday night when I got home late from work, so I had to come up with something else. It thought about other sweet decadent ways to use blackberries and suddenly recalled the Gluten-Free Raspberry Cake from ‘Sweet Vegan’ that I’d made for Easter. It has been such a hit, and tasted so good when mixed with vanilla buttercream I thought “why not try something similar with blackberries?” From there it was a no-brainer, blackberry vanilla cake it would be, topped with a blackberry buttercream frosting to match.


Like the Raspberry cake this blackberry version was a huge hit, even amongst people who’d previously said they were not blackberry lovers. So I hope you try it, enjoy it, and forever become a blackberry lover!

*** Note - Normally I’d use whole wheat pastry, or at least a combination of whole wheat and all-purpose flour. However, because I wanted the blackberries to stand out against the cake I chose to use all purpose flour, for aesthetic and contrast reasons. If that doesn’t matter to you buy all means sub in some whole wheat pastry or whole wheat flour. ***


Blackberry Vanilla Buttercream Cake

3 C Unbleached All Purpose Flour
3 tsp Baking Powder
1 C Earth Balance or other non dairy butter at room temp
1 1/4 C Granulated Sugar
3 tsp Vanilla Extract
6 tsp Ener-G Egg Replacer Mixed with 8 Tbsp warm water till frothy (or other egg replacer)
1 1/4-1/2 C Almond Milk (Unsweetened, Plain, or Vanilla flavor)
1 Tbsp Apple Cider Vinegar
1 ½ C Fresh Blackberries quartered

Blackberry Vanilla Buttercream Frosting 

1 C Earth Balance or other non-dairy butter at room temperature
4C Powdered Sugar
2tsp Vanilla Extract
3-4 Tbsp Blackberry Jam (Seedless if possible)
1-3 Tbsp Vanilla or Plain Almond Milk to thin if needed

To make the cake

- Preheat the oven to 350'F

- Combine the flour and baking powder in a large sized bowl and set aside.

- Using a handheld or stand mixer beat the Earth Balance with the Sugar and the Vanilla extract on medium speed until combined. Scrape down the sides of the bowl as needed. Set aside.

- In a third bowl, combine almond milk, vinegar, and Ener-G egg replacer mixture.

- Alternate adding both the dry and the wet ingredients to the earth balance sugar mixture. Staring and ending with the dry ingredients. Mixing on low-speed until each addition is just incorporated. Once all wet and dry ingredients have been incorporated scrape down the sides of the bowl as needed.

- With a wooden spoon gently fold in the blackberries until just incorporated.

- Grease two 9 inch cake pans - I like to use springform - with cooking-spray, and spread the cake better evenly between the two. Bake for 35-45 minutes until a toothpick inserted inside the middle of each cake comes out clean.

- Remove cakes from the oven and let cool for 10 minutes. Then remove the cakes from the pans transferring to a wire cooling rack. Let cool for 1 hour, or until completely cool.


To Make the Frosting

- With handheld or stand mixer beat non-dairy butter and vanilla extract until smooth and creamy

- Add in Sugar 1 cup at a time beating to incorporate.

- Add in 1 Tbsp of almond milk, plus the blackberry jam and beat until thoroughly mixed.

- If the frosting Is too thick add in additional almond milk or jam. If it’s a little thinner then you’d like add in some more powdered sugar 1/4 at a time.


Assembly.

- Place 1 cake upside down on a plate. So that bottom is facing up. Using a flat frosting spatula - or regular spatula - spread a thick layer of frosting over it.

- Carefully place the other cake - right side up - on top of the first cake.

- With the remainder of the frosting frost the top and sides of the cake as desired. Garnish with fresh blackberries however you like, and serve!


*** Note - Soy-Free if using a soy-free non-dairy butter, Can also be made Gluten-Free by subbing in GF Flour(s)***