Showing posts with label Lemongrass. Show all posts

Thursday, December 13, 2012

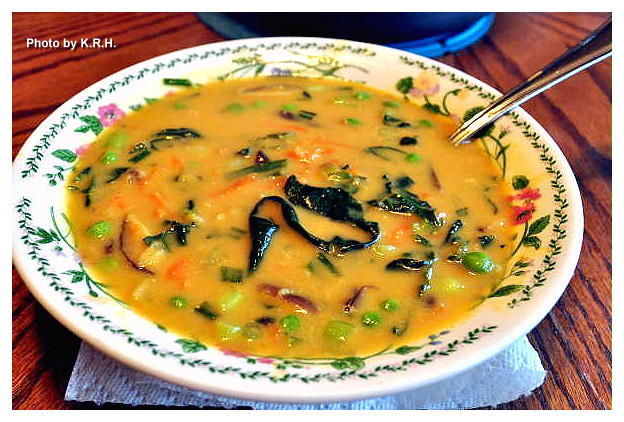
Coconut Curry Miso Soup...


I can’t believe I forgot to post about this recipe, or maybe I can believe it. Things have been so busy around here lately that it’s easy to loose track. Well, the day I received my first CSA box I was so excited to use that Tat Soi that I decided to make it for lunch. It was a Friday afternoon and I needed something filling, hearty and warming before heading to work for the night shift. Originally I thought about making Miso soup, that seems to be my most common go to meal when I need something delicious and filling on short notice, but as much as I love Miso soup I was looking for something more. The more I thought about it the more I realized I was also in the mood for curry, and coconut. Now I know from past experiments that miso and curry actually go pretty well together but I wasn’t sure on the coconut. I envisioned like a Thai coconut curry of sorts but with the addition of Miso to give it that bold, well rounded, and savory flavor I love so much from miso soup.


I didn’t know if it would workout but in the end I thought I couldn’t do that much harm. I guess I needn’t have worried too much, because the soup turned out so good that my husband and I gobbled up the whole pot. That’s two huge heaping bowls a piece. Now as much as you may want to eat this whole pot yourself once you make it, I highly suggest you share it with a loved one instead and serve a salad alongside it to complete the meal.


Coconut Curry Miso Soup

2 ½ C Water
2/3 C Coconut Cream***
1/4 C Red Miso
4 Garlic Cloves Minced
Thumb Sized piece of Ginger minced
2 tsp Red Curry Paste
1/4 C Frozen Green Peas
1/4 C Green Onion sliced
½ Head of Tat Soi Sliced
1 Carrot Grated
1/3 C Black Soybeans
½ C Sliced Shiitake Mushrooms
1/4 tsp Ground Turmeric
2 ½ tsp Sliced Lemon Grass
Black Pepper to taste

- Combine Water, coconut cream, and red miso in a medium sized pot. Place over medium heat and stir until all the miso and coconut cream is dissolved and the mixture is smooth.

- Add in the garlic, ginger, lemon grass, curry paste, and turmeric. Mix to incorporate, until curry paste is dissolved.

- Add mushrooms, tat soi, and simmer for 10-15 minutes over medium or medium low heat until vegetables are soft.

- Add all other ingredients and simmer for 5-8 more minutes until warmed through.

-Serve hot and enjoy!


*** Note - Coconut Cream is the thick cream that normally rises to the top of a can of coconut milk. Scrape the cream out of the can and use, do not use the liquid for this recipe. Reserve it for another use. Also in some Asian groceries and markets canned coconut cream is available.

PS: If you don't have Tat Soi you can use another Asian Green, though I highly recommend searching for the tat soi.

Monday, May 21, 2012

Lemongrass Tofu Marinated Maki...


For those days when you’re looking for a heartier more protein rich maki may I make a suggestion? Lemongrass tofu! This dish came about simply out of my desire to do something different with my maki. Asparagus, and avocado, sweet potato, and cucumber rolls are brilliant, but sometimes you just want something different. My local health food store sells a really tasty fried tofu maki that I enjoy occasionally, and I happened to have a block of extra firm sitting in my fridge, so I put two and two together. However unlike the tofu maki at my local grocery I wanted to create a sweet, tangy and spicy sauce to marinate the ‘fu in.


Since I’ve been playing around a lot with Asian flavors lately I found myself reminiscing about Vietnamese food. I absolutely love the richness and complexity of Vietnamese fare, one dish can have so many flavor notes. I also love the liberal use of lemongrass stalk in South East Asian cooking, it’s an ingredient that’s completely neglected in every other cuisine. Which in my opinion is unfortunate. The world at large should not be deprived of the awesomeness of a really good lemongrass coconut milk ice cream, but I digress.


The marinade I made for my tofu, is inspired by the countless recipes and menu listings I’ve seen over the years for lemongrass chicken. It seems to be everywhere in Vietnamese restaurants, and though I’ve only eaten it once - years and years ago - I can tell you that lemongrass tofu is infinitely better. However I should say that I’d never go so far as to claim this marinade is in any way authentic - just the happy outcome of me tossing things together, - it is absolutely delicious, and makes for an equally good dipping sauce for the finished maki, instead of or in addition to soy sauce.


Lemongrass Tofu Marinated Maki

4 Sheets Nori
1 ½-2  C Brown Rice
3 C Water
2 Tbsp Brown Rice Vinegar
1 Tbsp Sugar
2 Carrots grated
4 Green onions thinly sliced
1lb Block of Extra Firm Tofu

Sweet Lemongrass Marinade 

1/3 C Soy Sauce
1/4 C Agave
1/4-1/2 C water
2-4 Tbsp Minced Lemongrass
2-3 Tbsp Kieffier Lime Leaves minced
4 garlic cloves
1 piece ginger
½ tsp red pepper flakes

Soy Sauce or Thai Chili Sauce for Dipping
Pickled Ginger and Wasabi to Garnish

- First prepare your tofu. Drain your tofu and squeeze out as much water as possible. You want it to become dense. I used my tofu press for this, and left it in for about 2 hours. If you don’t have a tofu press you can simply wrap the tofu in a clean dish towel and place heavy objects on top of it.

- In the meantime pour all marinade ingredients into a blender and blend on high until thoroughly combined. 30-60 seconds. Set aside.

- When tofu has been thoroughly drained, place it in a container with a secure lid and pour the marinade over top. Leave in the fridge to marinate for 1-2 hours.

- Now is a good time to think about making your rice. For this recipe I used brown rice because that’s what I had, but if you prefer you can easily switch it out for sushi rice and there won’t be any difference. So combine your rice, your water, the vinegar and sugar in your rice cooker and cook as directed. If you don’t have a rice cooker combine rice, water, vinegar and sugar into a pot, stir to combine cover and bring to a boil. Reduce heat and let simmer until all water is absorbed and rice is cooked. Cooking time varies but for brown rice I’d say it’s usually done within 35 - 40 minutes so just check on it every now and again and make sure to stir so the bottom doesn’t burn. Add more water if necessary. However if you are using sushi rice the cooking time will be shorter, count on 20-25 minutes cook time but be sure to check.

- When your rice is cooked set aside until cool enough to handle.

- When tofu has finished marinating. Heat a large non-stick or cast iron pan over medium-high heat. Spray with a touch of non-stick spray. Remove the tofu from the marinade and reserve marinade. On a clean cutting board slice the tofu into 1/4 inch thick strips. Dip the strips back into the marinade to coat and then place in the heated pan.

- Fry tofu slices until firm, crisp, golden, and slightly blackened. Roughly five minutes per side, perhaps a little longer if using a non-stick pan. Once all slices have been fried on both sides remove the tofu to a plate and set aside. Once cooled slice each strip into thinner slices lengthwise.

- Now you’re ready to assemble your Maki, which is by far the trickiest part, but trust me you’ll be okay. On your clean work surface. - I use a clean bamboo cutting board - lay down your bamboo sushi rolling mat. On top lay down 1 sheet of Nori with the shiny side facing up. Have a bowl of cold water at your work station and with wet - but not profusely dripping - hands grab handfuls of rice and spread evenly over the sheet of nori. Spread the rice as close to the edges as possible but leave about a half to a quarter inch of space on the horizontal side of the Nori furthest from you. This little boarder will help your rolled Maki stick together. Rinse your hands before moving onto the next step.

- Next layer in 2-3 strips of tofu on the left parallel with the horizontal edge of the nori closest to you. Laying them down over the rice you just spread out. If they’re not long enough to reach from left to right then layer in 3 more strips on the right so that the edge closest to you is completely filled with tofu. If some poke out past the nori you can trim them off, or leave them as is.

- Sprinkle desired amount of grated carrots and sliced green onions over top of the tofu,

- Now, using your mat, and working slowly pull the mat up slightly and roll it over. Moving slowly and using both hands slowly roll your Maki, using the bamboo mat to press down and make the roll tight. You may have to stop at some point to push the filling back under the Nori or to help guide the roll. Stop just before you get to the opposite edge that you’ve left empty. Dip your fingers into the water, run them along the empty edge then roll your nori closed. Press down tightly to seel.

- It’s okay if it’s not perfect, rolling Maki takes practice and even though I’ve done it a ton of times I still don’t make a perfect roll each time. Sometimes my rolls are to fat, sometimes they don’t seel properly, sometimes I don’t cut them well. It happens, don’t beat yourself up about it. Remember that you’re doing it for the fun of it, and it’s - maybe - your first time, you’ll get better the more you practice.

- Next, and this step is very important. Before cutting your Nori into one inch sections run your chef knife under cold water. By the way you should always use a chef knife or other similar smooth edged knife to cut sushi. If you use a steak knife, or a bread knife or some other kind of knife with a jagged edge your Maki is going to get shredded and will likely fall apart. Once seaweed is wet it is very, very durable, your roll will fall apart before the seaweed cuts properly. I know from experience. So run your Chef knife under cold water. Give it a shake and then starting from one edge and working towards the other cut your roll into rounds.

- The best way to cut your roll is to do it in one smooth motion. Do not use your knife as a saw. Press down firmly it’s okay if the roll doesn’t cut right away, it’s okay if it looks like it’s getting squished a bit this is normal. Use one fluid motion, press down on the knife with your knife hand and hold the long end of the roll steadily in place with the opposite hand. Press the knife firmly down until it has cut all the way through. To separate the round from the rest of the roll you may have to give one quick saw motion depending on the sharpness of your knife, but otherwise that is it. Run your knife under cold water before EACH cut! This is important. Before each cut your knife must be wet. The drier your knife Is the more difficult this will be and the more likely your roll will fall apart.

- Congratulations! Now that one roll is finished - You should have gotten 6-8 rounds out of it by the way - give yourself a pat on the back, and then begin again from step one. Repeat all steps until ingredients are used up. At the end you may have some leftover rice. If this is the case no worries, stick it in the fridge and toss it into a salad tomorrow, or make a veggie roll for lunch!


- To serve arrange on plates and serve with dipping bowls of soy sauce, the reserved lemongrass marinade and my favorite Sweet Thai Chili Sauce. Serve with dollops of wasabi if desired and pickled ginger, yum!


*** Note - Gluten-Free if using GF Tamari. If you don't have  Kieffier lime leaves you can just use some fresh grated lime zest and fresh lime juice.***

Monday, May 14, 2012

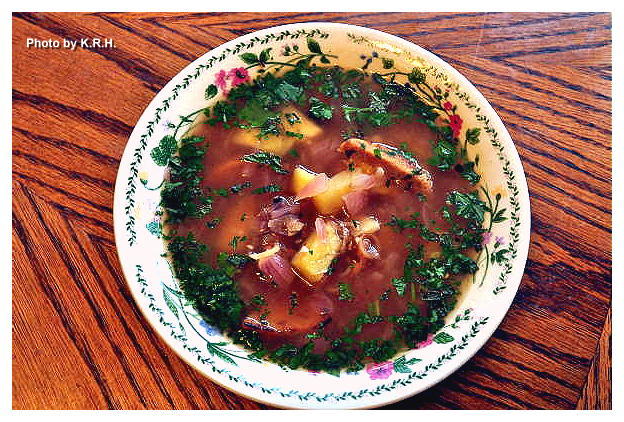
Hot and Sour Pineapple Seitan Broth...


Everyone has a favorite type of cuisine, it doesn’t matter who you ask, everyone has a favorite. Some might say Italian, and some might say Mexican. Others might say German, or Greek, or Japanese, or Chinese. I love all cuisine’s, and if you asked me to pick a favorite I wouldn’t be able to narrow it down to one specific country, but I could narrow it down to a continent. Asia. Asian cuisine is by far my favorite, if I could eat nothing else for the rest of my life that would be totally fine with me. I love Chinese, Japanese, Indonesian, Korean, Thai, Vietnamese, Cambodian, Malaysian, Nepalese, and Indian food, I love them all. This is the food I grew up on, and these are the types of restaurants I typically sought out when I grew older - not that they were at all hard to find in Vancouver.


Vancouver you see has a huge Asian population. Over 30% of the cities inhabitants are of Chinese heritage, they are the largest ethnic group in the city. Vancouver has the largest Chinatown in all of Canada, and the third largest Chinatown by population in North America. The city also boasts significant Japanese, Korean, Filipino, Vietnamese, Indonesian, Cambodian, and Indian populations. I loved this growing up, and I spent a significant portion of my teenage and early adult years exploring Vancouver’s Chinatown, which still today remains one of my top 3 favorite places in all of Vancouver. I loved going to the night markets, I loved going to hawker stalls, and food stands. I loved ducking into little shops, bakeries and groceries, and I most definitely loved eating in every Asian restaurant I came across. It is amongst these people, and these cultures that I feel most comfortable and most at home. I miss ‘my’ Chinatown all the time, I miss meditating in the Sun Yet Sen Classical Chinese Garden - one of the most beautiful and peaceful places in downtown - something I typically did 2-3 times a week when I wasn’t working. Some weeks I was in Chinatown everyday, usually alone, which is how I preferred it. For some reason I rarely went to Chinatown with friends, these adventures were always solo, that is until I met my husband, and then the two of us would explore together.


My husband, who loves Asian food as much as I do if not more, found Vancouver to be a magical place. Growing up in Chicago and suburban Illinois he wasn’t exactly exposed to the same level of Asian culture as I was. It wasn’t until he attended University in Southern California that he really experienced Asian food proper, particularly sushi for which he has an undying love. I can’t tell you how many Vancouver days and nights we spent stuffing our faces with all the glorious sushi on offer. Sushi bars you see are to Vancouver what Starbucks is to Seattle. No joke, you can’t throw a rock in downtown Van without hitting at least three Sushi Bar’s or restaurants. They are almost literally on every corner, and they are far more populous then either Starbucks or McDonald’s. As my husband said to me many years ago - and has said many times since - “Even the shittiest hole in the wall Sushi bar in Vancouver is better than the best Sushi Bar in Chicago.” - With which after moving here I would have to agree. While after a lot of searching I have found some very good sushi here in Chicago none of it can ever compare to the sushi I enjoyed in Vancouver, which Is why I typically prefer to make my own, but that’s beside the point.


Together we hit up Korean BBQ’s and Vietnamese Pho restaurants all over the city. We chowed down on Thai takeaway, and Indian curries. We stuffed ourselves on fried bananas in coconut milk, and green tea ice cream. More often than not we were the only white people eating in the restaurants we chose, and half the time we couldn’t read the menus - which weren’t in English - and so had to order by pointing at pictures. I miss this a lot, and I definitely miss the food. Even after living here for nearly 5 years I can’t get used to the endless stream of white faces, I feel awkward being part of the ‘majority,’ and I find the lack of diversity in the suburbs suffocating.


I guess it’s because I’ve been missing Vancouver lately that I’ve been making more and more Asian dishes at home. Lately I find myself particularly fascinated by the foods of Malaysia. The cuisine of Malaysia is one of the few Asian cuisines with which I’m not overly familiar, but it’s always intrigued me. Years ago I bought a Malaysian and Singapore cook book but never made anything out of it because at the time I wasn’t very proficient in the kitchen. When I finally developed my skills in the kitchen I’d stopped eating red meat and pork and was only six months away from turning vegetarian. So the book has just been sitting in my closet collecting dust for the past five years.


Traditionally Malaysian food is not particularly vegan friendly. Malaysia is a pretty ethnically diverse place, and religiously diverse as well, with a percentage of the population being Buddhist. So there are vegetarian dishes but many of them call for eggs. Most people might consider this a problem, but not me. These dishes have been calling to me over the past couple of weeks, and once I get curious about something I find it very hard to get my mind off the topic, so I decided I would try and veganize some of these recipes. When it comes to vegan Asian cuisine I find there are a lot of repeat recipes. Anyone can make a vegan curry, or a vegan stir fry. There are recipes abound for vegan won ton, vegan kung pao, vegan fried rice, and vegan tempura. As much as I love all of those things I like a little variety too, and I want to start making vegan versions of more of the dishes I used to enjoy. As well as new dishes that remind me of the tastes, and flavors I loved back in those days.


The first dish I decided to recreate is a simple Nonya dish. When early Chinese traders settled in ports of Penang, Melaka and Singapore beginning in the 15th century, many of them married local Malay woman. These marriages created an ethnic sub-group of Malay-Chinese, which in Malay are referred to as Peranakan. This group was particularly noted for it’s distinctive dress, it’s lavishly decorated homes and above all it’s cuisine. All the meals were cooked by the woman or Nonyas - the Peranakan word for female - and were an inspired blend of both Chinese and Malay traditions. The style of cuisine is very unique, full of flavor and infused with elements of Indian, Thai, Portugese, and Chinese cooking.


For my first foray into Malay cooking I chose a simple soup dish because It intrigued me, and it inspired memories of many of the sweet, sour and hot dishes I used to enjoy back home. Though the soup is traditionally made with prawns It wasn’t hard for me to decide that seitan would be a perfect substitute. I had some homemade seitan in the freezer that I needed to use, and all the other ingredients I needed were on hand. Though I was initially a little skeptical about how this might turn out I have to say it came out amazing. Really, I enjoyed leftovers of this soup for lunch all week, and it got better and better each day. I highly suggest making it a day in advance and giving it a night to let the flavors develop in the fridge. However it does taste wonderful the first day as well. I really hope you try this delicious soup, and enjoy it as much as I did.


Hot and Sour Pineapple Seitan Broth 

1 Tbsp Peanut Oil
1 Small Red Onion diced
8 Garlic Cloves minced
1 Thumb sized Piece of Ginger grated
1 ½ tsp Red Pepper Flakes
1 lemongrass stalk trimmed and minced or 3 tsp jarred minced lemongrass
2-3 Tbsp Tamarind Paste
1 ½ Tbsp Sugar
1 ½ Tbsp Soy Sauce (or Coconut Amino's)
5 C Water
Sea salt and Black Pepper to taste (Optional)
8oz Seitan (Homemade or Store Bought)
2 C Fresh Pineapple chopped into bite sized pieces
½ Bunch Cilantro minced
Fresh mint leaves, minced to garnish

- First prepare your seitan by slicing it into thin strips.

- Next heat a large pan over medium-high heat and spray lightly with non-stick spray. Add Seitan in batches and fry a few minutes on each side until browned and crispy. When browned on each side remove the seitan to a plate and set aside.

- Heat the oil in a medium sized pot over medium-high heat. Add the diced onion, minced garlic and grated ginger. Saute for 5 minutes until fragrant.

- Add the red pepper flakes, and lemongrass saute another 2-3 minutes until onions become translucent.

- Stir in the tamarind paste and sugar, then add the 5 cups of water. Stir to combine then bring to a boil. Reduce the heat then simmer for 10 minutes.

- Season the broth lightly with sea salt and pepper to taste, and stir in the soy sauce.

- Add the Pineapple and reserved Seitan to the broth and simmer for an additional 5 minutes until the pineapple is soft and both it and Seitan are heated through.

- Add in the minced cilantro and mint leaves. Divide the broth evenly amongst serving bowls making sure each bowl gets a good helping of both pineapple and seitan. Garnish with extra cilantro and mint if desired.

Typically this soup is served as an appetizer because it’s considered an appetite enhancer, however you can also serve this broth over a plate of steamed rice or noodles for a more substantial meal, or eat it as is for a light lunch or dinner. Either way it’s delicious!


*** Note - Soy Free if using Coconut Amino's instead of soy sauce ***