Showing posts with label Indian Fusion. Show all posts
Tuesday, July 22, 2014
Moong and Toor Dal Tadka with Coconut and Red Chilies...
I know what you’re thinking, hot soup or dal in the middle of summer? You’re crazy! And normally I would agree with you only I just recently came off five days of being ridiculously ill with what was probably Norovirus and so I didn’t want to push the limits of my digestion. Since Thursday afternoon I’d been living off of crackers, bread, tea, and on Saturday evening when I finally began to feel stable enough to take in something heartier I made a very brothy vegetable soup. It was pretty basic - potatoes, carrots, celery, onion, broth, water, and spike seasoning. It was tasty, but come Monday when I was feeling roughly 85%-90% better I wanted to eat something fun!
I’ve really been craving Indian food lately, specifically lentils, and when I think of lentils I automatically think of dal, there are few things more nourishing and comforting then a big ‘ole bowl of dal. Specifically I wanted dal tadka, which I’ve only recently discovered There’s a great little Vegetarian Indian Restaurant not far from where I live that serves a wicked good Dal Tadka, I had it the week my mother was in town visiting me, and I’ve been kind of dreaming about tadka ever since.
Tadka incase you don’t know is really just a cooking technique in which you fry whole spices in oil so that they release their natural oils, and after a minute or so you pour the whole thing - oil and all - into the dish you’ve prepared. It sound a bit strange maybe since we’re used to putting spices in our food at the beginning of cooking rather then at the end but let me assure you that this technique imparts some truly phenomenal flavor! And that’s exactly what I wanted.
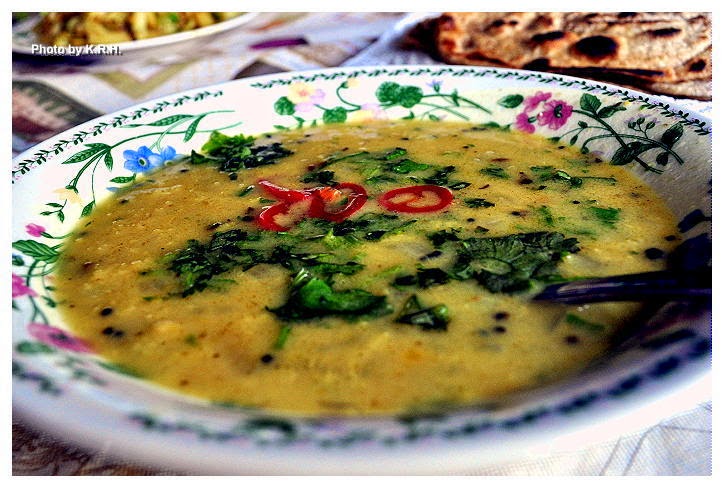
Now, I’m not going to lay any claims saying that this is in any way a traditional dal tadka, or even a traditional dal, but it is delicious. It’s full of ingredients that are delicious and healing, however if you’re unaccustomed to cooking Indian food at home you may not have them all on hand. Still, they should be easy enough to find at your local Indian grocery - that’s where I get mine - and they are well worth hunting down. Trust me once you taste the slightly bitter, onion flavor of Nigella seeds you’ll be hooked! Similarly the buttery, garlic/onion flavor of asafetida can not be matched, and black mustard has a unique flavor itself, different from that of yellow mustard. As for pickled red chilies I make them myself, and so I’m not sure if you can actually buy such a thing anywhere. Though if you have a basic pickling recipe you can easily pickle some of your own chilies. It’s not necessary but I love the added flavor note.
Moong and Toor Dal Tadka with Coconut and Red Chilies
Dal
1 tsp Olive Oil
1 Large Yellow Onion Diced
1 C Moong Dal - soaked for 1 hour and rinsed
½ C Toor Dal - soaked for 1 hour and rinsed
4 C Water
½ tsp Ground Turmeric
1 - 1 ½ tsp Salt - to taste
1 13.5oz can Full Fat Coconut Milk
½ Bunch Cilantro Minced
Tadka
2-3 tsp Olive Oil
1 ½ tsp Black Mustard Seeds
½ tsp Nigella Seeds
½ tsp Coriander Seeds
½ tsp Fenugreek Seeds
1 tsp Asafetida Powder
6 Garlic Cloves Minced
1-2 Red Chilies Minced - depending on heat preference.
To Garnish -
Extra Minced Cilantro
Sliced Pickled Red Chillies - optional but highly recommended!
For the Dal
- Heat the Olive oil in a large soup pot over medium high heat. Add the diced onion and saute for 5-6 minutes until lightly golden.
- To the pot add the soaked and rinsed Moong Dal as well as the Toor Dal. Stir to combine.
- Add the 4 cups of water, the turmeric, and the salt. Cover and bring to a boil. Boil for 10 minutes then reduce the heat and let simmer for 20 minutes.
- Check on the doneness of your dal. If the lentils are still hard, or too firm for your liking continue to simmer for an additional 10 minutes until they become soft. If the lentils are soft already, and have reached a somewhat mushy consistency add in the coconut milk and stir to combine. Simmer for 5 minutes.
- Remove the pot from the heat and add in the minced cilantro. Stir to combine.
For the Tadka
- Heat the oil on high in a heavy bottomed frying pan. Once hot add in the mustard seeds, nigella seeds, coriander seeds, fenugreek seeds, asafetida powder, minced garlic and minced chili. Fry for one minute or until the seeds pop, the garlic has turned golden and the chilies have softened slightly. It’s okay if the spices brown a little, it adds to the flavor.
- Remove the pan from the heat and scrape the entire contents - spices and residual oil - into your pot containing the dal.
Assembly -
- Stir the Tadka into the dal until it’s been well combined. Let sit for 5-10 minutes to let the flavors mingle. Then divide amongst serving bowls and garnish with additional cilantro and pickled red chilies if desired.
- Serve with basmati rice, and/or Indian Flatbread. I made a batch of Roti to scoop the dal up and it was a delicious accompaniment.
Labels:
Asafetida,
Cilantro,
Coconut Milk,
Coriander,
Dal,
Fenugreek,
Garlic,
Gluten-Free,
Indian Fusion,
Lentils,
Main Meal,
Mustard Seeds,
Nigella Seeds,
Onions,
Soup,
Soy-Free,
Sugar-Free,
Turmeric
Friday, September 27, 2013
Vegan Mofo #27 - Madhu’s Onion Stuffed Flatbread (Pyaj Paratha)
The Region - India
The Book - The Indian Vegan Kitchen
The Author - Madhu Gadia
The Recipe - Onion Stuffed Flatbread (Pyaj Paratha)
Page # 162
Difficulty - Easy
Duration - Roughly 45-60 minutes
I had so much fun making Aloo Paratha - or Potato stuffed flatbread - a couple of weeks ago I thought I’d try my hand at it again with a different filling this time. Potato stuffed flatbread is really my favorite but I love onion and cauliflower stuffed breads as well. Now that I know how easy it is to make home-made paratha I knew I’d have to try Madhu’s recipe for Pyaj Paratha - or Onion stuffed flatbread.
The technique is basically the same as with any paratha. You make a dough of chapati flour - which I didn’t have so I used half and half whole wheat flour and all purpose - water, and salt. Let it sit and make your filling. For the onion filling you simply need to dice some red onion and chilies, then add in some cayenne, coriander, and amchoor powder. Once that’s all done you divide your dough, roll it out into balls, place some of the filling in the center close it up and roll it out again. When all that’s done you’re ready to fry them in a cast iron skillet and there you have it.
Initially I was a little concerned that by using raw onion instead of sauteed onion there would be an overpowering onion flavor that would make the bread inedible. Still I staved off the temptation to disregard the recipe and saute the onions first. I used them raw, grilled my bread and hoped for the best. Much to my surprise the onion flavor wasn’t overpowering in the end. I suppose if you mince the onion small enough it allows them to cook relatively well despite the fact that the bread is only in the pan for a minute or two a side.
Another thing I noticed this time around is that I’m getting much, much better at making paratha. The more you do it, the easier it gets and the quicker you are. I don’t think I’m ever going to buy another store-bought Naan or flatbread again. It’s like making your own corn tortillas, once you have homemade you just can’t go back, especially when it’s so easy. If you’ve never made paratha at home you simply have to try it! It was the perfect accompaniment to some South Indian Humus .
Vegan Mofo #26 - Anypy’s South Indian Hummus...
Vegan Mofo #26 - Anypy’s South Indian Hummus
The Region - India
The Book - Vegan Indian Cooking
The Author - Anupy Singla
The Recipe - South Indian Hummus
Page # 132
Difficulty - Easy
Duration - Roughly 10 minutes
I love a good hummus, and so when I first saw Anupy’s version for a South Indian take on the classic dish I knew I’d have to make it at some point and yesterday was a lazy kind of day. It was the kind of day where I didn’t feel like doing a lot of cooking or making anything that required a lot of ingredients. I wanted fast and simple and something I wouldn’t have to thick about and so I thought it would be the perfect easy dinner with some homemade Naan.
Besides being quick and easy I was also immediately intrigued by the ingredients, and was particularly curious to use lentils instead of chickpeas for the base. Anupy doesn’t specify what type of lentils to use and so I used a can of brown lentils. I was also really interested to use mustard seeds and coconut oil, not to mention excited at the prospect of using my Rasam and Asafetida powders for something. Other ingredients in this twist on hummus include garlic, lemon juice, black pepper, salt, smoked paprika, cumin, and water as needed to thin.
See? Simple. It’s also an extremely delicious combination. The lemon and Rasam powder gives the hummus a tart, tangy flavor, and the coconut oil gives it a subtle tropical flavor as well as a smooth buttery flavor. The mustard seeds don’t get entirely pureed and so they leave a bit of crunch in the mix and the asafetida just brings the whole thing together. This is probably one of the most creative and best tasting hummus’s I’ve ever eaten, and it tasted so darn good with that homemade Naan I mentioned - but more on that later.
Labels:
Asafetida,
Cook Book,
Garlic,
Hummus,
Indian Fusion,
Lemon,
Lentils,
Vegan Mofo
Sunday, September 22, 2013
Vegan Mofo #20 - Anupy’s Seitan Tikka Masala...
Vegan Mofo #20 - Anupy’s Seitan Tikka Masala
The Region - India
The Book -Vegan Indian Cooking
The Author - Anupy Singla
The Recipe - Seitan Tikka Masala
Page # 207
Difficulty - Easy
Duration - About 30-40 minutes
And now, from China to India. Before going Vegan Chicken Tikka Masala was one of my favorite Indian dishes. I used to get it all the time in my favorite Indian restaurants around town. The flavor of the gravy is just so fantastic and complex, rich, and subtly sweet with a hint of spice, what’s not to like right? Of course it’s not so economical to be eating out all of the time and so I tried my hand - on numerous occasions - to make Tikka Masala at home. Several times I tried before going vegan without success, somehow my versions were just never as rich or complete. Then after going vegan I tried a tofu version that failed miserably, and a tempeh version that was nearly as bad. Why this should be the case I do not know, I used recipes I found online and recipes I found in cook books and none of them ever seemed to capture the greatness of the Tikka Masala’s I was enamored with from my favorite restaurants. Eventually I gave up trying to recreate it.
Then I got Anupy Singla’s wonderful book Vegan Indian Cooking, and lo and behold she has a recipe for Seitan Tikka Masala, I knew instinctively that I would have to try it eventually even if it only turned out to be another miserable failure in a long string of them. This was one of the dishes I was most excited about making for Mofo, and I’m happy to report that it exceeded all of my expectations, which came as something of a surprise.
Glancing over the recipe it looks like a bit of a chore but really it’s quite simple. You cube seitan and marinate it in a mixture of soy yogurt - I actually used coconut because that’s all I had - lemon, ginger, garlic, paprika, cayenne, cinnamon, black pepper, and salt. The recipe doesn’t specify how long to marinate it just says to do so while you prepare everything else, but I know a longer marinade time means better flavor and so I prepared this in advance and marinated it for an hour.
The gravy is just as simple in a food processor you combine an onion, garlic, serrano chilies, tomato paste, gram masala, coriander, red chili powder, sea salt, jaggary - which I didn’t have so I used brown sugar instead - water, and whole fresh tomatoes. Once combined you heat some oil in a pan and pour the mixture in, bring to a boil and simmer. Basically you cook this like you’d cook a spaghetti sauce and you add in some whole cloves and cardamom pods. I didn’t have either whole cloves or cardamom pods and so I used ground spices instead, it worked out beautifully, and I used about an 1/4 tsp of each.
While your sauce is bubbling on the stove you remove the seitan from the marinade and fry it till brown in a skillet. Then you add any leftover marinade from the seitan into the sauce, add in the cubed seitan, and some cashew cream. Let it sit for 10 minutes to let the flavor mingle and serve with minced cilantro over rice with naan.
So much easier then you’d think, and so, so delicious. This is the hands down best Tikka Masala I’ve ever made, and possible the best one I’ve ever eaten - vegan or otherwise. It’s just as good as any I’ve ever had in any restaurant, and really meets my expectations for rich complexity and subtle flavor. I loved everything about it and my husband heartily agreed that it was the best as he filled his plate for a second time.
Just as an aside here I’d like to mention that despite the Indian flavors, and the fact that Tikka Masala is served in virtually every Indian restaurant in the west, Tikka Masala is not exactly a traditional Indian dish. Certainly the dish shares some similarity with butter chicken, and Tandoori flavor and it was without a doubt invented by an Indian chef, however it was actually invented in the UK not India. No one is 100% sure who first created this dish or where it first originated - some say London, some say Glasgow, some say Birmingham and some say Newcastle - but the reasons for why it was created are pretty clear. As a former British colony there was/is a lot of trade between England and India, and the UK has a large Indian population as a result of this long-standing relationship. In an effort to make Indian cuisine more popular amongst the British, and more suitable to the palates of white people someone invented Tikka Masala, a mildly spiced Indian inspired dish that has now become the most popular Indian dish in the UK. In fact it’s even been called the most popular dish in British Restaurants period. As much as I love tikka masala I find this very funny, and don’t really consider tikka masala to be ‘true’ Indian food but more of a fusion. After all Tikka Masala is a dish that all of my white friends eat, and none of my Indian friends eat - that tells you something right there. Though, regardless of where it came from, or who invented it, it is a tasty dish, and if you like Tikka as much as I do then you absolutely need to try Anupy’s recipe for it. You’ll fall int love.
Tuesday, September 3, 2013
Vegan Mofo #6 -Madhu’s Potato Stuffed Flatbread (Aloo Paratha)...
Vegan Mofo #6 -Madhu’s Potato Stuffed Flatbread (Aloo Paratha)
The Region - India
The Book - The Indian Vegan Kitchen
The Author - Madhu Gadia
The Recipe - Potato-Stuffed Flatbread (Aloo Paratha)
Page # 160
Difficulty - Easy - But time consuming
Duration - Roughly 1 hour, maybe less if you work quickly
One of my favorite things about Indian cuisine is the bread. I mean who doesn’t love warm, fluffy bread to dip into sweet/sour chutney, or to scoop up their dal and rice? Am I right? I mean I don’t know a single person that doesn’t like Naan, Roti, or Paratha. I’ve already mentioned how much I hate working with dough, but despite my aversion to dough I’ve come to realize that home-made bread-stuffs of all kinds are really the best. I mean the Naan and Paratha I get at my local Indian restaurants is great, but I’m not going to order a basket of take-out bread every time I’m in the mood for Naan. In some places you might get lucky and find Naan at your local grocery store. This seems to be a more popular item that I’m seeing more and more unfortunately vegans need to be careful as many of the store-bought naan’s are made with eggs, milk, or butter. Most of the whole wheat naan’s I’ve tried are vegan, but they just don’t fluff up the same way as restaurants or home-made flatbread. They just don’t satisfy. Roti is harder to find outside of an Indian restaurant but it’s doable, of course it doesn’t taste the same either but them’s the breaks right? As for Paratha, good luck finding that in your local grocery, and when it comes to flatbread paratha are my favorite.
Incase you didn’t know Paratha are a stuffed flatbread originating in India, and they happen to be the most popular type of unleavened bread in the Northern part of the country. Typically they’re made from frying whole wheat dough in ghee, or oil, and they can be stuffed with just about anything but potatoes, chilies, onions, paneer, cauliflower, and spices like Ajwain and coriander are the most common/popular. Potato Paratha are my absolute favorite, I don’t know about you but there’s just something so delightful about potato stuffed bread. I always order this kind of flatbread in Indian restaurants when I want something a little hardier then the standard Naan, but I’ve never made it myself.
I thought this year’s Mofo would be the perfect opportunity to try my hand at making some Potato Parathas at home. Despite my disdain for dough, and despite my epic fail the last time I tried to make Naan, I decided what the hell. Mofo is all about challenging one’s self, and going against the grain is it not? At least that’s how I feel about it. I thought making the paratha was going to be hard, I thought it would involve a lot of sweating and a lot of swearing on my part but I was surprised to find out just how easy it is. Easy - but not quick, just FYI. The dough is simply made with whole wheat flour, salt, water and vegetable oil, and my favorite part about it is that it doesn’t need to rise!
Next you make the filling by boiling the potatoes. Then you mix and mash them with the rest of the filling ingredients, including salt, cayenne, finely diced green chilies, ground coriander, and ground amchur powder. Once the filling is done you divide the dough into balls, roll each one out and scoop some filing inside. Next you seal the ball, flip it over and gently use your rolling pin to roll it into whatever shape you like. Circle, oval, square etc.. mine are kind of oval shaped and I wasn’t too picky about getting them perfect because I was just happy they weren’t giving me much trouble.
In the end the dough stuck to the surface of the counter a little more then the recipe suggested it would, so I had to use more flour during the process, but overall this was a pretty easy process. Once the paratha are rolled out you fry them for a couple of minutes a side in a lightly oiled cast iron skillet and BAM! Done! Amazing, amazing home-made paratha.
Vegan Mofo #5 - Anupy’s Chana and Split Moong Dal with Pepper Flakes...
Vegan Mofo #5 - Anupy’s Chana and Split Moong Dal with Pepper Flakes
The Region - India
The Book - Vegan Indian Cooking
The Author - Anupy Singla
The Recipe - Chana and Split Moong Dal with Pepper Flakes
Page # 152
Difficulty - Easy - But plan ahead
Duration - Roughly 5 hours. Active time is only about 10 minutes
Today we move on from China and head over to India with an amazing Chana/Moong Dal. Strangely as much as I love a good soup or a stew, and as much as I love dal when it’s served to me in Indian restaurants, making dal at home is just never something I do. My pantry is always stocked with a variety of lentils, beans and spices so it’s not that I don’t have the necessary ingredients, maybe it’s because I’m usually really bad at planning ahead, and this dish in particular requires some forethought.
Indian dals are often made in a pressure cooker, apparently this is one of the most common methods. It helps the dals cook quickly and get creamy. I don’t have a pressure cooker though, so I’d have to cook my dals on the stove, which is certainly possible though more time consuming. I like that for this recipe Anupy uses a slow cooker. That I have, and it makes the whole dish super easy to throw together. However since it’s going into a slow cooker - emphasis on the word slow - this is why you need to plan ahead, otherwise dinner won’t be ready in time.
This is perhaps the easiest and best tasting dal I’ve ever made at home. It really was restaurant quality. I don’t typically order a lot of dal when I’m out, but when we were in London last year we had some poor weather, and since we ended up eating in several Indian restaurants dal was just the ticket. I’ve really been wanting to recreate some of those delicious flavors and Mofo seemed like the perfect opportunity to do that.
This particular dal uses chana dal, and moong dal as the base. It also includes yellow onion, ginger, garlic, tomato, serrano chilies, cumin seeds, turmeric, sea salt, cayenne, water, oil, red pepper flakes and cilantro. My initial thoughts based on the ingredient list is that with 6 cups of water it was going to be bland, and with all that heat it was going to be too spicy. Still I decided to leave the water as specified but I cut back on the spice. I cut the cayenne in half, and used only about three quarters of a jalapeno - I didn’t have serrano peppers. - Honestly I think this was the perfect level of spice for me and my husband. It wasn’t overpowering, so it allowed us to taste all the other flavors of the dish. I also really loved the use of whole cumin seeds rather then ground cumin. They add so much flavor and since they're in the slow cooker so long you don't have to worry about breaking any of your fillings on them.
| Dal in the slow-cooker |
Typically in South India dal and Sri Lanka dal is eaten with rice and vegetables. While in the North of India, Nepal, and Bangladesh dal is eaten with rice and bread. Since I was feeling a bit lazy I decided to forgo the rice and the vegetables and just make some homemade Naan, but you’ll have to wait until later today to hear all about the Naan making process.
Monday, January 14, 2013
Indian Spiced Lentil Loaf...
Everyone loves a good lentil loaf right? At least it seems that way. I say that because out of the 100 + cook books that I own I would say at least three quarters of them contain a recipe for a vegan ‘meatloaf’ or some variation of the classic hippy lentil loaf. Now, I was never that big a fan of ‘meatloaf,’ because well... for starters meat shouldn’t come in a loaf, ans secondly when you really think about what it is you’re eating - a big ole slab of ground beef with ketchup and breadcrumbs - it doesn’t really sound that appetizing. Certainly it’s not a very creative dish. A good lentil loaf on the other hand can blow your mind, after all lentils are a really versatile food, and I never fail to be amazed at what they can be made into. Plus on these cold winter nights when you’re dying for something savory and comforting but don’t want to do a lot of work a lentil loaf is perfect. They’re quick and easy to throw together with minimal active time. Once you have it in the oven baking you can take a shower, read a book, do some yoga, or just relax with a hot cup of tea.
Lentils loafs are also rich in nutrients. You get protein from the lentils, plus lots of healthful nutrients, vitamins, minerals and antioxidants from the array of spices and vegetables you decide to put into them. The problem though - at least for me - is that so many of the lentil loaf recipes floating around out there are the same. It’s always the same kind of lentils - usually brown - with the same basic combination of vegetables - onions, carrot, celery, - and the same combination of herbs - parsley, thyme, salt, pepper, basil, oregano. - Vegetable brother is another typical component as is soy sauce and are almost always topped with ketchup or BBQ sauce. Now, don’t get me wrong, I like this combination - a lot - but as you know I like variety. I’ve never been the type of person who makes the same thing over and over again and so I require a little more creativity in my life.
I had been thinking a lot about lentil loafs last November when I happened upon an interesting recipe in Robin Asbell’s book “Big Vegan” it was a French inspired lentil loaf with Herbs de Provence and a Dijon Mustard glaze, yum! I was immediately excited and so I made the loaf. It was beyond excellent, and it got me thinking about what other kind of cultural twists I could throw into a lentil loaf to shake things up a bit. Initially I wrote down a bunch of ideas that I’m eager to try out, but since Indian food is one of my - and my husband’s, - favorites, that seemed the most natural direction to go in first.
When I first came up with the idea I had no idea how I was really going to do it. I had no idea if it would be good or if it would even be edible, but in the end I really surprised myself because the loaf turned out really fantastic. It tasted like a big samosa covered in mango chutney. It had all the great flavors I love about Indian Cuisine, the sweet, the spicy, the pungent, all rolled up in one easy package. My husband loved it too and so we enjoyed this delicious Indian spiced loaf for 2 days as dinner and 2 days as leftovers in lunches. It was the perfect hearty meal for those cold nights that proceeded the beginning of the Christmas season.
One thing to keep in mind about this recipe however is the fact that this makes a very large loaf. It was too large for my regular loaf pan and so I baked it in a cake pan instead. If you’re not looking to make quite so much you could easily half the recipe, but remember that halving it will mean a shorter cooking time also. Anywhere from 25-40 minutes less, depending on the consistency of the loaf at the time you pour it into the pan. Though if you were so inclined to make the recipe as is it tastes fantastic as leftovers, either on it’s own or stuffed into whole grain pita bread with sliced tomato, onion, lettuce, cucumber and a little additional chutney. Or be a little more traditional and roll it up into some Naan bread. However you decide to make it just enjoy it!
Indian Spiced Lentil Loaf
1 C Green lentils
½ C Red Lentils
3 C Water
1 1/4 C Oat Flour
6 Garlic Cloves Minced
1 Tbsp Ginger grated
1 Yellow Onion Diced
1 tsp Mustard Seeds
3 Yukon Gold Potatoes diced
1 Tbsp Peanut Oil
2 C Cauliflower Chopped
1 Large Carrot
½ Frozen Green Peas
5-6 Tbsp Curry Powder
1 tsp Ground Turmeric
½ tsp Ground Cinnamon
1/4 tsp Ground Cardamom
4 tsp Ground Cumin
2 tsp Ground Coriander
Sea salt and Black Pepper to taste
2-4 Tbsp Mango Chutney
2 Tbsp Tamarind Paste
8oz Mango Chutney
- Preheat oven to 400'F/200'C
- Cook Green and Red Lentils in 3 Cups water until tender and most of water has been absorbed. If not all the water has been absorbed by the time the lentils are tender drain in a colander. If lentils are not tender by the time the water has absorbed add more. Once cooked set aside to cool.
- Steam the Potatoes and Cauliflower until just tender, then set aside to cool.
- In a pan over medium-high heat saute the mustard seeds for a few seconds until they begin popping. Add the peanut oil, the onion, garlic and ginger and saute for 5-7 minutes until translucent.
- In food processor combine the cooked lentils, potatoes, cauliflower, onion mixture, and the oat flour. Pulse until just combined.
- Add the Cardamom, Cumin, Coriander, Salt, Pepper, cinnamon, turmeric, curry powder, tamarind paste, and the 2-4 Tbsp of Mango Chutney. Pulse until it the mixture just becomes cohesive, and the spices have been incorporated.
- Turn the mixture out into a mixing bowl. Add in the grated carrot and the frozen peas. Stir to combine. Taste for flavor and texture and adjust seasoning as needed. More curry powder, chutney, salt etc... If the mixture is too wet add in a bit more oat flour. If it’s too dry add in a bit of oil, water, or more chutney or tamarind paste.
- Grease a 9 inch round cake pan - I used a sprongform pan, - and scrape the mixture into it. Smooth the top with the back of a spatula then top with the 8oz of Mango Chutney.
- Bake uncovered in the oven for roughly 60-75 minutes until the top is bubbling and the loaf seems firm when you insert a knife or wooden skewer into it.
- Remove from the oven and let cool on the counter top for 10-15 minutes before slicing. Serve with a giant salad!
***Note - I chose to make this recipe wheat-free, but to ensure it’s 100% gluten-free make sure you buy gluten-free oat flour, or make your own by using gluten-free oats. Alternately if you do not have a wheat or gluten intolerance you can use any type of flour that you prefer.***
Labels:
Carrots,
Cauliflower,
Curry,
Garlic,
Ginger,
Gluten-Free,
Indian Fusion,
Lentils,
Mustard Seeds,
Oats,
Onions,
Peas,
Potato,
Soy-Free,
Sugar-Free,
Tamarind
Wednesday, December 5, 2012
Superfood Lassi....
You all know by now - I’m sure - how much I love my morning smoothie, but the past few months I’ve been lazy. I’ve been relying on protein powders like Vega and now Hemp Protein to make a quick and easy meal in a glass each morning. It’s delicious, it’s convenient, I don’t have to think about what to put in it - almond milk, banana, almond butter, flax seeds and protein powder, done! The added bonus is that those powders make the smoothie filling, filling enough that it usually keeps me satisfied until lunch when I’m at work. The drawback to it is that over time it gets boring to drink the same smoothie each day, plus drinking a protein powder smoothie is significantly decreasing the amount of nutrition I’m getting from whole fresh organic fruits and vegetables.
The other drawback is that I don’t feel very energized. Not like you think I would considering the claims of a lot of these protein powders. The past few months I’ve felt lazy, lethargic, and tired. I’ve been going to bed early - for me - waking up late - for me - sleeping poorly, napping every afternoon for longer then I should be, and I seem to generally get less done each day. For a while I didn’t even notice this was going on. It was just one of those things that got lost in the shuffle of the day. A few weeks ago something finally clicked and I realized that there was no logical or reasonable explanation for why I was feeling so tired and lazy when I was getting far more sleep then is typical for me.
Now, I can’t solely blame the protein powder smoothies. If you buy organic brands with no or low sugar content and good vitamin and mineral content they’re fantastic in a pinch. However for me at least they were becoming part of a bigger problem, an overall lack of adequate nutritional intake. I was still eat reasonably healthfully, - it's not as if i'd been gorging on vegan mac and cheese, vegan pizza, and vegan cupcakes - I was still taking my vitamins and eating plenty of veggies, but the kinds of foods I was eating on a day to day basis were different. I was eating a lot of cooked foods, a lot of one pot meals - and other meals - that were high in starch, grains and carbohydrates. There was a lot of tofu, seitan and tempeh, too much sugar, and not enough fresh fruits and vegetables. I wasn't eating enough dark leafy greens, I was eating virtually no salads, and hardly any pure raw food at all. For breakfast i'd I have the protein smoothie, for lunch it would typically be leftovers from the night before, then dinner would be a new dish of one of the above mentioned items i'd been relying to heavily on. How did this happen? I have no idea, it probably started when I got back from vacation, and grew gradually worse as late summer turned into autumn and heavy, hearty winter fare began making it's way into my kitchen again. As i'm sure everyone knows, once you get into a slump you kind of just stick there for a while until something finally snaps you out of it.
For me, this revelation that I was in a food slump began to enter my conscious when I joined the CSA last month, which coincided with my Husband and I's efforts to begin eating only organic foods - at least as much as possible, i'd say we're doing this about 90-95% at the moment. Joining the CSA basically forces you to use what you have on hand unless you want to go shopping which kind of defeats the purpose of the CSA. It also forces you to eat what's in season, which is something I really like. Buying only organic food sort of forces you to do the same thing. The CSA doesn't provide us with everything we need and so I have to pick up a produce item here or there, and if one wants to eat all organic it is far cheaper to buy those foods that are in season. Both the CSA and buying only Organic also sort of force you to do more with less, they force you to be creative and find new ways of cooking foods. I've really enjoyed this little experiment over the past few weeks, and I've noticed the change it's brought about in me. However the final break in the slump came with my undertaking of a knew culinary challenge.
During the month of October there was a big movement for people to commit to a diet free of processed foods, for just the month of October. The goal was to eat only whole, fresh fruits and vegetables, and simple seeds, nuts, legumes, beans and grains. You weren't suppose to use any processed ingredients and if you did buy something processed it had to fall within two specific rules. 1) The item has to be something you could conceivably make at home with common pantry ingredients and 2) It had to have minimal ingredients and be as minimally processed as possible. I really wanted to embark on this challenge but since October was also Vegan Mofo and I'd already committed to my sandwich project I couldn't. Well, there's nothing to stop me from taking the challenge now is there? So I've been trying to eat this way for the past couple of weeks, slowly weaning myself off of sugar and processed foods, buying only processed foods that fall under those two guidelines. Buying things like Soy Sauce, Miso, Non-dairy milk, vegetable broth, a few non-dairy yogurts here and there, a little tofu and tempeh, and canned beans. All things I could make at home but don't for convenience sake, because really, who's going to sit around and spend several weeks fermenting soybeans to make miso? Even i'm not that hard-core - not yet anyway. Although I have slowly been phasing out canned beans in favor of dried, and I actually really like it. Canned beans are fantastic for quick and easy meals but making beans from scratch isn't as hard as I initially thought it was.
Anyway, I've really been enjoying this little adventure, and I've been doing great with it, but it wasn't until Friday that I finally kicked the protein powder smoothies in favor of that delicious almond banana oatmeal I made, then Monday I began a new smoothie regiment. I also started a new exercise routine Monday, as well as starting a new holistic body care regiment. These past three days I’ve felt better then ever. I’ve had way more energy, I’ve been staying up later, waking up earlier, and not taking naps in the day. I’ve been getting more done, I’ve been less tired overall, and most importantly I just feel really, really good. I feel fantastic really, and so I wanted to share one of the new smoothie creations I’ve been enjoying this week.
Now I apologize for the less then exciting picture, it is winter here after all so there isn’t much in the way of scenery, and the smoothie itself is a less then brilliant color. It’s a bit of a mauve-brown color thanks to the combination of yellow, green and purple foods but oh well. It’s the taste that matters and this smoothie is fantastic. It tastes like an Indian Lassi, but magical, and full of superfood nutrition. Seriously this smoothie has six superfoods in it, SIX! Goji and Acai berry, Hemp and Flax seeds, Spirulina, and wheatgrass, what more could you ask for? It's the perfect way to amp you up and start the day!
Superfood Lassi
6oz Plain Unsweetened Almond Milk Yogurt
1 Banana
1 Cup Chopped Frozen Mango Chunks
2 Tbsp Goji Berries
1 Pack Frozen Acai Berry Puree (3.5oz)
1 tsp Spirulina
2 tsp Flax Seeds
2 tsp Hemp Seeds
1 Cube Frozen Wheatgrass or 1 Tbsp Powder
½ C Purified Water
- Place all ingredients in a high-speed blender and blend on high until completely smooth. 1-2 minutes. Pour into a glass and enjoy!
Note: While you can make your own almond milk yogurt at home, I chose to buy a store bought brand with an extremely low sugar content, and minimal ingredients. If you prefer you could also replace the almond milk yogurt with a soy, or coconut yogurt.
PS: Stay tuned because I have a lot more healthful recipes, and information to share!
Friday, October 5, 2012
Vegan Mofo #7 - Celine and Joni’s Butternut Lentil Burgers...
Vegan Mofo #7 - Celine and Joni’s Butternut Lentil Burgers
The Book - The Complete Guide to Vegan Food Substitutions
The Author - Celine Steen and Joni Marie Newman
The Recipe - Butternut Lentil Burgers
Page #129
Difficulty - Easy
Duration - 45-60 minutes for roasted the Squash. And roughly 35 minutes to bake the patties once they’ve been formed. If you roast the squash the night before or in the morning the whole thing is super easy to throw together In about forty minutes.
I LOVE these burgers! I’ve had my eye on making them ever since I got this book just before Christmas last year. Something about them just sounded so amazing, that I couldn’t wait to try them. I know the photographs aren’t that visually impressive, sometimes it’s hard to make burgers look really dynamic but don’t let the boring photos fool you, these burgers are to die for!
This is definitely a burger recipe I’ll be coming back to again and again. I loved the texture and the flavor was out of this world incredible. I also really appreciate that these burgers are super easy to throw together, and that they use simple, fresh ingredients available to anyone. Many of them are pantry staples for most of us vegans. All their made of us butternut squash, red lentils, olive oil, sesame oil, salt, gram masala, tomato chutney, panko breadcrumbs and vital wheat gluten. However the recipe says for a gluten-free version you can remove the wheat gluten. I am not gluten-free but I’ve found I prefer VWG in smaller amounts and so I cut the amount of wheat gluten in half and added in more breadcrumbs to make up the difference. I also didn’t have - and subsequently couldn’t find - tomato chutney and so I used mango chutney instead which was absolutely delicious. Probably it adds a little bit of extra sweetness to the burgers but that’s alright with me. I also adjusted the gram masala - adding more - to suit my tastebuds. The result was a super scrumptious and yummy burger with full bodied flavor. I love the texture that the lentils and squash add, and I love the natural sweetness from the squash along with it’s natural almost buttery flavor. Overall the burger had a real nice subtle Indian flavor, with a bot of sweet and a hint of spice. I particularly liked the vague cinnamon scent and flavor courtesy of the gram masala.
Another great thing about these burgers if they’re versatile. Dress them up however you like with mustard, ketchup and vegan mayo, or a spicy sauce, or some extra chutney. Use tomatoes, onions, lettuce, sprouts, roasted peppers or spinach. Or you could shove them in a pita with some mashed curried cauliflower and peas. If you want to eat the burger without the bread these taste fantastic the next day on a bed of greens smeared with chutney and covered in sweet tomato slices.
There is so much yummy fun that you can have with these, so trust me when I say you must make them!
Thursday, May 31, 2012
Roasted Chili Lime and Indian Spiced Chickpeas...
Garbanzo Beans or Chickpeas as they’re also called are my hands down favorite bean ever! Well, I love other beans of course, and If I had to pick I’d say black beans, lima beans and edamame are right up there with chickpeas but chickpeas were the first bean I fell in love with so they’d always hold a special place in my heart.
I truly love them in anything. Soup, chili, stew, salad, sauteed with greens and other veggies. In rice, cous cous, or farro dishes, obviously as hummus. I love them in traditional Indian, Middle Eastern and Hispanic dishes, I just love, love, love them. They are probably the bean I buy and eat most frequently but sometimes - if you’re like me - you don’t want to go through the whole rigamarole of making something just to enjoy the one ingredient you love. Am I right? Now, I am no stranger to eating chickpeas right out of the can, I do it often, and it’s delicious, but some days you jsut need a little more than that, but you want something less than a meal. Well roasted snack chickpeas are just the thing!
| Roasted Indian Spiced Chickpeas |
Now roasting chickpeas isn’t exactly a new idea, so I can’t take credit for it. I’d seen mention of it before in magazine’s and online articles that connected to ‘healthy snacking’ though always intrigued by the idea I’d never actually thought to do it until last week. By then the recipes I’d previously seen were distant memories but roasting chickpeas seemed an easy enough task. All I needed to do was decide what flavorings I wanted to use. In the end I decided to go with a Mexican inspired flavor, and an Indian inspired flavor. Since they are two of my favorite types of cuisine and both traditionally use chickpeas it seemed a no-brainer.
| Chili Lime Roasted Chickpeas |
I was so impressed with the finished result. Not only do these things cook up fast, but they’re delicious! Absolutely-freaking delicious. They’re a truly healthy snack, and hearty too. The perfect thing to munch on pre-dinner when you usually reach for the sweets. They’re great served hot out of the oven or at room temperature, and truth be told they’re not half bad cold either. Bring a batch to your next BBQ or pot-luck and stick them on the snack table beside the chips, dips, pretzels, and party mix. They’ll be a sure fire hit.
Roasted Chickpeas 2 ways
(Cooking Instructions are the same for both)
Chili Lime Roast Chickpeas
1 15oz can Chickpeas
1 ½ Tbsp Lime Juice
½ Tbsp Agave Nectar
3/4 tsp Chili Powder
3/4 tsp Ground Cumin
Sea Salt
Indian Spiced Roast Chickpeas
1 15oz Can Chickpeas
1 Tbsp Lemon Juice
½ Tbsp Agave
½ Tbsp Olive Oil
3/4 tsp Curry Powder
3/4 tsp Gram Masala
1/4 tsp Ground Coriander
1/4 tsp Ground Cumin
Sea Salt
- Preheat oven to 400'F
- Drain and Rinse Chickpeas, then pat dry. Try to get them as dry as possible, before transferring them to a bowl.
- In a separate small bowl whisk together all flavor ingredients, both liquids and spices.
- Pour over the chickpeas and stir until thoroughly combined.
- Spread chickpeas in a single layer over a parchment lined baking sheet. Bake for 10-15 minutes then stir and bake another 10-15 minutes until chickpeas are brown and crispy.
- Remove from oven and transfer to a serving bowl, serve hot or refrigerate in an airtight container for later.
*** Note - For an Oil-Free version of the Indian Spiced Chickpeas Omit Olive Oil and use Lemon Juice or Tamarind Paste instead.***
PS: This probably goes without saying but if you decide to make both flavors at once do not put them on the same baking sheet. Use two different sheets!
Monday, December 5, 2011
Chole Chaat...
Well, I’ve been eating lunch at the hot bar quite a bit recently, and as you may recall the last time I was frequenting the salad/hot bar I discovered the awesomeness that is Tomato Bhaji and Kale. This time around I’ve discovered something just as awesome Chole Chaat, which is another Indian dish.
Generally speaking I don’t like to buy lunch during my work day. I prefer to bring lunch from home and save myself the money. Also this way I can ensure that I’m definitely getting a lunch that’s nutritious rather then just convenient. However because of the crazy business of the holiday season I’ve found myself over the past few weeks with less and less time (not to mention energy) to prepare lunch meals in advance. Thankfully I discovered Chole Chaat, which has been a true lifesaver. Not only is it mind-blowingly delicious it’s also low calorie, and absolutely packed with protein and fiber which is perfect for getting you through those long hard days.
When I saw it initially on my first circle around the hot bar I was less then impressed. It just didn’t look all that appetizing to me to see a bunch of chickpeas floating around in a thick yellow-red sauce. However upon circling around a second time I realized there really wasn’t anything at all that I found to appetizing and so I gave the Chaat a skeptical second look. I read the ingredients on the tag and discovered they were all things that I liked, so with my belly grumbling with hunger and a total lack of something more visually appealing I decided to bite the bullet and plop a few spoonfuls into my bowl.
How amazed was I when I took that first bite? Wow - there are not words to describe it. The dish was absolutely phenomenal. It had a nice heat, not too spicy, a little bit of sweet, a hint of curry, and just an all around grand robust flavor. I gobbled it up and wanted more. I have since got this dish from the hot bar six times, and after about the fifth I decided it was time I write down the ingredients and re-create the dish myself. It’s a good thing I took that initiative by the way, because the food at the hot bar is always in rotation meaning the same thing is rarely there for long periods of time, and this week I happened to see that Chole Chaat was absent from the hot bar. No matter though, armed with my handy-dandy hand scrawled list I decided to embark on re-creating this tastebud tantalizing dish Friday afternoon. The only problem was what quantities should I use?
Now, I did a quick Google search for Chole Chaat, and several recipes popped up. However like with my Tomato Bhaji debacle none of them entirely matched the ingredient list I had in my hand. Many of the online recipes included ingredients not on my list, and most of those same recipes were minus one or two of the ingredients I copied down. Like with the Bahji what made it worse is I couldn’t seem to find any two online recipes that agreed on how to make Chaat. Everything varied recipe to recipe from the actual ingredients to the quantities. Again I checked my Indian cookbook, and while there were several Chaat recipes, one even labeled Chole it again differed from my list, and all of the online recipes I’d found.
While I initially found this a bit frustrating, after a few moments meditation on the matter I decided this just gave me more room to be creative. I jotted down a few notes from the online recipes, took my scribbled on sheet of paper into the kitchen and set to work. The following is what I came up with and it was instantly satisfying, gratifying and amazing. It may have more ingredients then the hot bar version, and it may not taste 100% comparable - though I think it’s at least 90% accurate to what I’d eaten - but it is phenomenal. This is easily my new favorite thing to eat, and as strange as it may sound it’s the perfect thing to eat for breakfast before heading in for a long day at work.
I know that sounds crazy, but trust me. It’s actually quite common for people particularly in Mexico, Central America and South America to eat a form of rice and beans with tortilla for breakfast and I really think they’re on to something. When the first meal of your day is one loaded with fiber and protein it keeps you much fuller, for far longer. It seems like when I’m at work I tend to get hungry at least 2 hours after arriving, regardless of what I ate before leaving the house. Not so with this dish. Chole Chaat combined with a helping of brown rice kept me full for a good five to six hours at work, and when I was hungry a simple non-dairy yogurt, a banana and a cup of tea were enough to keep me satiated till I got home. So not only is this my new favorite dish, it’s also my new favorite before work staple. In fact I love it so much I plan on making a big pot of it to have throughout the week.
Now before we get started I have a note about this recipe. It can be made two ways depending on whether you want a chunky sauce or a smooth sauce. I personally prefer a smooth sauce with this recipe because it makes it more uniform, but if you’d prefer a chunky sauce omit the step that blends the sauce.
Chole Chaat
45-60oz canned chickpeas
2 Tbsp Olive Oil
1 Yellow Onion Grated
2 tsp Ground Coriander
2-3 tsp Ground Cumin
1/4 tsp Ground Turmeric
2-3 tsp Gram Masala
1 Tbsp Grated Ginger
4 Garlic Cloves Minced
3/4 tsp Sea Salt
*1-2 tsp Amchoor Powder (Optional but highly suggested)
1 tsp Paprika
1 tsp Red Pepper Flakes
1 Tbsp Sugar (optional)
2 ½ C Diced fresh tomatoes.
14oz Water
Cilantro to garnish
- Heat oil in medium sized pot on medium-high heat. Add in the minced garlic, grated ginger and grated onion. Saute over medium heat until fragrant and softened, about 5 minutes.
*** Note - If you plan to blend the entire sauce it isn’t necessary to grate the onion you can chop it. However if you are not blending the sauce you will want to great the onion as it makes for a smoother sauce. You get all that great onion flavor without all the big overpowering chunks. This is a little trick I picked up from my ancient Greek Cookbooks and it works really well. ***
- Add in coriander, cumin, turmeric, gram masala and saute another 3-4 minutes until spices are well incorporated and fragrant.
- Add in diced tomatoes and salt. Cover and cook over medium heat for 10-15 minutes until tomatoes have broken down and a sauce has formed.
- Once tomatoes have broken down transfer the sauce to a high-speed blender along with 1 cup of chickpeas and 14oz of water. Blend on high until completely smooth, about 30-60 seconds.
*** Note - For the chunky version, do not transfer sauce to the blender. Only blend 1 cup of chickpeas with 14oz of water. Then pour that mixture into the pot of sauce ***
- Return the contents of the blender to the pot. Add the remaining chickpeas, paprika, red pepper flakes, sugar, and amchoor powder. Stir to incorporate then cover and bring to a boil.
*** Note - Whether you use 45oz of chickpeas or 60oz will again depend on how much sauce you want. If you want a good sauce to chickpea ratio then use 45oz, if you want it less saucy use 60oz. This calculation is for the smooth version though. For the chunky sauce I think 45oz will be sufficient and 60oz may be a bit of overkill.***
| Sauce After Blending with 45oz Chickpeas |
- Once boiling, stir again, then reduce heat and let simmer for 15-20 minutes until chickpeas are heated through, and sauce has thickened slightly. Taste for seasoning and adjust as needed.
- Serve over rice or my favorite kale, or even better rice and kale, and garnish with cilantro. Eat for breakfast, lunch or dinner and most importantly enjoy!
*** Note - Amchoor Powder is made from raw green mangoes that are sun dried and then ground into powder. Used in many curries, dals, chutneys, and vegetable dishes to impart a tangy, fruity flavor without also adding moisture. Amchoor can be found in Indian groceries, or gourmet spice shops. It is definitely worth finding. ***
*** Note - Sugar-free if you leave the sugar out. ***
Subscribe to:
Posts (Atom)


