Showing posts with label Tomato. Show all posts

Tuesday, February 9, 2016

Classic Ratatouille...

It had been way to long since my last blog entry, I realize that. I had hoped to get back to regular blogging after we returned from our Washington/Oregon Road Trip, but things were just hectic, and I didn't have the time nor the energy, nor the inclination to do much cooking, or blogging. I don't know if today will mark my return to blogging or not, but I did want to post this recipe that I made last week because I thought it turned out rather good, and who couldn't use more vegetables?


Classic Ratatouille

2 Tbsp Olive Oil
4 Garlic Cloves Minced
4 Large Tomatoes
1 Large Onion Diced
1 Red Pepper Diced
1 Yellow Pepper Diced
1 Medium Eggplant Diced
2 Large Zucchini Diced
2 Tbsp Tomato Paste Mixed with 1 Tbsp Water
1 tsp Sugar
1 Bay Leaf
3 Springs Thyme
1 Tbsp Minced Basil
1 Tbsp Minced Parsley
1-2 Additional Garlic Cloves to taste
1 tsp Sea Salt
1/2 tsp Black or White Pepper to taste


- Score a cross into the bottom of each tomato.  Plunge into boiling water and boil for 20 seconds. remove from the water and blanch in ice water. peel the skins away from the tomato, and chop the tomato. Reserve.

- Heat 1Tbsp Oil in a pot. Add the onion and cook for 10 minutes. Add the 4 garlic cloves, the red and yellow peppers. Cook for about 4 minutes and then remove the vegetables from the pan.

- Heat the second Tbsp of Oil in the same pan. When it's hot add the eggplant and cook for 4 minutes until beginning to brown. Add the zucchini and cook for another 5 to 10 minutes or until the veggies are a nice deep brown.

- Add the Onion and Pepper mix back to the pot.  Add in the tomato paste mixture and stir well to combine. Cook for 2 minutes and then add in the tomatoes, sugar, salt, pepper, bay leaf, thyme and basil. Stir well and cover to cook for 20 minutes. Check the vegetables after 10 minutes and if they look too dry add in about 1/4 cup water.

- Mix the remaining 1 or 2 garlic cloves with the minced parsley. When your Ratatouille has finished cooking add the garlic/parsley mix and stir lightly just to combine.

- Serve your Ratatouille hot with crusty French Bread or Garlic Bread. Enjoy with a glass of red wine for good measure.

Wednesday, September 16, 2015

Vegan Mofo #18: Toulousaine Sausage and Bean Salad...


I don’t know how traditional this recipe is or how common, but after doing a bit of googling I found there are all kinds of recipes for sausage salads in Toulouse, the ingredients vary but usually it’s a vinegar mustard dressing, and has beans and sausage. This particular recipe I found when flipping through an interesting book called “The French Market” written by Joanne Harris and I thought it sounded so good that I wanted to try and veganize it, just to see how it was. I think it ended up being really good, and even my husband loved it which amazed me since he typically is no fan of beans, certainly not this many beans all at once!


I love the simplicity of the dish, I love both the bold and subtle flavors, the creamy beans mixed with the chewy sausage. Loved it over a bed of greens though you can simply eat it as is without the lettuce. Obviously the original recipes call for sausages from Toulouse, but in liu of that Harris recommended Italian Sausages so I went with my favorite, Field Roast.


Toulousaine Sausage and Bean Salad
(AKA Salade Toulousaine) 

4 Vegan Italian Sausages
1 15oz Can Chickpeas Rinsed and Drained
1 15oz Can Navy Beans Rinsed and Drained
1/4 Olive Oil
2 Tbsp Red Wine Vinegar
1 Tbsp Whole Grain Mustard
1/4 tsp Dried Sage
Sea Salt and Black Pepper to taste
4 Ripe Tomatoes
Lettuce, Arugula or Mixed Greens for serving (Optional)

- Heat a bit of Olive oil in a large frying pan over medium high heat. Slice the sausages into rounds and fry in the oil until browned on both sides, 5-10 minutes. Remove from the heat and place on a plate.

- Place the Chickpeas and Navy Beans in the same pan. Add the Oil, Vinegar, Mustard, Sage, Salt and Pepper. Mix to combine well and then cook for about 5 minutes until heated through.

- Add the tomatoes to the beans, mix well, and cook about 2 minutes. Remove from the heat, and place the bean mixture into a large serving bowl. Add the sausages and toss to combine. Taste and season with salt and pepper as needed.

- Line serving bowls or plates with a bit of lettuce or mixed greens, then top with 2 generous scoops of the Sausage and Bean Salad. Enjoy Hot, at room temp, or cold, I personally liked it best at room temperature.

Wednesday, May 6, 2015

Chickpea Flour Scramble - With Breakfast Taco Option...


I’ve been meaning to post this recipe for a while now, but I’ve found myself preoccupied of late. Sorry for the long absence, but I hope this recipe will make up for it. So, on the 23rd of April I really wanted a hearty breakfast. I woke up ravenous and desiring a scramble of some sort. Unfortunately I didn’t have any tofu on hand, neither did I have any canned chickpeas to make Isa’s Chickpea Scramble. However, it occurred to me in a brief moment of culinary genius that if I could make a scramble with whole beans, why couldn’t I make a scramble with chickpea flour? I had heard of it done before, and didn’t think it could be all that hard. I imagined it was somewhat like making a socca - which I love - and so I set to the task of making a chickpea flour scramble.

I was very skeptical that it would work out, especially in the beginning when I realized that the chickpea flour mix just didn’t want to break apart. The whole thing clumped together and wasn’t cooking. I thought I was going to have to scrap the whole endeavor - and no doubt if you try this recipe you might just think the same thing at first, but trust me, it works! - lucky for me I have patience - which is what this recipe needs - I kept at it and was rewarded by one of the most brilliant breakfasts ever. In fact I loved it so much I ended up making it the next day for my husband and I, as he hadn’t been home when I made it the first time. Skeptical as he was, he loved it too, and we devoured this scramble in taco form, though in my opinion it’s also just as good without the tortillas and extras.


What I love about this recipe is you can make the chickpea flour taste like whatever you like, I kept it simple and kept a traditional scramble flavor but you can literally add anything. You can add any spices you can add any vegetables and it creates the perfect gluten-free, and soy free scramble alternative for those who have allergies or sensitivities. More and more people are avoiding soy and gluten but that doesn’t mean they have to cut scrambles out of their lives too.


Personally I think this scramble has a better texture and mouth feel then a tofu scramble. Don’t get me wrong I do love tofu scrambles but I prefer a slightly dryer scramble and tofu scrambles usually have a bit of wetness to them. Also I think that the chickpea scramble mimics eggs better then tofu as it gets firm, but also retains that spongy, springy, softness of an egg. So if you’re looking for a new scramble to try give this one a go. I know it probably sounds weird but trust me the reward is worth it, I know you’ll love it.


Chickpea Flour Scramble 

1 ½ C Chickpea Flour
2 ½ C Water
1 tsp Black Slat
1 tsp Garlic Powder
1 tsp Onion Powder
½ tsp Turmeric
½ tsp Smoked Paprika
1/4 tsp Black Pepper

3 Green Onions diced
1 Ripe Tomato Diced

For Tacos 

Corn Tortillas
Shredded lettuce or Salad Mix
Vegan Cheese
Ketchup
Hot Sauce


- Lightly oil a medium sized pan, and heat over medium heat.

- In a bowl combine the chickpea flour through the black pepper and mix until thoroughly combined.

- Once the pan is hot add the chickpea flour mixture to the heated pan. Cover the pan and cook for about 4-5 minutes until the top looks glossy and the edges look cooked.

This is how it'll look when you first pour it into the pan


- Using a metal spatula begin scrambling the half-cooked mixture as you would scrambled eggs. Begin by folding and flipping the mixture over. Let it cook another 2 minutes or so and begin flipping again. Bare in mind that the mixture will be sticky and it will only be partially cooked making it difficult to fold, and separate but keep at it. It does take some time but use your spatula to continue to break the mass into smaller and smaller chunks, flipping them and cutting them. It should take at least 10 minutes.

After about 10 minutes


- After 10 minutes the mixture should be a bit dryer and it should be easier to break into pieces. The pan may well be very dry at this time and you can add a touch more olive oil to the pan to help prevent sticking as well as to help crisp up the chickpea mix. About a tablespoon of oil should be more then enough. Continue to flip and break up the chickpea mixture into smaller pieces with your spatula. Another 10 minutes and you should have some small and medium sized chunks, it should by now resemble a more traditional tofu or egg scramble.

Another 10 Minutes 


- When you have the chickpea mix broken into the size chunks you prefer, and they’re nicely dried and cooked through add in your green onions and cook another minute.

We're almost there, it's time for green onions!


- Add in your tomatoes and cook another 2 minutes.

Just about done, add your tomatoes!


- Your scramble should be more then ready now, and you can eat it as is - as you would any traditional tofu scramble. You can eat it on toast, as a side with ketchup, or as I did in tacos.

The finished product, so worth the effort!


- For Chickpea Flour Scramble Tacos spoon some of the chickpea scramble into a corn tortilla, top with your favorite shredded vegan cheese, a handful of shredded lettuce or salad mix, and then drizzle with ketchup or hot sauce as you desire. It would probably even be good with salsa.

Tacos anyone?


ENJOY!!

Friday, August 15, 2014

Spicy Beef and Spinach Lasagna...


It’s been unseasonably cool here the past week. Mostly the days are warm but in the evening it cools considerably and there’s a good breeze. Don’t get me wrong, I’m not complaining, I love cooler weather - fall is my favorite time of year - but this kind of weather really makes me want to eat ‘out of season’ you know? The other day when it was particularly grey and quite cool I suddenly felt in the mood for lasagna. I have about a million different lasagna recipes in my arsenal but I didn’t want to use any of them. Instead, I wanted to get creative, so I took a look around and found a package of Beyond Meat Feisty Beef Crumbles that I’d bought when they were on sale but never used. I don’t normally buy these kinds of things but since they were new, my husband and I thought we’d try them out but I just never knew what to use them in, until I realized they would be perfect in lasagna.


Since I was only making a lasagna for my husband and I, and I only had one package of beef and one package of cheese I made a small one using my 8x8 baking pan. You could probably double the recipe for a larger lasagna if you needed to, but this dish is super hearty and filling, we only ate one slice each which is a real anomaly for us - especially my husband who’s been known to turn into Garfield at the site of lasagna. This recipe exceeded my expectations and I was quite happy with the end result. So next time you need to make a really hearty, meaty, cheesy lasagna for the omnivore in your life give this one a shot - provided they don’t mind a little heat of course!


Spicy Beef and Spinach Lasagna 

6 Square Lasagna Sheets (8x8)
1 Tbsp Olive Oil
1 Yellow Onion Diced
8 Cloves Garlic Minced
*** 1 Package Feisty Beyond Meat Beef Crumbles thawed (Or your favorite vegan beef)
1 ½ tsp Crushed Fennel Seeds
14oz Can Diced Tomatoes
8oz Can Tomato Sauce
1 Tbsp Dried Oregano
1 Tbsp Dried Basil
1 tsp Sea Salt
1/4 tsp White Pepper
1/4 tsp Red Pepper Flakes
2 Tbsp Capers
3-4 Tbsp Minced Pepperoni Peppers
10oz Fresh Baby Spinach
*** 1 Package Daiya Mozzarella Shreds (Or your favorite vegan Mozzarella)

Tomato Sauce for Topping 

1 8oz Can tomato sauce
2 Tbsp Tomato Paste
4oz water
2 garlic cloves
2 tsp olive oil
1 tsp onion powder
2 tbsp capers
2 tbsp minced pepperoni peppers
½ bunch minced parsley
Sea Salt and Black Pepper to taste
1 tsp Dried Basil


Noodles 

- Set a pot of water on the stove and bring to a boil. When boiling add the lasagna sheets and boil for 5-6 minutes until the sheets become soft and pliable. They don’t need to be fully cooked. Drain them, and rinse them.


Filling 

- Heat the olive oil in a large pan over medium heat. Add the garlic and onion and saute for 5-6 minutes until softened.

- Add in the crushed fennel seeds and the beef crumbles. Saute for 5 minutes, until crumbles have browned.

- Add in the diced tomatoes, tomato sauce, oregano, basil, salt, pepper, capers, red pepper flakes, and Pepperoni Peppers. Simmer for about 10 minutes then remove from the heat.

Sauce 

- Heat the olive oil in a small pot on the stove. Add in the garlic and saute for 4 minutes until golden.

- Add in all the other ingredients and bring to a boil. Then decrease the heat and let simmer for 20 minutes.

- Remove from the heat and set aside until ready to use.


Assembly

- Preheat oven to 350'F

- Lightly grease an 8x8 baking pan. Layer in 2 of the lasagna noodles. Cover the lasagna noodles with enough spinach to cover them. Layer in enough of the meat filling mixture to cover the spinach. Then sprinkle enough of the cheese over the filling to cover.

- Layer 2 more lasagna sheets overtop, and repeat with remaining spinach, meat filling and cheese.

- Layer the last 2 lasagna noodles on top. Cover the top with the tomato sauce, and then cover in foil and bake in preheated oven for 45 minutes. Alternately you can bake the lasagna without the sauce and spoon the sauce over top after it finishes baking.

- Once finished remove from the oven, garnish with fresh minced parsley, then cut and serve! Preferably with a nice side salad.


*** Note - Just because I used Beyond Meat crumbles and Daiya Cheese doesn’t mean you have to. Use whatever you favorite vegan meat and cheese are, though if you use a plainly seasoned vegan beef you may want to add a bit more heat to the dish, it’s up to you. Something to keep in mind that this dish is gluten-free and soy free - as long as you use gluten-free lasagna noodles -because both beyond meat and daiya are gluten and soy free products. If you're using other vegan products and gluten or soy is an issue you'll have to read the labels to make sure.*** 

Tuesday, August 12, 2014

Scrambled Pintos...


This morning I was feeling a ravenous hunger. I knew my typical breakfast of a bowl of fruit or a smoothie just wasn’t going to cut it, and besides I was really craving something savory. Tofu scramble was sounding really good to me, the only problem was that I didn’t have any tofu. I briefly considered making a tempeh scramble until I realized I was all out of tempeh too! I flipped through my wealth of cook books in desperate search of another breakfast option but everything I saw was sweet, or bready and I didn’t want that. Then I remembered Isa Chandra Moskowitz’s Mad-Genius invention of Chickpea Scramble from her latest book “Isa Does It” and I knew that was what I wanted.


I went eagerly to the kitchen, opened up the pantry and would you believe I didn’t have a single can of chickpeas. The girl who loves chickpeas, who eats them all the time, had somehow unknowingly ran out! Now I was beginning to get frustrated. I took a look around the kitchen and saw a few things I had a lot of were potatoes, spinach, and onions, but how to make a breakfast out of that. I took another look in the pantry, took inventory of the beans I did have, and thought to myself “Hey, if a scramble can work with chickpeas, why not another bean?” and that, is how the Pinto Scramble was born.


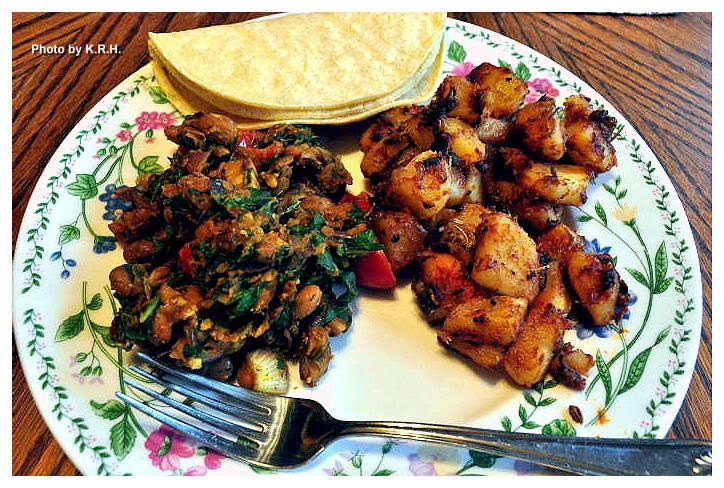
Man, this exceeded all expectations, and even my husband - who’s a notorious bean-hater, but getting better on that front - loved it. Now I want to try making different kinds of scrambles with all sorts of beans to see what kind of awesome combinations I can come up with. In the meantime I hope you try this one out, it’s super delicious, healthy, hearty and comes together in a flash. Serve it however you like - on a piece of lightly buttered toast with some fresh sliced tomatoes, on it’s own, or as I did with some fried potatoes, corn tortillas and extra hot sauce!


Scrambled Pintos 

1 Tbsp Olive Oil
4 Garlic Cloves Minced
½ Red Onion Minced
1 15 oz Can Pinto Beans rinsed and drained
½ tsp Chili Powder
½ tsp Ground Cumin
½ tsp Ground Turmeric
½ tsp Sea Salt
Black Pepper to taste
1-2 tsp Hot Sauce (or to taste)
1-2 Tbsp Fresh Dill Minced
8 Cherry Tomatoes Halved
1 Large Handful Baby Spinach Chopped

- Heat the olive oil in a pan over medium heat.

- Add the garlic, and onion and saute for 5-6 minutes until softened.

- Add in the pinto beans, chili powder, cumin, turmeric, salt, pepper, and hot sauce. Mix to combine and saute for 3 minutes until the beans are warmed through.

- Using a potato masher mash the beans right in the pan, so that they turn into a thick chunky paste. You do not need to get all the beans, leave some whole. Mash about two-thirds of the mixture.

- Add in the dill, tomatoes and spinach and saute for about 2 minutes or until the spinach has wilted.

- Taste for seasonings and add additional hot sauce if desired.

*** Note - If you want a more 'Mexican' feel you can omit the dill and add in an equal amount of minced cilantro instead. Though I quite like the unique flavor that dill brings to the overall dish.*** 

Monday, July 22, 2013

Mixed Green Salad with Maple Roasted Rutabaga, Edible Flowers, and Creamy Maple Dijon Dressing...


Sometimes the best thing to ever happen in my kitchen is we run out of food. Im sure many of you start running out of the essentials, as well as fresh produce by the weeks end, - I know it often happens to me, - but rather then look at this as a negative I try and turn it into a positive. Sometimes you have your most creative moments when you’re at your most limited.


Take this salad for instance, it came about entirely out of necessity.  The day I made it all I had left in my fridge were a few sparse handfuls of mixed greens, a couple of tomatoes, a lonely avocado, some green onions and 3 rutabaga and I’d procured for some other purpose and then promptly forgot about. My pantry of course had other things like canned tomatoes, pasta, canned beans, olives but I didn’t want that. I was craving something fresh and light, that was fast, filling and satisfying. Normally when I feel that way a salad is my ‘go-to’ so I quickly began thinking about how I could turn these meager offerings into a salad that would inspire and satisfy my tastebuds.


Now, I can’t say I’ve ever actually eaten a rutabaga before this, and if you asked me why I originally bought them I couldn’t tell you because I can’t for the life of me remember what I had planned to use them for. But, since I had them, and a salad of tomato, avocado and onion isn’t very inspiring - or filling - I thought I’d give them a try. How bad could they be roasted and thrown in with the greens? Maybe they’d taste kind of like beets, sweet and earthy, that works in salad!

So once the salad began taking shape I needed a dressing. This too came into existence out of necessity. I used the things I had on hand, and I chose to use coconut milk yogurt again to provide creaminess because I needed to use the remainder of the container ASAP. Plus it worked out so well on my arugula, beet and walnut salad I thought it was worth trying out again.


While the rutabaga was roasting it filled the kitchen with a heavenly smell, that had me drooling as I diced my veggies and whisked the dressing. By the time they popped out of the oven I couldn’t resist snapping one up and giving it a taste. Wow! Seriously guys, roasted rutabaga? This is like my new favorite thing ever. The tiny bit of maple syrup made it sweet and the Bragg’s made it smokey, this was an absolutely perfect combination. I happily tossed them into the salad, garnished my bowl with some edible flowers I’d picked up in the market, and drizzled on the dressing.

I took my first bite and knew instantly that it was magic! Maybe this combination sounds weird to you, but I assure you it’s not. The flavors blend so much better then even I could have imagined while I was creating it. You get the sweet smokey rutabaga, the bitter arugula, the creamy avo, the acid-sweet tomatoes, mixed in with a rainbow of flavors from wild flowers, and a dressing that is sweet, smokey and tangy. What more could you want?


Mixed Green Salad with Maple Roasted Rutabaga, Edible Flowers, and Creamy Maple Dijon Dressing

Salad - Makes 2 servings

2 Handful Arugula
2 Handful Mixed Baby Greens
2 Tomatoes sliced
1 Avocado sliced
Sunflower Seeds to taste
Green Onions to taste
2oz Edible Flowers
1 Recipe Maple Roasted Rutabaga

- Maple Roasted Rutabaga 

3 Small Rutabaga Cut into small chunks
1 tsp Olive Oil
1 tsp Maple Syrup
1 tsp Bragg’s Liquid Amino’s

Preheat Oven to 425'F and roast for 10-15 minutes

- Creamy Maple Dijon Dressing 

4 Tbsp Plain Coconut Milk Yogurt
2 Tbsp Dijon Mustard
1 Tbsp Maple Syrup
1 tsp Liquid Smoke

- Preheat Oven to 425'F. Place the cut rutabaga chunks into a bowl and drizzle over the olive oil, maple syrup and Bragg’s. I’ll be honest and say I didn’t measure exactly, but I didn’t use a lot so you can change the tsp quantity to suit your taste. Give the bowl a few good shakes to make sure all the rutabaga is covered in the mixture then spread the rutabaga out onto a baking sheet.

- Bake for 15 minutes until the rutabaga is smelling wonderful, and it’s a nice golden brown. It should be tender-firm.

- While the Rutabaga is roasting prepare your salad by evenly distributing the salad ingredients amongst two bowls.

- Next make the dressing. Whisk all ingredients in a small bowl until well combines and smooth. Since the yogurt may want to curdle when you add the mustard in this may take a couple of minutes of vigorous whisking to turn smooth. It will get there however.

- Once the Rutabaga is cooked divide it amongst the two bowls and drizzle the dressing over top of each salad.

Enjoy, on a lazy summer afternoon with a good book, and a drink.

Friday, July 12, 2013

Arugula Lasagna with Garlic Scape Pesto and Tofu Ricotta...


Okay, so I know it’s summer, and I know a lot of you are living in placed where it’s currently hot, hot, hot, but here in IL yesterday it was actually quite nice. It felt more like spring then summer with a cool breeze and no humidity. It was a perfect day, and while it might not have been a lasagna day per say, that’s inevitably what I ended up making for dinner.


You see, yesterday I was extremely busy writing essays and doing other homework. It consumed most of my day up until about 3pm. By then I was feeling a little tired and brain-fried and so I didn’t really feel like thinking to hard about making dinner. Originally I was just going to cook something from a cook book, but every recipe I found that was ‘quick and easy’ and looked appealing didn’t really utilize the bounty of fresh produce I had on hand. I had pounds of arugula, garlic scapes, kale, spinach, tomatoes, cabbage and beets and so I really wanted to make something that would use at least one or more of the most perishable items in that list. I started thinking about noodles, using my garlic scapes and kale to make a pasta dish but I didn’t feel like spaghetti. Then I remembered a box of whole wheat lasagna noodles my mom gave me to take home with me when I left Vancouver in May. Hm... Lasagna.....


So the wheels got turning, and I must say as much as I love a good lasagna I really hate actually making lasagna. It’s always such a process, but once I got thinking about it I couldn’t stop. I mean what if I put garlic scapes and arugula in a lasagna? I’d never heard of that before, It could be very interesting. What about some olives? Do I have tofu to make ricotta? What if I made a pesto out of the garlic scapes? Hm.. The questions just kept on coming and finally I decided, ‘lets do this thing!’ Of course pesto alone in a lasagna might be a bit too overpowering I thought, so I made a red sauce too, and everything combined together made the most perfect, and delicious lasagna. My husband says this is one of my best ever. No one flavor overpowers another, they all work In perfect harmony together. So If you like lasagna I urge you to make this one, it’s unique blend of flavors is really a pleasure. Of course, if it’s a bit too hot where you live to turn on the oven, then wait for a cool day to try it!


Arugula Lasagna with Garlic Scape Pesto and Tofu Ricotta 

Lasagna

14oz Whole Wheat or Gluten Free Lasagna Noodles
1 Large Yellow Onion Diced
½-1 lb Baby Arugula (I used roughly 1/2 to 2/3 of a 1 lb package)
1 Tbsp Olive Oil
2 Tomatoes Sliced
Handful of Kalamata Olives
Sea salt and Black Pepper to garnish if desired
1 Recipe Tomato Sauce
1 Recipe Garlic Scape Pesto
1 Recipe Tofu Ricotta

Tomato Sauce 

1 28oz Can Diced Tomatoes
8oz Can Tomato Sauce
3 Cloves Garlic
2 tsp Dried Basil
2 tsp Dried Oregano
1 tsp Red Pepper Flakes
Sea Salt and Black Pepper to taste
1/4 C Capers

Garlic Scape Pesto 

14 Garlic Scapes Steamed
½ C Walnuts
½ C Olive Oil
½ C Water
2-4 Tbsp Nutritional Yeast (to taste)
2 Tbsp Lemon Juice
1 tsp Smokes Paprika
1 tsp Sea Salt
1 tsp Garlic Powder
2oz Fresh Basil

Tofu Ricotta 

1 lb Extra Firm Tofu drained and Pressed
4 Garlic Cloves Minced
2 tsp Dried Basil
2 tsp Dried Oregano
½-1 tsp Sea salt
Black Pepper to taste
4 Tbsp Lemon Juice
2 Tbsp Tahini
1 Tbsp Mellow White Miso
Slightly less then 1/4 C Water


To Make the Tomato Sauce 

- Combine all ingredients except capers and blend until smooth, add in the capers and give a gentle blend for 2 seconds just to incorporate.

- Set aside until ready to use.

To Make the Pesto 

- Trim the ends off of your garlic scapes and steam in a pot fitted with a steamer basket for 5-7 minutes until bright and fragrant.

- Pulse Walnuts in a food processor until very fine.

- Add in Olive oil and garlic scapes. Process until relatively smooth. You may need to scrape down the sides of the bowl.

- Add in all other ingredients along with the water. Process again until you reach your desired consistency. (I like my pesto slightly textured.)

- Set aside till ready to use

*** Note - You can use more or less water depending on your desired thickness. You can also leave the garlic scapes raw if you prefer, but some people find the taste too strong which is why I suggest steaming them for a few minutes before hand.***


To Make the Tofu Ricotta 

- Crumble Tofu into a mixing bowl.

- Mix the White Miso with the water until smooth.

- Add all other ingredients to the tofu including the miso water mixture and use a fork to mash until everything is thoroughly combined and tofu reached desired ricotta-like consistency.

- Set aside until ready to use.

For the Lasagna 

- Boil the Noodles per package directions then drain and rinse under cold water.

- Heat 1 Tbsp of olive oil in a pan and saute the onion until soft. Add in the arugula and saute for roughly 5 minutes until wilted. Remove from heat and let cool for a few minutes.


Assembly 

- Preheat oven to 400'F

- Fill the bottom of a baking dish with a thin layer of the sauce. Place a layer of cooked noodles over top.

- Place half of the pesto mixture on top of the Noodles and spread to coat evenly.

- Spread half of the arugula mixture over top of the pesto.

- Spread half of the tofu mixture over top of the arugula mixture and spread as evenly as possible.

It’s okay if the Arugula shows through the tofu.

- Spread another thin layer of sauce over the tofu mixture, then top with another layer of noodles.

- Spread the remaining pesto over the noodles.

- Spread the remaining arugula mixture over the pesto

- Spread the remaining tofu over the arugula and top with another layer of noodles.

- Spread the remaining sauce over top of the noodles. Then garnish with thinly sliced tomatoes, kalamata olives and a bit of freshly ground sea salt and black pepper if desired.

- Place in the oven and bake for 20-30 minutes until tomatoes are shriveled and sauce is bubbling.

- Let cool for 15 minutes then cut into the Lasagna and enjoy!


***Note: This can be made gluten-free by using gluten-free noodles.*** 

Thursday, July 11, 2013

White Beans and Garlic Scapes with Caramelized Tempeh...


Garlic Scapes are still abundant at many markets, and since the season for them is so short I love to take advantage of them. Unfortunately last week I had a ton of them in my fridge but hardly anytime to cook. Still one afternoon as I was preparing to leave for work I needed something quick and easy to throw together to take with me for lunch and this just happened to be it.


It was one of those ‘Grab whatever’s around’ affairs. One of those ‘throw everything into a pot’ deals, you know? I’m becoming more and more fond of this style of cooking because it seems no matter what I throw together it always comes out great. With this dish in particular the scapes work so well with the creamy white beans. I used Italian flavors as inspiration and caramelized some tempeh for a bit of extra oomph and a little sweetness, By the way, caramelized tempeh is like my new favorite thing ever. If you’ve got some garlic scapes you don’t know what to do with I urge you to try this dish. It’s packed with good stuff and you can whip it together in under 30 minutes.


White Beans and Garlic Scapes with Caramelized Tempeh 

1 15oz Can White Beans (rinsed and drained)
1 Large Tomato Diced
12 Garlic Scapes cut into 1 inch dice
1 Tbsp Lemon Juice
1 Tbsp Olive Oil
½ tsp Red Pepper Flakes
1/4 tsp Dried Rosemary - (or fresh if you have it)
Sea Salt and Black Pepper to taste
8 oz Tempeh cubed and steamed for 10 minutes
3 Tbsp Bragg’s Liquid Amino’s - or Tamari or Soy Sauce
1 Tbsp Maple Syrup

- Heat the olive oil in a pan over medium heat. Add the garlic scapes and saute until nearly tender 4 minutes.

- Add in the White Beans, Tomato, Red Pepper Flakes, Rosemary, Sea salt and pepper and saute until the scapes are tender, the tomatoes have softened and the beans are heated through. About 4 more minutes.

- Add the lemon juice and stir to combine then transfer to a serving dish.

- Using the same pan as you used to cook the scapes and beans turn the heat up to medium-high. Add the cubed tempeh and saute until beginning to brown on all sides. About 5-6 minutes.

- Add in the Bragg’s, and Maple syrup. Let the mixture bubble up and get thick using a wooden spoon or spatula stir the tempeh around so that it all gets coated with the mixture. Cook about 2-3 minutes until most of the sauce has been absorbed into the tempeh and the tempeh takes on a ‘sticky’ look.

- Add the caramelized tempeh to the bean and scape mixture and enjoy!


PS: You can eat this as is, or you can enjoy it over a bed of greens or a bed of cous cous or rice.

Tuesday, July 9, 2013

Roasted Beet and Arugula Salad with Walnuts and Black Truffle Balsamic Drizzle...


Last weekend I didn’t buy any groceries, since last Monday was my birthday we did a bit of eating out in the beginning of the week so there was no sense in buying fresh produce only to watch it spoil. I had a well stocked pantry and a few items in the fridge with a longer shelf-life but by the end of the week food was getting pretty scarce in my refrigerator. When lunchtime on Friday rolled around the fridge was looking pretty sad and I was craving a salad. The only greens I had left was some arugula that needed to be used tout de suite, and ditto for some lonely looking beets.


Well arugula and beets sounded like a great combination especially once I started thinking about walnuts and balsamic vinegar. I also had some coconut milk yogurt sitting in the fridge that I’d specifically bought for a recipe I ended up not making and so I decided to use it in my salad dressing in place of oil. I wasn’t sure how that was going to work out, but somehow it paired beautifully with the bitter greens and tangy vinegar. Still the recipe needed just a little something extra to bring ti to new heights, and that something ended up being Black Truffle Oil. Now, I know black truffle oil is a fancy - and pricy - gourmet ingredient but it imparts a truly unique flavor into a variety of dishes. Seriously, this stuff has become my new best friend, and it’s great that such a little can go such a long way. It really makes the cost worth it. Of course if you prefer you can leave the truffle oil out, but I strongly recommend it. The salad isn’t quite the same without this unique component.


Strangely enough, though this started out as a haphazard attempt to just eat something before going into work, this ended up being one of my favorite meals of the entire week. It’s super simple to throw together but the flavor is out of this world. Enjoy!


Roasted Beet and Arugula Salad with Walnuts and Black Truffle Balsamic Drizzle

For the Roasted Beets 

2 Small Beets cut in Small Dice
Olive Oil to taste
Sea salt and Black Pepper to taste

For the Salad 

2 Handfuls Arugula
1 Batch Roasted Beets
1/3 C Walnuts
2 Green Onions sliced
1 Tomato

For the Dressing

2 Tbsp Plain Coconut Milk Yogurt
1 ½ Tbsp Balsamic Vinegar
½ tsp -1 tsp Black Truffle Oil
Sea Salt and Black Pepper to taste
Garlic Powder to taste

- Preheat the oven to 450'F.

- Spray a cooking sheet with a little bit of coconut oil.

- Drizzle a tiny amount of olive oil on the sliced beets. Add sea salt and pepper to taste then mix until the beets are well coated.

- Spread the beets out on the baking sheet making sure they do not touch then roast in the oven for 10-15 minutes until they are tender but not mushy. A little bite is nice!

- While the beets are roasting combine the salad ingredients in a large bowl.

- Combine the salad dressing ingredients in a small bowl and whisk until thoroughly combined. This may take a few minutes as the yogurt is going to want to curdle once you add the vinegar. Whisk briskly for 1-3 minute and it should come out smooth.

- Once the beets have finished roasting remove from the oven and let cool for five minutes.

- Top your salad off with the roasted beets, then drizzle over the dressing and enjoy!


PS: This salad makes one good sized serving, or two small starter servings. If you want to make enough for two good sized portions the recipe easily doubles.