Showing posts with label Curry. Show all posts

Friday, April 10, 2015

Cream of Leek Soup with Pink Peppercorns...


Believe it or not I came up with this recipe on the plane from Brussels to Chicago. It was partially inspired by a side dish of curried leeks I ate while in Luxembourg City. I was thinking about that dish on the plane ride home, and thinking how happy I was that spring was finally upon us. Leeks seemed to be a pretty popular meal item most places we went in Europe, which was fine by me since I love them so. You might think that after weeks of eating them I might be bored of them, but that wasn’t the case at all, in fact I only wanted more, and for whatever reason I kept thinking curry, coconut leek soup. This idea just wouldn’t leave my brain the entire plane ride home, and somewhere over the Atlantic I came up with the idea of adding fancy pink peppercorns and tarragon into the mix. Sounds crazy I know, but damn if it wasn’t delicious! This made a nice sized pot of soup, but my husband devoured most of it in one sitting. I wouldn’t be surprised if you did as well.


Cream of Leek Soup with Pink Peppercorns 

3 Medium-Large sized Leeks
6 Cloves Garlic Minced
1 Tbsp Coconut Oil
1 tsp Curry Powder
1 tsp Tarragon
1 15oz Can Coconut Milk
2 C Vegan Chicken Broth
½-1 tsp Pink Peppercorns crushed
Green Onions or Chives to Garnish
Sea Salt to taste

- Thoroughly wash the leeks and slice thinly.

- Melt the coconut oil in a pot over medium heat. Add sliced leeks, garlic, and curry powder and saute for 6-10 minutes until leeks are bright green, soft and fragrant.

- Add the Vegan Chicken broth and simmer for about 10 minutes.

- Carefully remove leek and broth mixture form the pot, place in a high-speed blender and blend on high until completely smooth.

- Return the soup to the pot, and add in the coconut milk, tarragon and ½-1 tsp of Sea Salt - or to taste. Stir until the coconut milk is completely blended into the soup, then let simmer for about 5 minutes.

- Turn off the heat and stir in the pink pepper corns and green onions or chives. Saving a little of each to garnish each bowl. Serve and enjoy.


Monday, November 4, 2013

My Favorite Creamy Macaroni and Cheese...


I know I’ve been ridiculously absent since Canadian Thanksgiving and for that I’m sorry. I just haven’t had the cooking spirit lately. My Oma’s somewhat unexpected passing has been hard on me, and the rest of the past month wasn’t much better. A variety of things culminated to leave me feeling uninspired and uninterested in doing much cooking, or blogging. For almost the entire week post-Thanksgiving we ate leftovers. Then we ate simple rice bowls that tasted delicious but aren’t exactly blog-worthy in my opinion. Then the past week we’ve been having something of a pizza extravaganza - of which I meant to take photos but my camera battery is dead and every day I absentmindedly forgot to re-charge it - thanks to my latest cook book purchase of “Vegan Pizza” by Julie Hasson. But now we’re into a new month, and I’m feeling better, re-inspired, and I’ve missed the blogesphere, and so Im going to make a greater effort to be more active this month.


To kick things off I thought I’d share a favorite Mac and Cheese recipe with you. I know there are tons of mac-loving vegans out there, vegan mac is like the holy grail for some, and yet I’ve never been much of a mac lover. Blasphemy I know, but I was never one to eat food from a box, that had a lot to do with my upbringing I suppose. Certainly as a kid I ate macaroni and cheese now and then, and I’m sure I liked it well enough but I never developed that ‘ohmygodgottahaveit!’ love affair with it. After I grew up and moved out I don’t think I ate Macaroni and Cheese at all, except for maybe trying my hand at making a home-made baked mac once or twice. My husband was also not a mac and cheese fan - he didn’t like cheese at all in any form in fact - and so it was not a meal that ever made it onto our radar.


Of course, as happens with so many things, the minute you go vegan all your previous ideas and notions about food go out the window. I like Mac and Cheese much more now, then I ever did growing up, and these days I really love and appreciate creative mac and cheese recipes. While I still wouldn’t consider it anything close to being a favorite food, I do now and then find myself getting a wicked bad craving for it. One such crazy craving hit me out of the blue in mid-October as I was reminiscing about the Toronto Vegetarian Festival - more to come about that in a very belated review post. - and the epic Mac and Cheese Burrito we ate there courtesy of Hot Beans. - More on that to come as well. - My husband and I were so blown away by this absurd concoction that we just knew we’d have to eat it again. Of course Toronto is a far way to travel from Chicago just for a burrito and so I decided to try and recreate this masterpiece at home.

Now, the first step to making any mac and cheese burrito is making mac and cheese. Essentially you can use any mac and cheese recipe you like, but the following recipe is one of my very favorite mac recipes. - Inspired by THIS recipe from Vegan Mischief who also happens to be a Vancouver Vegan -  Coconut milk is really the silent star here, as it gives the mac a thick and creamy texture without imparting any coconut flavor. It is hands down my favorite non-dairy milk to use when making macaroni and cheese, and I love the unique combination of spices. I hope you enjoy it as much as I do.


My Favorite Creamy Macaroni and Cheese 

½ Small Yellow Onion minced
1 tbsp Olive oil
4 Garlic Cloves Minced
½ tsp Smoked Paprika
1/4-1/2 tsp Turmeric
1 tsp Mild Curry Powder
½ -1 Tbsp Ground Fenugreek
1/4 tsp White Pepper
½ tsp Dried Oregano
½ tsp Dried Basil
1 Vegan Chicken Flavor Bouillon cube
2 Tbsp White Miso
4 Tbsp Water
1/4 C Nutritional Yeast
2 C Full-Fat Canned Coconut Milk
1 Tbsp Dijon Mustard
1 Tbsp Cornstarch
1 Tbsp Water
1 Bag Daiya Cheddar Shreds
12-16oz Elbow Macaroni Noodles (Gluten-Free)
Salt and Pepper to taste (Optional)

- Cook pasta according to package directions. Drain in a colander and then return to the pot until your sauce is ready.

- Heat the olive oil in a medium sized pot over medium heat. Add in the minced onion and saute for 3-5 minutes until softened. Add in the garlic and saute another 2 minutes.

- Add Smoked Paprika, Turmeric, Curry, Fenugreek, white pepper, oregano, and basil. Saute another 2 minutes.

- Meanwhile combine the 2 tbsp of Miso with 2 tbsp of water, stir until smooth.

- Also combine the vegan chicken bouillon cube with 2 tbsp of water and mix until smooth.

- Add the Nutritional Yeast and the Coconut milk to the pot with the onions, whisk until combined and smooth. Add in the Bouillon mix, along with the miso mix, and let simmer stirring frequently for five minutes.

- Whisk together the cornstarch and the 1 tbsp of water to make a slurry.

- Add the cornstarch mixture to the Pot, along with the Dijon Mustard, and the Bag of Daiya shreds. Continue to simmer, whisking until all the daiya has melted into the sauce and the sauce has thickened. This could take roughly 5-10 minutes.

- Once the daiya has melted and the sauce has reached a creamy thickness that you like, taste for flavor and if you feel it’s needed you can add ½ -1 tsp of sea salt, along with a bit of fresh cracked black pepper.

- Then add the sauce to your cooked Macaroni and serve as is garnished with a bit of Italian parsley or use it to make an epic mac and cheese burrito - recipe to come tomorrow!

As always, enjoy!

*** Note - I typically always use gluten-free noodles, if you do then the dish is gluten-free. You can also make the dish soy free by using a soy-free miso such as chickpea miso.***

Monday, January 14, 2013

Indian Spiced Lentil Loaf...


Everyone loves a good lentil loaf right? At least it seems that way. I say that because out of the 100 + cook books that I own I would say at least three quarters of them contain a recipe for a vegan ‘meatloaf’ or some variation of the classic hippy lentil loaf. Now, I was never that big a fan of ‘meatloaf,’ because well... for starters meat shouldn’t come in a loaf, ans secondly when you really think about what it is you’re eating - a big ole slab of ground beef with ketchup and breadcrumbs - it doesn’t really sound that appetizing. Certainly it’s not a very creative dish. A good lentil loaf on the other hand can blow your mind, after all lentils are a really versatile food, and I never fail to be amazed at what they can be made into. Plus on these cold winter nights when you’re dying for something savory and comforting but don’t want to do a lot of work a lentil loaf is perfect. They’re quick and easy to throw together with minimal active time. Once you have it in the oven baking you can take a shower, read a book, do some yoga, or just relax with a hot cup of tea.


Lentils loafs are also rich in nutrients. You get protein from the lentils, plus lots of healthful nutrients, vitamins, minerals and antioxidants from the array of spices and vegetables you decide to put into them. The problem though - at least for me - is that so many of the lentil loaf recipes floating around out there are the same. It’s always the same kind of lentils - usually brown - with the same basic combination of vegetables - onions, carrot, celery, - and the same combination of herbs - parsley, thyme, salt, pepper, basil, oregano. - Vegetable brother is another typical component as is soy sauce and are almost always topped with ketchup or BBQ sauce. Now, don’t get me wrong, I like this combination - a lot - but as you know I like variety. I’ve never been the type of person who makes the same thing over and over again and so I require a little more creativity in my life.

I had been thinking a lot about lentil loafs last November when I happened upon an interesting recipe in Robin Asbell’s book “Big Vegan” it was a French inspired lentil loaf with Herbs de Provence and a Dijon Mustard glaze, yum! I was immediately excited and so I made the loaf. It was beyond excellent, and it got me thinking about what other kind of cultural twists I could throw into a lentil loaf to shake things up a bit. Initially I wrote down a bunch of ideas that I’m eager to try out, but since Indian food is one of my - and my husband’s, - favorites, that seemed the most natural direction to go in first.


When I first came up with the idea I had no idea how I was really going to do it. I had no idea if it would be good or if it would even be edible, but in the end I really surprised myself because the loaf turned out really fantastic. It tasted like a big samosa covered in mango chutney. It had all the great flavors I love about Indian Cuisine, the sweet, the spicy, the pungent, all rolled up in one easy package. My husband loved it too and so we enjoyed this delicious Indian spiced loaf for 2 days as dinner and 2 days as leftovers in lunches. It was the perfect hearty meal for those cold nights that proceeded the beginning of the Christmas season.

One thing to keep in mind about this recipe however is the fact that this makes a very large loaf. It was too large for my regular loaf pan and so I baked it in a cake pan instead. If you’re not looking to make quite so much you could easily half the recipe, but remember that halving it will mean a shorter cooking time also. Anywhere from 25-40 minutes less, depending on the consistency of the loaf at the time you pour it into the pan. Though if you were so inclined to make the recipe as is it tastes fantastic as leftovers, either on it’s own or stuffed into whole grain pita bread with sliced tomato, onion, lettuce, cucumber and a little additional chutney. Or be a little more traditional and roll it up into some Naan bread. However you decide to make it just enjoy it!


Indian Spiced Lentil Loaf 

1 C Green lentils
½ C Red Lentils
3 C Water
1 1/4 C Oat Flour
6 Garlic Cloves Minced
1 Tbsp Ginger grated
1 Yellow Onion Diced
1 tsp Mustard Seeds
3 Yukon Gold Potatoes diced
1 Tbsp Peanut Oil
2 C Cauliflower Chopped
1 Large Carrot
½ Frozen Green Peas
5-6 Tbsp Curry Powder
1 tsp Ground Turmeric
½ tsp Ground Cinnamon
1/4 tsp Ground Cardamom
4 tsp Ground Cumin
2 tsp Ground Coriander
Sea salt and Black Pepper to taste
2-4 Tbsp Mango Chutney
2 Tbsp Tamarind Paste
8oz Mango Chutney

- Preheat oven to 400'F/200'C

- Cook Green and Red Lentils in 3 Cups water until tender and most of water has been absorbed. If not all the water has been absorbed by the time the lentils are tender drain in a colander. If lentils are not tender by the time the water has absorbed add more. Once cooked set aside to cool.

- Steam the Potatoes and Cauliflower until just tender, then set aside to cool.

- In a pan over medium-high heat saute the mustard seeds for a few seconds until they begin popping. Add the peanut oil, the onion, garlic and ginger and saute for 5-7 minutes until translucent.

- In food processor combine the cooked lentils, potatoes, cauliflower, onion mixture, and the oat flour. Pulse until just combined.

- Add the Cardamom, Cumin, Coriander, Salt, Pepper, cinnamon, turmeric, curry powder, tamarind paste, and the 2-4 Tbsp of Mango Chutney. Pulse until it the mixture just becomes cohesive, and the spices have been incorporated.

- Turn the mixture out into a mixing bowl. Add in the grated carrot and the frozen peas. Stir to combine. Taste for flavor and texture and adjust seasoning as needed.  More curry powder, chutney, salt etc... If the mixture is too wet add in a bit more oat flour. If it’s too dry add in a bit of oil, water, or more chutney or tamarind paste.

- Grease a 9 inch round cake pan - I used a sprongform pan, - and scrape the mixture into it. Smooth the top with the back of a spatula then top with the 8oz of Mango Chutney.

- Bake uncovered in the oven for roughly 60-75 minutes until the top is bubbling and the loaf seems firm when you insert a knife or wooden skewer into it.

- Remove from the oven and let cool on the counter top for 10-15 minutes before slicing. Serve with a giant salad!

***Note - I chose to make this recipe wheat-free, but to ensure it’s 100% gluten-free make sure you buy gluten-free oat flour, or make your own by using gluten-free oats. Alternately if you do not have a wheat or gluten intolerance you can use any type of flour that you prefer.***

Friday, October 5, 2012

Vegan Mofo #8 - Joni’s Curried Split Pea Burger...


Vegan Mofo #8 - Joni’s Curried Split Pea Burger

The Book - The Best Veggie Burgers on the Planet
The Author - Joni Marie Newman
The Recipe - Curried Split Pea Burger
Page # 54 Tzatziki Sauce on page 193
Difficulty - Easy
Duration - 1 hour. If you make the split peas ahead of time then you only have to throw the ingredients together and bake for 30 minutes. Super easy.


Joni Marie Newman is the self-proclaimed Queen of Veggie burgers, and she along with Celine Steen and now Tamasin Noyes have come up with some really wonderful, magical and innovative burger and sandwich recipes. Since I own most of those cook books don’t be surprised if you see an overwhelming number of posts reviewing sandwiches from a handful of the same people. I’m trying to keep it varied but the whole reason I chose sandwiches for my Mofo project was because I hardly ever make them, so what better time then now to put those sandwich and burger cook books into rotation?


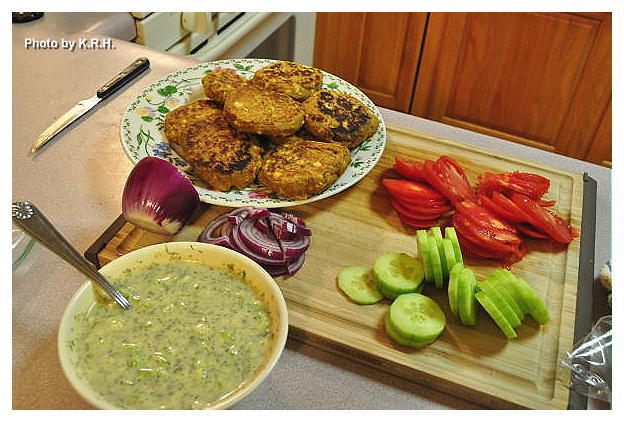
Anyway - On to the actual ‘burger.’ This curried split pea burger is very similar to a falafel. Just add curry powder and use split peas instead of chickpeas. Though it’s less complicated then a falafel, as falafels are always fried and typically also contain ingredients like onion, garlic, cilantro chilies or what have you. This is a very simple back to basics burger that utilizes simple wholesome ingredients. Split peas, curry powder, whole what flour, sesame oil, salt and pepper, and a little tiny bit of non-dairy yogurt. They’re easy to make and I like that they’re baked rather then fried. I almost always prefer to bake my veggie burgers I feel it yields a firmer result plus I don’t like the added oil.


When these are ready to eat you can serve them on a bun like a traditional burger or follow Joni’s suggestion and stuff them into a pita with sliced tomato, onion, and cucumber with a nice thick drizzle of her tzatziki sauce. I chose the pita route and even though I make a mean tzatziki of my own I decided for the sake of this post that I’d try Joni’s version. It turned out pretty good and again it was nice and simple. Some non-dairy yogurt, fresh dill, chopped cucumber, minced garlic, olive oil, lemon juice and salt and pepper. The perfect accompaniment to this delightful burger. I think the only thing I did differently is that I used extra garlic and dill for the tzatziki - personal preference - and I added more curry powder to the burgers. Just to suit my own tastebuds. Since it’s such a simple recipe it’s easy to play around with, so enjoy it!


Thursday, June 7, 2012

Curry Kapitan with Coconut and Chili Relish...


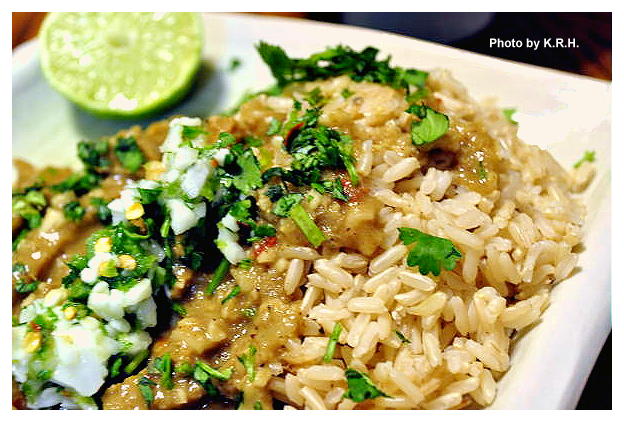
My latest foray into Malaysian Cooking. Curry Kapitan is traditionally made with chicken, and it’s said that the dish recalls the traditional role of the Chinese Kapitan, who was a man of considerable social standing amongst the Malay and Chinese people in old Melaka. Possibly invented by the Peranakans - the Malay-Chinese - to present to the Kapitan or to celebrate his role. It owes it’s flavor to the cultural melting pot of Old Melaka, and to the traditions of Chinese, Malay, Portugese, and Indian cuisine. Of course for my version I used homemade seitan instead of chicken, and decided to use soy sauce for a salty taste instead of dried shrimp paste.


This dish is nothing if not flavorful. The aroma alone is mouth-watering, but the taste... incredible! Though the ingredient list may seem long, this dish actually comes together rather quickly and it is worth every ounce of effort. When I first set out to make this dish I had no idea what to expect, and there were a few moments at least where I thought the whole thing would end in disaster. However when it came time to eat, and I took my first bite of curry Kapitan I was in love. The flavor is so complex that it’s hard to describe, but it has every flavor note you could possibly want in a dish. You can adjust the seasonings to make it as hot or mild as you like, but a little bit of kick is part of what makes this dish so fantastic. Use the chilies as a garnish, with a squeeze of lime and you won’t be disappointed. It tastes even better the next day!


Curry Kapitan with Coconut and Chili Relish 

For the Rempah 

½-1 tsp red pepper flakes
1 large red onion
10 cloves garlic
thumb sized piece of ginger
1 tbsp soy sauce
½ tsp ground turmeric
2 tsp Chinese five spice powder
1/4-1/2 tsp ground cinnamon

For the Curry 

2 Tbsp tamarind paste
Flesh from half of 1 Fresh Thai Coconut (roasted)
2 tbsp peanut oil
1 15oz can coconut milk + 1/3 c water
1-2 Pack Stevia
1 ½ lb Seitan (Homemade or Store bought)

For the Chili Relish 

½ - 1 Jalapeno Minced (Depending on how spicy you want it)
½-1 Red Chili Minced or ½-1 tsp red pepper flakes
½ Bunch Cilantro Minced
Flesh from half of 1 Fresh Thai Coconut
Juice of 1 Lime


To Serve

1 Lime
Extra Cilantro minced
Cooked Brown Rice

- First you must open your coconut. To do this the easiest way is to get a cleaver. It doesn’t have to be a good cleaver, it doesn’t have to be a $500 one, a $50 one will work just as good. Use the cleaver to whack your coconut a couple of times to break through. Drain the liquid out into a bowl or measuring cup and refrigerate to dink later, it’s not needed for the recipe.

- Once the liquid has been drained from the coconut you can split it in half. Use your cleaver and give the coconut a great whack in the middle. If like me you’re not strong enough to get the cleaver all the way through the coconut in one whack, and not skilled enough to keep hitting it in the exact same spot, use a rubber mallet to hammer the cleaver down through the coconut. This works really great, and fast.

- Once your coconut is in half use a spoon to scoop out the delicious white flesh. Once all the flesh has been removed rinse it under cold water and rub any filament away. Pat the coconut dry, and then slice it thin. Reserve half the amount of coconut in a bowl, to use as part of the relish and dry roast the other half in a pan over medium heat until it’s golden brown. Be careful not to burn it. The coconut should emit a slight nutty aroma.

- Once the coconut is a nice golden brown remove it and grind it either in a food processor or mortar and pestle until it resembles corse sugar grinds. Place in a bowl and set aside.

- Now to make the Rempah. In a food processor blend together the garlic, ginger and onion. Add in the soy sauce and pulse to combine. Stir in the turmeric, cinnamon and five spice powder.

- Heat the oil in a large pan over medium-high heat and stir in the rempah. Fry for five to eight minutes until the mixture becomes fragrant.

- Add the seitan to the pan and fry another 3-5 minutes, to let the seitan brown a little.

- Add in the coconut milk, water, Tamarind, stevia and season with sea salt and black pepper. Bring the mixture to a boil, then reduce heat and let simmer for 10-20 minutes. Add in the reserved roasted coconut.

- In the meantime combine all the relish ingredients in a bowl.

- Serve the Curry Kapitan over a bed of brown rice, garnished with extra cilantro, some squeezed lime, and the chili relish.


*** Note - To make this dish Gluten-Free use Wheat Free Tamari and a soy-based ‘meat’ or tofu. To make this dish Soy-Free use Coconut Amino’s instead of soy sauce.***

Monday, June 4, 2012

Indo-Malaysian Shami Kebabs...


Just incase you thought I was finished experimenting with Malaysian cooking, this post it to assure you that I’m not. I’ve just been very busy lately preparing for vacation, so I haven’t been cooking quite as much as usual, and much of the cooking I have been doing has been for the express purpose of cleaning out my fridge before I take off. Before I do however, this dish really needs to be shared!


Even though a Shami Kebab isn’t exactly the sort of kebab we here in the west are used to, they are delicious. Originally of Indian Origin these kebabs are traditionally made from a mix of lentils and ground lamb. They are a popular item at the Malay and Muslim Hawker stalls and are often served alongside a dish or rice, and a sambal, however they are also sometimes eaten as a burger which is sort of how I chose to enjoy mine.


Of course my Shami Kebabs were not made with ground lamb, (Ew!) Instead to get that kind of texture and ‘sticking together’ effect I decided to use two different kinds of lentils, as well as cashews and mushrooms. The end result was so fantastic and delicious that both my husband and I failed to see how the dish could have in any way been improved by the addition of lamb. These kebabs, or patties as they should more accurately be called - are hearty, flavorful, and down right scrumptious. I dare you to eat just one.


Also instead of eating these kebabs with a heavy side or rice, or on a burger bun I decided to slayer them onto a sliced French Baguette, piled with lettuce, tomato, cilantro, mango chutney, and a drizzle of tamarind sauce, and mint yogurt. Now that I think of it a few sliced onions would have gone perfectly on there as well. Next time!


Shami Kebabs 

1/3 C Red Lentils
1/3 C Green Lentils
2 Onions finely diced
10 Garlic Cloves minced
1 Thumb Size Piece Ginger grated
1 Small Green Chili minced (Optional)
6oz Baby Bella Mushrooms finely diced
½ C Cashews Ground into a meal
1/4-1/3 C Chickpea Flour (depending on how wet your mixture is)
2 tsp Curry Powder
1 tsp Ground Coriander
1 tsp Ground Cumin
1 tsp Gram Masala
½ tsp Ground Turmeric
Sea Salt to taste
2-3 Tbsp Earth Balance
½ Bunch Cilantro minced

Optional Garnishes 

Cilantro
Sliced Tomato
Lettuce
Thin Sliced Red or Yellow Onion
French Baguette or Italian Loaf
Mango Chutney

Quick Tamarind Sauce 

2 tbsp tamarind paste
2 packets stevia or to taste
water to thin

Quick Mint Yogurt 

1/4 C Sour Cream
1 Tbsp Lemon Juice
1 Tbsp White Miso
2 Tbsp Water
Minced Fresh Mint to taste
Salt and Pepper to taste

- Rinse Lentils then place them in a medium sized pot and add enough water to cover. Bring to a boil then reduce heat to simmer and cook lentils until the water has absorbed and the lentils are tender. Roughly 20-40 minutes. If your water absorbs before your lentils are tender add more water.

- When lentils have finished cooking drain and set aside.

- Meanwhile melt the Earth Balance in a large pan. Stir in the diced onions, garlic, ginger, and green chili. Saute over medium-high heat for 5-10 minutes until mixture is fragrant and onions are translucent.

- Add in the diced mushrooms, the curry powder, coriander, cumin, gram masala, and turmeric. Saute for 3-4 minutes then add the lentils. Saute another 5-10 minutes until mushrooms are soft and moisture has evaporated. Transfer the mixture to a large mixing bowl and set aside to cool.

- Once mixture is cool enough to handle season with sea salt and pepper and add in the ground cashews, the minced cilantro and the chickpea flour. Thoroughly combine until the mixture becomes cohesive enough to form patties.

- Form the mixture into 10-12 palm sized patties. Place on a lightly greased baking sheet and bake at 400'F for 10-15 minutes. Remove the baking sheet, gently flip the patties over and bake for another 10-15 minutes until the patties are browned and have firmed up. Let cool for 5-10 minutes before serving if serving as a sandwich. It serving with rice serve immediately.

- To assemble your Shami Kebab sandwich. Slice a French Baguette in half crosswise then slice each half lengthwise down the middle so you have two roughly 6inch sandwiches. Slice three patties in half then layer three halves on each baguette. Top with mint yogurt, mango chutney, tamarind sauce, lettuce, tomato and cilantro and serve!


- To make Tamarind Sauce and Mint Yogurt simply whisk the ingredients for the Tamarind sauce in a bowl. Taste, adjust for seasoning and thickness and serve. For Mint Yogurt whisk all ingredients together in a bowl taste for seasoning and thickness and serve.

Thursday, May 31, 2012

Roasted Chili Lime and Indian Spiced Chickpeas...


Garbanzo Beans or Chickpeas as they’re also called are my hands down favorite bean ever! Well, I love other beans of course, and If I had to pick I’d say black beans, lima beans and edamame are right up there with chickpeas but chickpeas were the first bean I fell in love with so they’d always hold a special place in my heart.

I truly love them in anything. Soup, chili, stew, salad, sauteed with greens and other veggies. In rice, cous cous, or farro dishes, obviously as hummus. I love them in traditional Indian, Middle Eastern and Hispanic dishes, I just love, love, love them. They are probably the bean I buy and eat most frequently but sometimes - if you’re like me - you don’t want to go through the whole rigamarole of making something just to enjoy the one ingredient you love. Am I right? Now, I am no stranger to eating chickpeas right out of the can, I do it often, and it’s delicious, but some days you jsut need a little more than that, but you want something less than a meal. Well roasted snack chickpeas are just the thing!

Roasted Indian Spiced Chickpeas


Now roasting chickpeas isn’t exactly a new idea, so I can’t take credit for it. I’d seen mention of it before in magazine’s and online articles that connected to ‘healthy snacking’ though always intrigued by the idea I’d never actually thought to do it until last week. By then the recipes I’d previously seen were distant memories but roasting chickpeas seemed an easy enough task. All I needed to do was decide what flavorings I wanted to use. In the end I decided to go with a Mexican inspired flavor, and an Indian inspired flavor. Since they are two of my favorite types of cuisine and both traditionally use chickpeas it seemed a no-brainer.

Chili Lime Roasted Chickpeas


I was so impressed with the finished result. Not only do these things cook up fast, but they’re delicious! Absolutely-freaking delicious. They’re a truly healthy snack, and hearty too. The perfect thing to munch on pre-dinner when you usually reach for the sweets. They’re great served hot out of the oven or at room temperature, and truth be told they’re not half bad cold either. Bring a batch to your next BBQ or pot-luck and stick them on the snack table beside the chips, dips, pretzels, and party mix. They’ll be a sure fire hit.


Roasted Chickpeas 2 ways
(Cooking Instructions are the same for both)

Chili Lime Roast Chickpeas

1 15oz can Chickpeas
1 ½ Tbsp Lime Juice
½ Tbsp Agave Nectar
3/4 tsp Chili Powder
3/4 tsp Ground Cumin
Sea Salt

Indian Spiced Roast Chickpeas

1 15oz Can Chickpeas
1 Tbsp Lemon Juice
½ Tbsp Agave
½ Tbsp Olive Oil
3/4 tsp Curry Powder
3/4 tsp Gram Masala
1/4 tsp Ground Coriander
1/4 tsp Ground Cumin
Sea Salt

- Preheat oven to 400'F

- Drain and Rinse Chickpeas, then pat dry. Try to get them as dry as possible, before transferring them to a bowl.

- In a separate small bowl whisk together all flavor ingredients, both liquids and spices.

- Pour over the chickpeas and stir until thoroughly combined.

- Spread chickpeas in a single layer over a parchment lined baking sheet. Bake for 10-15 minutes then stir and bake another 10-15 minutes until chickpeas are brown and crispy.

- Remove from oven and transfer to a serving bowl, serve hot or refrigerate in an airtight container for later.

*** Note - For an Oil-Free version of the Indian Spiced Chickpeas Omit Olive Oil and use Lemon Juice or Tamarind Paste instead.***

PS: This probably goes without saying but if you decide to make both flavors at once do not put them on the same baking sheet. Use two different sheets!

Tuesday, April 24, 2012

Kickin’ Kale Coleslaw...


This salad recipe is partly inspired by the one my friend J brought to Easter this year, and partly inspired by the delicious kale salads I ate at Choice Health Bar in Lahaina, when I was in Maui in October. It’s the perfect blend of sweet, tangy and spice. The sweet coming from the dried fruit, the tang coming from the mayo, and the two vinegars, and the spice coming from smoked paprika, pepper, allspice, clove and curry powder. It may sound like a strange combination but trust me when I say they work in perfect harmony together. Paired with earthy hemp and sesame seeds this salad is a powerhouse of awesome flavor, and it got gobbled up faster then anything else when I made it for Earth Day.


One important thing to note about this salad is that, par usual I didn’t really measure the spices as well as I should have. You see I started off with a certain measurement, either 1/4 or ½ tsp and then kept adjusting from there. Unfortunately I neglected to write down what the final mastermind became for some of the spices. With the ingredients I’ve noted as (to taste) I suggest erring on the side of caution and going with the conservative measurement first, then tasting and adjusting to suit your preference. With the garlic and curry powder it’s also important to keep in mind that you want enough of each of those flavors to taste them, but not so much that either one of them is overpowering. You want to shoot for a mild garlic flavor and a mild curry flavor. In fact as you prepare the salad keep in mind that the flavors should be working together not fighting one another, meaning no one flavor should really overshadow the others. Instead they should be layered together to enhance the dish as a whole. With that in mind, you can’t go wrong. I know I at least will be making this salad - or some variation of it - for years and years to come!


Kickin’ Kale Coleslaw

4 ½ C Shredded Kale
3 Carrots Grated
1/4 C Raisins
1/4 C Dried Cranberries
3 Tbsp Hemp Seeds
2 Tbsp Sesame Seeds
½ C Chopped Green Onions

½ C Non-dairy Mayo
1-2 Tbsp Apple Cider Vinegar (to taste)
1 tsp Toasted Sesame Oil
1 tsp Umeboshi Plum vinegar
 2-3 Packets Stevia (to taste)
½ tsp Ground Allspice
3/4 tsp Smoked Paprika
3/4 tsp Dried Oregano
½-3/4 tsp Ground Thyme (to taste)
½ tsp Garlic Powder (to taste)
½-3/4 tsp Curry Powder (to taste)
Dash of Cinnamon and Cloves (slightly less then 1/8 tsp each)
Black Pepper to taste

- The easiest way to shred kale is in a food processor. Just pop it in and pulse a few times until you have fine shreds. Don’t puree it! If you don’t have a food processor just slice it thin with a knife.

- Once the kale has been shredded place it in a bowl with the grated carrot, cranberries, raisins, seeds, and onions.

- Combine all dressing ingredient in a small bowl and whisk until thoroughly combined. Taste for flavor and adjust seasoning as needed. For an additional kick you can always add a pinch or two of Cayenne pepper! Enjoy!


Tuesday, January 17, 2012

Baked Coconut Curry Sweet Potato Fries...


I made a really delicious tomato and farro soup for dinner last night, the recipe for which I was planning to post today. I am however in a bit of a time crunch, but since I don’t want to leave you empty handed so to speak I thought I’d share with you the absolutely to die for sweet potato fries I made last week.

If you’ve never had a sweet potato fry before - I don’t know how you couldn’t have, they’re amazing! - or you’re simply a sweet potato fry skeptic, - Do they really exist? - I urge you to try these out. They’re simply delicious, and a heck of a lot better for you then the typical French Fry. Not only are sweet potatoes so much healthier for you then the nutritionally dead white potato, but baking your fries instead of frying them is way more heart healthy, after all, all that oil isn’t doing any of us any favors right? Now I know, baking your fries doesn’t get them quite as crispy as frying them, but they do get crispy. Not quite as crispy is a small price to pay for your health I think. By the way you could always add a bit of cornstarch into the mix to coat the fires with, that usually helps the fries crisp up, I don’t think it’s necessary here but you could always try it.

As for this recipe I love coconut and I love curry, and those to flavors just so happen to go really well with sweet potatoes. Now there is a lot of controversy out there about coconuts, and coconut oil, is it really good for us? Or is it really bad for us? Honestly I don’t have the answer to that. My opinion on it is that it’s a plant food, a plant food who’s health benefits may out weight the few negatives. I look to the cultures that use coconut extensively in their cooking and see that study after study shows that they tend to have lower rates of heart disease then we do here in the west, but I can’t say with confidence that coconut oil is a health food or an evil food. So I treat it like most other things, moderation is important. I don’t eat it or use it everyday, and when I do use it I don’t overuse it, but I don’t stress about it either. However each of us has to make up our own mind about the foods we eat with the research we have available. If you don’t want to use coconut oil you could use organic peanut oil or another mild flavored vegetable oil, but it won’t be quite the same, and you can’t call them ‘coconut sweet potato fries’


Baked Coconut Curry Sweet Potato Fries

1 Tbsp Coconut Oil liquified
1 tsp Sweet Curry Powder
Sea salt to taste
2 Large Sweet Potatoes sliced into fry shapes

- To liquify the coconut oil just pop it into a glass bowl and microwave for a few seconds or put it in a pot on the stove over medium heat.

- Once liquified stir in your sweet curry powder. Add your sliced up sweet potatoes and toss until oil and curry have coated all of the fries. Sprinkle with a little sea salt then spread on a lined or lightly greased baking sheet.

- Bake at 400'F (204'C) for fifteen minutes. Remove from oven and flip over, return to oven and bake another fifteen to twenty minutes until fries are golden and firm on the outside but soft on the inside. Depending on your oven it make take up to forty-five minutes total so just make sure to check on them now and again.

Monday, October 31, 2011

Vegan Mofo # 27 Mark & Jennifer’s Aloo Saag (Potatoes & Spinach)...


Vegan Mofo # 27 Mark & Jennifer’s Aloo Saag (Potatoes & Spinach)

The Book - The 30 Minute Vegan’s Taste of the East
The Author - Mark Reinfeld & Jennifer Murray
The Recipe - Potatoes & Spinach (Aloo Saag)
Page - 12
Difficulty - Easy
Duration - 30 minutes, a little longer if you make rice to go with it.

Indian is one of my favorite cuisines. I love the spices, the aromas and the creativity. The flavor is always so impressive considering most Indian dishes don’t consist of too many ingredient. I especially love curries, they’re so great over rice or cous cous, served with warm bread. Yum! I’m a fan of any kind of curry or dal really, but seeing as how I love spinach so much and I was in the mood for potatoes I decided to give this one a shot. Though I’ve had this cook book for several months now I’ve only cooked one other dish from it. The Mu Shu Veggies, which were excellent. Since vegan mofo is a time of food and recipe experimentation for so many people I thought this the perfect opportunity to try this dish.


Now maybe it’s just me but it always seems that no matter what recipe I’m working from the Indian food I make at home can just never compare to restaurant Indian food. Maybe there’s some sort of Indian trick I’m not privy to, but that aside I thought this was a really great dish. The flavors were good, the sauce wasn’t too watery nor too thick, and the texture was good. It’s also fantastic that this dish can be made so fast. With such a quick cooking time you could easily make this dish for lunch or dinner, or if you’ve got a busy schedule you can whip this up in no time on a Sunday night and have it all week long.


As far as alteration go I didn’t change much. I did add about 6oz more spinach, 2 extra potatoes, and used a large onion instead of a small one. Subsequently I had to add in a bit more milk for the sauce and a pinch more of each spice to equal it out, but I didn’t add anything else or take anything away. Though I think next time I might try making this dish with coconut milk instead for a creamier richer texture and flavor.

Friday, August 19, 2011

Coconut Lime Curried Greens Over Volcano Rice...


As I mentioned the other day we really should be making leafy greens a significant part of our daily food consumption, so I’ve been experimenting all week with interesting and exciting ways to jazz them up. Personally I don’t mind greens served relatively plain with a bit of garlic, lemon juice, olive oil and salt and pepper, but I know most people are looking for a bit more of a kick for the old tastebuds. So this is what I came up with last night for dinner and I think it more then serves the purpose of delivering a creative new way to eat greens. It’s got a wonderful blend of Asian flavor, and is completely oil-free, which you gotta love right?


Coconut Lime Curried Greens Over Volcano Rice

Greens

1 Bunch Kale
½ Bunch Collards
1 red pepper medium dice
1 yellow onion medium dice
1 cup frozen peas
8-10 cloves garlic crushed
Vegetable broth to saute
Small handful basil leaves torn
Sea salt and black pepper

Coconut Lime Curry Sauce

1 can coconut milk plus a little water - slightly less then 1/4 cup water
1 tbsp lime juice
1 packet stevia (Optional - to taste)
1-2 heaping tbsp Thai red curry paste (To taste)
½ tbsp kaffir lime leaves minced (Optional)

Volcano Rice

1 ½-3/4 C Volcano Rice (Depending on how hungry you are)
2 - 2 1/4C Vegetable broth or water (Depending on the amount of rice)

- To make Rice add broth and rice to rice cooker and follow manufacturer’s directions. If you don’t own a rice cooker, cook as package directs.

- While rice is cooking, saute onions, red pepper, and garlic in a few tbsp of vegetable broth over medium heat. Until onions are translucent and peppers are soft. About 7-10 minutes.

- Add in your cooked greens and stir to coat with broth, and vegetables. Place lid over pan and cook on medium/medium-low heat stirring occasionally about 10 minutes.

- While greens are cooking make your marinade. Whisk together Coconut milk, lime juice, curry paste, stevia, water and lime leaves. Taste for seasoning and adjust as needed. If you like a bit more heat add more curry paste. Also you can use either red, green or yellow curry paste. I just prefer red. If you don’t have stevia you can use another sweetener of choice. Agave, brown sugar, granulated cane sugar etc...

- After 10 minutes your greens should have decreased in size and broken down a bit. Add your coconut milk mixture along with your torn basil leaves, sea salt and black pepper. Let boil, the reduce to simmer about 5 minutes. Add in frozen peas and simmer roughly 5 minutes longer.


- Serve coconut greens over rice and enjoy.

*** Note - Volcano rice is a product made by Lotus Foods http://www.lotusfoods.com/Volcano-Rice/p/LOT-503219&c=LotusFoods@SRI packed with minerals and antioxidants. It’s delicious, and has a mild flavor but if you can’t find it or don’t want to go searching for it you can just use regular brown rice. Also as for the greens you can use any kind you have on hand. I prefer kale and collards for this dish, but you can do all kale, or all collards or throw in some chard, whatever you want, don’t be afraid to be creative.***