Showing posts with label Tortillas. Show all posts

Tuesday, September 24, 2013

Vegan Mofo #22 - Terry’s Pupusas Stuffed with Black Beans and Plantains with Salvadorian Slaw...


Vegan Mofo #22 - Terry’s Pupusas Stuffed with Black Beans and Plantains with Salvadorian Slaw

The Region - El Salvador
The Book - Viva Vegan!
The Author - Terry Hope Romero
The Recipe - Pupusas Stuffed with Black Beans and Plantains with Salvadorian Slaw
Page # 162 Salvadorian Slaw is on page 79, Simple Latin Tomato Sauce on Page 46
Difficulty - Easy
Duration - About 45 minutes for the Pupusas, 15 minutes for the slaw not including marinade time and about 10-15 minutes for the tomato sauce.

Today we move on from Mexico to El Salvador with Pupusas which are fat, stuffed, grilled tortillas. Traditionally these cute little tortillas have been eaten in parts of El Salvador for as long as 2000 years, however it wasn’t until the early to the mid 1900's that they became more widespread around the country. Still Pupusas were relatively unknown outside of the country until forced migration -due to the Salvadorian Civil War in the 1980's - brought Salvadorians and their pupusas to neighboring countries and across the globe.


Until last night I had never eaten a Pupusas. Vancouver in the 80's and 90's or even the early 2000's wasn’t a place where Mexican, Central American, and South American cuisine abounded. Though that’s changing a little these days. Even Chicago with it’s large Hispanic community is not a place where I ever see Pupusas on offer - though perhaps I’m simply not looking in the right place. Still I knew way back when I bought Viva Vegan! That I’d have to make this dish eventually, and I’m so glad I finally got around to it. Isn’t that one of the best things about Vegan Mofo? It always challenges me to make the dishes I want to make but never seem to have the time for.


Unfortunately Pupusas mean working with dough, and you know I hate dough. I thought that since It was Masa dough - and I have no trouble making tortillas - that it would be fine but unlike a traditional wheat dough masa dough crumbles. Terry says the dough is suppose to be moist, and that it shouldn’t crumble but I really had trouble with it. My Masa kept cracking as I rolled it around in my palm trying to shape a bowl to fill. Then trying to pinch the bowl closed over the filling was a chore in itself. It didn’t take as long as I though it might to actually make the pupusas but in the end mine came out slightly cracked and a little bit of filling poked through a few. I suppose it doesn’t matter much that my pupusas weren’t perfect rounds, or that they are probably a little fatter then their traditional counterparts, or that they’re unsightly. What matters is the taste, and these pupusas really exceeded my expectations.


Terry’s Pupusas are filled with a spicy mix of black beans and cool sweet ripe plantain. She also suggests using vegan mozzarella but I didn’t have any. Instead I used some homemade Sharp White Chedder which I made using Skye Michael Conroy’s recipe in his book “The Non-Dairy Formulary” it worked out great. I really loved the hot masa dough, with it’s complex filing drenched in Terry’s simple Latin tomato sauce - which is just a blend of tomato sauce, onion, cumin, garlic, lime juice, and salt. With a heaping side of tangy pickled cabbage slaw or Curdito as it’s known - a condiment that shares similarity with German Sauerkraut or Korean Kimchi. - it was the perfect evening meal.


I’m sure once I get the hang of working with the masa dough in this way, and my pupusas shaping improves I’ll be making these all the time. I’d love to try out some of the filling variations Terry suggests especially the Squash and Bean and the Bean and Seitan fillings. I also think they’d be great with a sweet/savory filling like the raisin olive filling she uses in her Empanada recipe. The possibilities are limitless!




Friday, October 19, 2012

Vegan Mofo #19 - Celine & Tamasin’s Protein Happy Quinoa Wraps...


Vegan Mofo #19 - Celine & Tamasin’s Protein Happy Quinoa Wraps 
The Book - Vegan Sandwiches Save the Day!
The Author - Celine Steen & Tamasin Noyes
The Recipe - Protein Happy Quinoa Wraps
Page # 74
Difficulty - Easy
Duration - Roughly 20 minutes.


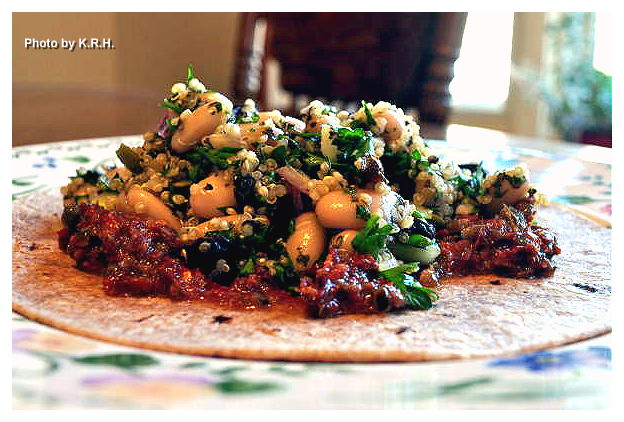
I absolutely love these wraps! They’re incredible, seriously. They’re super simple and so full of flavor, I could probably eat one of these every day and be very, very happy. Again my favorite thing about them is their emphasis on wholesome ingredients, all of which are pantry-staples for me. I also like that it’s a super quick meal. The most time consuming thing about it is cooking the quinoa but even that doesn’t take long. To make it even simpler you can always cook up a big batch of quinoa in advance along with preparing the spread in advance and then you have quick and simple lunches to throw together all week.


I also really liked the combination of flavors here. The spread is made from sun-dried tomatoes, olive oil, kalamata olives, capers and red pepper flakes. While the filling is made from combining cooked quinoa with white beans, golden raisins - I used regular - apple cider vinegar, lemon juice, olive oil, red pepper flakes, red onion, garlic, sea salt and black pepper, parsley, basil and roasted pepitas though I just used raw pumpkin seeds because that’s all I had. To serve you slice up some red bell pepper and cucumber really thin and layer it along with the filling into a whole wheat tortilla. Wrap it up and enjoy!


These are super filling too but not in a way that makes you feel weighed down. You can eat two of these and still not feel ‘stuffed.’ It’s the perfect late afternoon lunch. You could also opt out of using a tortilla and instead serve the quinoa and spread over a bed of mixed greens, it would be equally as tasty as a salad. Or you could eat the quinoa filling as is, it’s that good just on it’s own. Trust me! You need to make these, I know I’ll be making this a definite go-to lunch for work days.


Thursday, February 23, 2012

Coconut ‘Shrimp’ Tacos with Fried Plantains and Collard Greens...


Ah - I’ve been trying to post for the past two days and was unable to due to some sort of technical difficulty that appears to now be sorted out. This is the recipe I’d planned to post Tuesday, and since I haven’t been able to post in a couple I’ve got a nice backlog of posts waiting to be published. So stay tuned for all the delicious treats I have in store!


As winter is slowly coming to it’s end for another year I find I too am gradually moving away from the cozy, comforting meals associated with the colder months. It seems to always happen this way, about a month or so before the true end to a season my body is already geared up to enter the next phase. While I’m still enjoying soups, and other wintery treats, for the most part my heart and tastebuds are set on spring and summer.


Now before I was a vegetarian, shrimp was always a food I associated with spring, and especially summer. Coconut shrimp in particular, and over the course of the weekend I found myself longing for that sweet, crisp, coconut flavor. Of course I had no desire to eat actual shrimp, and no intention of doing so, but I wanted to find a way to recreate that flavor and texture, and I wanted to enjoy it wrapped in a summery Caribbean inspired kind of taco.


I have to say that despite some of my reservations while cooking, this dish turned out phenomenally and totally satisfied that tropical flair I was craving. Of course these little tempeh bites taste nothing like what I remember of shrimp but that’s not the point, the point is the fried coconut! Combined with the plantains, the collards, the coconut milk drizzle and the mango salsa this dish was heaven on a plate!


Now to put this whole thing together it does require a bit of work. There are several steps you have to go through to make the different taco components but it is so worth it, and if you prepare ahead of time it actually doesn’t take that long. So give it a go, really in the grand scheme of things it’s not a lot to ask for some good homemade coconut ‘shrimp’ tacos! Enjoy, and stay tuned for the salsa recipe which I plan on posting tomorrow.


Coconut ‘Shrimp’ Tacos with Fried Plantains and Collard Greens

Coconut ‘Shrimp’

1 lb Tempeh cut in cubes
1 15 oz can coconut milk
½ tsp garlic powder
½ tsp dried dill
1 tsp hot sauce
1 tsp kelp granules
½ C Panko Breadcrumbs (or gluten-free breadcrumbs if you're GF)
3/4 C Coconut Flakes (I used unsweetened)
1 tsp Cajun Seasoning Blend (or to taste)

Taco Fixin’s

1 Bunch Collard Greens chopped in bite sized pieces.
Whole Wheat or Corn Tortillas
1 Recipe Sweet Shredded Fried Plantains (Recipe Follows)
Roasted Vegetable Mango Salsa (Recipe to come)
Diced Avocado
Diced Green Onion
Coconut Milk Drizzle (Optional)

Sweet Shredded Fried Plantains

3 Plantains
2 Tbsp Coconut Oil
½ tsp Cinnamon
½ tsp Cajun spice blend
1 tbsp Brown Sugar
Water if needed

- First prepare your tempeh. If you’re working with two 8oz blocks of tempeh as I was cut each block horizontally into 6-8 slices. Then slice vertically in half or in thirds depending on how big you want your cubes. Place tempeh into an airtight container when cubed.

- Mix together the coconut milk, garlic powder, dill, kelp, and hot sauce. Pour over the tempeh. Close the container give it a good shake until all the tempeh is covered and then place in the fridge and let marinate for 1-2 hours.

- After the tempeh has marinated mix breadcrumbs, coconut flakes and Cajun seasoning in a shallow bowl. Grab a tempeh cube from the marinating dish give it a shake to remove any excess coconut milk then roll it in the breadcrumb mixture until it’s breaded on all sides. Set aside and repeat until all cubes have been breaded. Reserve the marinade mixture if you want to make a coconut drizzle.

- Once all of your tempeh has been breaded you can cook it 1 of 2 ways. The first way being to fry them. If you have a deep fryer just pop them in there for a few minutes until they’re golden brown. Then remove them and drain on a plate lined with paper towels. If you don’t have a deep fryer you can fry them in about a ½ cup of coconut oil or nuteral vegetable oil in a large frying pan, until golden brown. If however you’re like me and like to try and keep on the healthier side of things you can bake your coconut tempeh in the oven.

- Preheat your oven to 400'F (200'C) lightly grease a baking sheet then place your tempeh cubes on it. Spray the top of each cube with a tiny bit of non-stick spray then place in the oven and bake for 15 minutes. Remove from the oven turn each cube over and return to the oven to cook for another 10-15 minutes. Make sure to keep an eye on them so they don’t burn. Smaller cubes will cook faster and larger cubes will take longer so times may vary.

- While your tempeh is cooking you can work on your plantains. Grab 3 large, green plantains. Cut off the ends and peel. I find the easiest way to be running the tip of a knife down two sides then just dig in with my nail and roll the peel off.

- Once the peel has been removed take a vegetable peeler and run it along the plantains like you would to peel a carrot. You’ll get nice long thin strips of plantain, continue until all plantains have been turned into strips. You’ll probably be left with a core of plantain that your peeler can’t turn into strips, and that’s okay just cut it into thin rounds and toss it in with the strips. Waste not want not right?

- Heat the coconut oil in a large frying pan over high heat. Once melted add the plantains and stir until all strips are coated. Add in the cinnamon, sugar and Cajun Seasoning. Stir again until thoroughly coated and then cook on medium heat until plantains are golden brown and soft. About 8-10 minutes. Make sure to stir frequently so no plantains stick to the bottom, and you may need to add more oil, or water. I added in about a 1/4 of water because I didn’t want to use more oil, and it worked brilliantly. When plantains are finished remove them from the heat and if you like you can drain them on a paper towel. I personally didn’t bother draining them.

- To make your collards just add an inch of water into a pot fitted with a steamer basket. Add your chopped up collards and steam for 3-5 minutes until they’re bright green and wilted. They shouldn’t be mushy but soft, with still a bit of texture. Remove them immediately from the steamer basket and place onto a plate or in a bowl.

- To make the coconut drizzle all you have to do is stir 1-2 packets of stevia into the reserved coconut marinade along with 1-2 tbsp flaked coconut. Set aside, until ready to use.

- To assemble your taco place one tortilla on a plate. Layer on some collard greens and then a generous spoonful of shredded plantains. Top with 4-5 cubes of coconut tempeh, and a bit of coconut milk drizzle. Top with diced green onion, avocado, and a generous spoonful or two of roasted vegetable mango salsa. Wrap up tight and enjoy!


*** Note - This dish can be made Gluten-Free if using Corn Tortilla's and GF Breadcrumbs***

Thursday, September 22, 2011

Cajun Spiced Poblano Fajita-Tacos...


I absolutely love tacos. Taco night was always one of my favorite ‘eating events’ when I was growing up, and I say event because it was. My brother, Step-Dad and I were always in competition for how many tacos each one of us could eat. I usually capped out at around seven, which usually brought me neck and neck with my brother, give or take a taco on either side, but our Step-Dad always won. He could pack away as many as ten or twelve tacos in one sitting! Something I couldn’t do even if I hadn’t eaten all day.

One of my favorite thing about tacos is the assembly. I love the do-it-yourself style of eating. Where several dishes of food are laid out before you, and you’re given a plate on which to create your taco masterpiece. I liked the aesthetic of looking across the table and seeing 5 or 10 different serving bowls. I liked even more the ability to put exactly what I wanted in exactly what quantity in each of my taco shells. Making each one just a little bit different, then seeing which I liked best. I have a lot of fun memories of taco night growing up, even if they all seem to end with all of us bloated and sick laying in front of the t.v.


Fajitas are another food I have fond memories of, although they entered my life a lot more recently. For some reason, after my husband and I got married we started eating a lot of fajitas. I’m not sure why exactly. I guess because they were delicious and easy to make, and at that time I was still learning and mastering the art of cooking. I’ll tell you though, I sure mastered the art of the perfect fajita, it’s time tested and family approved. I made killer fajitas at least once a week, and then I started doing the Fajita-Burrito. A Chipotle rip-off that’s a lot cheaper and not as time consuming as you might think to do your self.

Fajitas and tacos always give me the same kind of feeling. Usually I’m eating them with a group of people, friends or family. We’re gathered around a large table with food laid out before us, and we’re digging in to drippy deliciousness, with juice running down our arms and food exploding from our soft-shells. There’s always storytelling, and laughter, jokes and sometimes competition, and it’s always a great time.


As a vegan however tacos are not something I eat often. In fact in my almost year of being vegan I can think of only one time where I’ve eaten a ‘traditional’ vegan style taco. This of course has more to do with the fact that we simply just don’t eat a lot of wheat or soy based meat products, rather then the idea that a good vegan taco can’t be found or made. It can be. Fajitas on the other hand never dropped completely off the radar as eating a vegetarian fajita doesn’t require a meat substitute, and we still enjoy a good fajita-burrito.

But then one night - not so long ago - I was really, really in the mood for tacos, and having no tofu, no seitan, and no tempeh on hand the Poblano fajita-taco was born. A great combination of fajita style filling with a taco style assembly that I gave a twist by adding spicy poblano peppers. Not only are they delicious and filling - just TRY and eat 7 of these babies, I dare you! I can barely pack away 2 fully loaded shells - but they give you all that comradery of the traditional beloved taco night. A lot of bowls laid across the table, a lot of messy, drippy, food bursting out of shells eating, the joy of creation, and a lot of fun.

By the way, these could just as easily be served in a more 'traditional' hard taco shell, I just personally prefer tortillas, or soft shells, always have.


Cajun Spiced Poblano Fajita-Tacos

1 ½ Large Red Bell Pepper Sliced
1 Large Yellow Bell Pepper Sliced
2 Medium Poblano Peppers Sliced (Less or more if you don’t/like heat)
1 Medium-Large Yellow Onion halved then sliced
Cajun Seasoning to taste
Chili Powder, garlic powder and Smoked Paprika to taste
1 Tbsp Olive Oil
1 Pack Whole Wheat Tortillas (Or favorite Tortilla. I used Sun-dried Tomato tortillas, and Chili Tortillas which added an extra bit of heat)

Optional but Recommended Add-Ons

1-2 Avocados sliced
2-3 Tomatoes diced or 1 pint grape or cherry tomatoes halved or quartered
1 Bunch Green Onions diced
½ Head Iceberg Lettuce shredded
½ Bunch Cilantro finely chopped
Tofutti Sour Cream (or other non-dairy sour cream of choice)
Daiya Cheddar Cheese (or other non-dairy cheddar cheese of choice)
Mild or Medium salsa of choice

- Heat tbsp of oil in large saute pan. Add onions, and all peppers. Saute over medium heat for roughly 10-20 minutes until onions and peppers are very soft. Poblano might still have a bit of firmness to them at this point but that’s okay.

- Halfway through cooking add your seasonings. I generally use anywhere between 1-3 tsp of Cajun seasoning depending on who I’m eating with. The Cajun seasoning I use has a powerful kick to it, and some people don’t like too much heat. Cajun seasoning brands will vary, as will your tolerance of heat. I recommend you start off moderately, with ½ tsp and work your way up from there if you’re not sure how much heat is too much for you. The same goes for Chili Powder and Smoked Paprika, each of these will bring a smokey heat of their own and so I suggest you start off moderately. I generally don’t use more then ½ tsp of Smoked paprika, or more then 1 tsp of chili powder, you may want to start off with 1/4 tsp of each and work your way up. Garlic is of course personal preference and I never measure this. I give the garlic powder bottle a few hearty shakes and that’s always enough. You want a little garlic flavor here but you don’t want it to be overpowering. After all this isn’t garlic’s show!

- Now for the assembly. Spread some non-dairy sour cream and/or salsa onto a tortilla. Top with your poblano filling, then your preferred add-ons. Sprinkle with a little Daiya cheddar and cilantro, roll it up tight and enjoy!


I really do recommend all of the add-on’s. Each one adds it’s own unique flavor and texture to the fajita-taco. However my husband assures me that they are just as good sans sour cream, cheese, and avocado, three things of which he is not a fan.

*** Note - You could also spread a little roasted red pepper humus on your tortilla in place of (or in addition to) the sour cream. I’ve done this and it was delicious!***
*** Note - Soy-Free if using soy-free non-dairy sour cream. Gluten-Free if using Corn Tortilla's or other Gluten-Free Tortilla's***

Wednesday, July 13, 2011

Loaded Taco Salad....


I have been craving tacos something fierce lately, and it’s not just tacos. Enchiladas, fajitas, 7-Layer Dip, Nachos, re-fried beans, fresh tomatoes, and avocados, salsa, cilantro, olives, and of course salads. When summer rolls around I fall into something of a salad frenzy. For days I’ve been craving this ridiculous barrage of foods and so yesterday when lunchtime rolled around and my tummy started a grumblin’ I decided something must be done about this insatiable desire for Latin inspired food. I had everything on hand necessary to make tacos, fajitas, or enchiladas, but to do so simply for my own lunch didn’t seem worth the trouble. I considered a burrito but it just seemed lacking and so I came up with this fully loaded, and super delicious salad. I’m telling you, it really turned those taco cravings upside down, so I hope you enjoy it as much as I did. It’s quick, easy, and relatively low-fat. The Guac is really the only ‘fatty’ ingredient but I believe we’ve had this conversation about avocados and Guac before. Of course if you are one of those people who absolutely dreads and fears the addition of an avocado into your meal by all means opt out, use a low-fat guac, or use my Easy Lima Bean Guac instead. Trust me when I say though that this salad just wouldn’t be the same without the creamy, garlicy goodness of a good guac.


Loaded Taco Salad

1- 1 1/2 heads romaine lettuce chopped
7 oz can refried beans (or to taste)
½ cup Organic corn fresh cooked (leftover is great) or frozen (thawed) (or to taste)
1/4 red onion diced (or to taste)
½ red bell pepper diced (or to taste)
2 ½ oz can sliced black olives (or to taste)
2 Organic corn tortillas
1 medium tomato chopped (or to taste)
1 Recipe Guacamole in a pinch (recipe follows)
3-4 Tbsp your favorite Salsa (or to taste)

Additional Add-ins/Garnishes.

These things are not necessary but they are recommended if you have them. They are all delicious additions, and the micro greens are an especially pretty touch.

Finely chopped cilantro (to taste)
1-2 small handfuls Micro Greens
1/4 C sliced green onion
2 oz can diced green chilies or fresh diced jalapenos (or to taste)
1/4-1/2C Shredded non-dairy Cheddar Cheese

*** Note - This salad yields enough for one humongous salad, and when I say humongous I’m not exaggerating. However you can always split this up into two more workable salads to serve with a nice side dish at dinner or for a light lunch. You could also split this salad up even more and turn it into four small side salads. However if you split the salad into 2 or 4 I recommend adding an additional 7oz of re-fried beans, and doubling the amount of guac. I also recommend doubling your salsa, and tortillas as well as a few of the veggies to ensure that everyone gets enough. Or you can do what I did which is sit down and eat the whole damn thing in one sitting. It really is that good! ***

- Slice or chop your lettuce uniformly, and place in a large bowl.

- Cut your tortillas into strips and spread over chopped lettuce. (For an extra flavor flair you can toast your tortillas first)

- Chop Tomato, red onion, and red pepper uniformly in small dice, then sprinkle over top of salad. Then add in the corn, sliced olives, and any of the additional add-ins.

- Place re-fried beans in microwave safe container and heat for 45 seconds or until warm. You don’t want it to be too hot.

- Scoop your re-fried beans to one side of your bowl, beside it line up your guacamole and your salsa, for a lovely presentation.

*** Note - If you’re a sour cream person then by all means add in a little non-dairy sour cream next to your beans, guac and salsa. ***

- To eat mix everything thoroughly together so that all ingredients are coated with re-fried beans, guac, and salsa. Enjoy!

*** Note - Once everything is mixed together it might not be all that pretty but it sure is delicious! The great thing about this salad is that it’s so creamy and full of flavor and yet there is no dressing. No dressing is required because the beans, the guac, and the salsa serve as a dressing.***


Guacamole in a Pinch

1 Avocado
1 tbsp lime juice
garlic powder (to taste)
onion powder (to taste)
dried oregano (to taste)
black pepper (to taste)
sea salt (to taste)
A pinch of white pepper (Optional)
A dash of smoked paprika (Optional)

- When it comes to quick and easy guacamole, yielding just enough for me I like to make it with my mortar and pestle, if you don’t have a mortar and pestle you can just dump all of these ingredients into a food processor or blender and process until smooth and creamy.

- If you do have a mortar and pestle it’s very simple. Half your avocado, peel away the skin and remove the pit. Place into the mortar with your seasonings and grind with your pestle until the guac is smooth and creamy.

- Taste for seasonings and adjust as needed. I never measure how much seasoning I add into my guac, that’s what makes it quick. Generally speaking I just add a few dashes of everything, taste, and if needed I add a few more good dashes. I do however recommend airing on the side of caution at first when adding in your seasonings, as you can always add more, but once the spice has been added you can’t take it away.

*** Note- Gluten and Soy-Free if  not using non-dairy cheese or if using Gluten-Free or Soy-Free non-dairy cheese ***