Showing posts with label Oats. Show all posts

Wednesday, September 9, 2015

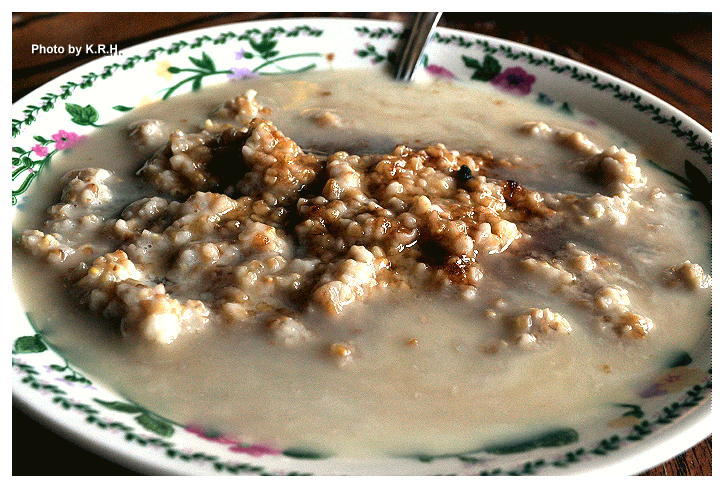
Vegan Mofo #10: Irish Weekender Oatmeal...


I’m going to break away from France for a moment and go back to Ireland because I want to talk about oatmeal. I know, you’re thinking oatmeal, boring! But it’s not! Not if you do it right anyway. Oatmeal or porridge is a pretty common breakfast staple in Ireland, Scotland, and England, it’s been eaten in various ways for centuries, and there’s a reason why people have relied on it as a staple food for all that time. It’s easy, it’s hearty, and it’s filling, best of all it’s cheap, and healthy too.  Of course no one really likes plain old cooked with water oats, and so it can be more or less healthy depending on what you add into it.


In reading about Irish cooking I came across a paragraph discussing oatmeal in which it said oatmeal is usually cooked with water and salt and served with a bit of brown sugar or honey, though on the weekends oatmeal might get ‘dressed up’ as a treat, or if it’s being served to guests it may be made a bit fancier. It also said that when staying in an Irish guesthouse you’re bound to get treated to a bowl of oatmeal loaded up with ‘the works’ and so it was these additions that I found particularly interesting and decided to combine them all in one bowl for what I think is hands down the best, and most delicious oatmeal I’ve ever eaten.

Honestly, I’ve eaten it three times since I’ve made it, though I wouldn’t recommend you eat your oatmeal quite like this every day, it’s certainly nice for a treat, a weekend, guests, or just a simple change of pace from your daily routine. Give it a try, even my husband liked it and he's never been a fan of oatmeal.


Irish Weekender Oatmeal 

Basic Recipe

1 Cup Steel Cut Oats
2 Cups Water
Pinch of Sea Salt

Optional to Serve 

Nondairy Milk
Nondairy Cream (Either store bought such as Silk, So Delicious or Califia, or thick homemade Cashew cream)
Bee Free Honey (or Agave if unavailable but I really recommend Bee Free)
Brown Sugar
Irish Whiskey

- Combine Oats, water and salt in a medium sized pot on the stove and bring to a boil over medium high heat. Stir a few times and then reduce the heat and let simmer 20-30 minutes until oats are cooked and most of the water has been evaporated.

- Make sure to keep an eye on the simmering oats and to stir from time to time to prevent them sticking to the bottom of the pan.

- Scoop your oatmeal into individual serving bowls and top as desired with optional serving ingredients.

- For my oatmeal I added a good amount of Soy milk, then sprinkled the top with a couple of teaspoons of brown sugar. Then I drizzled a bit of Bee Free Honey over the bowl, swirled in a spoonful of Califia Cream, and topped it off with a thimbleful of Irish Whiskey. So damn good! Try it!

- Enjoy your Irish Oats with some fresh baked scones, and a large steaming mug of Irish Breakfast Tea, Earl Grey, or Coffee.

Thursday, September 3, 2015

Vegan Mofo #3: Brotchan Foltchep...


Yes, another Irish Soup. What can I say?  I love Ireland, and I love Soup! Back in 2009 My husband and I traveled a good portion of Ireland, we hit 14 Cities and numerous natural wonders from the Dublin and the Wicklow Mountains, to Belfast and the Giant's Causeway, to Galway and the Cliffs of Moher to the Aran Islands, to Cork. We by no means saw it all, and I would love to go back some day because it was one of the most enjoyable travel experiences we've ever had. The people are some of the most helpful, good natured and genuinely friendly of anyone I've met anywhere. The country itself is bursting with overwhelming beauty and natural wonder, the cities and towns have a calm and peaceful vibe, and say what you will about food in that part of the world, but I never met an Irish Soup in an Irish Pub that I didn't absolutely love! Especially on those cold, drizzling days.


So, this soup is called Brotchan Foltchep (Also known as Brotchan Roy) and it’s a simple soup that utilizes some of Ireland’s staple foods, oatmeal, leeks and milk. It might sound weird to you to put  oatmeal in a soup, but trust me it’s delicious! Not to mention warming, and filling, plus it comes together really easy, what more can you ask for out of a meal?


Brotchan Foltchep 

2 Tbsp Vegan Butter
4 Large Leeks (White and Light Green Part Only Sliced)
3 Tbsp Steel Cut Oats
3 Cups Vegan Chicken Broth or 3 Cups water + 2 Vegan Chicken Bouillon Cubes
2 ½ Cups Non-Dairy Milk (Soy or Almond)
1 tsp Sea Salt
½ tsp Black Pepper (or to taste)
Pinch of Ground Mace
½ Bunch Minced Parsley

Optional but Recommended (If you have any broth leftover from making home-made chicken style seitan add 4 Tbsp to the soup. Or, whisk together 2 Tbsp Nutritional Yeast with 4 Tbsp of Water and add)

- Melt Vegan butter in a large stock pot over medium heat.

- Add sliced leeks and saute for 10 minutes until leeks are soft.

- Add Steel Cut Oats, Broth and Milk. Bring to a boil and then reduce heat to simmer. Let simmer for 20-30 minutes until Oatmeal is tender.

- Add in salt, pepper, mace, and the optional seitan liquid or nutritional yeast mixture. Let simmer an additional 10 minutes.

- Stir in the minced parsley. Let stand 5 minutes then serve with a nice brown bread, and enjoy!

Sunday, November 16, 2014

Pumpkin Pie Oatmeal...


As I think I’ve mentioned before I pretty much love pumpkin flavored everything. I’ve also been on a real oatmeal kick lately, and so I’ve had the idea to combine these two things for weeks now, only I’ve just been to lazy to actually do it. Finally this morning as I was enjoying a piping mug of peppermint hot chocolate and watching the snowflakes fall I decided it was time to give creativity a whirl.

I wasn’t exactly sure what to expect when it was all said and done, but I figured adding traditional pumpkin pie flavors to a bowl of oatmeal couldn’t go too wrong. I was right. This is a really warming comforting bowl of morning oats, full of autumnal and winter flavor. Perfect for any cold morning or any day you’re craving a bit of a pumpkin fix. Even my husband who despises all things pumpkin loved this sweet soothing breakfast. If you like your pumpkin pie a bit on the spicy side you can increase the ginger to 1 tsp, and up the nutmeg as well. I’m pretty picky when it comes to nutmeg which is why I only used a 1/4 tsp. These oats are fantastic topped with maple syrup and dried cranberries but you could use dried cherries as well or another sweetener of your choosing, and if you’re interested in kicking up the pumpkin another notch serve this with one of the delicious non-dairy pumpkin spice milks instead of regular old almond, soy or rice milk. Trust me on this!


Pumpkin Pie Oatmeal 

2/3 C Steel Cut Oats
1 15oz Can Coconut Milk
½ C Pumpkin Puree
½-1 Tbsp Blackstrap Molasses
1 tsp Ground Cinnamon
½ tsp Ground Ginger
1/4 tsp Cardamom
1/4 tsp Ground Nutmeg
Pinch of Cloves

To Serve 

Maple Syrup
Dried Cranberries
Chopped Pecans or Walnuts
So Delicious Pumpkin Spice Coconut Milk - or your favorite non-dairy pumpkin spice milk, or any regular non-dairy milk.

- Combine Oats, Coconut Milk, Pumpkin Puree and Molasses in a medium sized saucepan and bring to a boil.

- Once boiling reduce to a simmer and add in all of the spices.

- Let simmer gently on the stove top, stirring occasionally for 30-40 minutes until oats are tender and much of the liquid has been absorbed.

- Divide the oats into bowls and top with Maple Syrup, Dried Cranberries and Your Choice of Non-Dairy Milk.


Friday, October 24, 2014

Super Easy Superfood Oatmeal...


Quinoa for breakfast is nothing new. In fact, combining quinoa and oats for a delicious protein rich breakfast isn’t new either, but it is new to me. As quinoa continues to grow in popularity here in the United States I continue to come across new and interesting uses for it. Of course, I never have time to try all the recipes I see, or even half of them, and when it comes to breakfast food I’m usually at a disadvantage anyway since I’m not much of a morning eater anyway. Which is why I normally opt for a fruit or green smoothie.

Of course, there are those rare days when I wake up with breakfast on my mind, and today was one of those days. Normally when I crave breakfast it’s something carby, or decadent. It’s always something that requires work and effort and it’s very seldom wholesome. Today was different, maybe it’s the cool autumnal weather, or the fact that I’ve been feeling less then ideal lately, but I woke up craving oats. Actually, that’s a lie, I’ve been craving oats for days now actually but I’ve just been to lazy to make them. Since I woke up extremely early this morning for no apparent reason, and have the day off I decided that if I wanted oatmeal then there was no time like the present.


The original idea was just to make a basic pot of oatmeal that would be large enough to last me through the weekend, but as I was standing in front of my pantry I thought “why not try that whole quinoa breakfast thing?” So I decided to add some quinoa to my oats. Then I started thinking about what else might be good. I had a single apple sitting in my fruit basket, and that always tastes great in oatmeal, I have bags of random Superfood burning holes in my pantry shelves and so why not add them too for a super nutrient dense, antioxidant rich breakfast? See how it is? Once you get started down a certain path you can’t stop, and I ended up with one of the most enjoyable bowls of oatmeal ever. The goji and mulberries really added a nice element to the oatmeal, a subtly sweet and complex blend of flavors. Even my husband who is no fan of oatmeal, but reluctantly agreed to try it, loved it!


The beauty of this oatmeal is you can literally do whatever you want with it. There are so many things you can add in, so many variations, an endless amount of options to keep you interested. This morning I chose to add the blueberries, cherries, flaxseeds, sunflower seeds, maple syrup, pomegranate molasses, and unsweetened almond milk to my bowl and it was divine. My husband meanwhile chose blueberries, cherries, flaxseeds, chia seeds, raisins, maple syrup, pomegranate molasses and vanilla almond milk.

However you choose to eat it, I hope you enjoy it!


Super Easy Superfood Oatmeal 

1 ½ C Steel Cut Oats
½ C Quinoa
5 C Water
1 Granny Smith Apple Peeled and cubed
4 Tbsp Goji Berries
4 Tbsp White Mullberries

Optional Add Ins per Serving 

2 Tbsp Fresh or Frozen Blueberries, Raspberries, or Blackberries
8 Fresh or Frozen Whole Pitted Cherries
2 Tbsp Ground Flaxseed
1 Tbsp Raw Sunflower Seeds
1 Tbsp Hemp Seeds
1 Tbsp Chia Seeds
1-2 Tbsp Raisins
1-2 Tbsp Walnuts
Sliced Banana
½ - 1 Tbsp Maple Syrup
½ - 1 Tbsp Pomegranate Molasses
Almond, Coconut or other favorite non-dairy milk

- Combine the Oats, Quinoa and Water in a medium saucepan and bring to a boil. Once boiling reduce heat and let simmer on the stove for 40-60 minutes, stirring occasionally until the oats have thickened and are tender.

- Ten minutes before the end of cooking add in the peeled chopped apple and stir to combine.

- Five minutes before the end of cooking add in the Goji and White Mullberries and stir to combine.

- Remove the cooked oatmeal from the heat, and spoon out individual servings. Top each serving with desired add-ins.

*** Note - To ensure this is Gluten-Free use GF oats. *** 

Friday, August 23, 2013

Almost Raw Mango Cheesecake with Mango Glaze...


A few days ago I really wanted something sweet. I was dying for dessert, but as I mentioned a couple of days ago I’m staying away from sugar until I’m fully recovered. That means no dessert, or at least no traditionally sweetened desserts. I tried for a while to let the craving pass, and when it wouldn’t I started thinking about fruits. Only just sitting down and chomping away on a piece of fruit wasn’t really doing it for me. Then I got thinking about what I was going to do with the batch of home made cream cheese I’d made last week, and then I got thinking about cheesecake. Then I really wanted cheesecake except cheesecake is loaded with sugar. Hm! What to do?


It was then that a vague idea for a raw cheesecake popped into my head. Most raw cheesecakes are not sweetened with sugar, and a lot of them use fruit as a sweetener instead. I could get behind that right? Except I’ve made raw cheesecakes in the past and while I do enjoy them I find they always have a very strong cashew, date, coconut flavor, which is fine if that’s what you want, but it’s not really ‘cheesecake’ you know? I wanted a cake that was creamy, and cheesy, sweet and tangy, and suddenly I started thinking about mango. I mean it’s summer after all - even if it’s getting near the end of summer - and a Mango Cheesecake sounded just about perfect in that moment. Only, I was tired, and drained from being sick and didn’t want to go through the process of having to bake and look after a cheesecake, especially in the middle of an already hot evening.


So I started wondering if I could make a more traditional cheesecake using my homemade cream cheese and frozen mangos - which were the only kind I had - by employing the basic principals of raw cheesecake making. Once I got thinking like that it all kind of came together in a snap. As it turns out you can make a cheesecake in this way, and it tastes awesome. This cheesecake was so sweet, cool and mangoey the perfect treat on a humid summer evening. Yet it was creamy and tangy like a regular cooked cheesecake with not coconut, or nut aftertaste. The only problem with this particular cheesecake is storage. You see since the filling is quite liquidy you can’t store it in the fridge even after it’s been frozen, because it’ll melt and leak. I didn’t have a problem with it melting completely losing it’s shape and reverting back to pre-frozen state but it melted enough. Of course because cheese doesn’t taste great frozen, and you loose that creamy texture if it’s frozen solid leaving it in the freezer isn’t so great either. My recommendation is that this is a cake best eaten right away. Of course if you need to store it I suggest cutting the entire cake into individual slices first, then storing in the freezer. When you want to eat a slice, take it out and let it thaw for 30 minutes so it gets creamy again.

Though that might seem like some unnecessary trouble this cake is so amazing flavor-wise, that it’s really worth it, even if there’s no perfect way to store it. Of course you could always store most of it in the freezer and store individual slices in the fridge in a snap-lock container that way if it melts a little it won’t get all over your fridge. I think next week I’ll experiment and make this a full-on traditional cooked cheesecake, so I’ll let you know how that goes, but for now enjoy!


Mango Cheesecake with Mango Glaze 

Crust -

1 C Pecans
1 C Rolled Oats
½ tsp Ground Cinnamon
4 Medjool Dates Pitted and Soaked
1 tsp Vanilla Extract
2 Tbsp Coconut Oil
Pinch of Sea Salt
5-8 Drops Liquid Stevia

Filling - 

***1 ½ C Cream Cheese preferably homemade
3 C Frozen Mango Chunks Divided
2 Tbsp Lime Juice
Date Soak Water
1/4 tsp Ground Ginger
2 tsp Maca
1 tsp Vanilla Extract
Pinch of sea salt
2 Tbsp Coconut Oil
8-12 Drops Liquid Stevia

Glaze - 

1 C Frozen Mango Chunks
4 Medjool Dates pitted and soaked
Water
5-8 Drops Liquid Stevia

Instructions -

Crust -

Add Pecans and oats to a food processor and process into fine crumbs.

Add in the dates - reserve the soaking water - and coconut oil along with all other ingredients. Process until a smooth dough forms.

Turn out into a spring-form pan and press down evenly spreading the mixture across the bottom of the pan.

Freeze until ready to add the filling.

Filling -

Add 2 C mango chunks along with the date soak water leftover from the crust recipe to a high speed blender. The water should roughly yield between a third and a half cup. Add in the lime juice and vanilla extract and blend on high until completely smooth.

Add the cream cheese to the food processor along with the pureed mango mixture, coconut oil, maca, ginger, sea salt and stevia. Blend until smooth and fully incorporated.

Add in the remaining cup of mango chunks and process. You can process this until very smooth or leave it a little chunkier, it’s up to you.

Pour the filling into the prepared crust and return to the freezer. Freeze for 2-3 hours until solid but still creamy.

Glaze -

Add all ingredients to a high speed blender and blend until smooth. Pour over cheesecake when ready to serve and then serve immediately or freeze for an additional 30 minutes to firm up the glaze a little bit. Enjoy!


*** Note - I used homemade cream cheese that was made with cashews, salt, water, and 2 tbsp of coconut milk yogurt to culture it. The recipe I used was from Miyoko Schinner’s “Artisan Vegan Cheese.” though I think you could use any homemade vegan cream cheese just as long as it’s cultured. You could try making this with store-bought vegan cream cheese but honestly I don’t know how that would alter the taste and texture of this recipe. Store-bought cream cheese is full of preservatives and other ingredients and it may not freeze as well. Since my homemade cream cheese was practically raw I think it might work better then a cooked cream cheese, but feel free to experiment and let me know what you discover.*** 

Tuesday, January 22, 2013

For The Love of Bread: My New Sunbeam Bread Machine, and Veganizing The Bread Lovers - Maple Oatmeal Bread...

My Sunbeam! Cool Eh?


There’s nothing like homemade bread. Really. My mom has been making homemade bread for as long as I can remember, and once I moved away that was something I really missed. When you grow up on dense, hearty, homemade bread, store bought loves just aren’t the same. Store bought loaves are flimsy, unsubstantial, gummy, and for the most part tasteless, not to mention most store bought breads also contain about 40 ingredients which is absurd. Bread isn’t complicated, it’s extremely simple. It’s flour, salt, water and yeast. If you want to get a little more fancy then okay some breads may have eggs, milk, or sugar, but everything that gets put into a loaf of bread the average person should be able to pronounce and understand. That’s simply not the case with the majority of store bought bread.

So I like to make bread at home from scratch, using nothing but a big bowl, a wooden spoon, my hands, and my oven. Making bread ‘the old fashion way’ certainly takes more time, and then buying a loaf at the store but trust me when I say that nothing tastes better. Not to mention 1 slice of homemade bread is way more filling then a single slice of store bread, not to mention about 100 times more satisfying, and nutritious. Eating store bought bread to me is an evil of convenience, that’s not to say I never do it but I certainly prefer not to eat store bread. - Which is probably why I don’t eat much bread, period, because I can’t always be bothered to whip up a loaf from scratch. Typically when I find myself buying breads at the store it’s french bread to use in making Bruschetta or burger buns to put my home-made veggie burgers on. Every once in a while I’ll buy a good quality loaf of rye or pumpernickel but a regular loaf of bread? Last Years Vegan Mofo Sandwich craze aside, I can’t even recall the last time I bought a ‘regular’ loaf of wheat bread from the store.

 Maple Oatmeal Bread! My first Bread Machine Success!


Now having said all of that you’re probably thinking I make loaves of bread all the time. That I’m popping out fresh loaves of rye, wheat, and sourdough left and right, but I’m not. This is why I don’t eat a lot of bread, because as much as I love a good bread, and as much as I enjoy making a good loaf from scratch it is kind of a process. There’s the proofing of the yeast - and if my yeast doesn’t proof I automatically feel like giving up on the whole thing - then there’s the mixing, kneading, waiting, punching, more kneading, more waiting then you shape and bake. Typically for one loaf it takes between 2-4 hours, depending on the loaf. While most of that time is inactive, it does limit what you can do. You can’t exactly go out and forget about the bread rising on your counter top. You really have to pay attention to the clock and you have to be really exact about the times.

As I said bread from scratch is something I love to make, but it’s not something I can bother to do on a weekly basis. It’s a once in a while thing, and so the end result is that my husband and I just don’t eat a lot of bread period. For this reason Bread machines are a godsend, really. You plop in all your ingredients, press a couple of buttons and then do whatever you want until the machine beeps to signal your bread is done. Nothing in the world could be simpler. However, finding a good bread machine takes time and research, and each bread machine comes with it’s own quirks. Not to mention the fact that if you thought you had to be exact with baking bread the old fashion way you have to be really super exact doing it in a bread machine.


I have never had luck with bread machines ever. As I said my mom swears by hers but they have never worked to my advantage. My husband’s aunt gave me her old bread machine a few years ago and while I was grateful for it I never got a really wonderful loaf out of it. I don’t know if it was because the machine was old, or if it was just me, but suffice to say I rarely used the machine. In that old machine I would use my mom’s tried and true bread machine wheat bread recipe and it never came out right. It was always very dense, like a brick, and while it tasted delicious the texture was too much. Sometimes they would come out dry, and they were always dense, and squat no matter what. The size issue was the biggest thing for me. To have to use 4 cups of wheat flour and then only get a loaf that was half the size of a regular loaf really pissed me off. On top of that the machine in general was big, bulky, heavy, and noisy. Also part of the reason I didn’t use it a lot. It was a pain in the ass to get down out of the pantry and it took up so much space.

So a few months ago I got it into my head that I wanted/needed a new bread machine, and so I did a little research. There were some really good looking ones, and some really highly reviewed ones, that ranged in all manner of styles and prices. Eventually I settled on getting the Sunbeam 5891 2 pound programable bread machine, and lucky me my in-laws bought me it for Christmas!  It was a fantastic gift and I was super excited to receive it. I already know I’m going to be baking lots of bread in this sucker.

Now I settled on the Sunbeam because it was relatively inexpensive, it offered a lot of versatility when it came to programing various bread types, and it has a large clear LCD screen that tells you what mode you’re on, how big a loaf you’re making and how long until it’s done. I also like that it beeps when it rises, and when it’s done. It also has a big clear window so you can look inside and see what’s going on in there.  Size wise it’s a bit more compact then the other machine, and it’s definitely not as tall as the other machine. It’s about the size of a large rice cooker, though perhaps a little longer. When I first took it out of the box, I remarked to my husband that it looked like a space ship, or pod. With it’s sleek design, and oval window at the top. It’s very cool, and looks good.

Inside Shot!


As you can imagine I was very excited to start using this machine. So about a week or two after Christmas I set about making some bread. I read the manual back to front and then made one of the suggested recipes. A wheat bread. Imagine my surprise and disappointment when the bread came out dense and squat. The bread that was produced looked exactly like the breads my old machine use to make, how could this be? I had done everything right! I decided to try making a second loaf using my mom’s tried and true bread machine wheat bread recipe and that one came out completely gnarled, I mean it didn’t even look like bread. On top of that it was also dense and squat. I was really upset, I didn’t know what had gone wrong, and I didn’t want this new awesome gift to go to waste. So I did what any determined bread baker would do and I went on Amazon and ordered myself a copy of the book The Bread Lovers Bread Machine Cookbook: A Master Baker’s 300 Favorite Recipes for Perfect-Every time Bread - From Every Type of Machine by Beth Hensperger.

The book had received good reviews, and so I clicked on the ‘look inside’ feature that Amazon has and skimmed over the list or recipes. A lot of them sounded really fantastic and so I knew I wanted to get myself a copy of this book. Now keep in mind this book is not a vegan bread book, so many of the recipes contain ingredients such as milk, butter, eggs, cream, etc... but for me those are easy enough to veganize, and so I thought until someone makes a Bread Lovers Bread Machine Cook Book for Vegans this will have to do.

Once my copy arrived I read through it. The first 40 pages or so are just general information about how to use bread machines, the quirks of bread machines, how to make bread in general and so on. Typically this sort of information is the stuff I gloss over in other cook books but in this book I found it really helpful. Since I’m not a master bread baker - at least not with a bread machine - the wisdom in this section was beyond valuable. It explained to me exactly why my other breads weren’t turning out, and I began to understand just how delicate the balance of bread machine bread baking is. My three main problems seemed to be 1) not enough liquid, 2) packing my measuring cups to densely, and 3) not enough gluten in the flour that I was using. The solutions became 1) adding slightly more liquid, 2) filling the cups with a spoon then scraping them level with the back of a butter knife, and 3) Adding in a tablespoon or two of vital wheat gluten.


Easy-Peasy and now all is right in my bread machine baking world. For my next attempt at bread making I decided to make the Maple Oatmeal Loaf from Beth Hensperger’s book. I chose it because it sounded easy, and delicious and I had all the ingredients called for. I also was kind of in the mood for toast that day and since this was listed in the ‘Sweet Breads’ and “Breakfast Breads” section I thought it would be perfect. It’s a very simple recipe containing buttermilk, maple syrup, butter, bread flour, rolled oats, gluten, salt and yeast. I really liked the idea of adding oats to my bread, and who can argue with good quality pure maple syrup? Veganizing this recipe was super easy. For the buttermilk I substituted Almond milk, with 1 tbsp of apple cider vinegar. I waited 5-10 minutes for it to curdle then added it in as directed. For the butter I used Earth Balance, and voila, a non-vegan recipe becomes vegan. The substitutions - as far as I can tell - in no way harmed the bread any.

In fact this was the first loaf of bread I ever made in a bread machine that came out absolutely perfect. It was light, springy and delicious. Fantastic flavor, great texture. My only complaint is that the crust got a little ‘blackened’ in some spots around the sides, however I think this would have easily been remedied if I’d set the crust color on medium rather then dark. As far as overall flavor goes it didn’t do anything to take away from it, it just removes something from the presentation I think.

So there you have it, great bread from a bread machine - finally! - and I can’t be happier. In addition to highly recommending the Sunbeam Bread Machine I also highly recommend Beth Hensperger’s book The Bread Lovers Bread Machine Cookbook: A Master Baker’s 300 Favorite Recipes for Perfect-Every time Bread - From Every Type of Machine. Seriously, not only are the recipes delicious and easy to follow - so far I’ve made four of her breads - but the level of depth she goes into and the wealth of information she provides is really valuable to any novice bread machine user, or any bread machine user that encounters problems. Oh, and did I mention her bread recipes are delicious? They are!

PS: It’s my desire to veganize every single recipe in this bread machine book, and as I do so I will post about each bread, and how I veganized them all. I hope this information will be useful to any vegans out there who own or wish to own this book, who may not be quite as savvy about veganizing things. So stay tuned guys!

PPS: All Bread Freezes well - at least all bread that i've ever made. This one in particular did very well in the freezer. I sliced half and stored it in a zip-lock in the freezer, while the other half we devoured in about 2 days!

Monday, January 14, 2013

Indian Spiced Lentil Loaf...


Everyone loves a good lentil loaf right? At least it seems that way. I say that because out of the 100 + cook books that I own I would say at least three quarters of them contain a recipe for a vegan ‘meatloaf’ or some variation of the classic hippy lentil loaf. Now, I was never that big a fan of ‘meatloaf,’ because well... for starters meat shouldn’t come in a loaf, ans secondly when you really think about what it is you’re eating - a big ole slab of ground beef with ketchup and breadcrumbs - it doesn’t really sound that appetizing. Certainly it’s not a very creative dish. A good lentil loaf on the other hand can blow your mind, after all lentils are a really versatile food, and I never fail to be amazed at what they can be made into. Plus on these cold winter nights when you’re dying for something savory and comforting but don’t want to do a lot of work a lentil loaf is perfect. They’re quick and easy to throw together with minimal active time. Once you have it in the oven baking you can take a shower, read a book, do some yoga, or just relax with a hot cup of tea.


Lentils loafs are also rich in nutrients. You get protein from the lentils, plus lots of healthful nutrients, vitamins, minerals and antioxidants from the array of spices and vegetables you decide to put into them. The problem though - at least for me - is that so many of the lentil loaf recipes floating around out there are the same. It’s always the same kind of lentils - usually brown - with the same basic combination of vegetables - onions, carrot, celery, - and the same combination of herbs - parsley, thyme, salt, pepper, basil, oregano. - Vegetable brother is another typical component as is soy sauce and are almost always topped with ketchup or BBQ sauce. Now, don’t get me wrong, I like this combination - a lot - but as you know I like variety. I’ve never been the type of person who makes the same thing over and over again and so I require a little more creativity in my life.

I had been thinking a lot about lentil loafs last November when I happened upon an interesting recipe in Robin Asbell’s book “Big Vegan” it was a French inspired lentil loaf with Herbs de Provence and a Dijon Mustard glaze, yum! I was immediately excited and so I made the loaf. It was beyond excellent, and it got me thinking about what other kind of cultural twists I could throw into a lentil loaf to shake things up a bit. Initially I wrote down a bunch of ideas that I’m eager to try out, but since Indian food is one of my - and my husband’s, - favorites, that seemed the most natural direction to go in first.


When I first came up with the idea I had no idea how I was really going to do it. I had no idea if it would be good or if it would even be edible, but in the end I really surprised myself because the loaf turned out really fantastic. It tasted like a big samosa covered in mango chutney. It had all the great flavors I love about Indian Cuisine, the sweet, the spicy, the pungent, all rolled up in one easy package. My husband loved it too and so we enjoyed this delicious Indian spiced loaf for 2 days as dinner and 2 days as leftovers in lunches. It was the perfect hearty meal for those cold nights that proceeded the beginning of the Christmas season.

One thing to keep in mind about this recipe however is the fact that this makes a very large loaf. It was too large for my regular loaf pan and so I baked it in a cake pan instead. If you’re not looking to make quite so much you could easily half the recipe, but remember that halving it will mean a shorter cooking time also. Anywhere from 25-40 minutes less, depending on the consistency of the loaf at the time you pour it into the pan. Though if you were so inclined to make the recipe as is it tastes fantastic as leftovers, either on it’s own or stuffed into whole grain pita bread with sliced tomato, onion, lettuce, cucumber and a little additional chutney. Or be a little more traditional and roll it up into some Naan bread. However you decide to make it just enjoy it!


Indian Spiced Lentil Loaf 

1 C Green lentils
½ C Red Lentils
3 C Water
1 1/4 C Oat Flour
6 Garlic Cloves Minced
1 Tbsp Ginger grated
1 Yellow Onion Diced
1 tsp Mustard Seeds
3 Yukon Gold Potatoes diced
1 Tbsp Peanut Oil
2 C Cauliflower Chopped
1 Large Carrot
½ Frozen Green Peas
5-6 Tbsp Curry Powder
1 tsp Ground Turmeric
½ tsp Ground Cinnamon
1/4 tsp Ground Cardamom
4 tsp Ground Cumin
2 tsp Ground Coriander
Sea salt and Black Pepper to taste
2-4 Tbsp Mango Chutney
2 Tbsp Tamarind Paste
8oz Mango Chutney

- Preheat oven to 400'F/200'C

- Cook Green and Red Lentils in 3 Cups water until tender and most of water has been absorbed. If not all the water has been absorbed by the time the lentils are tender drain in a colander. If lentils are not tender by the time the water has absorbed add more. Once cooked set aside to cool.

- Steam the Potatoes and Cauliflower until just tender, then set aside to cool.

- In a pan over medium-high heat saute the mustard seeds for a few seconds until they begin popping. Add the peanut oil, the onion, garlic and ginger and saute for 5-7 minutes until translucent.

- In food processor combine the cooked lentils, potatoes, cauliflower, onion mixture, and the oat flour. Pulse until just combined.

- Add the Cardamom, Cumin, Coriander, Salt, Pepper, cinnamon, turmeric, curry powder, tamarind paste, and the 2-4 Tbsp of Mango Chutney. Pulse until it the mixture just becomes cohesive, and the spices have been incorporated.

- Turn the mixture out into a mixing bowl. Add in the grated carrot and the frozen peas. Stir to combine. Taste for flavor and texture and adjust seasoning as needed.  More curry powder, chutney, salt etc... If the mixture is too wet add in a bit more oat flour. If it’s too dry add in a bit of oil, water, or more chutney or tamarind paste.

- Grease a 9 inch round cake pan - I used a sprongform pan, - and scrape the mixture into it. Smooth the top with the back of a spatula then top with the 8oz of Mango Chutney.

- Bake uncovered in the oven for roughly 60-75 minutes until the top is bubbling and the loaf seems firm when you insert a knife or wooden skewer into it.

- Remove from the oven and let cool on the counter top for 10-15 minutes before slicing. Serve with a giant salad!

***Note - I chose to make this recipe wheat-free, but to ensure it’s 100% gluten-free make sure you buy gluten-free oat flour, or make your own by using gluten-free oats. Alternately if you do not have a wheat or gluten intolerance you can use any type of flour that you prefer.***

Friday, November 30, 2012

Almond Banana Oatmeal...


How many of you eat oatmeal everyday? Or even a few times a week? I know I don’t, and it’s not because I don’t like oatmeal, it’s just that... well I’ve never really been a breakfast eater. That’s not to say I don’t like a good breakfast now and again but typically when I wake up early I don’t eat much for an hour or two and then I end up grabbing an apple and making a smoothie. It’s quick, it’s easy, and by that time I’m ravenous so it works. Some fruit and a smoothie for breakfast certainly isn’t a bad way to start the day but there are some days where you just want more, and I feel that oatmeal is one of those unutilized breakfast foods. It definitely is in my house anyway. It also comes with the unfortunate stigma of being bland, flavorless and boring.


But oatmeal Is so good for us. It’s filling, it provides sustainable energy throughout the morning, it gives us beneficial nutrients, and best of all it helps to stabilize blood sugar and lower cholesterol which keeps our hearts and arteries happy. As for the taste, well, the oatmeal I made this morning knocks the socks off of any other oatmeal I’ve ever eaten. It’s super flavorful, extremely delicious and pretty quick.


I guess because the weather is getting colder now, I’ve started to crave more hearty winter fare, oatmeal definitely falls into that category and since I was still a bit hungry after my morning apple bu not quite ravenous I decided to take the time and make myself a bowl. For lack of ingredient variety and for the comfort of having something familiar I chose to incorporate ingredients into my oatmeal that I generally through into my morning smoothie. Such as banana, almond butter, flax, and hemp. What’s really great about this oatmeal is rather then add sliced bananas on top after it’s cooked, I cook the bananas right in the oatmeal itself. When bananas cook down they develop a truly amazing sweet, full bodied flavor that’s addictive. It made for a super satisfying morning meal that’s kept me full all day. You have to try it, even if you think you don’t like oatmeal!


Almond Banana Oatmeal 

½ C Steel Cut Oats
2 C Water
1 Large Banana
1 ½ - 2 heaping TBSP Almond Butter
½ - 3/4 tsp Ground Cinnamon
1 tsp Vanilla Extract
1 Tbsp Maple Syrup
1 tsp Hemp Seeds
1 tsp Ground Flax Seeds
2 Dried Apricots Sliced
2 Dried Plums Sliced
Splash of your Favorite Almond Milk (Optional - I used Vanilla)

- In a medium sized saucepan combine the steel cut oats and the water. Bring to a boil, boil for ten minutes then reduce the heat to a simmer and simmer for an additional 20-30 minutes until the water has been absorbed to your liking and the oats are soft and creamy.

- During the last 8 minutes of cooking slice the banana into the pot and stir to combine. Also add in the almond butter and stir to combine. By the time the oats are done cooking the banana slices should have cooked down into the oatmeal leaving no chunks. Though a few bits are okay.

- Once oats are done remove the pot from the heat and stir in the cinnamon, maple syrup and vanilla extract.

- Scrape oatmeal into a large bowl if you’re very hungry or divide into two bowls for two smaller portions.

- Top with hemp seeds, flax seeds, and chopped fruit - though you may need more of each of these if your making two portions. Then add your favorite almond milk if you like a wet oatmeal and enjoy!


PS: If you prefer a dry oatmeal this taste amazing just as is, the milk isn’t really necessary. I mostly used it for consistency and for a bit of extra vanilla flavor. Also feel free to experiment with different types of dried fruits. I used Apricots and Plums because that’s what I had, plus I’m quite partial to dried plums in things. Though you could use any dried fruit you like.

PPS: Oatmeal can be made Gluten-Free if you are using Gluten-Free Oats


Monday, April 2, 2012

Berry Oatmeal Breakfast Smoothie...


I’ve been drinking oatmeal smoothies for years now, and it seems the mainstream is beginning to catch on to how awesome they are. I noticed while out grocery shopping recently that the juice company Naked has a new line of fruit flavored oatmeal shakes on the market. I’ve tried a couple myself and I have to say they’re not bad, and they seem to be slowly gaining in popularity. While it’s nice to see new vegan-friendly products entering the market all the time, offering a wide breadth of choice, nothing could be easier then making your very own oatmeal smoothie at home. Plus if you do it yourself it’s cheaper, more nutritious, and lower in sugar.

An oatmeal shake is perfect for breakfast on the go, or for those of us who may not always be in the mood to eat in the morning and so prefer a liquid breakfast. That’s basically what propelled me to make my first oatmeal smoothie several years ago. You see, I actually really love oats and oatmeal, but I’m not always the best at eating it on a regular basis, and I’m sure others out there can relate to that. For me oatmeal is something I have to be in the mood to eat and honestly when I’m ravenous I don’t have the patience to wait for it to cook. Which makes the oatmeal shake a perfect solution!


The other great thing about starting your day with an oatmeal smoothie is that you’re truly starting your day off right, because they are absolutely packed with nutrition and have sufficient calories to keep you full and energized straight to (or perhaps even past) lunch. Perfect if you have errands to run, meetings to attend or a lot of work to file by the end of the day. An oatmeal shake is also a healthy way to keep an eye on your weight as the high protein content will keep you full longer and help prevent you from snacking before lunch, or even gorging when lunchtime comes around.

Oh and did I mention that oatmeal smoothies are delicious? ‘Cause they are. I promise I wouldn’t say it unless I meant it, and I certainly wouldn’t drink them if I didn’t think they were totally bomb.
I tend to switch up my oatmeal shakes from time to time but the following recipe the one I make most often. I’m particularly fond of the blueberry and oatmeal combination, I mean really is there anything better? I think not, especially when you blend in some super smooth and creamy almond milk and finish it off with a dash of cinnamon. Perfect breakfast heaven!

So even if the idea of oatmeal in a shake sounds strange to you, don’t be afraid to give it a try, you just might find yourself amazed!


Berry Oatmeal Breakfast Smoothie

2 C Fresh Blueberries (can use frozen if you like)
2 C Almond Milk (unsweetened or original)
1 Pack Frozen Acai Berry Puree (Thawed)
3/4 C Rolled Oats
1 1/2 Tbsp Hemp Seeds
½ tsp Ground Cinnamon
1/4 tsp Ground Cardamom
1-2 packets stevia (optional)

- Place all ingredient in a high-speed blender and blend on high for 30-60 seconds until smooth. Pour into glasses and top with additional blueberries and hemp seeds for a lovely presentation!

And, just to give you an idea of the wonderful nutritional content of this smoothie, here are a few facts and figures taken right from the backs of the cartons/packages of the products I used. Obviously percentages will vary slightly depending on which brands you use, but you get the idea.

2 C of Blueberries = 48% Vitamin C, 28% Fiber, 70% Vitamin K
1 Pack Acai Berry Puree = 5% Fiber, 15% Vitamin A, 4% Calcium, 6% Iron, 1g Protein, 8% Vitamin C3
3/4 C Dry Rolled Oats = 22.5% Fiber, 7.5g Protein, 15% Iron,
1.5 Tbsp Hemp Seeds = 4% Fiber, 5g Protein, 10% Iron,
2 Cups Almond Milk (Silk Original) = 4% Potassium, 8% Fiber, 2g Protein, 8% Iron, 100% Vitamin B12, 20% Vitamin A, 50% Vitamin D, 90% Calcium, 20% Zinc


If you drink the entire blender full, then that’s an incredible amount of nutrition, heck even if you drink half the blender you’re still getting a whopping amount of both calcium and protein, so don’t ever let anyone tell you that as a vegan you don’t get adequate nutrition, in fact if you’re eating healthfully you’re probably getting superior nutrition. Considering that animal flesh doesn’t contain fiber, antioxidants, or vitamins and comes along with a heaping side of saturated fat. So drink your oats and be happy!

*** Note - For Gluten-Free be sure to use GF Oats!*** 

Wednesday, March 28, 2012

Welcoming Spring with a Vegan Cookie Extravaganza...

Peppermint Oatmeal Carob Cookies


Spring is here! I suppose technically Spring’s been here since the 20th which was the equinox, and truthfully the weather has been very spring-like for most of the month, but this week in particular has felt very much like spring in a lot of ways. The weather has been very warm, a little breezy and we’ve had a few of the traditional spring showers. The sun is out and shining almost everyday, and it’s staying out longer. Everything is golden, and fresh and fragrant. The grass and foliage around here and in the parks has gone from brown and dreary to green and vibrant in only a week’s time. Flowers are opening and reaching for the sky, and my favorite sign of spring, the cherry blossom is in full bloom. Life has moved from inside to outside as children flock to the parks to play and more and more people meander out and about with their dogs. The Canadian Geese and the ducks that chose to migrate further south have returned to the lakes, where they’re preparing to mate. Butterflies have emerged, and birds sing gloriously in the trees while squirrels and bunnies romp in the weeds below.

Lavender Chocolate Chunk Cookies


Spring and Autumn are by far my favorite seasons, both for the beauty they impart on the world and for the feeling of peaceful contentment they instill inside me. Each year I like to do something special to ring in and honor the season, and this year I chose to bake a bunch of spring inspired goodies. This wasn’t the original plan, but as it happens my favorite used book store was having a sale last week, and I just so happened to come across four great vegan finds while perusing the shelves, two of them being vegan baking books. With so many new - to me - wonderfully creative, inspirational, and delicious sounding recipes under my arm this seemed the perfect opportunity to give them a whirl.


Monday morning I woke early, grabbed my books and headed straight for the kitchen, where I popped an audio book into the little portable cd player I keep by the window and set to work. I started with Kelly Peloza’s "The Vegan Cookie Connoisseur." a book I’d flipped through once or twice at my friend J’s without much interest. I think it was the photography that initially turned me off. Most of the photos are dark - too dark in my opinion - and I much prefer cook book photos to be shiny and bright. She does however include a photo with each recipe which I appreciate - dark or not - and I figured for $5 what would be the harm in picking it up? I’m really glad I did because there is some super creative, inspiring and amazing stuff hidden within these pages. There are so many cookie recipes I can’t wait to try out, in fact I was having such a hard time narrowing it down that I made three different recipes from this book.

Top Left - Lemon Poppy Seed Cookies. Top Right - Lemon Cornmeal Cookies.
Bottom - Pink Lemonade Cookies


Though it was tough to choose which recipes to start with I decided to keep with the theme of spring and went for three different lemon flavored cookies. You may think I went a little lemon crazy, but I absolutely love lemons! Especially in the spring and what better ingredient to use when the sun is shining and the world finally feels alive after the decay of winter?

Lemon Cornmeal Cookies


I began with the Lemon Cornmeal Cookies. I chose them because they were relatively quick to put together and because the picture - one of the few that actually isn’t too dark - was so bright, and happy. Just looking at all that magnificent yellow put a smile on my face, and lifted my spirits. Plus you have to admit that the addition of cornmeal in a cookie is just a little bit intriguing, no? I did make a few changes, one out of necessity - I didn’t have soy milk so I used flax instead, it worked perfect! - and the rest out of preference. I used a bit less sugar, a touch of lemon juice, and only rolled one side of each cookie in additional sugar. Trust me that was enough! The cookies baked up quick and were absolutely ‘melt in your mouth’ while still warm from the oven. I loved the lemon flavor of course and really enjoyed the subtle crunch of the cornmeal.

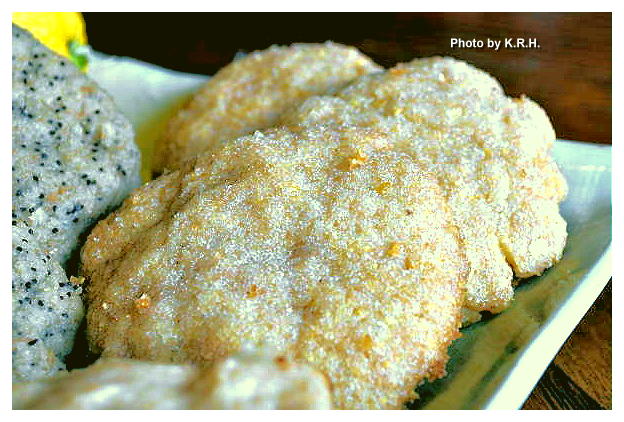
Lemon Poppy Seed Cookies


Next up were the Lemon Poppy Seed Cookies. This recipe is also accompanied by a relatively bright and happy picture, but it’s not the only thing that put a smile on my face. I mean, is there anyone out there who doesn’t think lemon and poppy seed are a perfect combination? They are truly a match made by the gods, and I am destined to love everything with this unique flavor combination. I adore lemon poppy seed muffins, cupcakes, loaves, rolls etc... but don’t recall ever having had a lemon poppy seed cookie until now. These were absolutely scrumptious! Like the lemon cornmeal cookies these baked up quick and were fast to throw together, which you wouldn’t think from their phenomenal flavor. Again I made a couple of alterations, flax milk instead of Soy, a little less sugar, a touch of lemon juice plus additional zest and I doubled - at least - the amount of poppy seeds.

Pink Lemonade Cookies


Lastly from Peloza I made the Pink Lemonade Cookies, the very sound of which is enough to make anyone smile. However I did not have pink food coloring, nor the ingredients to make my own, and so mine are just regular lemonade cookies I suppose. Still amazing though as the pink is used exclusively for aesthetic value. These cookies, while again simple enough upon first glance were a bit more work. I used flax again, decreased the sugar, added extra zest and a touch of lemon juice. However I found the dough to be kind of sticky, so it was hard to spread into a disk shape on my baking sheet. This may have been my own fault because of my alterations but in any case it was a bit of a process to get the dough to cooperate, and as it happens I was never able to get it to spread into perfect flat disks. Oh well the flavor was impeccable and in the end that’s all that really matters. The thing that makes these cookies so great, and it’s the reason you need them to be flatter rather then round is that you make a lemon butter cream frosting which you spread over half the cookies once they’ve been baked, then place a second cookie on top to make a sandwich cookie. Sort of like a lemon oreo but a thousand times better! The frosting was super simple - again I added extra zest - and squishing the cookies together was a breeze. I highly recommend making these, as well as the other two, especially if you like lemon. I don’t think you’ll be disappointed. I sure wasn’t, neither were the friends I chose to share these treats with.


For my next two batches I moved onto one of my other new books, Laura Matthias’s Extra Vegan Za. Though there are so many amazing sounding recipes in this book for everything from appetizers to dessert the first recipe I knew I had to try were the Peppermint Oatmeal Carob cookies. First of all who doesn’t love an oatmeal cookie? Secondly this combination just sounded to unique and cool not to try. I’m a huge fan of peppermint as I believe I’ve mentioned, and while I’ve had chocolate peppermint cookies before and peppermint chocolate I’ve never come across the combination of peppermint carob. Nor have I had peppermint in a cookie that wasn’t an all out chocolate cookie. Though I had my heart set on making this one, I was initially a little concerned that I wouldn’t like it. I was worried it might taste overly of peppermint or that the carob would be overwhelming but thankfully neither was the case. Even though I opted to leave out the vanilla extract in favor of extra peppermint extract. This truly was a perfect cookie. Laura says in the book that it’s her favorite and I can clearly see why, in fact it just might be my new favorite as well. Peppermint is a wonderful flavor to use in spring and summer because it’s so fresh and cooling. Mint of all types is extraordinary in salads, grain dishes, desserts, teas you name it and so I thought this cookie was a beautiful choice for a Spring bake-a-thon. What I like best about this cookie though is that you have three strong flavors, none of which overpower the others so you do get a real sense of all of them and they blend together so well. Absolutely amazing, and I never would have thought of it myself!


Lastly, also from Extra Vegan Za, I made the beautiful and delicate Lavender Chocolate Chunk Cookies. Lavender is a perfect choice for spring, it’s fragrant and floral and just the scent alone brings you peace of mind. I love it. Yet even though I almost always have dried culinary lavender on hand I rarely find an occasion to use it. The minute my eyes spied this recipe I knew it was meant to be. I just knew I had to try it out. Like with the peppermint oatmeal carob cookies I was excited yet unsure. I like the taste of lavender but not if it’s overwhelming. Too much lavender can be bitter and unpleasant and so I was hoping that would not be the case with these cookies. In fact Laura states in the book that for the lavender lover or the adventurous, use two tbsp of lavender, for someone less enthused by lavender use 1 tbsp. I started off with the 1 tbsp took a look at the dough and thought ‘what the hell’ and threw in the second tbsp with a little extra for good measure. Always ready for a culinary adventure I figured ‘why not take the plunge?’ I’m so glad I decided to throw caution to the wind because these cookies were magic! With just over 2 tbsp I didn’t find the lavender overwhelming at all, it was perfect, and it blended wonderfully with the chocolate chips. Actually I would go so far as to say that lavender is to chocolate what lemon is to poppy seed. The two go hand in hand, a match made by the infinite wisdom of the universe. Seriously I can’t keep my hands off these little gems and I highly recommend Extra Vegan Za on the basis of these two cookie recipes alone. I can’t wait to see what else Laura has in store!


So that concludes my culinary honoring of Spring. Although I did continue baking Tuesday when I tried my hand at Cinnamon Buns for the first time! An amazing experience that I was going to include in this post, but seeing as how it’s already quite long as it is I’ll save it for tomorrow. Plus I think cinnamon buns are entirely deserving of their very own post anyway.

Also stay tuned for some other exciting stuff I have coming up. I know I’ve been a bit neglectful of the blog this week, and I apologize. I’ve been rather busy and as such I haven’t had the leisure to experiment much with inventing my own recipes. Mostly I’ve been enjoying trying out the cook books I received for Christmas. However since this was originally intended to be a well rounded blog, with more on offer then just recipes I have some very interesting things to share that aren’t necessarily recipe related. Tomorrow we’ll have cinnamon buns, then look out for Friday’s post which will be related to woman’s health.


PS: Apologies also for the poor lighting in some of the photos. Though the sun was bright and shining outside it wasn’t exactly pouring through my kitchen windows at the time I chose to take these photos. And yes, I fully realize the irony of talking about Peloza’s dark photography, when my own in this post isn’t very well lit either. Ha ha... it seems these things happen to all of us from time to time.

*** Note - Also please keep in mind that if you are going to use Lavender in any food recipe, please, please make sure it’s culinary lavender, and not floral or aromatherapy lavender. There is indeed a difference and I assure you, you will not be happy if you get the wrong kind. Usually culinary lavender is easily found in spice shops, herbal shops, health food stores and even some grocery stores. It can also be found for sale as a whole plant that you can then plant in a pot or your garden, which is always fun!***