Showing posts with label Green Onions. Show all posts

Sunday, February 14, 2016

Roast Seitan With Spring Vegetables...


Happy Valentine's Day everyone!  Though I normally go 'all-out' when it comes to holiday cooking, I just don't really have that level of dedication in me these days. Most often I'm looking to cook something simple and quick that's healthy and tastes good, and on those days where I like to spend a little more time on something I typically only make one really nice dish rather then a dozen.

So this year we kept Valentine's Day low-key. At first I struggled with what to make, and then I decided to make something French (of course!)  Last year when we were in Paris I bought a cook book, it's non-vegan but I wanted it because it was full of 'traditional' French recipes as opposed to 're-imagined' French-fusion. I love the idea of French food, even if I can't eat most of it, and I bought the book with the intention of trying to veganize some of the less common recipes.


As I was thinking about what to cook, it occurred to me that Valentine's Day was the perfect opportunity to try something new, so I dug the book out and flipped through it. Suddenly a recipe for Roast Lamb with Spring vegetables caught my eye. I have no idea what makes this dish inherently French, or if you can really consider it much of a recipe but something about the photo was appealing to me. All those tasty spring vegetables I imagined sitting around a Seitan Roast and it just seemed perfect. I'm tired of winter, tired of winter food, lets bring on the Spring already!  So here's my version of it, you could use any seitan roast you desire I suppose, but I made my own. I used the 'Moo-Free Seitan" recipe from "Vegan Sandwiches Save the Day" cooked it in the slow cooker then left it in roast form rather then slicing it as the book suggests. If you make your own roast for the recipe or buy a roast I suggest buying or making one that's beef flavored as opposed to chicken flavor. Beef and Lamb taste little alike, but Beef Seitan is as close as I'm coming to lamb in this life. I also used the original cooking liquid from the seitan roast as my stock, but you could use any vegan beef stock. Also take into consideration that a store bought roast will be much drier then a homemade one, so cooking time may vary.


Roast Seitan with Spring Vegetables

1 Large Seitan Roast
3 Sprigs Rosemary
3 Sprigs Thyme
6 Garlic Cloves Sliced Thin
1 Pound Baby Potatoes Cut in Half
8oz Baby Carrots Left Whole
2 Medium Sized Zucchini Cut into Rounds
6 Small Leeks or in lieu of that 6 Large Green Onions
2 Tbsp All-Purpose Flour
1/2 Cup Red Wine
2/3 Cup Vegan Beef Stock
Earth Balance as needed
Sea Salt, Black pepper and Garlic Powder to taste


- Pre-Heat Oven to 350'F

- Spray a large roasting pan with a little non-stick spray. Place the roast inside. With a small knife make several incisions in the top of the roast. Slip the sliced garlic into the incisions. Lightly season the roast with sea salt, black pepper, and garlic powder. Add two small dollops of Earth Balance to the pan and place the roast in the oven.

- Cook for 15 minutes. Add the Potatoes to the pan remove the Rosemary and Thyme from their sprigs and scatter it over the roast and potatoes. Season the potatoes with a little salt and pepper then return to the oven and cook another 15 minutes.

- Flip the Roast over, season the underside with salt and pepper and garlic powder. Add the carrots to the pan along with another 2 dollops of Earth Balance. Return to the oven and roast for 20 minutes.

- Flip the Roast Over once more.  Add Zucchini and Leeks to the pan. (If using Green onions instead do not add them yet) Continue to roast until all the vegetables are fork tender.

- When the vegetables are fork tender add in the green onions if you're using them instead of leeks and roast for an additional five minutes until they are wilted and browned a little.

- Remove the whole pan from the oven. Transfer the Roast to a carving board and spoon the vegetables into a serving dish. Making sure to leave behind any juice

- Now to make the gravy. Heat your roasting pan over medium heat on the stove top. If there wasn't a lot of juice left over in your pan at the end of cooking add in two nice dollops of Earth Balance and wait for it to melt.

- Add the flour and whisk the flour around in the juice and EB until it has become a roux.

- Slowly pour in the stock, and then the wine, whisking the whole time. Season lightly with salt and pepper if you like and whisk slowly until the gravy has thickened to your liking.

-Slice the roast, divide it amongst plates, add a scoop of vegetables and drizzle with gravy. Enjoy with some nice red wine.

Saturday, February 13, 2016

Toasted Cashew Noodles....


This dish came about because I was starving, and craving noodles. I don't normally crave noodles, but I really felt like rice noodles in some kind of Asian style sauce. I didn't feel like Peanut noodles, though I love them, and I suddenly had a simultaneous hankering for Cashews. I didn't really have many fresh veggies on hand, and wanted to keep the dish simple anyway so the preparation would be quick - the faster it's made the faster I eat! - and this is what came about.


Surprisingly this turned out super good, it's got the perfect balance of sweet, salty, spicy, tangy. I also think the cashew butter makes a great stand in for peanut butter, and lends a more mellow, yet complex and nutty flavor to the dish. I also really love the nice bit of crunch in each bite from the red cabbage garnish. I didn't have any cilantro on hand, but I imagine that would make a good garnish too, if you happen to have some. Of course if you want to 'beef' it up, you could also add some cubed baked or fried tofu, or maybe even some tempeh. But I kind of like it exactly as it is, light and easy. Two of my favorite things right now.


Toasted Cashew Noodles

For the Noodles

2 tsp Toasted Sesame Oil
3 Carrots Sliced thin
6 Radishes cut into thin half moons
3 Green Onions sliced (White and green parts separated)
2 Garlic cloves sliced thin
1/4 Cup Cashews
12oz Rice Noodles
1/4 C or less of thin sliced Red Cabbage

For the Sauce

1/4 Cup Creamy Cashew Butter
1/3 - 1/2 Cup Coconut Milk (Depending on how thick you want the sauce)
4 Tbsp Tamari
2 Tbsp Mirin
2 Tbsp Lemon or Lime Juice
2 tsp Cane Sugar
1/2 tsp Ground Ginger
1/4 tsp Smoked Paprika
1/4-1/2 tsp Sriracha or to taste

- Place the noodles in a pot of boiling water and cook for 5 minutes or until they are tender. Drain and set aside.

- Heat the Sesame Oil in a large frying pan. When it's hot add the carrot, and radish. Cook on high for about 5-7 minutes until the veg becomes soft and starts to brown. Add in the white parts of the onions, and the garlic. Lower the heat and sauté for another 3-4 minutes until everything is cooked to your liking.

- Combine all sauce ingredients in a small pot and stir until smooth. Turn the heat on high, and when it begins to simmer whisk it for about a minute. You just want to heat the sauce through long enough for it to smooth out.

- Add the Cooked Noodles to the pan of veg. Pour the sauce over, and mix to combine.

- Divide into bowls, and top with Green onions, and red cabbage.

- In a dry skillet toast the cashews over high heat for 5-8 minutes until they smell nutty and begin to brown.

- Top each bowl with a handful of cashews and enjoy!

Tuesday, February 9, 2016

The Ultimate Stoner Breakfast....


It's not called The Ultimate Stoner Breakfast for nothing. This meal is pure 'meat' and potatoes, it's 'carbs, carbs, and more carbs.' it is exactly the kind of food you want to eat and should indulge in when you're grooving in your happy place, and everything is beautiful. One of the best things about it is how low effort it is, yet the flavor is not sacrificed. It's also super hearty, it'll tame even the wildest munchies, of course, don't limit yourself to just eating it at breakfast time!

Now, there are two ways you can eat this. The 'traditional' way with each food having it's own separate space on the plate. Or you can eat it like a taco. Yeah, you heard me, a pancake breakfast taco. How awesome is that? I know it sounds strange but trust me when I say it's amazing. My husband was really skeptical at first too, but after he watched me down 3 of these bad boys he was convinced enough to try it. If you enjoy it in Taco form then you can essentially add anything you like as a topping which is awesome, it makes it versatile. So trust me on this one, and give it a try.

(PS: You can use any pancake recipe you like, but I've included my go-to just incase you don't have one. I have also made these with gluten-free flour before and they have turned out well.)


Cheese Tots

Olive Oil
1lb Frozen Tater Tots
1 Small Yellow Onion Diced
Garlic powder
Sea Salt
4 Sliced Green Onions
1/2-1 Cup Daiya Cheddar or Mozzarella Cheese.

- Preheat Oven to 400'F

- Dump the tater tots into a baking dish with the diced onions. Drizzle a little olive oil over them then sprinkle them with salt, and garlic powder. Stir to combine everything.

- Pop it in the oven and bake for 15-20 minutes until tots are cooked to your taste.

- Remove from the oven, Sprinkle cheese, and green onions over top. Return to the oven and cook for 2-3 minutes or until the cheese has just melted and the onions are soft.

- Enjoy on their own as part of your breakfast, smothered in ketchup, sour cream, or mayo. Or enjoy in a taco!


Classic Go-To Pancakes

2 Cups White Flour
2 Tbsp Baking Powder
1 tsp Sea Salt
1 1/2 Cups water
3 Tbsp Olive Oil
3 Tbsp Maple Syrup

- Mix all dry ingredients in a bowl.

- Combine the water, maple syrup and olive oil.

- Pour the wet into the dry and stir until just combined.

- Heat a pan, spread a 1/4 C of batter out into the pan, spread it thin, but not too thin, similar to the thickness of a flatbread.

- Cook for a few minutes until bubbles appear on the surface of the pancake. flip and cook another couple of minutes until golden brown. Repeat.


The Ultimate Stoner Breakfast.

Add-Ons and Extras

Avocado
Sour Cream
Mayo
Ketchup
Maple Syrup
Your Favorite Tofu Scramble
Jalapeno Slices or Hot Sauce if you like it spicy

To Serve the "Traditional Way" Heap a mound of Cheese Tots onto your plate, Slap down 3-4 Pancakes next to it, then add on a portion of your favorite Breakfast Sausage, a portion of your favorite bacon, with half an avocado on the side. Serve with ketchup and mayo for the tots, and Maple Syrup for the pancakes and sausage.


To Serve it the "Taco Way" Spread a thin layer of Syrup over one pancake. Place 1/2 a slice of bacon (or a full slice if you prefer) on top of the pancake, then a breakfast link.  Pick the pancake up, and hold it in your palm like you would a taco shell. Take a spoon and scoop a small portion of the cheese tots inside your pancake shell. If you're using tofu scramble as well, scoop a small portion of that into the pancake taco along with the tots. Drizzle a bit of ketchup over top, and then serve with dollops of sour cream and/or mayo and whatever other add-on's you wish. It's great with or without avocado, and I personally like the mix of sour cream and mayo. So delicious!


Red Curry Rice Soup...


I made this soup a lot over January. It's so quick and easy which I love, but it's also super warming, comforting and packed full of nutrition and flavor. Unfortunately I didn't really write down a recipe, but this is more or less how it goes.


Red Curry Rice Soup

1Tbsp Olive Oil
1 Small Onion Diced
6-8 Garlic Cloves Minced
1 tsp Ground Ginger
3 Cups Vegan Chicken Broth
1 15oz Can Coconut Milk
2 Tbsp Red Curry Paste
1 tsp Sea Salt
2-3 Tbsp White Jasmine Rice
2-3 Baby Bok Choy
3-4 Green Onions sliced thin
1/4 tsp Gochujang or Red Pepper Flakes

- Heat the Olive Oil in a medium sized pot. Add the onion and cook for 5-6 minutes. Add the garlic and ginger and cook for another 4 minutes.

- Add the Vegan Chicken Broth and Rice. Bring to a boil and then lower to simmer. 10 Minutes.

- Add in the coconut milk, salt, and Red Curry Paste. Simmer another 10-15 minutes or until the rice is tender.

- Add the sliced Bok Choy Leaves, green onions and Gochujang. Stir to combine and cook 1-2 minutes just until the choy has wilted.

- Serve garnished with extra green onions, and Gochujang if desired.

Thursday, September 17, 2015

Vegan Mofo #19: Irish Leek and Cheese Soup...


Leek and Cheese Soup is kind of like the Irish version of French Onion Soup. Quick and easy to make using staple ingredients; warming on a cold night and comforting any time of year. I don’t really know where it comes from, but it’s probably been around in one form or another for ages. All I know is that I was interested in making it from the first moment I saw it listed in an Irish cook book.


Irish Leek and Cheese Soup 

3 Large Leeks, Washed and Sliced
1/4 Cup Non-Dairy Butter
*** 4oz your Favorite vegan Cheese
2 Tbsp All Purpose Flour
1 Tbsp Whole Grain Mustard
6 Cups Vegan Chicken Stock or Water mixed with Vegan Chicken Boullion Cubes
1 tsp Poultry Seasoning
1 tsp Sea Salt (More or Less to taste)
1/4 tsp Black Pepper
Additional Grated Vegan Cheese for Garnish (Optional)
Sliced Green Onions for Garnish (Optional)

- Melt the nondairy butter in a large soup pot over medium heat. Add the Leeks and saute for 10-15 minutes until softened.

- Add in the flour and stir constantly for about 2 minutes until leeks are well coated.

- Add in the salt, pepper, poultry seasoning, and mustard. Stir to combine.

- Slowly add in the stock, stirring to blend. Increase the heat and bring the soup to a boil. Then Reduce heat, cover the pot and let simmer gently for about 15 minutes.

- Add in the cheese. And let simmer an additional five minutes. If the cheese melts and blends in so be it, but if it doesn’t fully melt it’s kind of nice to have strands of gooey cheese within the soup.

- Taste and adjust seasonings as needed. Then serve garnished with additional vegan cheese and green onions if desired, serve with a hearty brown bread that you can use to sop up the soup.


*** Note - The Original recipe uses Irish Farmhouse Cheese, and specifically suggests Cashel Blue. However you can use any flavorful, sharp vegan cheese you can find. I used Provolone. I bought the slices and just broke them up into little squares. The squares somewhat clumped together to form little cheese lumps in the soup which I liked, as it very much resembled the picture of the original soup. But, use whatever vegan cheese you like, shreds or slices, doesn’t really matter either.***

Saturday, September 12, 2015

Vegan Mofo #13: Avocados Stuffed with Peruvian Chicken Mayonnaise 2 Ways...


When we were in Peru last September we ate a lot of really good vegan food. Vegan food is not as easy to come by in Peru as it was for us in other places in Central/South America but when you can find it, it’s very good. We enjoyed a lot of simple stews, lima beans, butter beans, corn, and definitely avocados. We took full advantage of the popular ‘plate of the day’ set up that most Peruvian restaurants have around lunchtime. Usually for a few bucks you get a nicely portioned meal with all the staples.


We didn’t have a Vegetarian version of Chicken Mayonnaise while we were in Peru, but I found a recipe for it in a Peruvian cook book that I found intriguing. There is certainly no shortage of Avocados in Peru, and they’re a lot bigger then the ones you buy around here. Anyway, since avocados are one of my favorite foods, and everyone loves a good ‘chicken’ salad, I thought I’d try my hand at making a more compassionate, chicken friendly version of this dish.

I think this would make a great starter to a dinner party, but it’s just as easily enjoyed as a main course along with a side salad. You’ll be surprised at how filling these little avocado boats are!


Avocados Stuffed with Peruvian Chicken Mayonnaise 2 Ways


Beyond Meat Version 

2 tsp Olive Oil
2 Ripe Avocados Peeled, Sliced in Half, Pits removed
1 Box Beyond Meat Chicken Strips Diced
1 Small Carrot Minced
1 Celery Stalk Diced
4 Green Onions Sliced
4 Kalamata Olives Minced
½-1 tsp Smoked Sea Salt
1/3 Cup Vegan Mayo
Black Pepper to taste
Strips of Red Bell Pepper to Garnish (Optional)


Chickpea Version 

2 tsp Olive Oil
2 Ripe Avocados Peeled, Sliced in half, pits removed
1 15oz Can Chickpeas rinsed and Drained
1 Small Carrot Minced
1 Celery Stalk Diced
4 Green Onions Sliced
4 Kalamata Olives Minced
½-1 tsp Smoked Sea Salt
1/3 Cup Vegan Mayo
Black Pepper to taste
Strips of Red Bell Pepper to Garnish (Optional)


Instructions - Beyond Meat Version 

- Heat the Olive Oil in a pan over medium heat. Add the diced beyond meat and cook for 6-8 minutes until nicely browned on all sides. Remove from the pan and place into a large mixing bowl.

- Add the carrot, celery, and half the onion. Saute for 4-5 minutes until the carrot is soft. Add a dash more oil if needed. When the veggies are soft remove from the pan and place into the bowl with the beyond meat.

- Add the remaining raw onion, olives, smoked salt, pepper, and vegan mayo to the bowl, stir thoroughly to combine.

- Taste and adjust seasonings as needed.

- Spoon the beyond meat mixture into the center of each avocado half. Place the halves on a serving plate, and garnish with red pepper strips. Add a dash of sriracha if you like things spicy!

Instructions - Chickpea Version.

- Place the drained, rinsed chickpeas into a serving bowl and mash with a potato masher. You do not need to mash every pea, just get a somewhat mashed consistency.

- Heat the oil in a pan over medium heat. Add the carrot, celery, and half the onion. Saute for 4-5 minutes until the carrot is soft. When the veggies are soft remove from the pan and place into the bowl with the mashed chickpeas.

- - Add the remaining raw onion, olives, smoked salt, pepper, and vegan mayo to the bowl, stir thoroughly to combine.

- Taste and adjust seasonings as needed.

- Spoon the chickpea mixture into the center of each avocado half. Place the halves on a serving plate, and garnish with red pepper strips. Add a dash of sriracha if you like things spicy!


Wednesday, May 6, 2015

Chickpea Flour Scramble - With Breakfast Taco Option...


I’ve been meaning to post this recipe for a while now, but I’ve found myself preoccupied of late. Sorry for the long absence, but I hope this recipe will make up for it. So, on the 23rd of April I really wanted a hearty breakfast. I woke up ravenous and desiring a scramble of some sort. Unfortunately I didn’t have any tofu on hand, neither did I have any canned chickpeas to make Isa’s Chickpea Scramble. However, it occurred to me in a brief moment of culinary genius that if I could make a scramble with whole beans, why couldn’t I make a scramble with chickpea flour? I had heard of it done before, and didn’t think it could be all that hard. I imagined it was somewhat like making a socca - which I love - and so I set to the task of making a chickpea flour scramble.

I was very skeptical that it would work out, especially in the beginning when I realized that the chickpea flour mix just didn’t want to break apart. The whole thing clumped together and wasn’t cooking. I thought I was going to have to scrap the whole endeavor - and no doubt if you try this recipe you might just think the same thing at first, but trust me, it works! - lucky for me I have patience - which is what this recipe needs - I kept at it and was rewarded by one of the most brilliant breakfasts ever. In fact I loved it so much I ended up making it the next day for my husband and I, as he hadn’t been home when I made it the first time. Skeptical as he was, he loved it too, and we devoured this scramble in taco form, though in my opinion it’s also just as good without the tortillas and extras.


What I love about this recipe is you can make the chickpea flour taste like whatever you like, I kept it simple and kept a traditional scramble flavor but you can literally add anything. You can add any spices you can add any vegetables and it creates the perfect gluten-free, and soy free scramble alternative for those who have allergies or sensitivities. More and more people are avoiding soy and gluten but that doesn’t mean they have to cut scrambles out of their lives too.


Personally I think this scramble has a better texture and mouth feel then a tofu scramble. Don’t get me wrong I do love tofu scrambles but I prefer a slightly dryer scramble and tofu scrambles usually have a bit of wetness to them. Also I think that the chickpea scramble mimics eggs better then tofu as it gets firm, but also retains that spongy, springy, softness of an egg. So if you’re looking for a new scramble to try give this one a go. I know it probably sounds weird but trust me the reward is worth it, I know you’ll love it.


Chickpea Flour Scramble 

1 ½ C Chickpea Flour
2 ½ C Water
1 tsp Black Slat
1 tsp Garlic Powder
1 tsp Onion Powder
½ tsp Turmeric
½ tsp Smoked Paprika
1/4 tsp Black Pepper

3 Green Onions diced
1 Ripe Tomato Diced

For Tacos 

Corn Tortillas
Shredded lettuce or Salad Mix
Vegan Cheese
Ketchup
Hot Sauce


- Lightly oil a medium sized pan, and heat over medium heat.

- In a bowl combine the chickpea flour through the black pepper and mix until thoroughly combined.

- Once the pan is hot add the chickpea flour mixture to the heated pan. Cover the pan and cook for about 4-5 minutes until the top looks glossy and the edges look cooked.

This is how it'll look when you first pour it into the pan


- Using a metal spatula begin scrambling the half-cooked mixture as you would scrambled eggs. Begin by folding and flipping the mixture over. Let it cook another 2 minutes or so and begin flipping again. Bare in mind that the mixture will be sticky and it will only be partially cooked making it difficult to fold, and separate but keep at it. It does take some time but use your spatula to continue to break the mass into smaller and smaller chunks, flipping them and cutting them. It should take at least 10 minutes.

After about 10 minutes


- After 10 minutes the mixture should be a bit dryer and it should be easier to break into pieces. The pan may well be very dry at this time and you can add a touch more olive oil to the pan to help prevent sticking as well as to help crisp up the chickpea mix. About a tablespoon of oil should be more then enough. Continue to flip and break up the chickpea mixture into smaller pieces with your spatula. Another 10 minutes and you should have some small and medium sized chunks, it should by now resemble a more traditional tofu or egg scramble.

Another 10 Minutes 


- When you have the chickpea mix broken into the size chunks you prefer, and they’re nicely dried and cooked through add in your green onions and cook another minute.

We're almost there, it's time for green onions!


- Add in your tomatoes and cook another 2 minutes.

Just about done, add your tomatoes!


- Your scramble should be more then ready now, and you can eat it as is - as you would any traditional tofu scramble. You can eat it on toast, as a side with ketchup, or as I did in tacos.

The finished product, so worth the effort!


- For Chickpea Flour Scramble Tacos spoon some of the chickpea scramble into a corn tortilla, top with your favorite shredded vegan cheese, a handful of shredded lettuce or salad mix, and then drizzle with ketchup or hot sauce as you desire. It would probably even be good with salsa.

Tacos anyone?


ENJOY!!

Friday, December 12, 2014

Stir-Fried Tempeh and Snow Peas in Black Bean Sauce...


This is just a really quick and easy stir-fry that would be good for dinner any night of the week. Simply prepared, it comes together without much effort making it perfect for busy nights. It was inspired by the limited produce I had in my fridge last week, and by my last trip to the Asian market where I got a huge jar of Black Bean Paste for a reasonable price. If you love Black Bean Sauce as much as me, and you’re in need of a good stir-fry recipe to throw into rotation, this one certainly satisfies.


Stir-Fried Tempeh and Snow Peas in Black Bean Sauce 

1tsp Sesame Oil
½ Large Yellow Onion Diced
*** 8oz Tempeh Sliced
10oz Snow Peas trimmed
3 Large Green Onions Sliced
3 Tbsp Black Bean Paste
4 Tbsp Water (or more to thin as desired)
2 Tbsp Agave Nectar
4 Cloves Garlic Minced
Brown Rice for serving

- In a small bowl whisk together the black bean paste, water, agave nectar and minced garlic.

- Place the tempeh in a shallow dish or sealable container, pour the marinade over top and cover. Let marinate at room temperature for 1 hour, or refrigerate and marinate for several hours.

- Heat Sesame Oil in a large pan over medium-high heat. When sizzling add the yellow onion and saute for 3-5 minutes until soft.

- Using a fork remove the tempeh form the marinade, shaking off as much marinade as possible before placing the tempeh into the sizzling pan.

- Cook Tempeh without stirring for 2-4 minutes until browned. Then flip and cook another 2-4 minutes. If needed, add a little bit of water to the pan to deglaze the pan and prevent the tempeh from sticking.

- Add the snow peas and cook for 3 minutes until bright green.

- Pour the reserved marinade into the pan and stir to combine everything. Cook for 3-4 minutes until everything is heated through and the marinade has reduced slightly. Add in the green onions and stir to combine. Let the dish sit for a couple of minutes to let the green onions wilt slightly.

- Serve the stir-fry over brown rice and enjoy!


*** Note - To make this soy-free you could use seitan in place of the tempeh*** 

Thursday, September 19, 2013

Vegan Mofo #15 - Taymer’s Bajan Seasoning...


Vegan Mofo #15 - Taymer’s Bajan Seasoning 

The Region - Barbados
The Book - Caribbean Vegan
The Author - Taymer Mason
The Recipe - Bajan Seasoning
Page # 19
Difficulty - Easy
Duration - About 15 minutes

Ordinally I only made this seasoning because it was called for in another recipe in Taymer’s wonderful book “Caribbean Vegan” but since it turned out so wonderful, and tastes so great I thought this little seasoning deserved a Mofo post all it’s own.

Bajan is a word that means ‘from Barbados’ and according to Taymer this seasoning - or some variation of it - is found in every kitchen on the Island.  From what Taymer says in her book, and from what I’ve read online there is no real set recipe, no ‘authentic’ ‘traditional’ recipe, as each family and each chef has their own blend, and puts their own creative touches or twists on it. I kind of like the fact that there’s no set recipe, that’s the ‘real’ Bajan recipe. I like that you can play around with it as long as you follow a few basic principals.

At least as far as my experience with Caribbean food goes Taymer’s version of Bajan tastes, smells and looks pretty authentic to me, as well it should since she’s a Caribbean woman. Her version uses a ton of green onions, a whole yellow onion, garlic cloves, Scotch Bonnet Peppers - though you can sub habanero which I did because I’ve never seen Bonnet’s in my area. - Lime juice, thyme, marjoram, parsley, curry powder, salt, black pepper, paprika, clove and white vinegar. None of these ingredients are cooked, they’re thrown right into a food processor and processed until you get a course sauce. After that your Bajan seasoning is ready to use in whatever creation you like from soups and stews, to tofu, tempeh or seitan. I originally made this seasoning to go into the Caribbean Split Pea Soup I was planning to make, but I can’t wait to try marinating some tofu in it and then firing up the grill.

Now, be cautious, anyone with a low tolerance for spice might find this to have too much kick, and if you’re not real sure about how much you can handle I would recommend using 1 small habanero or even a half habanero. I used 1 pepper, rather then two, and my sauce packs a punch, but the flavor is just so good, and really adds a new level of depth to meals. The other great thing about this recipe is that it makes quite a bit - about a medium sized pickle jar’s worth - a little goes a long way, and it can keep in the fridge for up to a year. How awesome is that?


Sunday, July 28, 2013

Creamy Carrot Top Pesto...


So, you go to the farmer’s market, and you see bunches upon bunches of beautiful long, thin, baby carrots. They’re bright orange, and luscious looking, with beautiful bushy tops that scream a bright vibrant green. You can’t help yourself from buying them because they’re everything that summer seems to represent. You take them home, and you use the carrots in whatever way most appeals to you, but then you’re left with a massive pile of carrot tops. Now the dilemma begins, because what is one suppose to do with a bunch of carrot tops anyway?

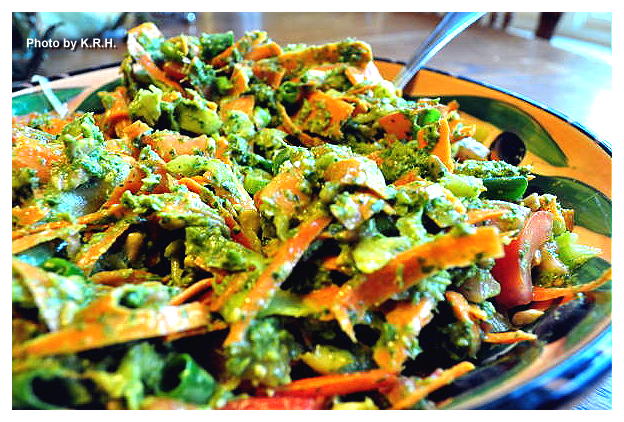
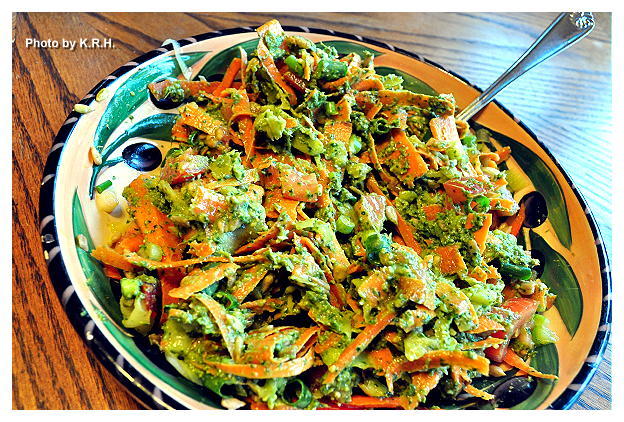
Carrot Top Pesto on some Thin Vegetable Ribbons


Carrot tops are not an item found on many restaurant menus. They’re not an item commonly features in cook books or on the food network. We don’t really live in a world where carrot tops are considered food, they are - more often then not - discarded, which to me seems like a terrible waste. Carrot tops are viable food, they’re full of nutrients just like any other green, and are probably better for you then the actually carrot itself. Still everyday they get thrown away as garbage, so if you’re like me and you hate to see waste, next time you buy some carrots at the Farmer’s Market put those tops to use in this delicious and creamy pesto!  It’s time for us to take carrot tops back and make them a feature on our plates rather then just another item in our compost or rubbish bins. Hopefully over the course of the summer I’ll come up with a few more creative uses for these delicate greens to share with you all, but this pesto is so good I might get side tracked and just make this all summer long instead! Oh, and did I mention what the bonus of making a pesto with carrot tops instead of basil is? You can get 4 Cups of carrot tops - plus the carrots they’re attached to - for half the coast of 2 oz of Basil. Maybe this depends on where you live, but in IL basil is expensive, at roughly $5 for 2oz organic basil, when I can get 2 bunches of carrots with 4 Cups of tops for $4.

My vegetable pasta contained Carrot and Zucchini Ribbon Noodles
Chopped Roma Tomatoes, and some Diced Green Onion
A Delicious combination with the Carrot Top Pesto 


Anyway, enjoy this pesto like you would any other, in a wrap or on a sandwich, in a warm or chilled soup, as a dip, as a sauce, as a dressing, on a pizza. I ended up enjoying it on raw noodles, you could do that too or use it on fresh cooked pasta. It’s up to you, it’s so versatile that the options are endless. As always enjoy!


Creamy Carrot Top Pesto 

Carrot Tops from 2 Bunches Carrots - Roughly 4 C
½ C Slivered Almonds
3 Green Onions
1 ½ tsp Garlic Powder - or 2 Cloves fresh Garlic
½ tsp Sea Salt
½ tsp Smoked Paprika
2-3 Tbsp Lemon Juice
½ C Flaxseed Oil
2 Tbsp Nutritional Yeast
1 Tbsp Mellow White Miso
1/4 tsp White Pepper
Slightly less then 1/4 C Water (Optional depending on how thin or thick you want your pesto)
Fresh Black Pepper to taste

- Add the almonds to a food processor and pulse until finely ground.

- Add the carrot tops and garlic and pulse until fine.

- Add in all the other ingredients - except water -  and pulse until you have a smooth paste. At this point check for consistency, if it’s too thick for your liking add in some water to thin. I used less then 1/4 cup but you can add as much as you need to, to get the pesto to your preferred consistency.

- Serve however you see fit and enjoy!


*** Note: I highly recommend using the miso as it adds a depth of flavor. However if you're following a soy-free diet you can leave it out, or you can replace the soy-based miso with an alternative miso like Chickpea Miso which is soy-free.***